Designs with a "halo"
Posted by msaeger
|
Designs with a "halo" June 04, 2020 11:55PM |
Registered: 8 years ago Posts: 430 |
|
Re: Designs with a "halo" June 05, 2020 01:50AM |
Registered: 8 years ago Posts: 430 |
Here is another example of what I am thinking.
[www.thingiverse.com]
Newbie with Folgertech 2020 i3.
[www.thingiverse.com]
Newbie with Folgertech 2020 i3.
|
Re: Designs with a "halo" June 05, 2020 07:20AM |
Registered: 11 years ago Posts: 5,780 |
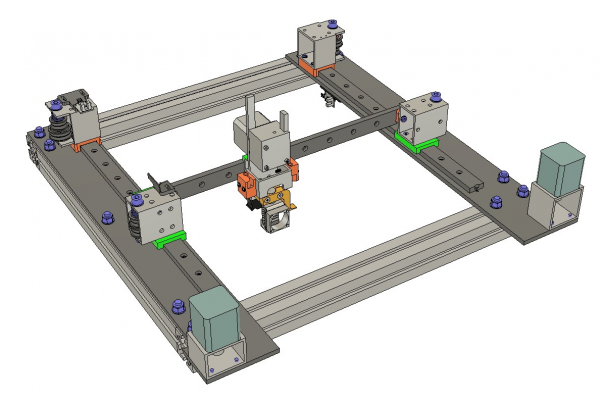
There are a few designs around. My own design, UMMD, uses two plates on a 4040 t-slot frame. It's effectively one plate, but doesn't require the full size of a single plate. That design allows the XY stage to be removed from the printer as a unit. I wouldn't try to build an XY mechanism on just a plate without having it bolted to a frame as the belt tension will cause the plate to flex. In my sand table, made of 4545 t-slot, I had to add a brace to the frame because the belt tension was bowing the longest frame members (about 1.9m) outward a few mm. Normal belt tension can do that. I originally designed UMMD's XY stage to be modular so that I could drop it into different length Z axes/frames. I kept electronics on top of the printer so it would be out of the heated chamber and and to minimize cable lengths. That would also facilitate dropping the XY stage into different frames. When printing, the filament spool sits on top of the printer and the filament passes down through the electronics enclosure to the extruder- the shortest, straightest possible path. A lot of printers put electronics in the bottom of the machine, but that can make access for repairs or modifications more difficult, and a problem if you heat the enclosure. Keeping the electronics on top makes it readily accessible in case there's repair or modification work to be done on it. Yes, it increases the height of the machine, but that's generally less of a problem than increasing the footprint by hanging the electronics off the back or side of the machine.
Here's the XY stage from UMMD:
Using a plate makes it a lot easier to ensure that the Y axis linear guides are parallel because they start off in the same plane. That, in turn, makes it easier to put the X axis linear guide parallel to that plane. The only alignment issue you have to worry about then is getting the Z axis perpendicular to the XY plane.
I'd avoid mounting any XY stage on the top of the frame for the same reason I avoid the "wheels in the t- or v-slot" type designs. It complicates and enlarges any enclosure you might want to make for the machine. The machine is going to have a frame, so it may as well hold panels to enclose the printer. You can print materials like ABS reliably in an enclosed printer, if you get the enclosure temperature up to about 50C. Yeah, I know, PETG...
That printer on Thingiverse that you linked has belts on one level (not stacked). That requires twists where the belts cross at the front of the printer. The way he has them twisted, the toothed sides are in contact- that is liable to cause all sorts of problems. If the twists are done right, the smooth back sides of the belts can face each other at the crossover, and then it's a good idea to put a separator plate between them, made of something nice and smooth and preferably low friction like PTFE. I had the belts set up to cross back to back in my sand table, without a plate, and found the rubber was disintegrating where the belts rubbed against each other.
Edited 2 time(s). Last edit at 06/05/2020 07:33AM by the_digital_dentist.
Ultra MegaMax Dominator 3D printer: [drmrehorst.blogspot.com]
|
Re: Designs with a "halo" June 08, 2020 12:43AM |
Registered: 8 years ago Posts: 430 |
Thanks for the lengthy reply! I have download the cadd model of your machine and have been looking at it as well as the skgo machine which I think looks similar to the xy part of yours. I would definitely have the plate mounted on a frame. I was thinking a continuous plate would be more rigid than the two plates but when the two plates brace the corners maybe it would not make a difference.
Newbie with Folgertech 2020 i3.
Newbie with Folgertech 2020 i3.
|
Re: Designs with a "halo" June 08, 2020 07:23AM |
Registered: 11 years ago Posts: 5,780 |
The Sec-kit printers are based on the UMMD design.
UMMD's XY stage was recently modified- I don't recall if I put the changes into the CAD file that has the whole printer, but this page has a link to the latest XY stage Fusion360 CAD file.
I recently installed servomotors in my sand table and found that they kick stepper motor ass! For my next trick I'll be replacing the steppers in UMMD's XY stage with those servomotors. There will be another blog post when I do...
Edited 1 time(s). Last edit at 06/08/2020 07:24AM by the_digital_dentist.
Ultra MegaMax Dominator 3D printer: [drmrehorst.blogspot.com]
|
Re: Designs with a "halo" June 14, 2020 12:15PM |
Registered: 9 years ago Posts: 294 |
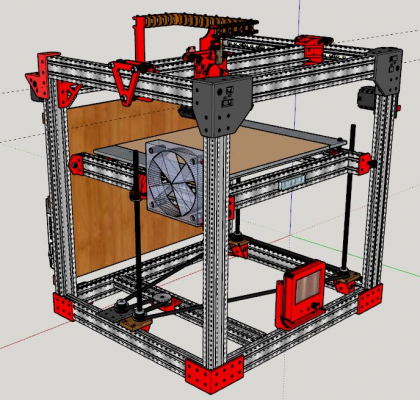
I built my CoreXY from Carl Feniak's plans posted on Openbuilds. I made a few modifications, modeled it in Sketchup and built it. I reduced the width, reversed the front to back putting the motors in the back, and made the Z axis 3 screws instead of a cantilever platform. It may look a little skimpy and weak. The platform is confined at the corners with simple rollers. The gantry runs on rollers in V slot rails and the plastic bottom corners look feeble but are perfectly solid. I have been running this for 4 years now and it is running VERY well. It is solid as a rock. I have a piezo endstop/probe built into the head assy. The electronics and PSU are mounted on the back board. The XY belts run mostly in the rail slots which was what I mostly liked. It is easy to scale and mine is 300x300x300. If you want more info, PM me.
Edited 3 time(s). Last edit at 06/14/2020 12:25PM by ruggb.
Edited 3 time(s). Last edit at 06/14/2020 12:25PM by ruggb.
Sorry, only registered users may post in this forum.

