Home
>
Reprappers
>
Topic
Belt tension and general issues with print quality
Posted by dslc
|
Belt tension and general issues with print quality May 30, 2012 08:41AM |
Registered: 17 years ago Posts: 137 |
Hi all. I'm having ongoing print quality issues. Even when printing at low speeds (circa 20 mm/s) there are still anomalies in the prints. Have tried changing belt tension, half-stepping vs. 1/8th stepping, adjusting the current using the trimpot on the stepper board, etc..
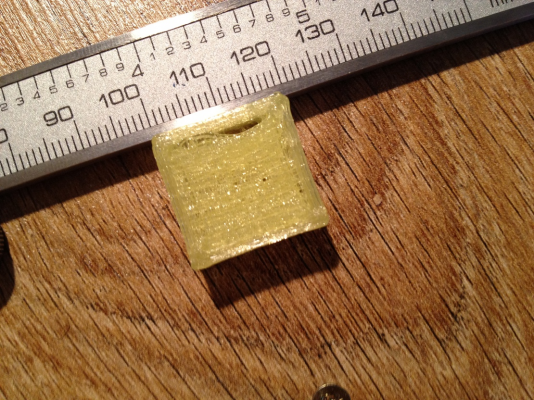
These changes have yielded marginal improvements, but I'm still disappointed. See photo attached for example. The gap you see on that print is occurring on every one of my prints. Is this likely due to belt tension?
The box in the photo is the 20mm box from one of the calibration sets on thingiverse (it comes out at around 19.5mm on my setup). Here are the settings I used to print in that particular case:
- Stepstick: the reference voltage Vref = 1.7 V (max. possible)
- 20mm/s print feed rate & perimeter feed rate, 40 mm/s travel feed rate, 0.3 bottom layer ratio
- nominal temperature 195 degrees (I say nominal because this is based on thermistor tables supplied and my thermocouple gives a slightly different reading. I don't think the temperature is the issue though.)
If I try to increase the belt tension on the y-axis significantly, the motor gets stuck at a certain point - even with maximum possible current from the Stepstick board. This is not what I expected.
The video below shows the box being printed.
Any suggestions welcome.
I'm using a Gen7 v1.3 board, Teacup Firmware, and Greg's hinged accessible extruder.
Edited 1 time(s). Last edit at 05/30/2012 10:00AM by dslc.
|
Re: Belt tension and general issues with print quality May 30, 2012 12:04PM |
Registered: 17 years ago Posts: 137 |
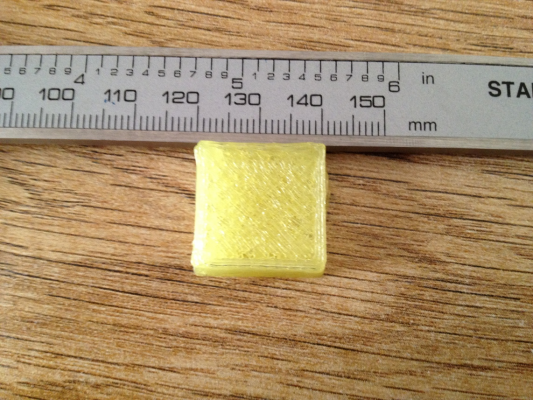
Changing the fill angle when generating the gcode (i.e. in Slic3r) seems to improve things considerably. See photo of subsequent print below. This is with a 45 degree fill angle - all other settings the same.
In retrospect, I can see a potential cause for the problem. Initially, I was printing with 0 degrees fill angle, 0.4 fill density and a rectilinear fill pattern. So, plastic was being deposited in tracks parallel to the perimeter - with nothing in between. Hence the gap! This is my provisional diagnosis at least. Has anyone else experienced this problem?
I've noticed another issue now though. The height of the print is different. I might post more details about this later if I can't figure it out.
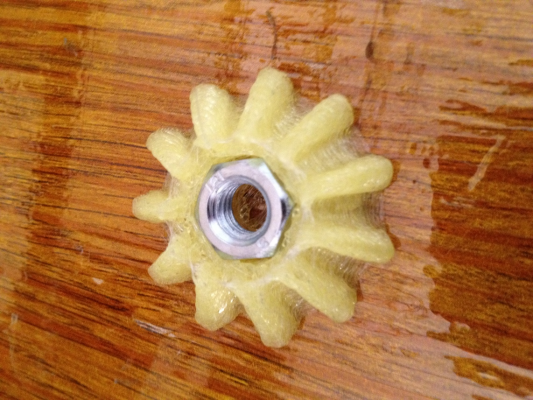
I've attached a photo of another test print below. This is the bevel gear from Sublime's mini lathe. It shows that I'm still getting unwanted "wisps" of plastic. In case this is related to "retraction", here are the relevant Slic3r settings:
Retraction:
- length: 1 mm
- lift Z (mm) : 0
- Speed (mm/s) : 40
- Extra length on restart (mm) : 0
- Minimum travel after retraction (mm) : 2
P.S. I've run out of plastic filament except for this semi-translucent yellow stuff. I know it's not the best for demonstration.
|
Re: Belt tension and general issues with print quality May 30, 2012 07:15PM |
Registered: 13 years ago Posts: 248 |
Hi David,
Sort out any wobble in the hot end. Even if you are filling in at 0 and 90deg the filament should lay down perfectly straight.
Temperature considerations... If you bring it up to 195Deg C, even if you aren't 100% sure it is at that temperature, when you print a small object at 20mm/s and first layer set to 30% of that speed (as you've said above), the heat from the heater block is just radiating on to the printed piece and continuing to soften it.
There are many ways to deal with this if you still want to print a single small item, but I moved away from printing very small items initially as test pieces since they were such a challenge.
Try print four test squares at the same time, and put 50mm between them. It will give each square cooling time. You could get into running a small fan, but then you may be cooling your heater block too much and run into different challenges there. You may consider warping your heater block in teflon (PFTE). I've picket up oven liner in Lidl and it's great stuff.
In general you need to be confident that your X and Y are travelling smoothly by hand. Disengage the belts and see how they are moving. It should be a smooth movement, no sticky points. A little resistance is ok once it's steady.
It is also worth doing dummy prints, going through the motions, but with the extruder off. (power down, and plug out the extruder motor and hot end. That the Q&D way!) With dummy printing you can observe how things are running, and try out different speeds.
What happens when you extrude in mid-air? Does the filament flow smoothly and consistently from the extruder? Does your hot-end temperature vary much as you extruder? What interface are you using? Pronterface?
Can you post more pictures of other objects you have printed, half printed? Doesn't matter if they were failures. There's a lot to be seen in a half printed part.
If you are shooting more video, show your belts in action. Before you start, video pressing on the belt so we can judge the tension.
Hope that's enough for you for now.
Regards,
NumberSix
[numbersixreprap.blogspot.com]
|
Re: Belt tension and general issues with print quality May 31, 2012 07:43AM |
Registered: 17 years ago Posts: 137 |
Everything you've said there makes sense NumberSix. I'm going to run the next few prints at 185 degrees.
Before I try the tests you outlined, I thought it might be worth showing two videos which demonstrate the issue I'm having with my belt tension and stepper motors. (I meant to upload something like this yesterday but ran out of time.)
As regards friction or sticky points on the y-axis ...
I have detached the belt and moved the print-bed manually a number of times - to get an estimate of how much friction there is. As far as I can tell there is very little friction. I lubricated the smooth rods a few weeks ago and it seems to have helped. It glides fairly effortlessly to be honest.
Here's a video showing a belt tension which actually causes the motors to stall.
(Some people might disapprove of the cable-tie method of tensioning I suppose.)
Here is the y-axis stepper motor stalling (with the belt tension shown above):
This seems to me like it could be a problem with the stepper motor. Again, this is with max. current possible from the Stepstick stepper-motor driver.
I'm not having the same degree of problems on my x-axis.
It might take me a while to get around to trying the other things you outlined, but will get back as soon as I can.
Thanks for your help.
david
|
Re: Belt tension and general issues with print quality May 31, 2012 08:14AM |
Admin Registered: 17 years ago Posts: 7,879 |
It looks like the belt might be binding in the gap between the fender washer and the bearing. My prusa didn't work because of that. I made a bracket with two small bearings mounted horizontally to act as belt guides. That was mainly because I didn't want to disassemble it. A simpler solution is to use two 608 bearings and adjust the position so the belt runs in the middle.
[www.hydraraptor.blogspot.com]
[www.hydraraptor.blogspot.com]
|
Re: Belt tension and general issues with print quality May 31, 2012 02:16PM |
Registered: 17 years ago Posts: 137 |
Had a quick look at this and I think your diagnosis is spot on nophead. Will look into the solution you outlined as soon as I have time.
@NumberSix: I forgot to mention ... I think I sorted out the wobble on my hot-end (just tightened some screws). Now that you mention it I might need to double-check it, but I think it's fairly sturdy.
Thanks for the help guys. Will try your suggestions and get back to you as soon as I can.
@NumberSix: I forgot to mention ... I think I sorted out the wobble on my hot-end (just tightened some screws). Now that you mention it I might need to double-check it, but I think it's fairly sturdy.
Thanks for the help guys. Will try your suggestions and get back to you as soon as I can.
|
Re: Belt tension and general issues with print quality May 31, 2012 05:50PM |
Registered: 17 years ago Posts: 137 |
A slight diversion ...
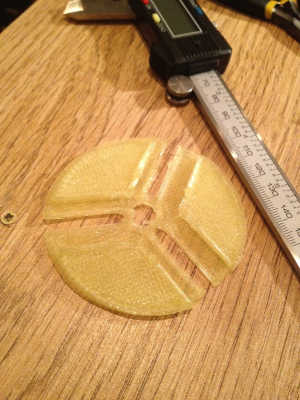
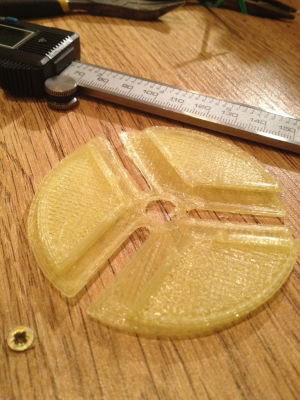
I tried printing something larger (since, as NumberSix mentioned, small objects can be challenging), and chose the guide for the three-jaw chuck on thingiverse (again, authored by Sublime). It didn't come out symmetrical so I guess the steppers were missing steps, but other than that I'm reasonably happy with the quality.
(There was a slight lift at one of the corners also - coz the nozzle wasn't quite close enough to the bed on the first layer).
|
Re: Belt tension and general issues with print quality May 31, 2012 11:07PM |
Registered: 12 years ago Posts: 142 |
I had the same problem on my x axis and by mistake found it was exactly as Nophead suggested.
My guide bearing was slightly off center and allowed my belt to bind against the fender washer.
I fitted another bolt beside the guide bearing and wrapped some insulation tape at the right point on the bolt to hold the belt off the fender washer.
As to the other issue you mentioned regarding the table height. It is critical to have the bed level in relation to the print head.
Try placing your Z at home, turn off motors and move the x carriage to the four outer points of the bed, checking clearance with 2 or 4 sheets of folded paper. Then check the center as the bed could be bowed slightly.
When this is done try a test print of a large item to test the bead surrounding your print. If it is slightly squashed and sticking, all is good.If it follows the head around and doesn't stick, you are too high. If it balls up arounf the print head, you are too low.
I have designed a Z stop adjuster from ply, that allows you to get a very fine adjustment of your Z stop using a screw head bolt and will post this on thingiverse when printed. This has helped me tremendously.
|
Re: Belt tension and general issues with print quality June 01, 2012 04:18PM |
Registered: 17 years ago Posts: 137 |
|
Re: Belt tension and general issues with print quality June 05, 2012 03:30AM |
Registered: 12 years ago Posts: 142 |
I have printed one of the z stop adjusters and will test it and then post on thingiverse.
It is the only reason I am still printing.
I came that close to giving up on this technology as I couldn't get the filament to stick no matter what I did.
Now I know from experience what to look for and adjust the end stop for a perfect first layer then walk away.
If the perimeter bead doesn't stick, pause the print, move z axis up 10mm, clean off the tip and table, adjust the end stop up or down, then restart print.
I wasted so much time and filament hoping the print would work out with a bad first layer it was not funny.
|
Re: Belt tension and general issues with print quality June 05, 2012 06:45AM |
I haven't seen anyone say this yet, but running stepsticks or pololus at max current is bad bad thing unless the formula tells you to do that! You did read the data sheet on the driver chip being used, didn't you?  For those who can't read datasheets, [reprap.org]
(Change the 0.05 ohm resistance in the equation to the value that the stepstick uses. Probably 0.2 ohms.)
This is a computed thing. Not "it feels right like this".
If you can touch your steppers and drivers with it cranked to max without burning your hand, I'd say something has already gone wrong and you may have already burned something out.
 For those who can't read datasheets, [reprap.org]
(Change the 0.05 ohm resistance in the equation to the value that the stepstick uses. Probably 0.2 ohms.)
This is a computed thing. Not "it feels right like this".
If you can touch your steppers and drivers with it cranked to max without burning your hand, I'd say something has already gone wrong and you may have already burned something out.
Sorry, only registered users may post in this forum.
