Home
>
Reprappers
>
Topic
Finally got an ok print looking for some advice
Posted by rotinaj13
|
Finally got an ok print looking for some advice June 07, 2012 09:19PM |
Registered: 11 years ago Posts: 23 |
After a lot of work and figuring things out and learning on the fly, I have my wolfstrap printing. I am using a j head nozzle the short variation. I was printing at 185. It has a .35 nozzle and using "3"mm PLA. I do not have a heated bed, it is wood with 3 layers of 3m blue tape on it. I roughed down the bed lightly with fine grit sand paper and cleaned it with acetone. I have included pictures of the top, side and bottom along with the config file. My printer is running sprinter firmware 1.3.11t . I am using the newest version of pronterface with slic3r. within pronterface my rates are set at XY: 300 Z: 200 E: 300. The printer laid down the first layer ok, the only thing I noticed is it did not print the skirt around the part. After about 5 or 6 layers I had one corner pull up from the bed which is the corner where the mess up is. After about 3 passes the part was heavy enough to stay on the bed. I think when it pulled up is what caused the blobs on the side. When I was watching the nozzle on the first layer it seemed that the plastic built up on the nozzle just a little bit before it started laying lines. Once it layed lines down they looked as perfect as the layer lines on the side towards the top. It has taken a lot of tweaking to get to this point as before it was pulling the plastic off the bed when it was laying the first layer of infill. I am welcome to any and all advice on improving this print so I can move closer to a fully calibrated printer! Thanks!!
Edit: I forgot to mention I am using Wades extruder, my filament shows no slipage and my electronics are gen6. Thanks
Edited 1 time(s). Last edit at 06/07/2012 09:31PM by rotinaj13.
Edit: I forgot to mention I am using Wades extruder, my filament shows no slipage and my electronics are gen6. Thanks
Edited 1 time(s). Last edit at 06/07/2012 09:31PM by rotinaj13.
|
Re: Finally got an ok print looking for some advice June 08, 2012 12:37AM |
Registered: 12 years ago Posts: 142 |
Hi Rotinaj13 and welcome,
A few points straight up.
The numbers on Pronterface do have an effect on print quality but more so the settings you define in Arduino and send to your cpu on your printer.
In particular your settings for x, y, z and e. Standard settings on mine were 80, 80, 3000 and 900
My new settings are 65.05, 66, 2540 and 800. These of course differ or each printer and stepper configuration etc..
There is a great post from Triffid Hunter here on calibration.
[reprap.org]
When you have these somewhere close, I drew up a 20mm hollow cube in sketchup and tried this as a test. Print, check with calipers, adjust settings in Arduino, resend to printer and repeat until you are happy.
One setting that will improve print quality that surprised me was the extruder amount. My first print of a small herringbone gear had the top hole completely closed up with extra filament. This will allow you to define things like holes without having to clean out with a drill and things like snap in bearing fittings that just snap in nicely.
Having said that, I initially set my speeds low to start and then raised them as quality improved. I started at 20mm/sec on all settings in Sli3er and on Pronterface. I now still only print at max of 40mm/sec to maintain quality.
Also something I found out that was not mentioned anywhere was before a print, I always " prime " my extruder by clicking extrude 5mm and cleaning up the extruded filament before the print starts. This is necessary as the hotend will ooze some filament out as you are setting up your print and when you try to print, the extruder is out of filament when it is trying to lay down the skirt or even the first part of the first layer.
Another thing that is critical to a good print is bed height in relation to the hot end. You must check this with 2 or 4 sheets or paper on all 4 corners and the centre as the bed could be slightly warped.
I designed a z stop adjuster that allows you to set the z stop micro switch with the turn of a screw headed bolt.
Others have designed similar types. Mine is on thingiverse.
[www.thingiverse.com]
Of course this is hard to print without a calibrated printer but my first one was just made out of ply.
I will start a print and if the bead is balling up around the hotend, stop, raise 10mm, clean off the bed and adjust the z stop adjuster up slightly. Sometimes only a quarter of a turn. Back down 10mm and restart.
If the bead is laying on the bed rounded and not sticking, pause, raise and adjust the z stop down slightly and try again.
Hope this isn't too much straight up and hope it helps.
Greg
|
Re: Finally got an ok print looking for some advice June 08, 2012 06:28PM |
Registered: 11 years ago Posts: 23 |
Hello Greg,
Thank you for the welcome. I assume that the settings in the firmware you mention are the steps to calibrate the printer to move exactly 100mm when you command it to and not the max feedrate for the axis? I have the printer steps calibrated so that each axis moves the ammount asked. For the extruder I calibrated this with the hotend off to ensure it moves the right amount of filament. Should I calibrate it to the amount extruded? The 20MM cube actually comes out looking pretty good. I will post pictures in a little bit. As far as the extruder amount goes, is that by just adjusting filament size and extrusion multiplier? I will try this print again after turning down the speeds a bit in the settings. Hopefully it just needs some extra cooling time to adhear a little bit better. When you say you lower the Z end stop, is that raiing the nozzle height? I am thinking about getting some glass and mounting that to the bed for a flat surface with painters tape on it. I seem to be having the issue when I do objects with infill becuase the hollow cube comes out nice but when I have to infill it wants to pull off the bed a little bit. Thank you for your help!!!
~AJ
Edit: Okay at this point I have the glass covered with 3 layers of blue tape, I have it mounted. I am getting ready to heat up the hotend and set the new gap. Then I will lightly sand it and clean it with acetone and try it out
Edited 1 time(s). Last edit at 06/08/2012 10:26PM by rotinaj13.
|
Re: Finally got an ok print looking for some advice June 09, 2012 02:31AM |
Registered: 11 years ago Posts: 23 |
Okay I added the glass print bed have it leveled just about as close as I can get it. I think I have my Min z level set 2 low. My first layer is very thin and very stuck to the print bed. The first layer is 1.73mm wide and .1 mm high. I have attached a picture of the print.
|
Re: Finally got an ok print looking for some advice June 09, 2012 05:10AM |
Registered: 12 years ago Posts: 142 |
Hi AJ,
The numbers I mentioned are in Sprinter.pde.
I have included a pic of my sprinter settings but these may be different to yours.
Your measurement of the filament going in to the extruder is correct not the extruded material. Your melted filament will be more due to the size of your tip.
My filament going in is 3mm and my tip is 0.5mm so the amount extruded is 6 times the amount going in. This changes for your tip as yours is 0.35mm but initial setting is for the amount going in. You modify this to suit the finish you require when you start printing.
Lowering the Z end stop also lowers the print head. When you home your Z axis, the Z motors stop as the x carriage or x motor bracket hits your z micro-switch.
The glass plate on your hotbed will make all the difference. I started the same as you with multiple layers of tape on my print bed to get the right clearance from the hot end. since i fitted my z stop adjuster, i use 1 layer of tape and adjust the z screw to suit.
I simply lay the tape on the glass and then run over it with my fingertips in all directions to clear out all air bubbles and this also roughs it up a bit. I don't use acetone. this method will have the prints sticking so well that I sometimes have to scrape the tape off the bottoms of my prints after it has to be ripped off the bed and replaced. I would rather this than the print lifting during the print.
The bottom layer is ok as long as it doesn't rip into your tape. Too low and the filament will ball up around the tip and not stick as it is squeezed out the sides. too high and the filament will follow the tip around and not stick.
The pic you included looks to be tapering as it gets higher but this may be the angle of view.
If this is true you may have to check the distance between your z smooth guide bars at the top and bottom and make sure these match. Otherwise as your print head gets higher, it will move in or out causing a tapered side.
I have included a pic of my z stop adjuster. This will make your life so much easier.
|
Re: Finally got an ok print looking for some advice June 09, 2012 07:13AM |
Admin Registered: 17 years ago Posts: 7,879 |
Quote
My filament going in is 3mm and my tip is 0.5mm so the amount extruded is 6 times the amount going in.
36 times as volume is conserved and is l x pi r^2. Actually a bit less because die swell means it comes out bigger than 0.5mm.
[www.hydraraptor.blogspot.com]
|
Re: Finally got an ok print looking for some advice June 09, 2012 09:45PM |
Registered: 11 years ago Posts: 23 |
Wow what a crazy difference your suggestions have made! It turns out that my initial problem was that my printhead was too high. I have lowered it to the point that if I do not set a z offset it has so much adhesion that I have to remove the tape to remove the part. I also slowed down my speeds in slic3r to slow the travel down a bit this has made a difference in the quality of the cube. I will edit this post to add the picture. I am very interested in hearing how I can improve from this print which I must say is the best one I have printed to this date. I have to say I read a posting where someone was frustrated with their reprap and wishing they had just bought a commercial version, they posted "i cannot just recommend a reprap to anyone." I have to agree with that statement this has went from an idea wanting one, into a project, then into a hobby and its turning into an obsession! I was getting frustrated after building mine and doing the basic calibration, but it is so nice to see it starting to improve into what I hope will be a repstrap capable of printing the parts for my reprap. While I have invested a good amount of time into this, I am happy at the direction it is moving in! I cannot thank you guys enough for your advice! While lurking the forums can get you a lot of information to get pretty far with this, the knowledge and experience the members have in this forum helps the most when tweaking the systems!
~AJ
~AJ
|
Re: Finally got an ok print looking for some advice June 09, 2012 11:04PM |
Registered: 12 years ago Posts: 142 |
Great news AJ,
Looking forward to seeing your improved print photo.
What I did when calibrating was print a 20mm cube and then write on the side or bottom of the cube the settings in sprinter.pde. Also write the direction of the print as in < x > on the x direction side and < Y > on the y direction side etc..
Then i would change these and repeat.
It is a good way to compare the different settings.
|
Re: Finally got an ok print looking for some advice June 09, 2012 11:44PM |
Registered: 11 years ago Posts: 23 |
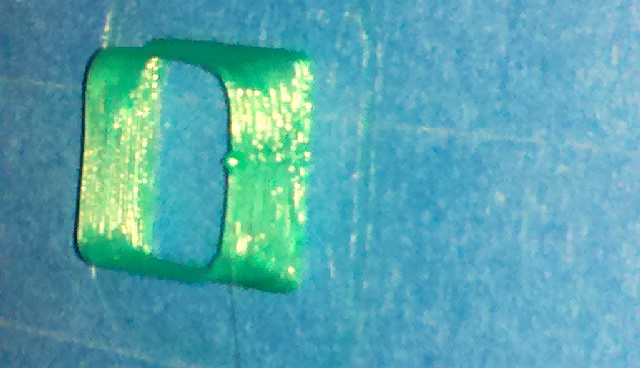
Wow thats a lot of difference there Greg! Out of those which one is your best so that I can set my goal. Here is a picture of the cube. On the top that little bit on the top was from my extruder stopping after the print was done then me moving it. I should really add some code in my slic3r to automate this! Let me know what you think. At this moment it is the best that I have printed thus far
|
Re: Finally got an ok print looking for some advice June 10, 2012 12:42AM |
Registered: 12 years ago Posts: 142 |
Hi AJ,
It looks like the print is tapering in as it gets higher. This is what I was talking about earlier concerning the alignment of your guide bars on the z axis.
If the Z guide bars are wider at the bottom than the top, the print head will follow this line and print inwards as it raises.
This in turn will allow your y belt to become looser as the distance between the z axis becomes shorter as the print head moves upwards. This will also effect the quality of your prints.
This could also be an issue with belt tension on z and y causing you to slip and lose steps.
Second from left was my last print of these cubes but I have changed my settings since these were printed.
If you do this, number the prints as in 1, 2, 3, 4 as well as recording the settings and direction of x and y. This will help with the calibration.
After these were printed I tried some things from thingiverse and adjusted mainly the extrusion mount to get more definition of my holes and less spider webs to clean up. My first holes on the small herringbone gears was almost completely closed and the last is a definite hexagon.
Sorry, only registered users may post in this forum.