Home
>
Reprappers
>
Topic
CoreXY Build
Posted by tjb1
|
CoreXY Build January 10, 2014 09:05AM |
Registered: 10 years ago Posts: 553 |
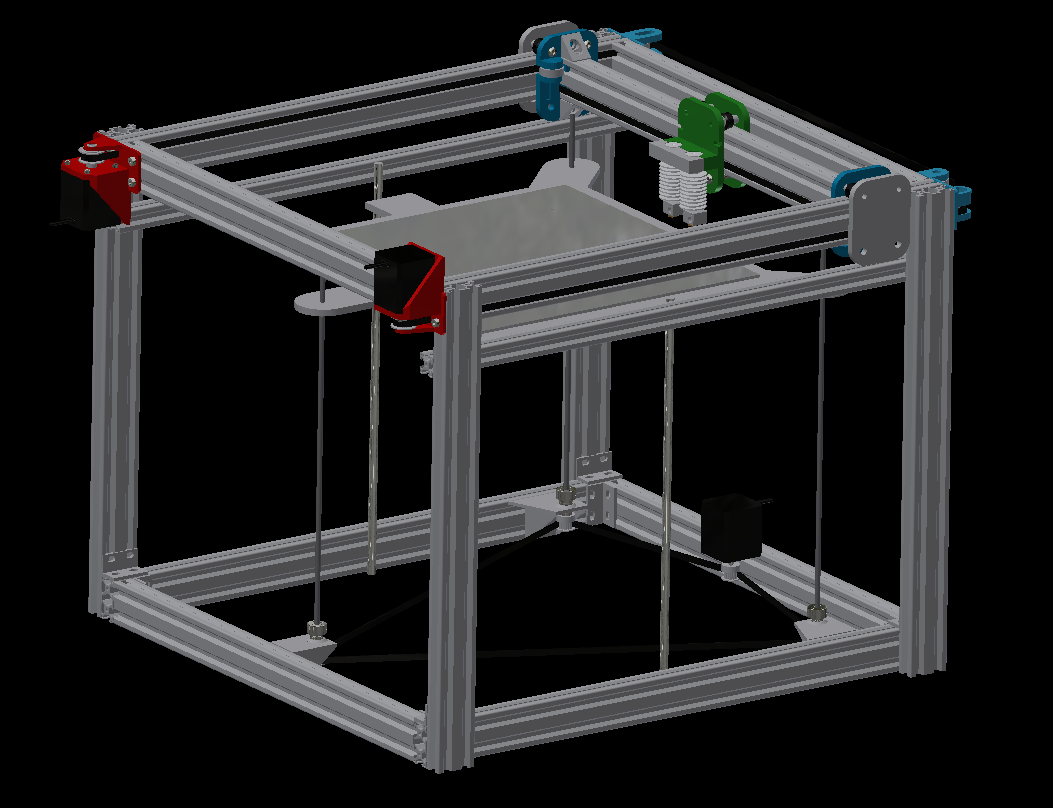
Hello everyone, I have been working on a CoreXY design for about a month now and I feel I am far enough along to share the current one and get some feedback. All extrusions are V-Slot from Openbuilds and of course the wheels are from them also. I started off with a Spectra design but it was far too difficult/complicated to keep the extrusion inside the profiles and the pulleys got very large with the amount of travel the printer has. I have since moved the design to using GT2 x 6mm belts, they just barely fit in the extrusion but its workable. The motors will use 30t pulleys (which put the belt exactly where I need) and every point uses a 608 bearing to guide the belt around.
The right motor is upside down to get the belt in the lower slot which prevents an angled crossing at the back, this design also uses symmetrical parts for the motor mounts and idler plates at the back. There are some provisions on the idler plates to tension the belts. The belts in the drawing are not exactly the profile, I just added a rough belt and made it long enough that I could see where it was everywhere on the printer but this is a CoreXY design so you can figure out the belt path. I'm fairly confident that X-Y is done at this point minus a few tweaks to parts and adding belt clamps to the gantry.
The Z was last part added and has no had many refinements and is currently not finished. It will be using 2 - 10mm smooth rods to constrain the printer in X-Y and 3-M5 threaded rods for leveling/drive. There will be 1-NEMA17 driving the Z by belt and each threaded rod will have a pulley on the bottom.
The printer currently has enough travel to duplicate the hotend setup on the other side to use 4 - E3D hotends and have all 4 completely clear the bed on all 4 sides.
Edited 1 time(s). Last edit at 01/10/2014 09:05AM by tjb1.
|
Re: CoreXY Build January 10, 2014 01:08PM |
Registered: 13 years ago Posts: 485 |
Nice! The belts in the t-slots looks nice and tidy.
Please don't use screws for the Z axis though. The threaded rods aren't perfectly straight and cause the dreaded Z-wobble. Have a look at using cables of belts for the Z axis. Tantillus has excellent layer alignment with the cable Z axis, and Ingentis has a large belt-driven Z axis working.
Please don't use screws for the Z axis though. The threaded rods aren't perfectly straight and cause the dreaded Z-wobble. Have a look at using cables of belts for the Z axis. Tantillus has excellent layer alignment with the cable Z axis, and Ingentis has a large belt-driven Z axis working.
|
Re: CoreXY Build January 10, 2014 02:55PM |
Registered: 10 years ago Posts: 553 |
|
Re: CoreXY Build January 10, 2014 04:17PM |
Registered: 11 years ago Posts: 334 |
There is nothing wrong with using screws as long as you have decoupled them from the platform.
Can I ask why aren't you using Vslot for the table?
I have to say I'm not a fan of the belt driven Z. This may just be personal preference but I feel that it over complicates things over just using another stepper.
It looks like you're on your way to a nice printer.
WWW.ZATOPA.COM - Your Place for high quality 3D Printing Filament and accessories
|
Re: CoreXY Build January 11, 2014 11:52AM |
Registered: 10 years ago Posts: 553 |
Quote
jzatopa
There is nothing wrong with using screws as long as you have decoupled them from the platform.
Can I ask why aren't you using Vslot for the table?
I have to say I'm not a fan of the belt driven Z. This may just be personal preference but I feel that it over complicates things over just using another stepper.
It looks like you're on your way to a nice printer.
To be honest, I never thought of using the v-slot for the bed. I do have my own plasma table so I can knock out a custom bed fairly quickly. The z is run by belts because I am using those screws as leveling and would rather not use up a driver to add a third z motor. I don't have to worry about them going out of sync unless a belt slips and to level, i just need to loosen pulley set screw and adjust.
|
Re: CoreXY Build January 14, 2014 07:48AM |
Registered: 10 years ago Posts: 553 |
I have a order from Openbuilds arriving Thursday that will allow me to check fitment of all the parts that I need to check. Still mulling around on the Z axis, it's either one or two motors. I have no way to get three motors on so it's really looking like the three screws over the belt setup as I see by bed being pretty heavy.
|
Re: CoreXY Build January 15, 2014 05:35PM |
Registered: 11 years ago Posts: 544 |
ive been researching doing a belted or cabled z axis, it would need at least three seperate cables. Id like to use maybe 4 spectra lines for each cable and then have them feed back through pulleys to a drum. the drum would have a large gear reduction so it could be run by one motor and maintain an accuracy of 3200 steps per mm using a 200 step motor and 16x microstepping. or maybe just 200 steps per mm.
Edited 1 time(s). Last edit at 01/15/2014 05:44PM by aduy.
Edited 1 time(s). Last edit at 01/15/2014 05:44PM by aduy.
|
Re: CoreXY Build January 16, 2014 07:50AM |
Registered: 10 years ago Posts: 553 |
So I received some parts yesterday...found some issues. The extrusion dimensions do not match a lot of the dimensions they provide. For example, the slot width is almost 6.5mm while the drawing had shown something around 5.4mm. I spent a lot of time working out a way to place the belt on the outside of the extrusion, this isn't necessarily an issue though as I can still use the same setup as before with hopefully less worry of rubbing or any issues. I suppose I could get the belt in further but I would need to find bearings with a 5-6mm width and then find a way to keep the belts parallel to the extrusion which I am already pushing with the current setup, 688 bearings are 5mm wide but they still have an 8mm bore which I'm not really fond of.
|
Re: CoreXY Build January 26, 2014 04:59PM |
Registered: 10 years ago Posts: 172 |
|
Re: CoreXY Build January 29, 2014 06:27PM |
Registered: 10 years ago Posts: 20 |
|
Re: CoreXY Build January 30, 2014 10:31AM |
Registered: 10 years ago Posts: 553 |
Quote
cfeniak
You will have no problem getting 6mm GT2 belt inside the extrusion if you position it right. You could even get 8mm if you wanted.
The slot is only 6.4mm wide, I can't get 8mm through that. The thing is, I built most of the printer off drawings on the openbuilds website which are mostly all wrong so I had thought the slot was 5.4mm wide which is why the belt runs where it does.
All parts are ordered except the electronics. I had a custom tool ground to turn the 688 bearing covers using 5/8 ID, 7/8 OD Acetal Delrin stock. That size will only require a light turning op and then cutoff, the center should be fine for the 688 bearing as is and the OD has roughly .004-.014" stock on it before I get to the 22mm OD I need. Should be very quick to knock out a bunch of these parts.
The Z belt comments have been taken into consideration, I currently have a belt on the way from RobotDigg which I believe is just long enough to position it as shown in the picture. If needed I can get a much longer belt from SDP-SI to get roughly 180 degrees of wrap on each pulley.
This weekend I will go through the model and update all of the pieces and ready them for printing and will begin getting all the prints finalized next week. Next weekend I will be turning the bearing covers and cutting the extrusions to length and should have a basic printer in 2 weeks minus the bed platform which will probably be custom cut on my plasma table. I will look into using the extrusion to make the bed.
|
Re: CoreXY Build February 04, 2014 09:57AM |
Registered: 11 years ago Posts: 225 |

|
Re: CoreXY Build February 04, 2014 10:55AM |
Registered: 10 years ago Posts: 553 |
Quote
zelogik
Nice printer, I just waiting for seeing the way you will clamp your belt on the carriage
Belts will go behind the X carriage, then into holes and wrap back around to the face, the back of the carriage plates are flush with the top of the belt when the belts are parallel to travel direction. On the face, I will be bolting belt clamps to hold the belts. Maybe make the carriage plates 2 pieces that bolt around the belt, who knows...cross that bridge when I arrive

|
Re: CoreXY Build February 04, 2014 11:15AM |
Registered: 10 years ago Posts: 553 |
If anyone knows of a good way to tension the belts I would love any ideas. I have a sliding idler hole now on each side but that would be a manual tension. I was thinking of putting springs between the idler bolt head/nut and the extrusion profile which would force the bolt out and tension the belt. I would also be using bolts or something to collaspe the idler for installation and then just remove the bolts once the belt is secure and let the springs tension the belt. Be aware, these will be fairly heavy springs 
Edit 1: I have these springs which are pretty hefty - [www.mcmaster.com] - 26# each so 2 per idler would be plenty if I go that direction
Edit 2: I ordered some oversized 5/16 dowel pins to get a snug fit in the 8mm ID bearings and some .156" diameter springs since the ones I have (listed above) at quite a bit larger in diameter than my bracket itself. With the new springs I should be able to get about 12# of force on the belt and I hope that using a dowel pin will allow for smooth movement and pressure on the springs.
Edited 2 time(s). Last edit at 02/04/2014 11:31AM by tjb1.
|
Re: CoreXY Build February 04, 2014 02:05PM |
Registered: 10 years ago Posts: 553 |
Today I should have all the extrusions required and all the components for the wheels. I will still be waiting on a few parts from McMaster and Openbuilds (I didn't order enough slot nuts). This weekend I will be cutting all of the extrusions to size and making the bearing covers. Hopefully this week I can find some time to work on the parts again, I need to edit the Y axis carriages to fit the new length X profile and then adjust hole locations to fit the mini v wheels.
At this point, I have a few parts finished. The motor mount has been changed 3 times for easier printing and better fitment. The Y carriages have been adjusted several times and I will have two designs to play with coming up. The current one uses a small M3 screw to ensure the threaded rod holding the bearing stays in but I may use a corner bracket for added bracing and to hold the bearing rod in.
I have a few ideas for belt tension on the X-Y axis, none of them seem like a good solution and I am struggling here to find something compact yet effective. I will upload some pictures of this area tonight to help understand the issue. I really like the current idlers I have that you just load with a screw driver or something and then tighten, no need to worry about a spring collasping but I know the GT2 do stretch a little bit during use.
|
Re: CoreXY Build March 21, 2014 04:06PM |
Registered: 10 years ago Posts: 10 |
Good job. I have been working on a very similar printer. Using V slot rail, standard t-slot, and openrail for the xy linear motion. Z axis will be Ultimaker style with dual 12mm rods for constraint and TR 10x2 precision leadscrew. I also designed around dual E3D hotends. I haven't completed design of z axis yet but I have about 550mm of leadscrew for the Z travel, xy will be 250x320mm(borosilicate dimensions).
The belts inside the extrusions is a clean looking design...I toyed with doing this on mine but you loose a lot of modular ability provided by the t slots, being extremely modular is a design goal as I plan to also use my base design for a small mill. Another design goal of mine is to have automatic anti-backlash tensioners on the belts and for the moment it was much simpler to accomplish this with the belts outside. I also plan to enclose my build chamber by simply sliding acrylic into the slots.
How do you plan on adjusting the dual extruder setup so you can zero the nozzles relative to each other?
Problem I see with your design for belt tensioning is that by using a coil compression spring, you will have to use(like you mentioned) a heavy spring to keep the belt tension from compressing the spring when reversing directions at high speeds/accelerations. A spring K high enough to prevent this would likely overstress the belt and reduce its useable life. All depends on the mass of your xy rail/carriage and your change in velocities. Your belt tensions should be low though...belt manual
If you can work it into your concealed belt design, try something like what I am planning. Use a torsion spring to turn a "screw" and push against a pulleyed idler arm. Design it so the belt tension it creates is within the proper operating range and as belt stretches, the torsion spring will turn the screw some more, taking up the slack. This is how many motorcycle cam chain tensioners work.
I will try to take and upload some photos of my build.
|
Re: CoreXY Build June 09, 2014 08:02PM |
Registered: 9 years ago Posts: 210 |
Hi tjb1, any news on your project? Looks really good and I'd love to see some photos or hear what problems you ran into.
I'm curious why you decided to put the belt inside of the vslot extrusions? (and not besides or under them)
Would you share your cad files?
I'm looking for a design that allows a really big printer, and using V-Slot extrusions for the carriage instead of steel rods might be ideal because of the weight and precision.
PS: Ah, I've found the wiki page and the github repository.
I have been thinking about this while reading this thread about a coreXY by zelogik who uses a bend and movable idler to tension the belt.
I had an idea but found this one that is pretty close to what I had in mind, and looks like a very compact, printable and near perfect belt tensioner. Maybe you could even make it more compact by having a printed pulley that you can screw fixed and has an "outer nut" that you can hold with a wrench while unscrewing the holding nut to make it adjustable. Damn I have to learn cad to express my ideas lol.
Edited 2 time(s). Last edit at 06/09/2014 10:20PM by Dejay.
I'm curious why you decided to put the belt inside of the vslot extrusions? (and not besides or under them)
Would you share your cad files?
I'm looking for a design that allows a really big printer, and using V-Slot extrusions for the carriage instead of steel rods might be ideal because of the weight and precision.
PS: Ah, I've found the wiki page and the github repository.
Quote
tjb1
If anyone knows of a good way to tension the belts I would love any ideas.
I have been thinking about this while reading this thread about a coreXY by zelogik who uses a bend and movable idler to tension the belt.
I had an idea but found this one that is pretty close to what I had in mind, and looks like a very compact, printable and near perfect belt tensioner. Maybe you could even make it more compact by having a printed pulley that you can screw fixed and has an "outer nut" that you can hold with a wrench while unscrewing the holding nut to make it adjustable. Damn I have to learn cad to express my ideas lol.
Edited 2 time(s). Last edit at 06/09/2014 10:20PM by Dejay.
|
Re: CoreXY Build June 10, 2014 10:09AM |
Registered: 10 years ago Posts: 553 |
Quote
Dejay
Hi tjb1, any news on your project? Looks really good and I'd love to see some photos or hear what problems you ran into.
I'm curious why you decided to put the belt inside of the vslot extrusions? (and not besides or under them)
Would you share your cad files?
I'm looking for a design that allows a really big printer, and using V-Slot extrusions for the carriage instead of steel rods might be ideal because of the weight and precision.
PS: Ah, I've found the wiki page and the github repository.
Quote
tjb1
If anyone knows of a good way to tension the belts I would love any ideas.
I have been thinking about this while reading this thread about a coreXY by zelogik who uses a bend and movable idler to tension the belt.
I had an idea but found this one that is pretty close to what I had in mind, and looks like a very compact, printable and near perfect belt tensioner. Maybe you could even make it more compact by having a printed pulley that you can screw fixed and has an "outer nut" that you can hold with a wrench while unscrewing the holding nut to make it adjustable. Damn I have to learn cad to express my ideas lol.
I have not got much further than the original post. I do have nearly all the parts and have cut all the v-slot to size and had prototyped the motor mount to pretty much the final design. I also got to making the carriages and had to do a redesign halfway in because I used the wrong wheels to start with and then had problems with the bearings in the wheels locking up because the spacer was incorrect but OpenBuilds sent me new bearings that appeared to solve the issue.
I did build a Kossel Mini in this time and have it set up with bed leveling and I am getting much higher quality parts out of it than my i3. I had a ton of problems with my i3 involving the E3D, PLA and thermocouples which took me a couple weeks of troubleshooting before I gave up and went back to the budaschnozzle and some of the problems did show up in the early parts so I would like to reprint most of them.
You'll probably also notice that the github has nothing on it. The reason for that is because I honestly have no idea how to use it besides downloading the ZIP files. I've gotten much better with CAD since the original design as far as making the models cleaner and easier to adapt so I will likely go through and rebuild all the models and the entire assembly. If you are interested in what I currently have, PM me and I can try to find a way to get the files to you.
|
Re: CoreXY Build June 10, 2014 04:19PM |
Registered: 9 years ago Posts: 210 |
I am in no hurry since I'm still waiting for my kossel mini kit and have to build and get it working first. And then I'll have to learn cad first too. I just like your design, no crossing belts like they did with the fabtotum.
Thank you for the info!
For a non programmer git is a bit intimidating, tbh even for a programmer switching from earlier source control systems to git is You should just get the git windows program from github. The way git (and other distributed source control systems) works is this:
You create a local repository, basically the folder where you put all your working files and subdirectories.
This repository has your working files you just edit and change and save normally
This local repository also saves a complete backup history in a subfolder (I think .git)
You'll select and add all the files that you want under version control in the git client
Git detects what changed automatically
You then "commit" changes to your local repository
You can then "push" these changes from your local repository to another (remote) repository e.g. on github
Others then can "pull" your changes from the remote repository to their own repository and then "update" to apply the changes to their own working files
This allows merging changes if you work on the same text files and going back to any previous version or just updating quick by only downloading the changed or new parts of the files of the project. You can also see the history and all comments attached to the change log.
It sounds intimidating, but it really is rather simple. It's just a bit unbelievable how powerful it is and that it really can work that clever. You basically have your own local github server than can sync all changesets with other repositories. Try it out with a test repository and some test changes, you'll have it working in no time. Usually you'll just install, create a local repository, add all working files, and then commit/push stuff in one step.
Edited 1 time(s). Last edit at 06/10/2014 04:20PM by Dejay.
Thank you for the info!
For a non programmer git is a bit intimidating, tbh even for a programmer switching from earlier source control systems to git is
You should just get the git windows program from github. The way git (and other distributed source control systems) works is this:You create a local repository, basically the folder where you put all your working files and subdirectories.
This repository has your working files you just edit and change and save normally
This local repository also saves a complete backup history in a subfolder (I think .git)
You'll select and add all the files that you want under version control in the git client
Git detects what changed automatically
You then "commit" changes to your local repository
You can then "push" these changes from your local repository to another (remote) repository e.g. on github
Others then can "pull" your changes from the remote repository to their own repository and then "update" to apply the changes to their own working files
This allows merging changes if you work on the same text files and going back to any previous version or just updating quick by only downloading the changed or new parts of the files of the project. You can also see the history and all comments attached to the change log.
It sounds intimidating, but it really is rather simple. It's just a bit unbelievable how powerful it is and that it really can work that clever. You basically have your own local github server than can sync all changesets with other repositories. Try it out with a test repository and some test changes, you'll have it working in no time. Usually you'll just install, create a local repository, add all working files, and then commit/push stuff in one step.
Edited 1 time(s). Last edit at 06/10/2014 04:20PM by Dejay.
|
Re: CoreXY Build June 18, 2014 07:59AM |
Registered: 10 years ago Posts: 553 |
I just order 4kg of filament and the Kossel has been doing great so I may have the frame done in the next two weeks. I know there were some issues with the bearing plates and the eccentric spacers not fitting correctly but I believe that issue was related to my first layer being incorrect. The Kossel has FSR leveling so as long as I get the bed roughness set correctly for the layer height, it works great and produces very nice parts.
I am in process of rewiring the plasma cutter table, changing software and adding new electronics to it so I will be looking into making the bed out of v-slot or just 2020 extrusion that I got from Misumi during the promotion.
I've never tested it but I do not believe the belt will stay on a normal bearing throughout my whole design, at the time I was testing crowned covers and ended up making a custom tool to cut them out of plastic tube from McMaster in 2 passes but the tube is a slip fit on the bearing and I haven't found a way to secure it yet. I may try scoring the outer bearing surface with an abrasive cutoff wheel to give the glue somewhere to grab or try to find flanged bearings like the Kossel uses.
|
Re: CoreXY Build June 18, 2014 08:41AM |
Registered: 10 years ago Posts: 553 |
Just did a big search for flanged bearings, idler pulleys, and any other type of bearing. Problem with the flanged bearings is to get the diameter I need, the width gets massive which isn't exactly bad but it won't keep the belt in position so I will see if I can work with something around 14mm diameter. Misumi has a toothed idler pulley which is almost perfect except they are $30 a piece and I would need 8 of them. I see a few places on ebay sell similar smooth idlers for about $6 a piece so I will look into those also.
Sorry, only registered users may post in this forum.