Home
>
Reprappers
>
Topic
Newbie Homing Issues
Posted by indians010
|
Newbie Homing Issues December 16, 2017 12:55PM |
Registered: 6 years ago Posts: 12 |
I would appreciate as much help as possible here as we are brand new to 3D printing. My 12 year old son bought the Prusa i3 v2 and everything went pretty well until it came to the homing. We followed every step and setting to a T in the configuration manual with no luck. On first attempt both x and y axis moved to the endstops then the motors grinded for a few seconds then stopped. When I manually moved the axis away from the endstops and tried again I had the same results. Attempting to contact Reprap tech support via phone is a joke, so I uninstalled all the associated software, re-read the build manual, configuration manual and watched each YouTube video again hoping I missed something, and re downloaded everything. In the meantime someone finally emailed from Reprap and basically suggested that I do everything mentioned in the build manual, trim the pins on the ramps so it seats correctly in the Arduino, asked if I was actually homing with the home button and not the arrows, my wires may be flipped, and check the endstop wire location on the ramps. All of these were done twice and still no avail. Now after second attempt at deleting and re-installing software I have a similar but new problem. When the home button is hit the x axis moves to the endstop, grinds for a few seconds, stops, moves off the switch then back to it, and when y home is pressed it moves in small increments away from the endstop and the same when y is homed it grinds, stops then resets at endstop and x moves incrementally the wrong direction. I feel like it is actually something very simple to someone who knows what they are doing or even a programming setting that I am missing. Again sorry for the long rant here, but I have hit the end of my rope here and my son is dying to use this thing. Any and all help is appreciated. And in the midst of exchanging emails with Reprap they informed me that their not sure what phone number to call and that none of their phones work.
|
Re: Newbie Homing Issues December 16, 2017 01:19PM |
Registered: 6 years ago Posts: 1,863 |
It sound like your end-stop switches are incorrectly installed.
Do you have a ohm meter, Can you check to see if the end-stop switches actually function. Then Make sure they are correctly plugged into the controller.
Post pictures of how you have the end-stop connected.
Edited 1 time(s). Last edit at 12/16/2017 01:20PM by Roberts_Clif.
Do you have a ohm meter, Can you check to see if the end-stop switches actually function. Then Make sure they are correctly plugged into the controller.
Post pictures of how you have the end-stop connected.
Edited 1 time(s). Last edit at 12/16/2017 01:20PM by Roberts_Clif.
|
Re: Newbie Homing Issues December 16, 2017 01:51PM |
Registered: 6 years ago Posts: 12 |
Roberts_Clif
I ran the m119 test and all enstops work as should in that respect. I double checked the connections and everything seems tight. I will try to post some pictures later as it won’t let me from my phone. It says the file size is too large. Anyhow they are installed as exactly prescribed in the build manual.
Thanks
|
Re: Newbie Homing Issues December 16, 2017 02:15PM |
Registered: 6 years ago Posts: 12 |
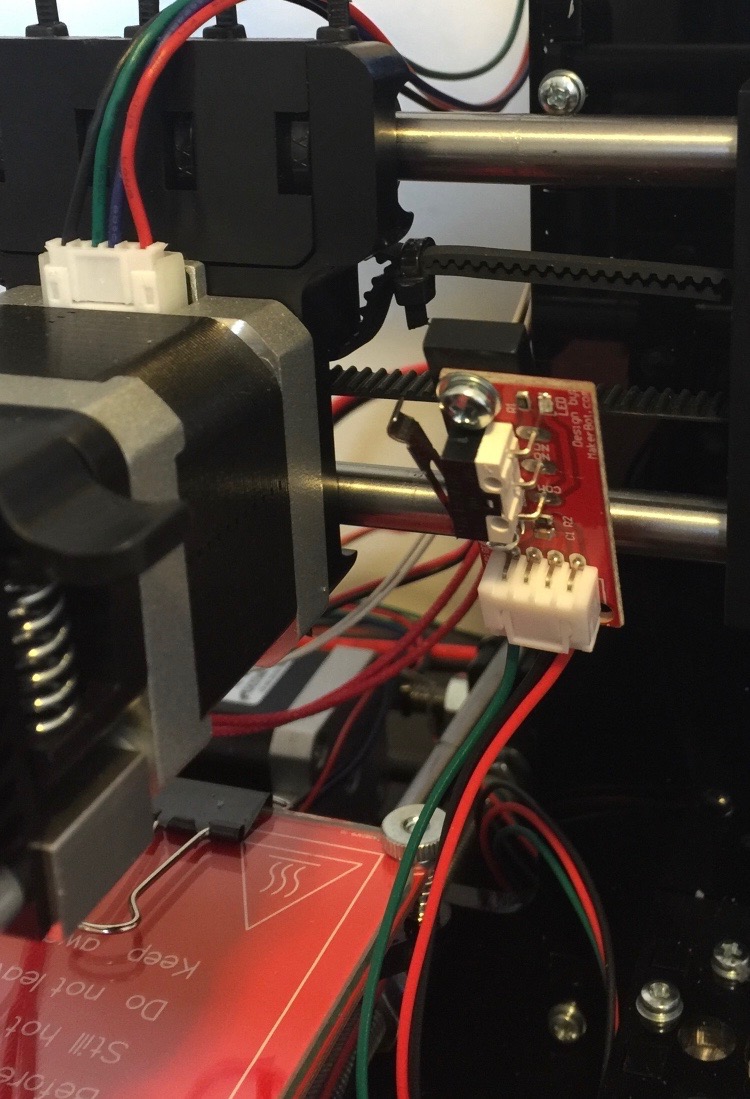
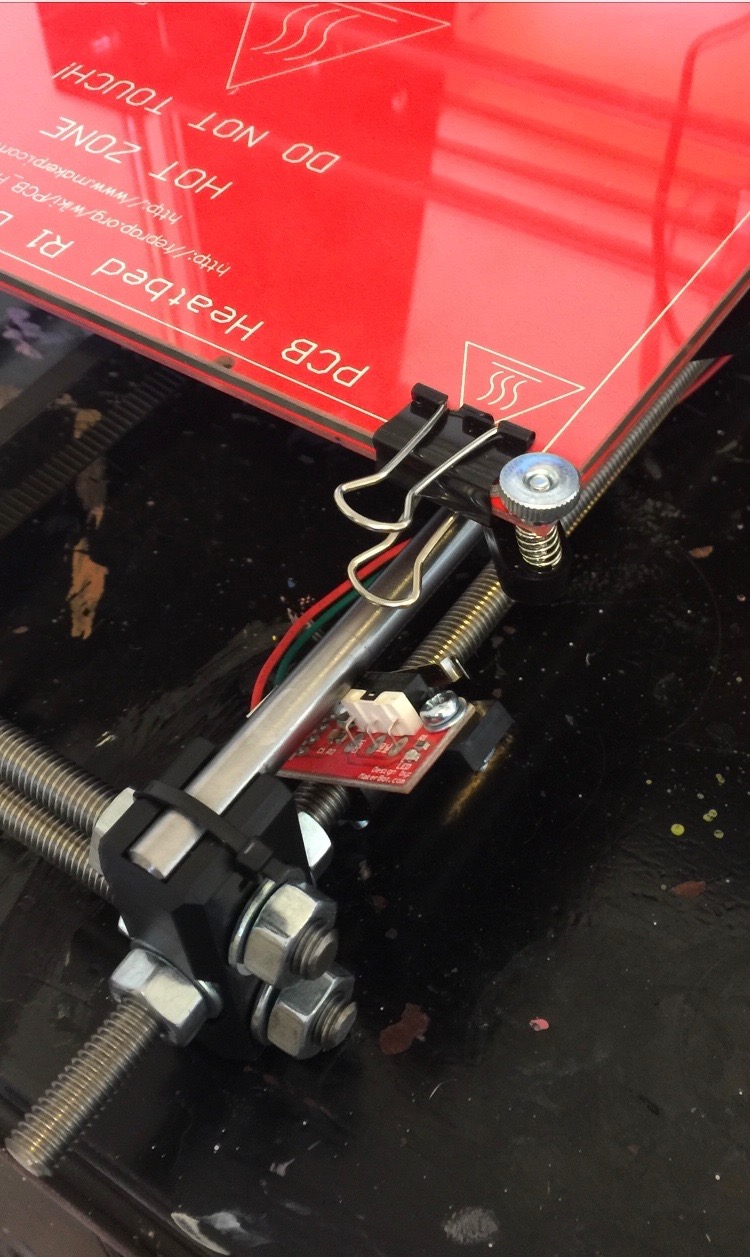
Here are th x and y endstops and their respective connections to the ramps. X being bottom y middle and z top.
|
Re: Newbie Homing Issues December 16, 2017 07:10PM |
Admin Registered: 13 years ago Posts: 7,001 |
From your images
Your X endstop seems to be on the right hand side, so that should be configured as a Max endstop and homing direction of 1, normal moves X+ should move towards the endstop, and use max endstop plugs
Your Y endstop is not clear... from the first image It looks like your heated bed has the writing upside down, from this we can infer that the Y endstop is at the front. This is also a max endstop and should be configured as such. So Y homing direction should be 1 and normal moves Y+ will move the bed forward, and use max endstop plugs
|
Re: Newbie Homing Issues December 16, 2017 08:01PM |
Registered: 6 years ago Posts: 12 |
Dust
You are correct. The x is on the right and y at the front. Again this is our first attemp at 3d printing and going by the build manual. So where would I change those homing directions? Would it help if I posted the link to the build manual and configuration manual to see if maybe I’m just missing something or you could at least point out any other problems you may see?
Thanks
|
Re: Newbie Homing Issues December 16, 2017 08:54PM |
Registered: 6 years ago Posts: 1,863 |
|
Re: Newbie Homing Issues December 16, 2017 10:21PM |
Admin Registered: 13 years ago Posts: 7,001 |
Presuming your using marlin, its all in Configuration.h
// Direction of endstops when homing; 1=MAX, -1=MIN
// :[-1,1]
#define X_HOME_DIR 1
#define Y_HOME_DIR 1
#define Z_HOME_DIR -1
also move X and Y endstop plugs over to max positions and change
// Specify here all the endstop connectors that are connected to any endstop or probe.
// Almost all printers will be using one per axis. Probes will use one or more of the
// extra connectors. Leave undefined any used for non-endstop and non-probe purposes.
//#define USE_XMIN_PLUG
//#define USE_YMIN_PLUG
#define USE_ZMIN_PLUG
#define USE_XMAX_PLUG
#define USE_YMAX_PLUG
//#define USE_ZMAX_PLUG
If you find you axis is moving the wrong way change these as needed
// Invert the stepper direction. Change (or reverse the motor connector) if an axis goes the wrong way.
#define INVERT_X_DIR (flip from true to false or vice versa, opposite of what is there now)
#define INVERT_Y_DIR (flip from true to false or vice versa, opposite of what is there now)
#define INVERT_Z_DIR (flip from true to false or vice versa, opposite of what is there now)
Edited 1 time(s). Last edit at 12/16/2017 10:23PM by Dust.
|
Re: Newbie Homing Issues December 16, 2017 11:18PM |
Registered: 6 years ago Posts: 12 |
|
Re: Newbie Homing Issues December 17, 2017 07:44AM |
Registered: 6 years ago Posts: 12 |
I will add that that the only time the motors move in the wrong direction is when the opposite axis is homed and sitting on the endstop. Example: both x and y axis are sitting at midpoint of travel. I hit the home button for x and it moves to the endstop, grinds, moves off the endstop slightly, then returns to the endstop with a tiny grind then finally stops. Once this is done I hit y home and it moves in the wrong direction one increment at a time each time I hit home, as if I’m using the manual function. If I move x off of the endstop and home y, then it will move to home and basically the same process as with x. With the axis only moving the wrong direction some times is what confuses me. But again I am new to all of this. I will be trying your suggestions here shortly Dust.
This may sound very unknowledgeable on my part but could it be that I have the drive belts too tight? Just grabbing at straws here.
Edited 2 time(s). Last edit at 12/17/2017 09:37AM by indians010.
This may sound very unknowledgeable on my part but could it be that I have the drive belts too tight? Just grabbing at straws here.
Edited 2 time(s). Last edit at 12/17/2017 09:37AM by indians010.
|
Re: Newbie Homing Issues December 17, 2017 11:25AM |
Registered: 6 years ago Posts: 1,863 |
From the Page 63 of RRG Build Manual V1.4.pdf
The Y end stop is located on the front bottom of the Y assembly.
The X end stop is located on the right side of the X assembly.
The Z end stop is located on the right side vertical rod right above the stepper motor.
OK let take a look. From my Prusa i3 standpoint.
Y motor position and direction is reversed // On rear 180 degrees flip
X motor position and direction is reversed // on left rear vs on right front
In turn it appears different than it actually is. If the back of the 3D Printer were facing you it would function like my 3D Printer. Only difference would be the Y Stepper Motor would be on the front.
This would mean the direction of the Y Axis would have to be reversed.
My Stepper direction config
// Invert the stepper direction. Change (or reverse the motor connector) if an axis goes the wrong way.
#define INVERT_X_DIR false
#define INVERT_Y_DIR false
#define INVERT_Z_DIR true
Your Stepper direction Config
// Invert the stepper direction. Change (or reverse the motor connector) if an axis goes the wrong way.
#define INVERT_X_DIR true // This changed because the X-Axis direction changed
#define INVERT_Y_DIR false // This remains the same because the stepper is changed 180 degrees.
#define INVERT_Z_DIR true
These are correct
// Direction of end-stops when homing; 1=MAX, -1=MIN
// :[-1,1]
#define X_HOME_DIR -1
#define Y_HOME_DIR -1
#define Z_HOME_DIR -1
Looking at this it appears to be correct.
Are you sure the switches are being activated when homing. It appears from the photo that the X-Axis end-stop mounting bracket could be hitting the stepper before the switch is activated
And it sounds like the Y axis thinks it is already homed.
Can you upload a short video to a google Drive account and post the Share address. Unless you have a different way to do this.
|
Re: Newbie Homing Issues December 17, 2017 12:40PM |
Registered: 6 years ago Posts: 12 |
I will try to upload a YouTube video and post the link. But from what I gather from what you are saying is that the setup seems right? Basically Home is the back right corner. I have the endstop at just the right angle to engage and not hit beforehand. This morning I unplugged everything, separated the arduino and ramps checked pins and jumpers and reassembled. I was hoping it was something as simple as a loose connection but no help. I’m wondering if it would be beneficial to see if they’d send new electronics or return if not.
|
Re: Newbie Homing Issues December 17, 2017 01:11PM |
Registered: 6 years ago Posts: 1,863 |
Believe it or not I received a Brand new controller where the circuit traces were open going to hot-end thermister, and had to solder the trace closed.
Look at the trace at the corner this is a open trace. Next to impossible to find under the silkscreen.
Edited 1 time(s). Last edit at 12/17/2017 01:12PM by Roberts_Clif.
Look at the trace at the corner this is a open trace. Next to impossible to find under the silkscreen.

Edited 1 time(s). Last edit at 12/17/2017 01:12PM by Roberts_Clif.
|
Re: Newbie Homing Issues December 17, 2017 01:23PM |
Registered: 6 years ago Posts: 1,863 |
|
Re: Newbie Homing Issues December 17, 2017 04:33PM |
Registered: 6 years ago Posts: 12 |
Ok guys, well even being brand new to this I feel like a complete idiot on this one. I called a friends brother, who come to find out know quite a bit about printing. Anyway within 5 min he had it figured out. It seems in the process I labeled my x and y endstops backwards, therefor the reason they weren’t recognized. He had me move one axis and manually trigger the opposite endstop and voila. Sorry for all the time you guys spent, but I guess it’s nice to know there are actually people willing to help. Now I’m on to figuring out the best setting for printing.
Edited 1 time(s). Last edit at 12/17/2017 04:33PM by indians010.
Edited 1 time(s). Last edit at 12/17/2017 04:33PM by indians010.
|
Re: Newbie Homing Issues December 17, 2017 08:32PM |
Registered: 6 years ago Posts: 1,863 |
|
Re: Newbie Homing Issues December 17, 2017 09:09PM |
Registered: 6 years ago Posts: 12 |
|
Re: Newbie Homing Issues December 18, 2017 01:02PM |
Registered: 6 years ago Posts: 1,863 |
|
Re: Newbie Homing Issues March 01, 2018 06:49PM |
Registered: 6 years ago Posts: 1 |
// ################ Endstop configuration #####################
#define ENDSTOP_PULLUP_X_MIN true
#define ENDSTOP_X_MIN_INVERTING true
#define MIN_HARDWARE_ENDSTOP_X false
#define ENDSTOP_PULLUP_Y_MIN true
#define ENDSTOP_Y_MIN_INVERTING true
#define MIN_HARDWARE_ENDSTOP_Y false
#define ENDSTOP_PULLUP_Z_MIN true
#define ENDSTOP_Z_MIN_INVERTING true
#define MIN_HARDWARE_ENDSTOP_Z true
#define ENDSTOP_PULLUP_X_MAX true
#define ENDSTOP_X_MAX_INVERTING false
#define MAX_HARDWARE_ENDSTOP_X true
#define ENDSTOP_PULLUP_Y_MAX true
#define ENDSTOP_Y_MAX_INVERTING false
#define MAX_HARDWARE_ENDSTOP_Y true
#define ENDSTOP_PULLUP_Z_MAX true
#define ENDSTOP_Z_MAX_INVERTING false
#define MAX_HARDWARE_ENDSTOP_Z true
#define max_software_endstop_r true
#define min_software_endstop_x true
#define min_software_endstop_y true
#define min_software_endstop_z true
#define max_software_endstop_x false
#define max_software_endstop_y false
#define max_software_endstop_z false
#define ENDSTOP_X_BACK_MOVE 5
#define ENDSTOP_Y_BACK_MOVE 5
#define ENDSTOP_Z_BACK_MOVE 5
#define ENDSTOP_X_RETEST_REDUCTION_FACTOR 3
#define ENDSTOP_Y_RETEST_REDUCTION_FACTOR 3
#define ENDSTOP_Z_RETEST_REDUCTION_FACTOR 3
#define ENDSTOP_X_BACK_ON_HOME 5
#define ENDSTOP_Y_BACK_ON_HOME 5
#define ENDSTOP_Z_BACK_ON_HOME 5
#define ALWAYS_CHECK_ENDSTOPS 1
// ################# XYZ movements ###################
#define X_ENABLE_ON 0
#define Y_ENABLE_ON 0
#define Z_ENABLE_ON 0
#define DISABLE_X 0
#define DISABLE_Y 0
#define DISABLE_Z 0
#define DISABLE_E 0
#define INVERT_X_DIR 0
#define INVERT_Y_DIR -1
#define INVERT_Z_DIR -1
#define X_HOME_DIR -1
#define Y_HOME_DIR -1
#define Z_HOME_DIR 1
#define X_MAX_LENGTH 100
#define Y_MAX_LENGTH 100
#define Z_MAX_LENGTH 340
#define X_MIN_POS 0
#define Y_MIN_POS 0
#define Z_MIN_POS 0
#define DISTORTION_CORRECTION 0
#define DISTORTION_CORRECTION_POINTS 5
#define DISTORTION_CORRECTION_R 90
#define DISTORTION_PERMANENT 1
#define DISTORTION_UPDATE_FREQUENCY 15
#define DISTORTION_START_DEGRADE 0.5
#define DISTORTION_END_HEIGHT 1
#define DISTORTION_EXTRAPOLATE_CORNERS 0
#define DISTORTION_XMIN 10
#define DISTORTION_YMIN 10
#define DISTORTION_XMAX 190
#define DISTORTION_YMAX 190
// ##########################################################################################
// ## Movement settings ##
// ##########################################################################################
#define FEATURE_BABYSTEPPING 1
#define BABYSTEP_MULTIPLICATOR 1
#define DELTA_SEGMENTS_PER_SECOND_PRINT 180 // Move accurate setting for print moves
#define DELTA_SEGMENTS_PER_SECOND_MOVE 70 // Less accurate setting for other moves
#define EXACT_DELTA_MOVES 1
// Delta settings
#define DELTA_DIAGONAL_ROD 333 // mm
#define DELTA_ALPHA_A 210
#define DELTA_ALPHA_B 330
#define DELTA_ALPHA_C 90
#define DELTA_RADIUS_CORRECTION_A 0
#define DELTA_RADIUS_CORRECTION_B 0
#define DELTA_RADIUS_CORRECTION_C 0
#define DELTA_DIAGONAL_CORRECTION_A 0
#define DELTA_DIAGONAL_CORRECTION_B 0
#define DELTA_DIAGONAL_CORRECTION_C 0
#define END_EFFECTOR_HORIZONTAL_OFFSET 39.7
#define CARRIAGE_HORIZONTAL_OFFSET 31
#define DELTA_MAX_RADIUS 90
#define ROD_RADIUS 238
#define PRINTER_RADIUS 103.7
#define DELTA_HOME_ON_POWER 0
#define STEP_COUNTER
#define DELTA_X_ENDSTOP_OFFSET_STEPS 0
#define DELTA_Y_ENDSTOP_OFFSET_STEPS 0
#define DELTA_Z_ENDSTOP_OFFSET_STEPS 0
#define DELTA_FLOOR_SAFETY_MARGIN_MM 50
#define SOFTWARE_LEVELING
#define DELTASEGMENTS_PER_PRINTLINE 24
#define STEPPER_INACTIVE_TIME 360L
#define MAX_INACTIVE_TIME 1800L
#define MAX_FEEDRATE_X 100
#define MAX_FEEDRATE_Y 100
#define MAX_FEEDRATE_Z 100
#define HOMING_FEEDRATE_X 30
#define HOMING_FEEDRATE_Y 30
#define HOMING_FEEDRATE_Z 30
#define HOMING_ORDER HOME_ORDER_ZXY
#define ZHOME_MIN_TEMPERATURE 0
#define ZHOME_HEAT_ALL 1
#define ZHOME_HEAT_HEIGHT 20
#define ZHOME_X_POS 999999
#define ZHOME_Y_POS 999999
Sorry, only registered users may post in this forum.