Home
>
Reprappers
>
Topic
Progress Update
Posted by Leav
|
Progress Update November 04, 2008 05:24PM |
Registered: 15 years ago Posts: 151 |
Hi Reprappers,
Iv'e been around the forum alot ad until recently i've been all talk and no walk...
So here is a small update from me and a small question/observation.
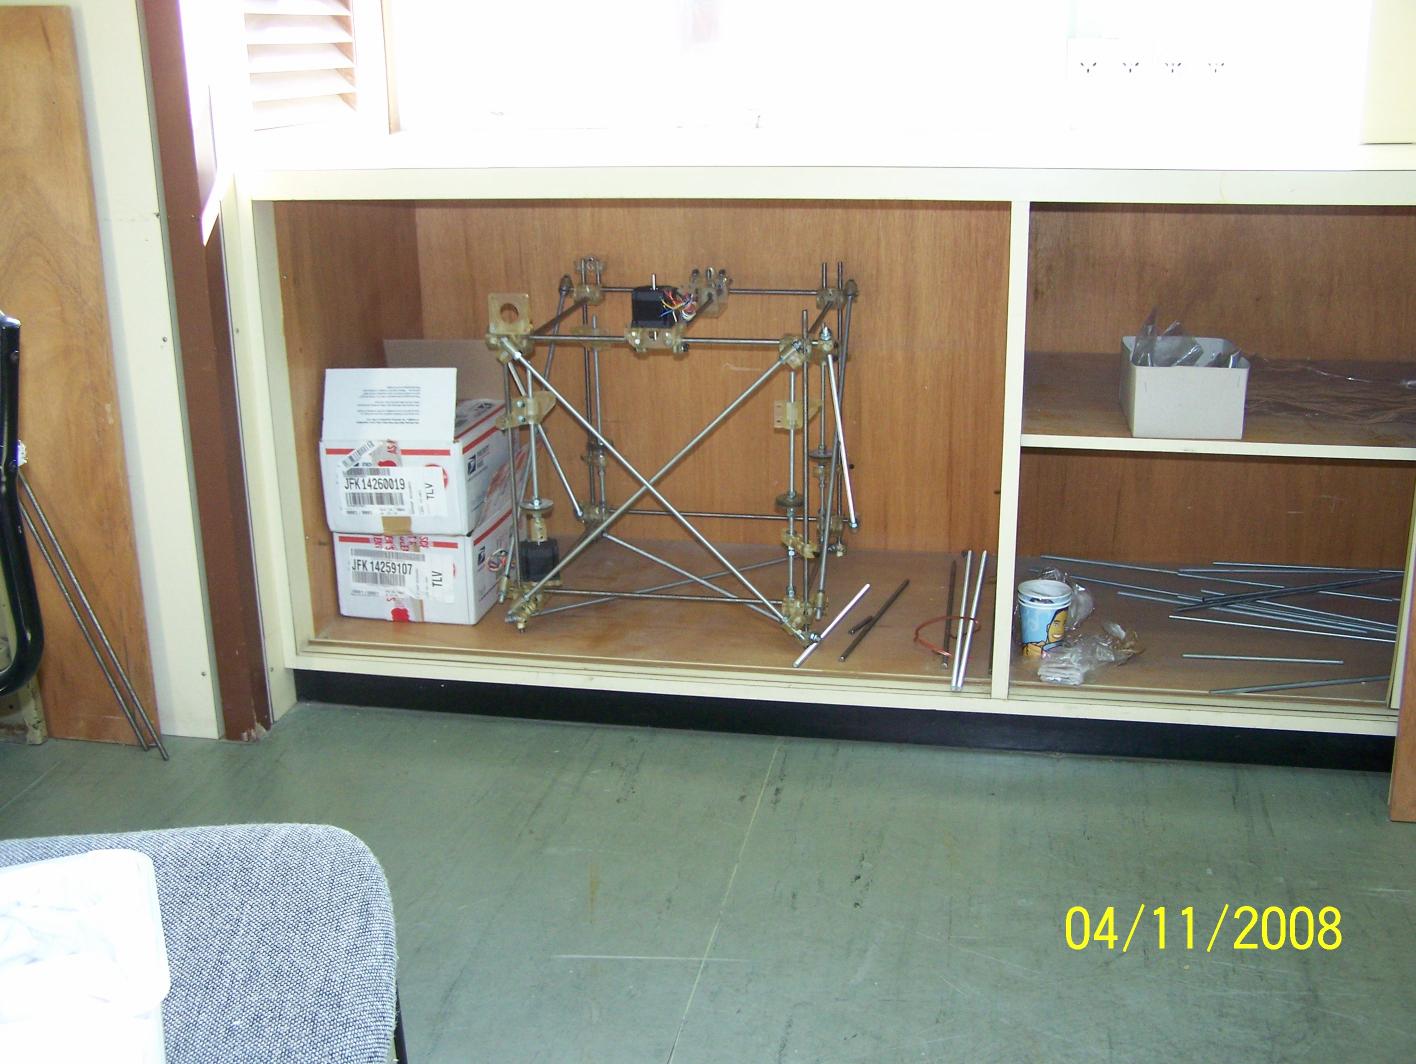
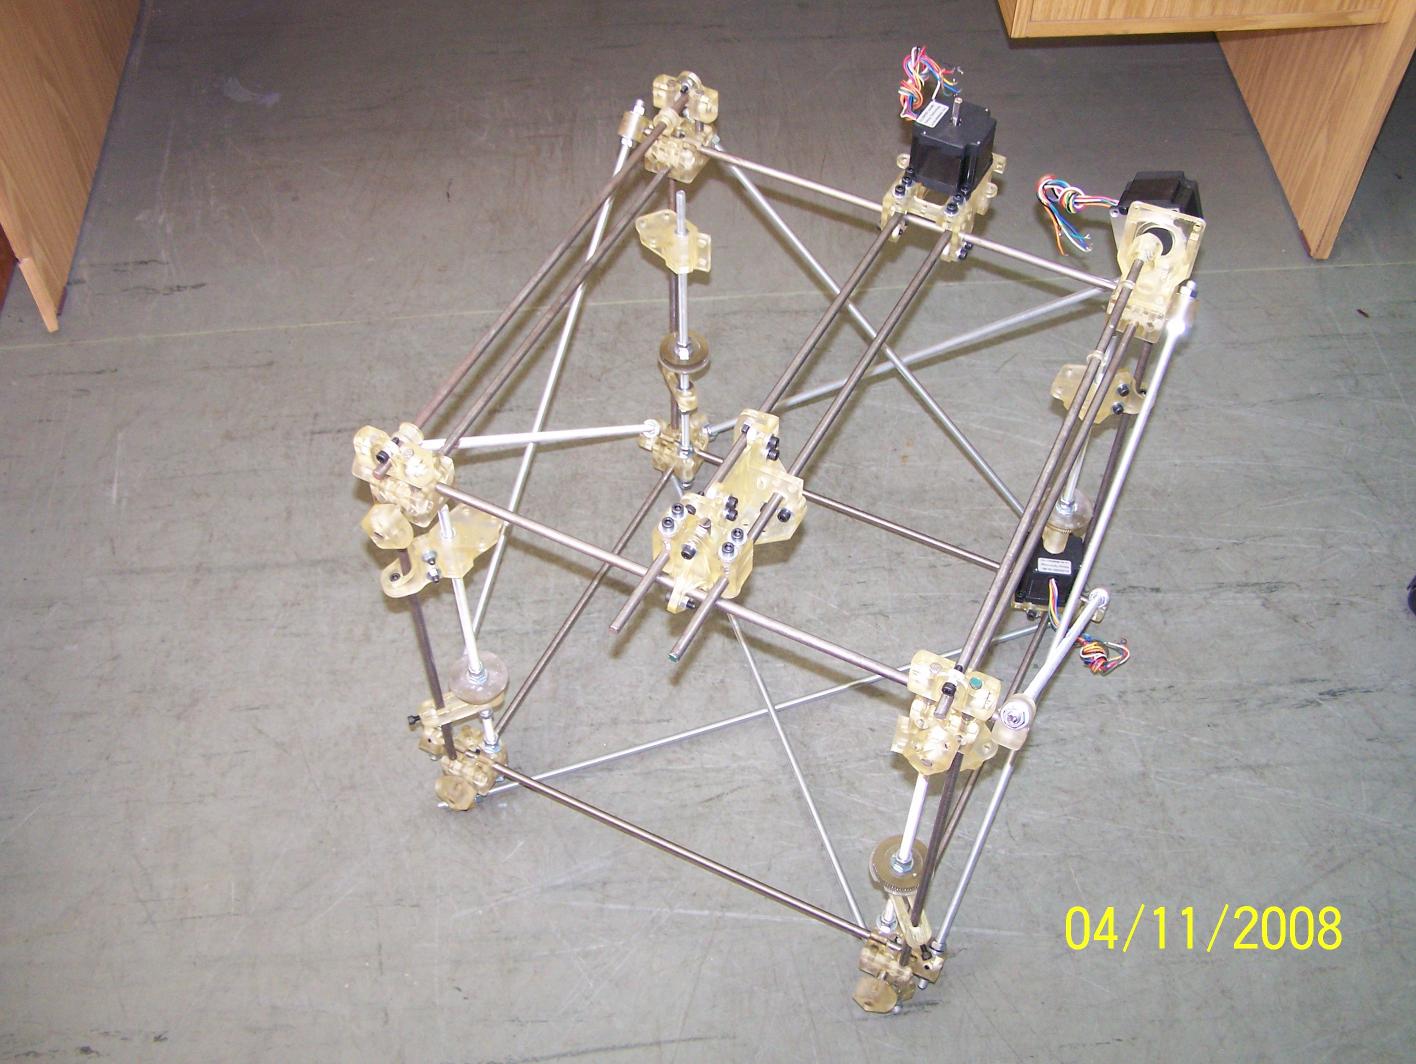
I am very impressed with the rigidity of the frame. it is much sturdier than I thought it would be.
Just a note: the 3D printer I have access to is an Objet one, which has tendancies to make any hole a wee bit smaller... this caused the Y idler houses (is that the correct name?) to crack when I forced the plastic bearings in... (not a good idea...)
Not a big deal since the rods going into the corner bracket take the load and pull it back together.
Check out the other attachments, and feel free to ask me questions if you have any....
-Leav
Edited 1 time(s). Last edit at 11/04/2008 05:26PM by Leav.
Iv'e been around the forum alot ad until recently i've been all talk and no walk...
So here is a small update from me and a small question/observation.
I am very impressed with the rigidity of the frame. it is much sturdier than I thought it would be.
Just a note: the 3D printer I have access to is an Objet one, which has tendancies to make any hole a wee bit smaller... this caused the Y idler houses (is that the correct name?) to crack when I forced the plastic bearings in... (not a good idea...)
Not a big deal since the rods going into the corner bracket take the load and pull it back together.


Check out the other attachments, and feel free to ask me questions if you have any....
-Leav
Edited 1 time(s). Last edit at 11/04/2008 05:26PM by Leav.
|
Re: Progress Update November 05, 2008 09:49AM |
Registered: 16 years ago Posts: 536 |
Awesome! It's good to see a man of action on the forums! 
How long did it take for the Objet to print out a Darwin? And how strong are the parts? They look very accurate.
As for hole sizes, I had access to a machinist's drill set - drill bits sized every 0.001" or 0.002" - that made the assmebly work a lot easier when I put my Darwin together.
How
How long did it take for the Objet to print out a Darwin? And how strong are the parts? They look very accurate.
As for hole sizes, I had access to a machinist's drill set - drill bits sized every 0.001" or 0.002" - that made the assmebly work a lot easier when I put my Darwin together.
How
|
Re: Progress Update November 05, 2008 10:46AM |
Admin Registered: 17 years ago Posts: 1,915 |
|
Re: Progress Update November 06, 2008 01:44PM |
Registered: 15 years ago Posts: 21 |
|
Re: Progress Update November 06, 2008 04:16PM |
Registered: 16 years ago Posts: 447 |
Looks like this is their website: [www.objet.com]
|
Re: Progress Update November 06, 2008 04:51PM |
Registered: 15 years ago Posts: 151 |
Hi 
----->>>>>>>>Awesome! It's good to see a man of action on the forums!
Thanks it's fun finally getting stuff done!
----->>>>>>>>How long did it take for the Objet to print out a Darwin?
I really couldn't say since the printing of the parts was spread out over several weeks when the printer was free.
I could try and guesstimate about 36 hours total running time since the large trays were about 10 hours each and there were 2.5 of those plus some smaller trays of tidbits I forgot the first times.
----->>>>>>>>And how strong are the parts?
They are strong, but somewhat brittle. we actually printed a model for stress testing in one of those machines that look like torture devices and pull the model apart while measuring stress and strain. I'll let you know the results if you're interested.
----->>>>>>>>They look very accurate.
They are! I am amazed by the detail it can produce. the head works like an inkjet printer! it has 36 (I think) heads that simultaneously deposit plastic while making a linear pass. it's pretty awe inspiring to watch.
----->>>>>>>>What did Objet charge to print the Darwin parts?
Not sure since it's a faculty printer (I'm a student here at the Technion [en.wikipedia.org] ) and I am lucky enough to not have to worry about the cost!
Again I can estimate: printing all the parts cost something on the order of thousands of dollars
but when I'm done I'm going to give that printer a run for it's money!
A room full of Darwins!
----->>>>>>>>Oh, I nver saw an Objet machine, not ebn on a photo or video. Can you give any details? Speed, quality, pricing of machine and material, availability?
Here is a great video showing an Objet machine in action:
[www.youtube.com]
Truly inspiring for me! I would never have believed that possible!
-Leav
---------------------------------------------------------------------------
Also, I just finished calibrating my Z-Axis!
Edited 1 time(s). Last edit at 11/06/2008 04:54PM by Leav.
----->>>>>>>>Awesome! It's good to see a man of action on the forums!
Thanks
it's fun finally getting stuff done!----->>>>>>>>How long did it take for the Objet to print out a Darwin?
I really couldn't say since the printing of the parts was spread out over several weeks when the printer was free.
I could try and guesstimate about 36 hours total running time since the large trays were about 10 hours each and there were 2.5 of those plus some smaller trays of tidbits I forgot the first times.
----->>>>>>>>And how strong are the parts?
They are strong, but somewhat brittle. we actually printed a model for stress testing in one of those machines that look like torture devices and pull the model apart while measuring stress and strain. I'll let you know the results if you're interested.
----->>>>>>>>They look very accurate.
They are! I am amazed by the detail it can produce. the head works like an inkjet printer! it has 36 (I think) heads that simultaneously deposit plastic while making a linear pass. it's pretty awe inspiring to watch.
----->>>>>>>>What did Objet charge to print the Darwin parts?
Not sure since it's a faculty printer (I'm a student here at the Technion [en.wikipedia.org] ) and I am lucky enough to not have to worry about the cost!
Again I can estimate: printing all the parts cost something on the order of thousands of dollars
but when I'm done I'm going to give that printer a run for it's money!
A room full of Darwins!
----->>>>>>>>Oh, I nver saw an Objet machine, not ebn on a photo or video. Can you give any details? Speed, quality, pricing of machine and material, availability?
Here is a great video showing an Objet machine in action:
[www.youtube.com]
Truly inspiring for me! I would never have believed that possible!
-Leav
---------------------------------------------------------------------------
Also, I just finished calibrating my Z-Axis!
Edited 1 time(s). Last edit at 11/06/2008 04:54PM by Leav.
|
Re: Progress Update November 06, 2008 05:55PM |
Admin Registered: 16 years ago Posts: 13,886 |
... they print with UV-curable resins and the strong light you can see are two UV-lamp-arrays beside the head.
This prototype of a micro-gripper is made by an Eden500 Objet-printer:
With a reprap/repstrap it's possible to dispense fluid PMMA (i have "ACRIFIX 192" from Degussa) with a syringe and cure the actual sheet wit an UV-lamp.
I'm testing with this type of 'room-temp' fabbing too, but for fast UV-curing i need powerfull (and expensive) UV-sources or the curing time per slice would exceed 15 minutes until it's hard enough for supporting the upper slices an the fabbing would last a very long time.
But the Acrifix-objects are fully cured like normal PMMA (plexiglass) and i didn't notice any warping with my first tests ...
Viktor
This prototype of a micro-gripper is made by an Eden500 Objet-printer:

With a reprap/repstrap it's possible to dispense fluid PMMA (i have "ACRIFIX 192" from Degussa) with a syringe and cure the actual sheet wit an UV-lamp.
I'm testing with this type of 'room-temp' fabbing too, but for fast UV-curing i need powerfull (and expensive) UV-sources or the curing time per slice would exceed 15 minutes until it's hard enough for supporting the upper slices an the fabbing would last a very long time.
But the Acrifix-objects are fully cured like normal PMMA (plexiglass) and i didn't notice any warping with my first tests ...
Viktor
|
Re: Progress Update November 08, 2008 07:10PM |
Registered: 15 years ago Posts: 151 |
2D printing for the win!!!
Also, a RepTube video:
[www.youtube.com]
I wrote some basic code for the arduino to do this just so I could sleep better tonight
Onwards! to the extruder!!!!!
-Leav

Also, a RepTube video:
[www.youtube.com]
I wrote some basic code for the arduino to do this just so I could sleep better tonight
Onwards! to the extruder!!!!!
-Leav
|
Re: Progress Update November 08, 2008 07:40PM |
Registered: 16 years ago Posts: 536 |
|
Re: Progress Update November 18, 2008 09:35AM |
Registered: 15 years ago Posts: 151 |
After some requests (ok just one ) I'm attaching some simple test codes here for straight uploading to the arduino.
These are based off of the codes in the wiki pages for the electronics.
Remember to tweak all the parameters for your system (e.g. the opto switch types and direction of the stepper motors) - I suggest just running it with a finger on the kill switch, that's how I tested out the direction and the opto switches.
hOMING - brings back all the axes one by one to the home position using only the opto switches as feedback (no sanity checks)
pRINToPTO - doesn't move any motors, only prints the status of the opto switches to the arduino IDE terminal.
rECTANGULARsPIRAL - prints the above rectangular spiral from the current position (no homing). width height and margins are easily modifiable.
enjoy.
-Leav
Edited 1 time(s). Last edit at 11/18/2008 09:36AM by Leav.
) I'm attaching some simple test codes here for straight uploading to the arduino.These are based off of the codes in the wiki pages for the electronics.
Remember to tweak all the parameters for your system (e.g. the opto switch types and direction of the stepper motors) - I suggest just running it with a finger on the kill switch, that's how I tested out the direction and the opto switches.
hOMING - brings back all the axes one by one to the home position using only the opto switches as feedback (no sanity checks)
pRINToPTO - doesn't move any motors, only prints the status of the opto switches to the arduino IDE terminal.
rECTANGULARsPIRAL - prints the above rectangular spiral from the current position (no homing). width height and margins are easily modifiable.
enjoy.
-Leav
Edited 1 time(s). Last edit at 11/18/2008 09:36AM by Leav.
|
Re: Progress Update November 18, 2008 10:28AM |
Registered: 15 years ago Posts: 300 |
Hi Leav
Thanks! Just what I need to start checking my new repstrap, of which I only have the X & Y axis working at the moment.
The first one of your scripts I am going to use is pRINToPTO as I using used xy stages that hall effect limit switches on them that I have to check functionality on.
Is the arduino IDE enviroment suppose to display the output of the script on the display?
It doesn't with my Sanguino the only way I have been able to get it to work is disconnect the IDE from the comport and start a terminal emulator against the port.
Fred
Leav Wrote:
-------------------------------------------------------
> After some requests (ok just one ) I'm
> attaching some simple test codes here for straight
> uploading to the arduino.
>
> These are based off of the codes in the wiki pages
> for the electronics.
>
> Remember to tweak all the parameters for your
> system (e.g. the opto switch types and direction
> of the stepper motors) - I suggest just running it
> with a finger on the kill switch, that's how I
> tested out the direction and the opto switches.
>
> hOMING - brings back all the axes one by one to
> the home position using only the opto switches as
> feedback (no sanity checks)
> pRINToPTO - doesn't move any motors, only prints
> the status of the opto switches to the arduino IDE
> terminal.
> rECTANGULARsPIRAL - prints the above rectangular
> spiral from the current position (no homing).
> width height and margins are easily modifiable.
>
> enjoy.
>
> -Leav
Thanks! Just what I need to start checking my new repstrap, of which I only have the X & Y axis working at the moment.
The first one of your scripts I am going to use is pRINToPTO as I using used xy stages that hall effect limit switches on them that I have to check functionality on.
Is the arduino IDE enviroment suppose to display the output of the script on the display?
It doesn't with my Sanguino the only way I have been able to get it to work is disconnect the IDE from the comport and start a terminal emulator against the port.
Fred
Leav Wrote:
-------------------------------------------------------
> After some requests (ok just one
) I'm> attaching some simple test codes here for straight
> uploading to the arduino.
>
> These are based off of the codes in the wiki pages
> for the electronics.
>
> Remember to tweak all the parameters for your
> system (e.g. the opto switch types and direction
> of the stepper motors) - I suggest just running it
> with a finger on the kill switch, that's how I
> tested out the direction and the opto switches.
>
> hOMING - brings back all the axes one by one to
> the home position using only the opto switches as
> feedback (no sanity checks)
> pRINToPTO - doesn't move any motors, only prints
> the status of the opto switches to the arduino IDE
> terminal.
> rECTANGULARsPIRAL - prints the above rectangular
> spiral from the current position (no homing).
> width height and margins are easily modifiable.
>
> enjoy.
>
> -Leav
|
Re: Progress Update November 19, 2008 05:04AM |
Registered: 15 years ago Posts: 151 |
While the Arduino is connected to the pc, there is a button next to "send to I/O board" which reads something like "open terminal"
When pressed it restarts the Arduino and prints out whatever the arduino jabbers about on the serial line.
should be the same for the sanguino as far as I know....
-Leav
When pressed it restarts the Arduino and prints out whatever the arduino jabbers about on the serial line.
should be the same for the sanguino as far as I know....
-Leav
|
Re: Progress Update November 28, 2008 06:23AM |
Registered: 15 years ago Posts: 10 |
|
Re: Progress Update November 28, 2008 07:43AM |
Registered: 17 years ago Posts: 550 |
|
Re: Progress Update November 28, 2008 08:06AM |
Registered: 15 years ago Posts: 10 |
|
Re: Progress Update November 28, 2008 09:04AM |
Admin Registered: 16 years ago Posts: 13,886 |
|
Re: Progress Update November 30, 2008 09:27AM |
Registered: 15 years ago Posts: 10 |
|
Re: Progress Update November 30, 2008 10:35AM |
Registered: 17 years ago Posts: 550 |

|
Re: Progress Update November 30, 2008 10:35AM |
Admin Registered: 17 years ago Posts: 7,879 |
Yes if it takes less than 0.75A but a better way would be to use the PWM driver board which will drive more current and with less power losses.
The DC motor board is bidirectional so motors can be reversed, but that functionality is not required for a solenoid.
[www.hydraraptor.blogspot.com]
The DC motor board is bidirectional so motors can be reversed, but that functionality is not required for a solenoid.
[www.hydraraptor.blogspot.com]
Sorry, only registered users may post in this forum.