Design nearly done - construction started...
Posted by Maxx Mayhem
|
Re: Design nearly done - construction started... December 16, 2013 02:44PM |
Registered: 10 years ago Posts: 474 |
Maxx obviously you know you're going into an unknown realm here with that many extruders. I think your original idea where you going to get it working on one first is probably the best way to go. But obviously you're the one that's doing it if you want to try for nine extruders right off the bat go for it. One of the other problems with multiple extruders on raprap is obviously you have to keeping them up to an idling temperature not full temperature but a few degrees lower. The main drawback of keeping anything warm on the extruder is that it's going to want to leak a little out of the nozzle. And then when it's printing the nozzle not being used tends to drag this little bit of extrusion on the nozzle through the print. Plus it's going to have to be purged and cleaned professionals use a space off the bed with a little container for purged material and next to it a little brass wire brush that it runs over a little bit before it prints. I am just guessing but it sounds like you're thinking of a carousel. If this is the case you could mount the carousel. Pivot Point on an angle. And angle the extruder mount accordingly to the carousel. So the one that is called for printing would be vertical the ones not being used because of angle of pivot pin would be above print.
Edited 4 time(s). Last edit at 12/16/2013 03:00PM by cnc dick.
Edited 4 time(s). Last edit at 12/16/2013 03:00PM by cnc dick.
|
Re: Design nearly done - construction started... December 16, 2013 03:08PM |
Registered: 17 years ago Posts: 392 |
A carousel on an angled axis sounds interesting, but the mechanics might get complicated real fast!
Yvan
Singularity Machine
Yvan
Singularity Machine
|
Re: Design nearly done - construction started... December 16, 2013 03:22PM |
Registered: 10 years ago Posts: 474 |
Again I'm guessing but I think he's thinking of using a carousel with the pivot point anyway I'm just guessing all you have to do is mount this pivot point instead of right angle will say on a 20° angle and then the extruders mounted on the outside of the carousel would be mounted so that they were at a 20° negative angle so when the one called for at the center point would be vertical and because of the diameter in the position of the other extruders it would give you clearance. Or you could run the carousel vertical at a right angle and then just because of the radius the other nozzles would have clearance. In any case each extruder should have a manual mechanical adjustment very accurate for each extruder to match the nozzle heights
Edited 3 time(s). Last edit at 12/16/2013 04:04PM by cnc dick.
Edited 3 time(s). Last edit at 12/16/2013 04:04PM by cnc dick.
|
Re: Design nearly done - construction started... December 16, 2013 04:42PM |
Registered: 11 years ago Posts: 256 |
Am I really that transparent?? Yes that's precisely what I had in mind...(BTW, it's still ONLY 7 extruders, the other 2 mots are X & Y). Yes, think of a round cut diamond, hack off the bottom leaving a faceted rotor (flipped over of course) servo controlled with some sort of detent. This solves the problem of offset in the software.I still have to work out the geometry so that the whole thing doesn't start eating up build area. The accuracy needs to be built in. This would be easy if I had a sine table, but seeing as they cost more than my milling machine, I'll just have to use angle gauges to set up my rotary table. The mount will hold the J heads at the bottom flat on the insulator with a clamp that will allow for height adjustment, though the position XY must be dead on. The great thing about this forum is that it gives me an opportunity to learn about potential problems beforehand, and share my solutions. Only with the number of potential issues... the build turns quickly to space program.
|
Re: Design nearly done - construction started... December 16, 2013 05:31PM |
Registered: 10 years ago Posts: 474 |
Maxx you are not that transparent it's just that there's only a few ways to achieve what you want to do. And me being a mechanical type like you obviously I think of the problem and then tried to solve it. If two people think the same way attacking a problem usually come out close to the the same solution
|
Re: Design nearly done - construction started... December 16, 2013 09:15PM |
Registered: 17 years ago Posts: 392 |
I guess there are only three basic configurations for arranging several extruders. Either in line, in a circle or an arc.
I think the arc might have an advantage over the circle in one way. Less rotation would be needed to reach all 7 extruders. That would be less demanding on the wiring and filament feed path. The circular arrangement would look the coolest though.
Yvan
Singularity Machine
I think the arc might have an advantage over the circle in one way. Less rotation would be needed to reach all 7 extruders. That would be less demanding on the wiring and filament feed path. The circular arrangement would look the coolest though.
Yvan
Singularity Machine
|
Re: Design nearly done - construction started... December 16, 2013 09:24PM |
Registered: 11 years ago Posts: 256 |
I suppose great minds think alike! I like the circular idea, because that is the one with the least penalty of print area. Properly executed, a circular arrangement allows for full functionality without being any larger than a fixed system. In fact, it may even allow for greater area in (in my case) the Y axis, by over an inch. I will be wiring my hot ends with the smallest number of wires possible, with on board switching on the carriage. 
|
Re: Design nearly done - construction started... December 17, 2013 03:49PM |
Registered: 17 years ago Posts: 392 |
7 x 4 = 28 wires... yes a bit much. BTW are you thinking of switching to 24 v instead of 12 v for the heaters? 48 v and so on would be even easier to deal with amperage wise.
I never liked the 12 v thing, but when I showed up the core RepRap guys had just settled on 12 v, so my comments were too little too late to change anything!
BTW, I also never liked how a hot end's life depends on just one wimpy thermistor. I think there should be two per hot end, when they don't agree, Safety Shut Down Time. With seven extruders, the probability of failure has just gone up seven fold! Especially with J-Heads, they are not the most bullet proof nozzles around.
Yvan
Singularity Machine
|
Re: Design nearly done - construction started... December 17, 2013 04:37PM |
Registered: 10 years ago Posts: 474 |
Again I'm just guessing I think he's going to try to run all of the extruders on the same power for the idle Temperature. And then the one that's in the print position . Be electrically switched and would be the actual print temperature set in software. But I haven't figured out how he will do it
Edited 1 time(s). Last edit at 12/17/2013 04:49PM by cnc dick.
Edited 1 time(s). Last edit at 12/17/2013 04:49PM by cnc dick.
|
Re: Design nearly done - construction started... December 17, 2013 05:22PM |
Registered: 11 years ago Posts: 256 |
Me neither... Probably some kind of switching system, everything's based on having all of the extruders plugged into EXT0 and then run through some sort of multiplexor. But right now, I'm trying to design cold ends. They have to be very small and bullet - proof. If they work out, I may make them available...
Probably some kind of switching system, everything's based on having all of the extruders plugged into EXT0 and then run through some sort of multiplexor. But right now, I'm trying to design cold ends. They have to be very small and bullet - proof. If they work out, I may make them available...
|
Re: Design nearly done - construction started... December 20, 2013 10:17PM |
Registered: 11 years ago Posts: 256 |
Well, here's a couple of shots - the soldiers ready for battle! And the beginnings of my extruders, as well as spool holders, and bearing retainers. A quick estimate tells me I've got about 600 parts and fasteners so far, including parts ready to attach, with at least 150 more before I get done. Approximately 180 of these are hand made parts. More soon...
|
Re: Design nearly done - construction started... January 04, 2014 10:08AM |
Registered: 10 years ago Posts: 474 |
|
Re: Design nearly done - construction started... January 06, 2014 08:16PM |
Registered: 11 years ago Posts: 256 |
Today, I'm working thru the details on my extruder cold ends. It's been slow going the past several weeks, due to a combination of unrelated factors, but I do hope to get most of this assembly done by the end of the week. There is a lot of head scratching that goes with it; I know exactly how the parts go but I'm still working out how to make some of the components repeatable, thus the long delay. I had a pipe burst last week, so part of the shop was under water, but now it is dry and very, very clean. 3 days later I had a severe drain clog, also in the shop, only this time fins were not needed... Once I get done with this piece, it's all down to the carriage, and the remaining bits of the enclosure, which will then have me ready for testing.
|
Re: Design nearly done - construction started... January 13, 2014 07:48PM |
Registered: 10 years ago Posts: 474 |
|
Re: Design nearly done - construction started... January 14, 2014 04:32PM |
Registered: 11 years ago Posts: 256 |
Hey, CNCD, I'm almost done with the cold end shells, (likely 2 more days) I still have to make the internals, hopefully over the weekend. Then there are the hubs to put all together, and I can Finally start the carriage. It's been slow going, as I have been working in the field a lot... But I have got to get this thing done!!
|
Re: Design nearly done - construction started... January 20, 2014 03:29PM |
Registered: 11 years ago Posts: 256 |
Things have heated up for the cold ends! After what seems like an eternity, I have finally gotten to the point of finishing the cold end shells, and now am in the process of duplicating the prototype of the inner workings. I have a tap on order, but the rest is happening. I'll be closed for the next 2 days so I hope to wrap much of this assembly up in this time. I still have to make the hubs that tie the cold ends together, as well as the electronics bay, the gimbal setup, and the vent assembly. But these things should actually be a lot easier than the cold ends. Should being the operant expression.
|
Re: Design nearly done - construction started... January 26, 2014 07:55AM |
Registered: 10 years ago Posts: 474 |
|
Re: Design nearly done - construction started... January 26, 2014 01:57PM |
Registered: 11 years ago Posts: 256 |
I'm waiting for a tap and a die to finish the last couple of steps on the cold ends, and I'm working on the assembly hubs for them. I noticed yesterday that yet another (well known) company has taken to Kickstarter to elicit funds for a multi color printer which is "just around the corner". Where are they getting their ideas? Maybe it is simply a logical progression and if I am part of it, that's fine. But I personally do not feel it is appropriate to ask people to pay you to develop a product in Kickstarter. More like panhandling than a cooperative venture. I will likely bring a product to kickstarter at some point, but not until it is ready to go, proven. I know precisely how to do multi color, it just takes time to make the parts to prototype it. That's why I have trouble grasping that a company who has had success can't A fund the project on their own, and B, has yet to produce it. So, they will probably become the next Apple...
More pix next week.
On the subject, I just saw this; not just me... [www.nbcnews.com]
Edited 1 time(s). Last edit at 01/26/2014 02:02PM by Maxx Mayhem.
More pix next week.
On the subject, I just saw this; not just me... [www.nbcnews.com]
Edited 1 time(s). Last edit at 01/26/2014 02:02PM by Maxx Mayhem.
|
Re: Design nearly done - construction started... February 01, 2014 01:13PM |
Registered: 10 years ago Posts: 474 |
Hi Maxx I would not worry too much about those people I think everybody that is buying kits and assembled machines is getting pretty sick of unreliable junk that hasn't been tested enough and is built by somebody who really doesn't care. I think everybody thinks it's easy but there's a lot of testing to do to be able to release a reliable product keep us up to date Maxx
|
Re: Design nearly done - construction started... February 01, 2014 03:59PM |
Registered: 11 years ago Posts: 256 |
A funny thing happened to me the other day. Well, not so much funny as , well. So I'm making a pair of 8 sided hubs to hold my extruders, they are steel and rather chunky, and take about 8 hours each to make. So I am about 20 seconds from completing the final clean up pass on the second one when the chuck goes loose, the bit grabs the work and... trash bag gets about a pound and a half heavier. So I replaced the mangled piece the following day, but in the overnight, I evolved the cold end design to where it sits now, which I believe will be a bit more serviceable and reliable. The moral of this story is not to distrust the piece of crap 4 jaw harbor freight lathe chuck, rather that it it the hiccups in the construction process that often result in the refinements that make a better end project. Several people have inquired as to whether I have available or will be posting plans. The fact is that beyond my initial CorelDRAW sketch which I had posted almost 10 months ago, this process is taking place inside my head. I figure stuff out, I make a few measurements, and I start working. Perhaps more art than science, not a matter of doing it the easy way, but ideally the ultimate way. I invite everyone along on this journey not with the assumption that anybody else suffer the slings and arrows of trying to build this particular machine, rather to show you all the process that I use in creating a new manifestation of a filament printer, starting from whole cloth. There are of course some strong similarities to the printers we all know - Ramps, steppers, Jheads, linear rods and so on, but from there, I wanted to do some new things, and those new things require new approaches to certain systems within the printer. Also, as it has advanced, I think it is fair to say that I have gone beyond a desktop paradigm, to more of a commercial level machine, and the output goals have increased along with it. This is a long process and I have at times the patience of Mr Toomey from The Langoliers, and the attention span of a goldfish. To wit, I need an open ended design (to some degree) to make it through the process. It actually is somewhat rocket science, but somewhat more Lost in Space than NASA.
As a guitar player, I am quite comfortable going on stage and improvising live, something that frequently freaks out band members who just want to get through the song. But there is no point to songs you just get through, except for them to be over. At the end of the song nothing has really happened, perhaps people bought drinks. When I make things, furniture, machinery, or just about anything else, there is a process of discovery that should not conclude until the moment the product is put to its intended use. Then there was a point to the song. And for me, I can have the kind of closure that comes from not only being done, but having done the project right.
So it is my hope that as I continue to post my thoughts and images of this project, I can impart a sense to all of you of ownership of your individual projects. Your printer is yours - you should take the basic design of it and run with it. Make it your own. If you think you have a better way, don't hesitate to try it. And if you are inclined to build a printer from scratch, just think it through, make your design based on the realities of what you wish to accomplish, remember that the super low priced things that some people are trying to do will probably not be a good basis to estimate the costs of a one off project. Think about you geometry, what kind of objects you ultimately want to print. Go through this forum and the wiki until your head is just full of questions. You printer, if successful, will be the answer.
|
Re: Design nearly done - construction started... February 08, 2014 02:16AM |
Registered: 10 years ago Posts: 474 |
|
Re: Design nearly done - construction started... February 08, 2014 12:03PM |
Registered: 11 years ago Posts: 256 |
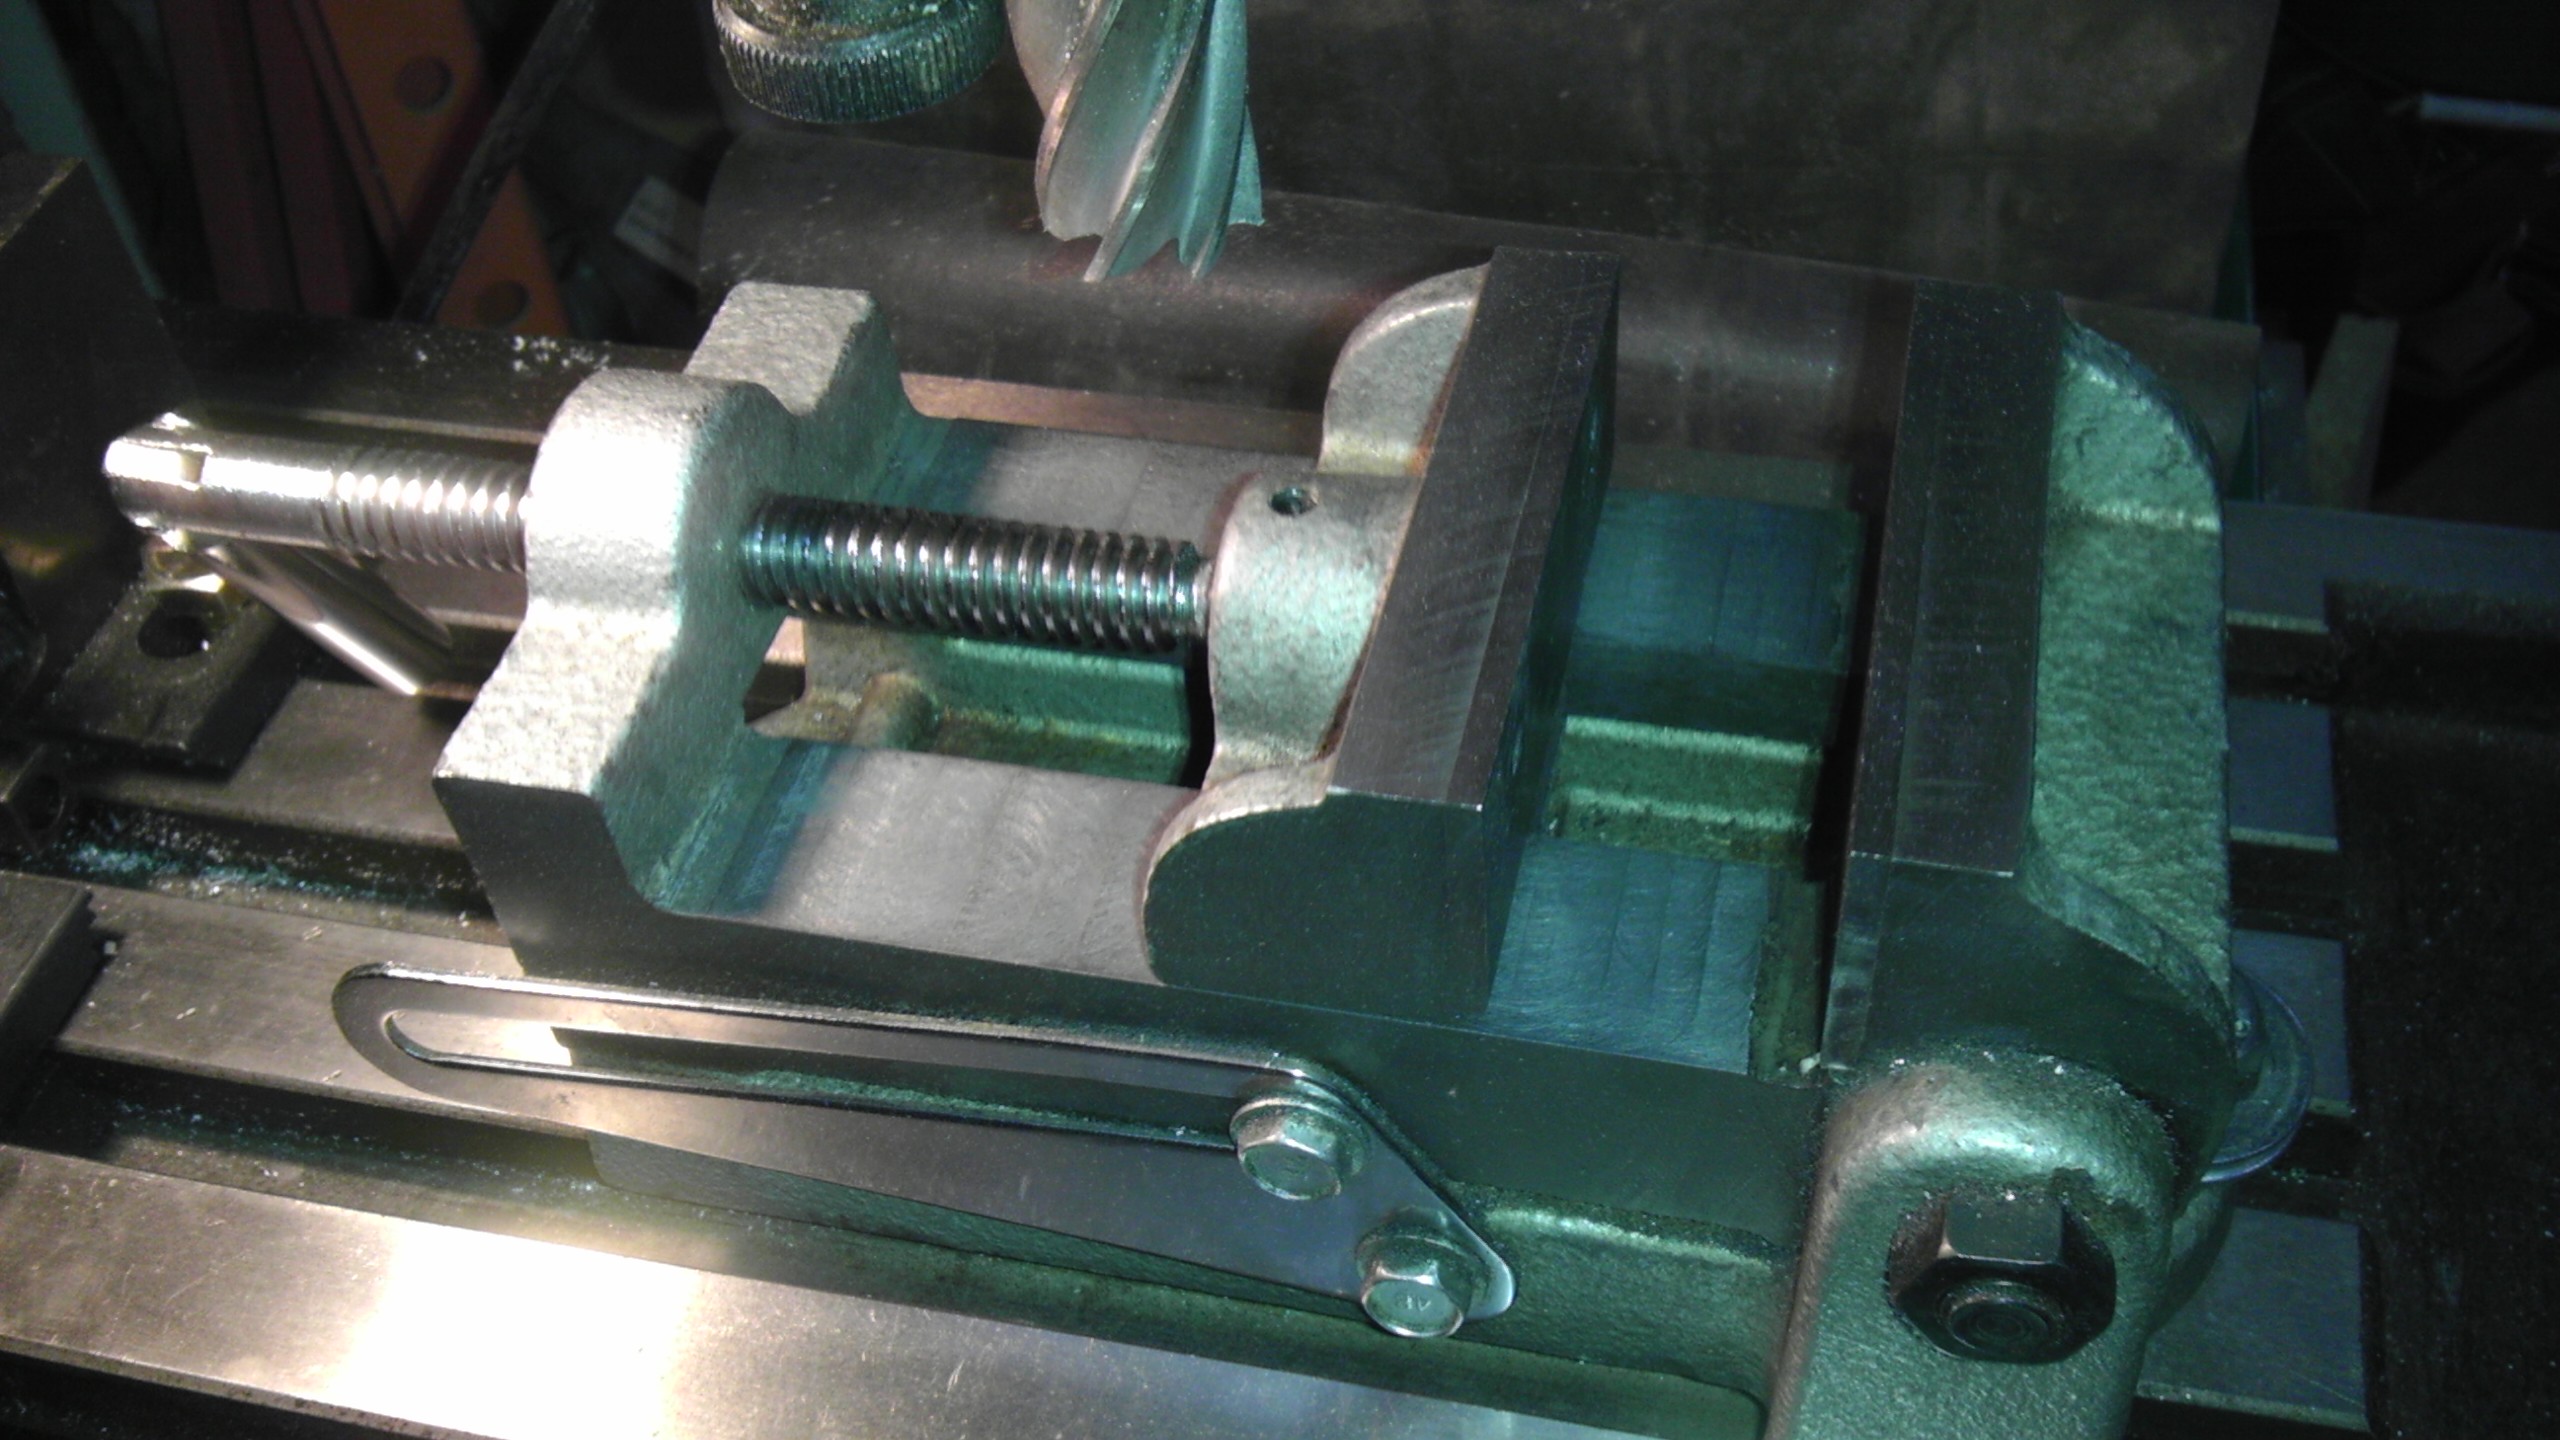
Closer... I am working on the extruder assy today. Life has been in head to head competition with progress. After struggling with my harbor freight angle vise, to make the blanks for the extruder angle blocks, and fiddling with shims and spacers to level everything up, I finally machined the surface to match it to the bed and cutter ( it was .010 out!) and snug the traveler. There was material protruding from under the stationary jaw as well. All in all I put a good 2 or 3 hours into dressing out this thing, as well as replacing the rotted rubber way cover on the mill itself. I still have some minor adjustments to make, as the front travel on the mill y axis is a bit snug.
Anyway, the extruders, save for any final adjustment are done, the hubs are started, the mounting blocks are just begun. I am redesigning the Y axis only slightly, as the 12 mm rods won't cut it and I don't want to fix stuff that should not need to be fixed in the first place, so I am experimenting with milling on hardened rod, with the objective of getting much fatter rods, turning down the ends to fit my adjustment system, and slotting in a belt to make a rack and pinion drive with out all the fiddly bits I was first planning.( wait... he's trying to make something simpler??) This will allow me to eliminate a point of variable rigidity. The 12 MM rods will go to the X axis. the 8s will go ehem...back into stock. The redesign on the travel will greatly simplify the primary carriage, while improving accuracy as well as simplifying adjustability. This is also more consistent with the basic design principle of still heavy, moving light. It would also resolve the problem of having a rack gear separate from the linear rod, which would have been a somewhat ugly proposition all the way around. There are certain things you want to keep ultimately simple, and there are some which are necessarily complicated. So I don't mind ending up with well over 200 parts in the extruder assembly, but I want the carriage to have as few parts as is possible. I may even do a R/P on the x axis which means a moving motor but no moving belts. (still up in the air on this one)
There are still a lot of parts to make up but as the parts count balloons, progress is being made, and the goal is getting closer.
|
Re: Design nearly done - construction started... February 09, 2014 07:42PM |
Registered: 11 years ago Posts: 205 |
You know to call that a milling vise is a travesty. It is at best a drill press vice. You really ought to get yourself a small CNC Kurt style vise. The Kurt vises pull the movable jaw down as they tighten, Yours goes up or down depending on the height of the part. Then you can use soft jaws, which are really great to work with. A quick pass with an end mill and they are the perfect height and true to the travels. When you need to hold something odd you just cut the vise jaws to fit. As they wear you take a few thousands off and you good to go. I almost never use hard jaws anymore. You can move the jaws to the ends of the vise too. In that position my 4" vises clamp about 10". Another little hint. Cut a small step on the bottom of each jaw. That keeps a chip from sitting there and messing up you location. It also means you can reface the jaw completely without removing it. I bought two 4" vises off Ebay for about $104 each. Relative to a Kurt they are junk, relative to yours they are one heck of an improvement!
|
Re: Design nearly done - construction started... February 09, 2014 09:45PM |
Registered: 11 years ago Posts: 256 |
Yes, a Kurt would be nice. So would a bridgeport. I do not however have a high enough ceiling in my shop for a bridgeport, shame, because I have seen some sold rather cheaply lately. The thing with the drill mill is that you can only remove so much material in a pass in the first place, so the vise I have is appropriate.My budget for metalworking equipment is not unlimited, either in funds or space, I make my living primarily in wood work. Fact is, I don't much care for the angle vises as they come from China, but there are a number of things that will improve them. The first thing I did to mine was to surface it, and to clearance the space under the jaws. Next, I shaved the bottom of the traveler to decrease the deflection that occurs from clamping. the bottom had been smoothed, and it is still not ideal, but is is less of a hindrance. A number of harbor freight tools are quite usable, if you take the time to tune / adjust / complete the manufacturing process on them. And when I bought most of my metal working stuff, everything Harbor freight was 50 cents on the dollar of what it costs today 5 years later. You do sound like you know what you are talking about, so I'm sure you know just how many tools you need to make a lathe and mill useful. So I had to choose between quality and variety.... Also, as I have pointed out in the past, I have little to no experience or education in machining, just what I have read online, or seen on tv. I have learned more about it through this project than my total prior knowledge, my accuracy and finish is improving. I have enough tools to make practically whatever I want, It just is not always as easy as I might like. I hope to build a tool that sets a standard, but I do so with the equipment at my disposal. I do happen to have in my collection some of my grandfather's tools, now about 70 years or more old. They served to make the machinery that powered our navy's ships in WWII. Some are fancy, some are rudimentary. We, as I seem to recall, won. All this said, I lately sometimes wish I had a machining center...
|
Re: Design nearly done - construction started... February 15, 2014 11:09AM |
Registered: 10 years ago Posts: 474 |
|
Re: Design nearly done - construction started... February 15, 2014 11:29AM |
Registered: 11 years ago Posts: 256 |
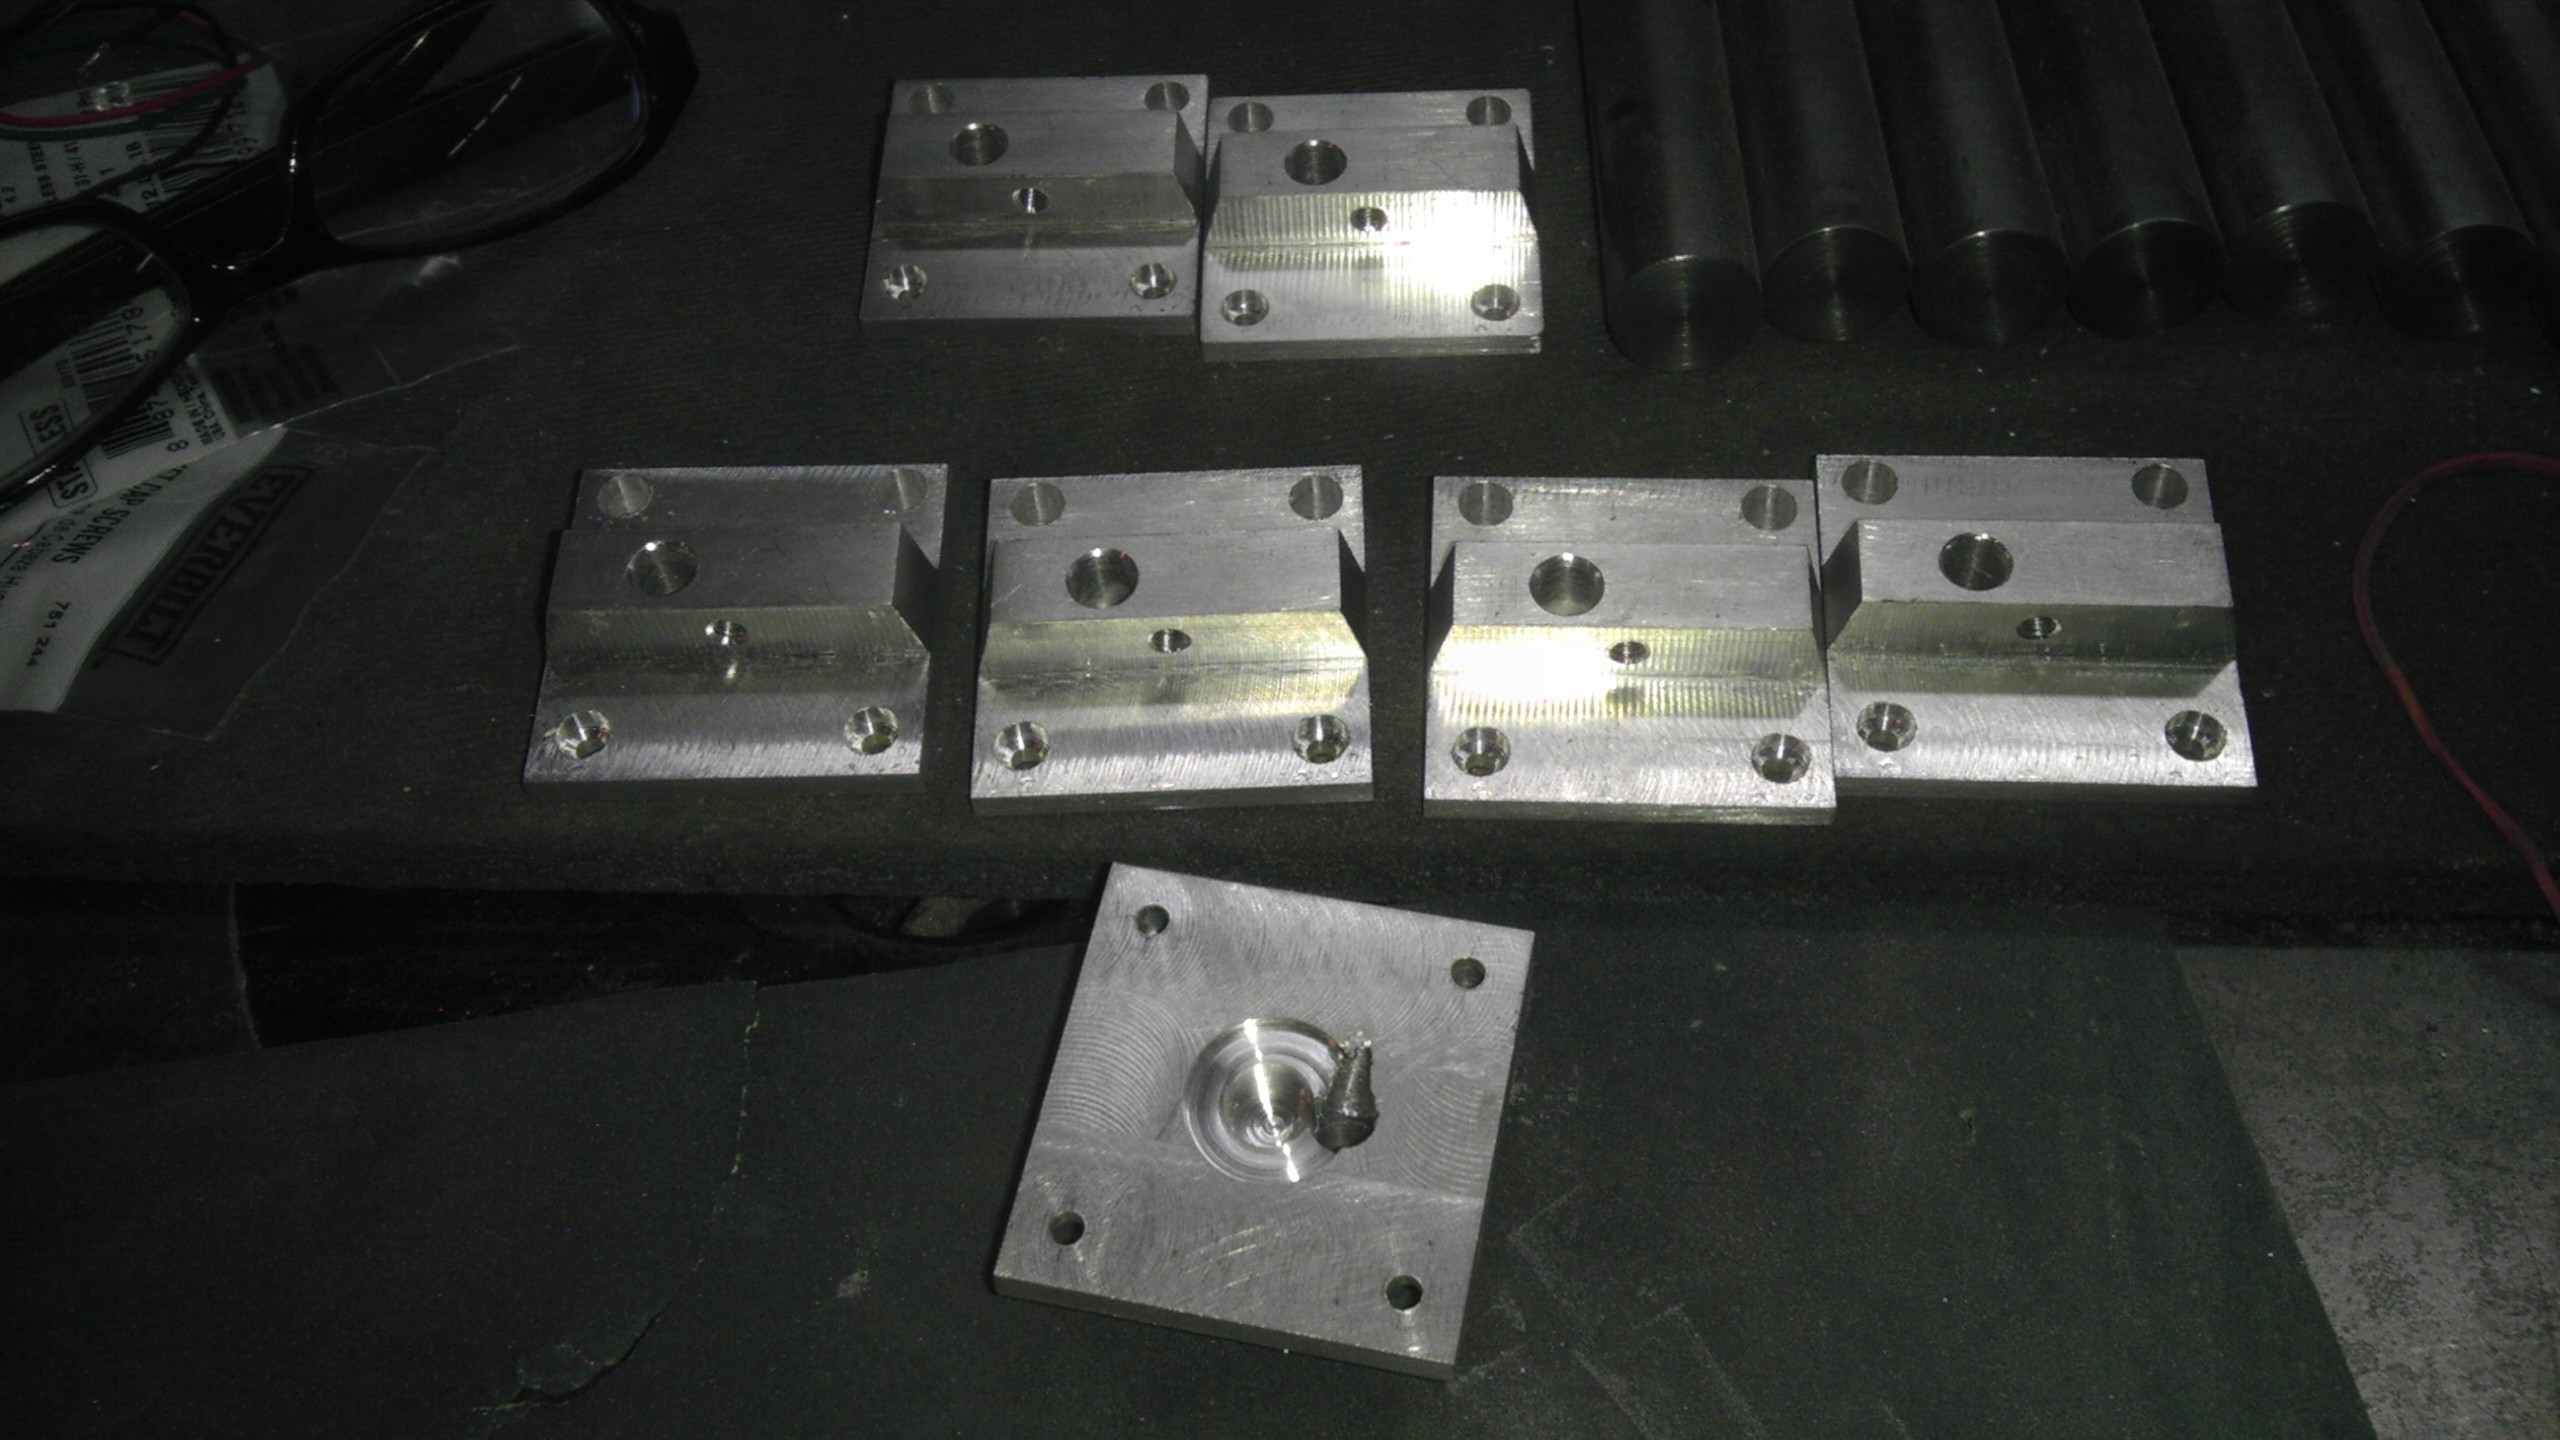
I just finished the hangers for the extruders, and am going to try and get the hub parts drilled and finished today. These pix were taken before I polished and finished them yesterday...I've been snowed in, so I have actually made good progress this week. The whole assembly should be done later in the week, as soon as I can get the bolts... I'm also getting ready to start testing to see if I will be able to groove a hardened rod, so I can refine my rack and pinion setup. Originally I had thought of having a rack run parallel to the rod, but one piece is better. I'm going to go from 12 mm to 25 mm on my long axis, the online calculator I used indicates about 90% less flex that way. When I started this project one thing I really wanted was a rack and pinion setup at least on the long axis, but if i can manage to do it on the short axis as well, even though I'll have a flying motor, there will be fewer moving parts and no belt issues to deal with. While this post might echo some of the info from the one last week, it should be noted that I have actually resorted to engineering to make this determination at this time, so...If all goes well today, I may even have more tonight.
|
Re: Design nearly done - construction started... February 15, 2014 03:38PM |
Registered: 11 years ago Posts: 205 |
Maxx,
I completely get what you are saying. I am lucky that I have an old clunker bridgeport, and a REALLY sweet 1954 10" SouthBend lathe in nearly new condition. They however are kept at my employers shop as I don't have room. However that was why I built the IFactory CNC mill, lathe, 3D printer.
You appear to be machining quite a few parts, which is why I brought up the vise issue. If you struggle to hold parts properly then that affects nearly everything you do, no matter what other fancy tooling you might have. The Kurt style vises are so versatile that you do a lot more parts in the vise too. I don't often move mine, frequently using it to hold a fixture plate instead of removing the vise and bolting it down. I also have a limited budget, and I made a nice set of hold down clamp bars and such instead of purchasing them.
|
Re: Design nearly done - construction started... February 15, 2014 06:59PM |
Registered: 11 years ago Posts: 256 |
That's cool, the main issue with me is that between the deep freeze and the urgency of finishing this machine, funds are limited, and when I say limited, I mean in the same respect as having dates with swimsuit models limited. I agree with you about holding power, this would be an even bigger issue if I had a heavier mill. The thing I like about the vise I have is the ability to do angles. Yes it is limited there too, but after surfacing it last week, it is more helpful. Anyhow, I do have another shot as promised, this time, the extruders, which barring any final tweaking, are nearly ready to mount on their hub...
I agree with you about holding power, this would be an even bigger issue if I had a heavier mill. The thing I like about the vise I have is the ability to do angles. Yes it is limited there too, but after surfacing it last week, it is more helpful. Anyhow, I do have another shot as promised, this time, the extruders, which barring any final tweaking, are nearly ready to mount on their hub...
|
Re: Design nearly done - construction started... February 18, 2014 06:44PM |
Registered: 11 years ago Posts: 256 |
I have finished making the hub for the extruders today, all that remains for them is powder coating and assembly, then I can hang the extruders. These were made from mild steel, one of the few items other than the frame not made from aluminum. Once the extruder assembly is done, I will be working on the electronics, along with the housing for same, as I wait for the new linear rods to get here.
These were made from mild steel, one of the few items other than the frame not made from aluminum. Once the extruder assembly is done, I will be working on the electronics, along with the housing for same, as I wait for the new linear rods to get here.
|
Re: Design nearly done - construction started... February 19, 2014 04:45PM |
Registered: 10 years ago Posts: 474 |
Maxx looks good a little bit off-topic but I was looking at some different 3-D printer electronics starting about a week ago and I found a company called pibot it looks pretty good seems to be good quality they have a package with drivers that will take up to 4 1/2 Amp of course they are out of stock and Chinese-based so the Chinese new year has shut them down and they can't get the Toshiba chips. Plus they're pretty new so I can't get anybody that seems to have worked with them before they have a forum but it's very small because they are new but they have a couple of pictures of prints that look good


Sorry, only registered users may post in this forum.