I3 Omega from Diytechshop
Posted by cfy7
|
Re: I3 Omega from Diytechshop March 12, 2014 05:01AM |
Registered: 10 years ago Posts: 231 |
|
Re: I3 Omega from Diytechshop March 12, 2014 09:31AM |
Registered: 10 years ago Posts: 99 |
They do not. I had started trying to rig something up to rig my 40mm fan off the ramps to try and cool the hotend when my hot end died completely and i gave up. I was going to use an 80mm on the ramps since it is much quiter.
Too high of temp kills these hotends I believe, but the parts also just weren't milled right as well. Yours should be from their new stocks so I'd think you're fine.
I read somewhere that the inventor of the j head thinks his should be run with a fan.
If I planned on running their hot end I'd try and run it with a fan, especially if I was was printing abs. At least to give it a try to see if it does anything differently.
Edited 1 time(s). Last edit at 03/12/2014 09:33AM by cfy7.
|
Re: I3 Omega from Diytechshop March 12, 2014 09:42AM |
Registered: 10 years ago Posts: 231 |
Looks like the E3D hotend I ordered will be here before the printer, so I may be able to skip the little brass altogether. However, I'm not sure the E3D will fit into the mounting piece provided with the printer and I may need to use the little brass just to get some pieces printed.
Bruce
Bruce
|
Re: I3 Omega from Diytechshop March 12, 2014 10:52AM |
Registered: 10 years ago Posts: 99 |
I forgot to say, Diytechshop assured me their hotends are fixed, so it shouldn't be a problem. They seemed pretty confident of this and there haven't been any reports of the new ones failing on here.
I hope to have my E3D today. If it comes I'll post some pics of it attached.
I used standard bits to clean up my parts. I don't have any metric as well.
I hope to have my E3D today. If it comes I'll post some pics of it attached.
I used standard bits to clean up my parts. I don't have any metric as well.
|
Re: I3 Omega from Diytechshop March 12, 2014 12:35PM |
Admin Registered: 15 years ago Posts: 1,470 |
Yes, for printing with PLA. Not necessary for ABS. This is just to keep the thermal break (PEEK) cool enough so that the PLA doesn't become rubbery too far up and cause too much friction to be pushed through.Quote
cfy7
I read somewhere that the inventor of the j head thinks his should be run with a fan.
I build my machines primarily with metric hardware, but also use standard (fractional inch) bits to clean up printed parts. Since drilling out holes is usually just to clear bolt threads, this works just fine. A slightly over-sized hole doesn't hurt anything, and in fact usually helps with assembly. Note that I haven't built one of DIYTechShop's machines though.Quote
cfy7
I used standard bits to clean up my parts. I don't have any metric as well.
Edited 1 time(s). Last edit at 03/12/2014 12:37PM by NewPerfection.
|
Help improve the RepRap wiki!
Just click "Edit" in the top-right corner of the page and start typing. Anyone can edit the wiki! |
|
Re: I3 Omega from Diytechshop March 12, 2014 01:50PM |
Registered: 10 years ago Posts: 99 |
Newperfection, Thanks for clearing that up.
All,
I've had some downtime since I haven't had a working hotend since the Little Brass Hotend died. It's covered in a blob of plastic and frankly I don't feel like touching it since I got so frustrated with it leaking. I've wasted enough time with it. They're sending a new one, and I have the E3D coming. I think the E3D got delayed today because we're in the middle of a snow storm here in Upstate, NY.
I put my heated bed together yesterday. I started by taking the top aluminum plate and flipped it over. I covered the whole side with 4 inch Kapton tape. Then I wiggled 10 feet of 19 AWG NiChrome wire back and forth across it in a pattern. I used some thin kapton to hold everything in place while I did this. After that I soldered up the thermistor and mounted it to the center of the plate. Next I soldered some Teflon insulated wire to the heater wires. Then I slowly covered it all with some more 4 inch Kapton tape, making sure to keep all the NiChrome wire firmly pushed against the aluminum top plate. I've ordered some exhaust insulation wrap that I plan on sandwiching between the top and bottom plate to help direct the heat upwards.
My thoughts on putting the heater under the aluminum is that it heats up the aluminum and helps dissipate it evenly to the glass. Right now it is doing that and the temperature is very even. I still have to tweak Marlin to get it to it's full potential.

|
Re: I3 Omega from Diytechshop March 12, 2014 03:20PM |
Registered: 10 years ago Posts: 231 |
I got the automated message from fedex saying they will deliver my printer tomorrow and they need a signature. I wrote DIYTS as I haven't been able to download anything yet, but I don't expect to hear from them. I might try calling them this afternoon. The E3D hotend should be here today as well. I'm excited to get to the unboxing.
Bruce
Bruce
|
Re: I3 Omega from Diytechshop March 12, 2014 03:30PM |
Registered: 10 years ago Posts: 231 |
Quote
cfy7
I forgot to say, Diytechshop assured me their hotends are fixed, so it shouldn't be a problem. They seemed pretty confident of this and there haven't been any reports of the new ones failing on here.
I hope to have my E3D today. If it comes I'll post some pics of it attached.
I used standard bits to clean up my parts. I don't have any metric as well.
Yes, let us know how it fits into your hotend mount and if you need to print a custom one. Hopefully it will just attach up nicely to what we have.
Bruce
|
Re: I3 Omega from Diytechshop March 13, 2014 01:36AM |
Registered: 10 years ago Posts: 231 |
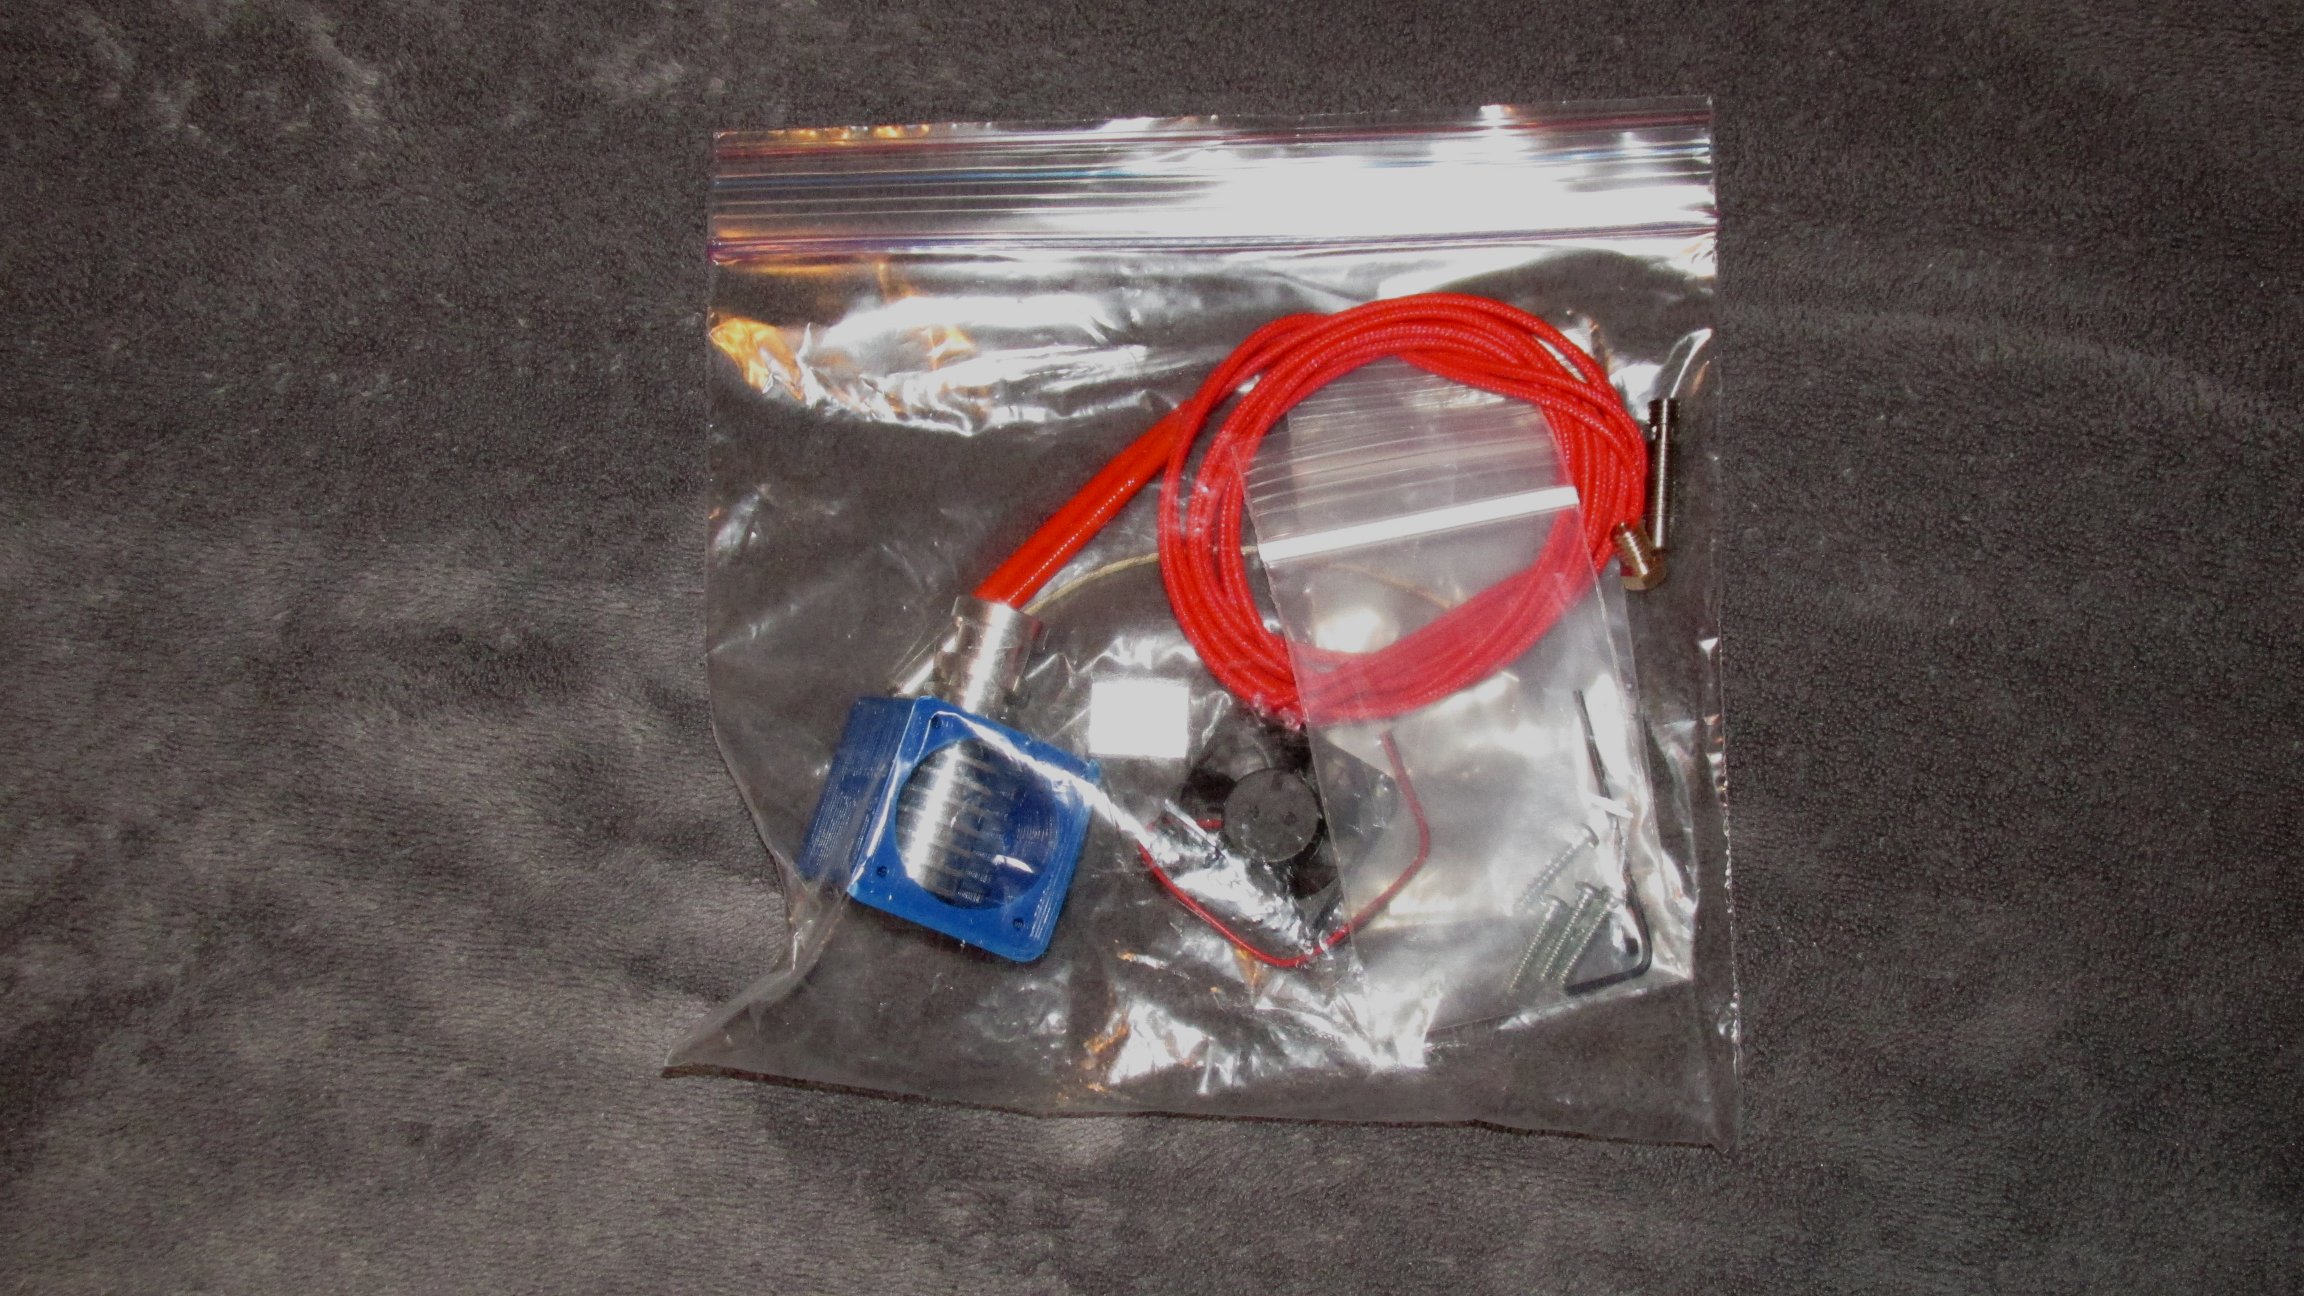
I got my e3d today. There were no instructions included, but they do have nice PDF instructions on their website. Here's some photos. All the parts fit nicely in a single plastic sandwich bag which is how it was shipped 
Bruce
Edited 1 time(s). Last edit at 03/13/2014 01:37AM by brucehvn.
Bruce
Edited 1 time(s). Last edit at 03/13/2014 01:37AM by brucehvn.
|
Re: I3 Omega from Diytechshop March 13, 2014 03:22PM |
Registered: 10 years ago Posts: 99 |
Got my E3d today and only had about an hour to play with it. Yesterday I managed to print out a mounting plate from thingiverse to fit the e3d. Today I took an extruder body and drilled out a hole in the bottom big enough for the top of the e3d to recess into. It mounted up pretty well.
The thing is awesome! I was barely able to print at 10mm/s with my old failing hotend. I put the e3d at 50 mm/s and 220c and it printed so smoothly. I couldn't believe it. I can't wait to try going faster with it just to see if it can.
I still haven't received my replacement hotend from diytechshop so I can't say if the new ones are any better, but as it stands I'm not a fan of the old one.
|
Re: I3 Omega from Diytechshop March 13, 2014 03:37PM |
Registered: 10 years ago Posts: 231 |
Quote
cfy7
Got my E3d today and only had about an hour to play with it. Yesterday I managed to print out a mounting plate from thingiverse to fit the e3d. Today I took an extruder body and drilled out a hole in the bottom big enough for the top of the e3d to recess into. It mounted up pretty well.
The thing is awesome! I was barely able to print at 10mm/s with my old failing hotend. I put the e3d at 50 mm/s and 220c and it printed so smoothly. I couldn't believe it. I can't wait to try going faster with it just to see if it can.
I still haven't received my replacement hotend from diytechshop so I can't say if the new ones are any better, but as it stands I'm not a fan of the old one.
So, I won't be able to mount the e3d without the custom mounting plate? That means I have to install the little brass first and get it printing. My printer should be at the fedex store waiting for me to pick it up. I assembled the e3d last night. The only thing I don't like about it is mounting the thermistor with kapton tape. Looks very unprofessional and the rest of it looks so nice. Oh well.
Bruce
|
Re: I3 Omega from Diytechshop March 14, 2014 02:54AM |
Registered: 10 years ago Posts: 6 |
It's been like 3 weeks since my I3A arrived and I have not been able to get it to move and finally I read this thread and I have to Jumper the pins under the stepper drivers? Holy crap, that's a huge step I missed. Do you have pictures of how that would look? I work during 100% of their support hours, so I haven't been able to get anything resembling help on this thing.
|
Re: I3 Omega from Diytechshop March 14, 2014 03:38AM |
Registered: 10 years ago Posts: 231 |
Well, I didn't receive my printer today. Yesterday, I put into fedex to have them deliver it to one of their 24 hour stores about 1/2 mile from here because I knew I would be out for part of the day and wouldn't be able to sign for it. For whatever reason, even though it would have been delivered to my house today, they couldn't seem to get it to their own store, so it will be Fri before I can pick it up.
I finally got my first email from DIYTS. I had queried about the build instructions for the alpha. They sent me 3 TIF images they said were the beginning of the instructions and the rest would be coming soon.
Bruce
I finally got my first email from DIYTS. I had queried about the build instructions for the alpha. They sent me 3 TIF images they said were the beginning of the instructions and the rest would be coming soon.
Bruce
|
Re: I3 Omega from Diytechshop March 14, 2014 10:14AM |
Registered: 10 years ago Posts: 99 |
Quote
mrpaulie
It's been like 3 weeks since my I3A arrived and I have not been able to get it to move and finally I read this thread and I have to Jumper the pins under the stepper drivers? Holy crap, that's a huge step I missed. Do you have pictures of how that would look? I work during 100% of their support hours, so I haven't been able to get anything resembling help on this thing.
Just fill in the pins under the stepsticks. Three jumpers under each.
Ramps
Kinda like how it is in that auction, they have colors so it's easier to see.
Without them, at least with mine it kinda just sat there making noise. Whoops!
|
Re: I3 Omega from Diytechshop March 14, 2014 10:46AM |
Registered: 10 years ago Posts: 99 |
It looks like in the config file I had I was using the wrong thermistor information. Even the file I was able to download on diytechshops page had the wrong one in it.
The one used on the little brass hotend is part number B57560G104F. It's an epocs 100k, so in the firmware it should be a 1, not a 5 like I had and I've seen in several others being used in diytechshops machines.
I'll post an updated config sometime in the next few days to this thread.
The E3D though should be a 5, since it has a different thermistor.
Speaking of E3D, this thing is amazing. It is printing so much faster then my old hotend. At the moment it seems to like doing the perimeters a little slower, but it can fly on the infill. I'm very impressed. The design just makes sense on this thing. I'm printing with pla and it's working just fine.
|
Re: I3 Omega from Diytechshop March 14, 2014 03:30PM |
Registered: 10 years ago Posts: 231 |
Quote
cfy7
Speaking of E3D, this thing is amazing. It is printing so much faster then my old hotend. At the moment it seems to like doing the perimeters a little slower, but it can fly on the infill. I'm very impressed. The design just makes sense on this thing. I'm printing with pla and it's working just fine.
I'm jealous you are already printing with it
My printer is at the local fedex office ready for pickup. I only have ABS so we'll see how it does with that, but I probably won't have the printer up and running for a few days. We have company coming and staying with us. I'll try and do the unboxing and check to see if everything is there.Bruce
|
Re: I3 Omega from Diytechshop March 14, 2014 05:09PM |
Registered: 10 years ago Posts: 99 |


It's printing pretty well with this new hotend. Banding is decent with the z axis, not too much shifting around. I'm very happy right now.
I printed out some of the parts for a new extruder, one from thingiverse that is made for the E3D. I ordered the metal parts for it and am waiting on them.
Next I want to print a holder for the smart controller, a new mount for the ramps/cooling fan and some better end stop mounts.. Their double sided tape mount for the ramps could use some improvement. The fan is blocked by the smart controller wires.
Right now I'm pretty happy with this machine.
Edit: I've been using the 80 mm fan you see in the owl pic. The layers are forming much nicer with it.
Edited 1 time(s). Last edit at 03/14/2014 05:11PM by cfy7.
|
Re: I3 Omega from Diytechshop March 15, 2014 03:48PM |
Registered: 10 years ago Posts: 99 |
The first attached file is my most recent config file setup for using an E3D with it. I bumped up the max temps, and selected the proper thermistor. I would not run this config with the little brass hotend. It could melt the PEEK.
The second file is for their little brass hotend. It has the proper thermistor selected.
Both files have a 190 x 190 print area to ensure nothing gets damaged. Expand it once you get your machine calibrated.
Edited 1 time(s). Last edit at 03/15/2014 08:45PM by cfy7.
The second file is for their little brass hotend. It has the proper thermistor selected.
Both files have a 190 x 190 print area to ensure nothing gets damaged. Expand it once you get your machine calibrated.
Edited 1 time(s). Last edit at 03/15/2014 08:45PM by cfy7.
|
Re: I3 Omega from Diytechshop March 17, 2014 07:26PM |
Registered: 10 years ago Posts: 231 |
Ok, so just an update on my i3a. I picked up the kit from Fedex on Fri. After reviewing what I could without a complete BOM, I found that I had no wing nuts for attaching the bed and no plastic parts whatsoever. I sent email to DIYTS last night.
Today, the plastic parts (black) arrived today via separate package. They also responded to my email and sent out what they say are the beginnings of the build instructions and will send the final copy soon. The instructions are good enough for me to perhaps get the frame built. Regarding the wing nuts, in the instructions they sent, the illustration shows wing nuts, but the parts list for that illustration doesn't list any. However, the parts list says it should use 21 m3 nuts for this step. The illustration shows 17 m3 nuts plus 4 wing nuts. So my guess is they are replacing the wing nuts with regular nuts but the illustration doesn't match. A little confusing.
So, I have a couple questions regarding how you wired up your stuff. First of all, we have 2 z-axis motors that need to have their wiring combined at some point as we only have one stepper driver for the z-axis. How did you guys handle this as DIYTS only sends us 4 motor wires. In my kit, the 4 motor wires are all the same length and obviously they don't need to be. Some motors are closer to the electronics than others. So did you just trim those motor wires to what you need, then use the leftovers to form 2 sets of wires for the z-axis motors. One might be long to reach across the printer to the electronics side, the other can be shorter since it sits right under the electronics. Splice them together in the solderless connectors, then have one wire set to the driver?
Another question. What powers the Arduino Mega? Does it get it's power from the Ramps board shield?
I see the issue cfy7 ran into with the heat sinks on the stepper drivers. They sent me the big ones also (11x11x5mm) with 5 fins. They really should be 9x9x5 with 4 fins. I'm thinking of either trying to cut off one fin on each, or mount them sideways. They sell the smaller heat sinks on ebay for cheap, but I don't want to wait at least 2 weeks for them to arrive from Hong Kong or China.
Anyway, I'm going to start building this thing tonight now that I have the plastic parts. I plan to try and video my entire journey and have a youtube series to document the entire build process so hopefully it can help others.
Bruce
|
Re: I3 Omega from Diytechshop March 17, 2014 08:39PM |
Registered: 10 years ago Posts: 99 |
Should be 5 sets of motor wires. I shaved the plastic connectors on mine so that they could both fit on the ramps board for the z axis. Personally I didn't trim mine since I wanted to keep em long incase I ever take it apart and use the motors on a different machine.
I've seen they're using different motor wires and different connectors for their printers, so you could have a different setup. Mine came with the motors, and 5 sets of wires with a connector that fit the motor. They were all long enough to make it to the ramps with plenty of room to spare. The kit also came with 5 wire sets to go from the motor wires to thre ramps that were all at precut lengths. They had no use in my kit so I didn't use them. Also came with crimp on connectors for them that I didn't need. The last parts they came with were the pins and connectors to go to the ramps. I crimped and soldered them all.
The way the diytechshop ramps board is setup, is that it has the proper diode in place to power the mega.
It's a shame they're not including wing nuts. I think it's much nicer with wing nuts. There are better ways to save money on kits.
You could just throw some tape on the heat sinks. They actually sent me new heat sinks with the new drivers they sent me that they had already taped. I had hoped they started doing this to prevent future problems. Guess not. I bought some spare drivers on ebay that came with the perfect size heat sinks for under 20 bucks. They were in the US and took a couple days to arrive. It's good to have extra drivers since they get fried all too easily. I especially think they should have some tape on those heat sinks because they have a replacement policy in place that they'll replace those parts, even if it's your fault. (So it ends up costing them money, not you. Great policy by the way, and one of the main reasons I picked them to buy my machine from.)
Alright, have fun and I look forward to seeing some videos.
|
Re: I3 Omega from Diytechshop March 17, 2014 09:42PM |
Registered: 10 years ago Posts: 231 |
Quote
cfy7
Should be 5 sets of motor wires. I shaved the plastic connectors on mine so that they could both fit on the ramps board for the z axis. Personally I didn't trim mine since I wanted to keep em long incase I ever take it apart and use the motors on a different machine.
I've seen they're using different motor wires and different connectors for their printers, so you could have a different setup. Mine came with the motors, and 5 sets of wires with a connector that fit the motor. They were all long enough to make it to the ramps with plenty of room to spare. The kit also came with 5 wire sets to go from the motor wires to thre ramps that were all at precut lengths. They had no use in my kit so I didn't use them. Also came with crimp on connectors for them that I didn't need. The last parts they came with were the pins and connectors to go to the ramps. I crimped and soldered them all.
Yes, you are correct, there are 5 sets of motor wires. The one for the extruder is different than the rest (see photos). It is more like you describe where it has the connector for the motor and then 4 wires 28" long. However, for the axis motors, they gave me the wires that have the 6 pin connector for the motors with 6 short wires coming out (maybe 6 inches). Then they gave me separate 28" 4 wire leads with connectors for the ramps board on both sides. Obviously, I need to cut off one of the connectors and either cut the wires down to size and crimp connect them to the motor wires or leave them long as you did. I had to use a blog post I found to figure out which 4 of the six wires I needed. I'm going to have to use one of the ramps connectors I cut off for the extruder since they didn't provide me with the connector. All in all, I think I can make it work, but what a difference from kit to kit. I'm beginning to think I prefer soldering the wires instead of using the crimp joints. I guess I should decide soon which way to go
Quote
cfy7
It's a shame they're not including wing nuts. I think it's much nicer with wing nuts. There are better ways to save money on kits.
I agree. However, I plan to incorporate the self leveling feature of the Marlin firmware soon after I get it running. I have the servo motor and I just need to print the parts to hold it.
Quote
cfy7
You could just throw some tape on the heat sinks. They actually sent me new heat sinks with the new drivers they sent me that they had already taped. I had hoped they started doing this to prevent future problems. Guess not. I bought some spare drivers on ebay that came with the perfect size heat sinks for under 20 bucks. They were in the US and took a couple days to arrive. It's good to have extra drivers since they get fried all too easily. I especially think they should have some tape on those heat sinks because they have a replacement policy in place that they'll replace those parts, even if it's your fault. (So it ends up costing them money, not you. Great policy by the way, and one of the main reasons I picked them to buy my machine from.)
Are you talking about using kapton tape to tape down the heatsinks? I have the thermal tape they provided to stick them on the drivers, but we need additional tape to hold them in place in case they slip from the thermal tape, right? Can you take a photo of the taped ones they gave you?
[quote=cfy7]
Alright, have fun and I look forward to seeing some videos.
[/quote]
Me too
I'm anxious to get started but have to finish some of my day job work first, lol.Bruce
|
Re: I3 Omega from Diytechshop March 17, 2014 09:54PM |
Registered: 10 years ago Posts: 99 |
Nothing fancy with the tape. Just use the double sided to stick em on the drivers, but throw some kapton on the edges of the heat sinks so that if they do slip they'll be insulated and can't short out.
Your motor wires are way different than mine, my motors only have 4 wires coming out in their wire bundles.
Your motor wires are way different than mine, my motors only have 4 wires coming out in their wire bundles.
|
Re: I3 Omega from Diytechshop March 17, 2014 10:07PM |
Registered: 10 years ago Posts: 231 |
Quote
cfy7
Nothing fancy with the tape. Just use the double sided to stick em on the drivers, but throw some kapton on the edges of the heat sinks so that if they do slip they'll be insulated and can't short out.
Your motor wires are way different than mine, my motors only have 4 wires coming out in their wire bundles.
Yeah, I used this blog post which explains how to measure the resistance between the wires and figure out which wires to use. Maybe this can be helpful to others who get the same setup for their motor wires.
Bruce
|
Re: I3 Omega from Diytechshop March 18, 2014 03:56AM |
Registered: 10 years ago Posts: 55 |
Quote
brucehvn
I'm beginning to think I prefer soldering the wires instead of using the crimp joints. I guess I should decide soon which way to go
Forgett about the crimping, just solder it... That will make your live a lot easier cause otherwise you would have another point of failure.
On top of that I would suggest to get an relieable endstop mount at least for the Z - axis to avoid head crashes. Had the problem 3 times in the beginning because the endstops with zip ties always move.
|
Re: I3 Omega from Diytechshop March 18, 2014 12:32PM |
Registered: 10 years ago Posts: 99 |

Printed this off for my wife as a late v day present. Printed it really fast with the E3D hotend. It's the heart from thingiverse.
Almost no clean up on it, all the holes were great. It really came out great. The z layers are almost perfect.
Only problem is that the small extruder gear self destructed while printing. It was a blue one from Diytechshop. Their black plastics are so much better. The blue stuff I got doesn't have very good adhesion between layers. I put on a black one and I'm good to go.
This machine is working great though, and the print quality is amazing. For under 500 bucks I got a great machine.
|
Re: I3 Omega from Diytechshop March 18, 2014 09:56PM |
Registered: 10 years ago Posts: 231 |
Well, I got black pieces and so far, so good. Got through the initial couple pages of the build instructions last night. Basically the Z-Axis mounts, Z motors, the electronics mounting, and the support rods.
Couple things, so far.
1) The Z-Axis mounts did not take into account a raised circular ring on the motor body around the motor shaft, so I had to do a little filing on them to make them fit properly.
2) Mounting the Arduino board to the acrylic holder, I could only get two of the holes to line up instead of 3. The third hole is a little too close to the edge for me to try and drill out some more, but it seems stable enough with just the two bolts mounting it.
3) Can't figure out which 2 bolts to use for the electronics fan. It says they should be #6-32 1 3/8" long, but I only have two sets of bolts where there are only 2 and neither of them fits through the holes in the acrylic piece. Did you guys have to drill those holes out a little bit? I guess I'll put the rest together and see which 2 bolts I have left over.
4) The threaded rod lengths don't seem to match what's in the instructions. They say the support rods should be 350mm, but I don't have anything that's that size. The Y-Axis rods it says should be 325mm, but I don't have anything that matches that either. So, I hope I'm using the right ones. I remember lordofhyphens had a similar issue. I'll look back at his post.
Anyway, having fun so far. Next is the Y-axis stuff.
BTW: cfy7, nice print. I'm excited to get this thing running and get the e3d on it.
Bruce
Edited 1 time(s). Last edit at 03/18/2014 09:58PM by brucehvn.
|
Re: I3 Omega from Diytechshop March 18, 2014 10:25PM |
Registered: 10 years ago Posts: 99 |
2.) I drilled a complete set of new holes. The ramps board was blocked by the smart controller though so I ended up ditching the mount completely. I also had it fall off a couple of times when the double sided tape gave out. I printed out a new mount for the arduino/ramps for an 80mm fan. It's much quieter as well. I mounted it by drilling 2 holes. I also printed off holders for the screen but the cables aren't long enough so I ordered some new ones that I'm waiting on.
3.) I used the shortest screws for mine. I can't remember if I had to drill it out.
4.) My support rods are 370ish. I've heard different lengths from others though. Your y axis threaded rods should be the same length as your y axis smooth rods, I'm sure you know that though.
3.) I used the shortest screws for mine. I can't remember if I had to drill it out.
4.) My support rods are 370ish. I've heard different lengths from others though. Your y axis threaded rods should be the same length as your y axis smooth rods, I'm sure you know that though.
|
Re: I3 Omega from Diytechshop March 18, 2014 10:41PM |
Registered: 10 years ago Posts: 231 |
|
Re: I3 Omega from Diytechshop March 19, 2014 09:20PM |
Registered: 10 years ago Posts: 231 |
Ok, I haven't seen anyone mentioned this before...
My Ramps board has a diode taped to the bottom of it. Am I supposed to solder that in somewhere, or is it extra, or what? I've attached photos of both the top and bottom of the board. On the bottom the diode is not connected to anything, just taped there. Weird.
Bruce
Edited 1 time(s). Last edit at 03/19/2014 09:20PM by brucehvn.
|
Re: I3 Omega from Diytechshop March 19, 2014 09:27PM |
Registered: 10 years ago Posts: 99 |
That's the ramps board they sent you? Weird. I got one that looked just like that, same jumper colors and everything off of ebay cheap. The 2 ramps that diy has sent me were red with the diode installed.
That's what one of mine looks like from diytechshop. That loose diode when installed will power your arduino.
[reprap.org]
Edited 1 time(s). Last edit at 03/19/2014 09:29PM by cfy7.

That's what one of mine looks like from diytechshop. That loose diode when installed will power your arduino.
[reprap.org]
Edited 1 time(s). Last edit at 03/19/2014 09:29PM by cfy7.


Sorry, only registered users may post in this forum.