Isaac Mendel build
Posted by jkelso
|
Re: Isaac Mendel build September 10, 2010 04:44PM |
Registered: 13 years ago Posts: 418 |

|
Re: Isaac Mendel build September 10, 2010 06:25PM |
Registered: 13 years ago Posts: 418 |
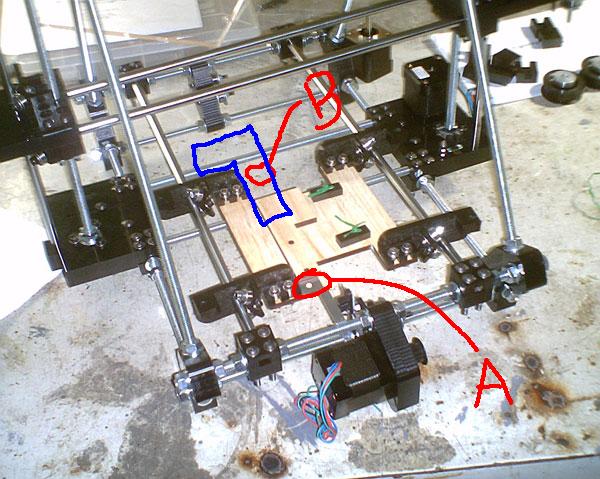
Going back now to mount the opto switches, a step I skipped over. I realized that in order to get inside the hole underneath the Z motor bracket I needed a smaller socket wrench, my ratchet socket wouldn't fit in there and my normal socket wrench set didn't go down that small. Lucky for me there is a Napa auto parts 2 blocks away so I snapped one up from the bargain bin for 3 bucks. When attaching the opto to the Y-idler block, I mounted it with the pins facing away from the motor, the documentation doesn't specify which way so I'm hoping this will work.

|
Re: Isaac Mendel build September 10, 2010 07:03PM |
Registered: 13 years ago Posts: 418 |
It turned out my bargain wrenches didn't go up to the 5.5 mm size I was needing for these bolts. Quick trip back up there, napa didn't have the size so I went next door and got it at autozone.

|
Re: Isaac Mendel build September 10, 2010 08:07PM |
Registered: 13 years ago Posts: 418 |
I assembled all the Z bearing guides using regular nuts, nylok nuts didn't seem to fit here so I put a little loctite on the ends of the screws here. Tightening these I used a 7mm socket wrench for the first nut and small needle nose pliers to tighten the 2nd one.

|
Re: Isaac Mendel build September 10, 2010 11:16PM |
Registered: 13 years ago Posts: 78 |
|
Re: Isaac Mendel build September 11, 2010 12:19AM |
Registered: 13 years ago Posts: 418 |
I'm working on that part right now. Phase 6 step 1. Everything is going according to plan. I've loosely assembled the X-motor clamp and Z-elevator clamps in preparation to insert the smooth X bars. I checked the bottom nut to make sure I'm still getting 25-26mm length from nut to end of rod.


|
Re: Isaac Mendel build September 11, 2010 10:29AM |
Registered: 13 years ago Posts: 418 |
|
Re: Isaac Mendel build September 11, 2010 11:16AM |
Registered: 13 years ago Posts: 418 |
I mean, every one it's like 3 minutes of a close up on his face and him telling very general things about some technology. Then the creative edit where he's a few feet back and then back up right in the camera. After a while it's like, gross, and at the end there's about 45 seconds of kind of showing someone the basics of doing something then it's all a wrap and another video with the same formula on a completely new subject. That type of "in your face" internet style works for certain comedy channels on youtube, but when somebody is trying to learn something and all they see is some guy with salt and pepper bushy sideburns preening it wears thin.
|
Re: Isaac Mendel build September 11, 2010 03:16PM |
Registered: 13 years ago Posts: 418 |

|
Re: Isaac Mendel build September 11, 2010 06:01PM |
Admin Registered: 17 years ago Posts: 1,791 |
jkelso, I see what your are saying, and Bre and Zach are not my favorite people in the world, but I think it is more fun to build up RepRap's house* than to try to tear down MakerBot and Thingiverse.
-Sebastien, RepRap.org library gnome.
Remember, you're all RepRap developers (once you've joined the super-secret developer mailing list), and the wiki, RepRap.org, [reprap.org] is for everyone and everything!
-Sebastien, RepRap.org library gnome.
Remember, you're all RepRap developers (once you've joined the super-secret developer mailing list), and the wiki, RepRap.org, [reprap.org] is for everyone and everything!
|
Re: Isaac Mendel build September 11, 2010 06:08PM |
Registered: 13 years ago Posts: 418 |
I actually love thingiverse and have nothing bad to say about makerbot except that they offer electronics items for sale which they apparently have no interest in actually keeping in stock. I'm not all into the political ramifications of saying things about people, I simply noted that I think the videos are annoying because he wasted a bunch of my time looking at them on youtube.
|
Re: Isaac Mendel build September 11, 2010 06:11PM |
Registered: 13 years ago Posts: 418 |

|
Re: Isaac Mendel build September 11, 2010 07:36PM |
Registered: 13 years ago Posts: 418 |
One last thing about makerbot. There was a point in time at which you could only get a $1000 price range 3D printer from one source, makerbot. Then, a bunch of people bought them. I'm sure they work great and everything, I'm not trying to disgrace people that own cupcakes. But, I think that now we are at a time where other options have made the cupcake obsolete in this new market. Nobody wants that small of a build size for a 3D printer, it's too limiting. I think if makerbot wants to stay competitive they need to come out with a new model or become a legit parts vendor. To me, it seems makerbot does not want others to get those complete electronics kits because people aren't building their precious kit. In business, you need to keep moving or you're dead. Stop standing in the way bre pettis.
|
Re: Isaac Mendel build September 11, 2010 10:06PM |
Admin Registered: 17 years ago Posts: 1,791 |
Camiel's stuff is coming online soon, and Casainho's doing up stuff in 6 months, and so on. And I know we've got some entrepeneurs in the wings.
And, the arduino-mega pololu stuff is super easy to source. Not to say that there isn't anything wrong with the gen 3 tech zone remix.
And then there is http://reprap.org/wiki/4_Axis_TB6560_CNC_Stepper_Motor_Driver_Board_Controller which is closed source, but bogdan thinks is super keen.
The fun part is keeping track of all this.
-Sebastien, RepRap.org library gnome.
Remember, you're all RepRap developers (once you've joined the super-secret developer mailing list), and the wiki, RepRap.org, [reprap.org] is for everyone and everything!
|
Re: Isaac Mendel build September 11, 2010 11:18PM |
Registered: 13 years ago Posts: 418 |
Being a newbie at all this, I think it's a good thing for someone to build their own kit from scratch. This is something you are going to need to be familiar with mechanically and once it's put together you will be qualified to adjust it and work on it if you need to. This Isaac kit has been a pretty smooth build overall. When I decided to go for this over the premade botmill kit I did it because it has advantages in design, being so new. I'm kit number 38, which feels pretty unique, and there's only one person so far showing off their Isaac build on youtube. I bought the kit knowing that the documentation is incomplete. Something told me not to worry. Right now I've begun the last two phases which are "coming soon" on the flemingcnc site documentation. I started out doing what looked familiar, adding in bearings to the shapes which I already figured out hold bearings. Soon, I discovered that these parts mount the plexiglas build platform. I installed one of the opto switch end stops I got today onto one of the parts. Even without the last documentation, it becomes pretty clear what needs to be done from here.

|
Re: Isaac Mendel build September 12, 2010 11:47AM |
Registered: 13 years ago Posts: 418 |
I notice today that two of the pieces that I bolted underneath the platform cracked down the side when I tightened them. This plastic normally has a lot of flex and will bend when tightened against. I heard a crack and thought I cracked the plexi. I looked around the part and didn't notice it then. The part still has structural rigidity and I don't think it needs replaced for now. At this point I suppose I could print a new one later. I suppose I could reverse engineer the part in Inventor. Are these part files available? Anyway, the platform slides pretty nicely and I remounted the opto end stop to the bottom of the part so that it slides right into the opto switch.

|
Re: Isaac Mendel build September 12, 2010 12:46PM |
Registered: 13 years ago Posts: 418 |
For some time now I have been looking at the remaining parts, trying to fit them together and decipher how they work. There was a moment there where I thought to myself "is this a joke?". Then I went back to the flemingcnc site and watched the youtube video on the front page which shows the X-carraige in motion. I figured out from there that the bearings attach to the "x carriage bearing supports" with some 16mm M3 bolts and a nut that fits sideways into a slot cut into the part. I feel like a test subject.

|
Re: Isaac Mendel build September 12, 2010 01:14PM |
Registered: 13 years ago Posts: 418 |
Now I notice that there are 4 bed springs which obviously go between the plexiglas and the bearing guide. I suppose if I had "done my homework" and poured through the vast reprap forum archives I would have known this. A small delay. Had I known something about putting this together I wouldn't have cracked the plastic also. Why am I doing all the dirty work of documentation and they are the ones making the profit?

|
Re: Isaac Mendel build September 12, 2010 02:21PM |
Registered: 13 years ago Posts: 418 |
After going on youtube I found a channel tbfleming that reveals the construction of the bed and the wood part that goes underneath. Finally, I realized what I was missing here. I also went to the reprap site and searched "bed springs" which led me to a mendel bed construction diagram that was different than mine but there were some helpful hints on there. Odd that I'm scavengering around the internet looking for clues to this. It's almost as if these things are designed by engineers who aren't interested in money or the commercialization of these machines to the general public. These are for "tested geniuses" only, apparently. I think if somebody wanted to really make these kits easily available and USER FRIENDLY TO BUILD that they could take away a lot of business from the people already in business here.
|
Re: Isaac Mendel build September 12, 2010 02:21PM |
Registered: 14 years ago Posts: 53 |
The bed should float at least 0.5" above the y-chassis-bearings and provided adjustment of the be to the nozzle of the extruder. Most of all of that work is the exact same as the Mendel alignment procedures in the Mendel wiki and would strongly suggest you read through because most of it still applies.
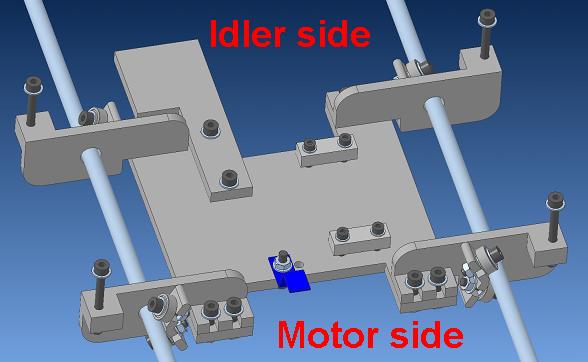
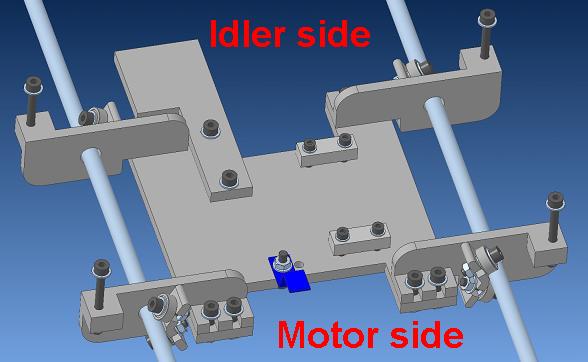
Also your at the x-carriage build stage so you should have a look at the pictures here:
[objects.reprap.org]
We don't have words to them yet, but it's fairly straight forward.
---
Isaac: a CNCed Mendel Derived RepStrap
FlemingCNC
Also your at the x-carriage build stage so you should have a look at the pictures here:
[objects.reprap.org]
We don't have words to them yet, but it's fairly straight forward.
---
Isaac: a CNCed Mendel Derived RepStrap
FlemingCNC
|
Re: Isaac Mendel build September 12, 2010 03:12PM |
Registered: 14 years ago Posts: 53 |
Your criticisms are founded, no argument there. We were hoping that more people would of shared their build experiences by now, but they just haven't. I get tons of emails thanking me for the kit and how well it's printing, but few pictures or videos.
Not a single kit out there is user friendly IMHO, the whole concept of a 3D printer is still in it's infancy. Makerbot's takes dozens of hours to build, we own one we know. The laser Mendel breaks parts left and right and has no documentation. Out of everyone I've met who asked me what I do for a hobby, when I reply with "I build and play with 3D printers" they just look at me with blank stares. No one know what these machines are, and what they can be used for.
Almost everyone on these forums are literally on the bleeding edge, including you. Go read some of Spacexula's (spelling?) posts; most people give up after completing the assembly (all kits). The assembly is by far the easy part, it's the 2-3 weeks of tweaking the extruder and software that people quit at. You will break nozzles because the temp is too cold; you'll melt parts because the temp is to hot.
Don't give up, it truly is worth it, and Todd and I will help as much as possible, just keep your spirits up
---
Isaac: a CNCed Mendel Derived RepStrap
FlemingCNC
|
Re: Isaac Mendel build September 12, 2010 03:29PM |
Registered: 13 years ago Posts: 418 |
Don't worry I'm more excited about this than anything I've done for a long time. There are those moments where I'm wondering why I'm lost and frustrated, but now that I see the link you just gave me much of that worry just went away. I agree, 99.9 percent of people out there don't even know what a 3D printer is. I think this is much like building the Altair back in the day, either you knew about it and you knew what you were doing or you didn't. Thanks for the extra documentation I am getting very excited to finish this and I don't want to mess it up. There were a few minutes there where I could imagine some engineers giggling as they counted the money

|
Re: Isaac Mendel build September 12, 2010 04:12PM |
Registered: 14 years ago Posts: 73 |


|
Re: Isaac Mendel build September 12, 2010 04:44PM |
Registered: 13 years ago Posts: 29 |
|
Re: Isaac Mendel build September 12, 2010 06:14PM |
Registered: 13 years ago Posts: 418 |
That was my next question. what to do with that extra part. Any help is greatly appreciated. I spent about a half hour loosening up the Y-chassis bar clamps and readjusting the assembly to get it as square as possible. Now it's gliding smoothly again and I'm getting ready to install some more parts. ><
<
|
Re: Isaac Mendel build September 12, 2010 07:28PM |
Registered: 13 years ago Posts: 418 |
I think I may have it right this time. This feels like that Jodie Foster movie where they get those instructions from space to build this incredibly complex machine. I'm hoping this movie has a better ending.

|
Re: Isaac Mendel build September 12, 2010 07:44PM |
Registered: 14 years ago Posts: 73 |

|
Re: Isaac Mendel build September 12, 2010 09:41PM |
Registered: 13 years ago Posts: 418 |
They wasted 30 billion so she could see a projection of her dead father for 10 minutes? Biggest waste of money of all time I'm starting to configure the electronics now, I think that the main board on top will be reprinted later to an upgraded mount I saw on thingiverse. I'm putting together the cables but it doesn't really spell out exactly how I need to hook it up. If the red cable comes from the bottom on the USB connection, which side should it hook up to on the top?
Edited 1 time(s). Last edit at 09/12/2010 10:49PM by jkelso.

Edited 1 time(s). Last edit at 09/12/2010 10:49PM by jkelso.
|
Re: Isaac Mendel build September 12, 2010 10:08PM |
Registered: 13 years ago Posts: 418 |
First time I get to use my new multimeter, checking that the 6 pin connector I made actually works. Turned out there were 2 connections not reading so I pushed the wires in harder and now it works.

|
Re: Isaac Mendel build September 12, 2010 11:11PM |
Registered: 13 years ago Posts: 418 |
I figured out that there are "keyed" ends to these connections. I can see that there is a small white dot on one end circuit board next to the connection. On the motherboard the white dot is drilled out. I can see that on the other side there is no white dot so I'm left to guess that the white dot was there but it was drilled out for the hole. These are the little details that engineers or techies might pick up on, but the average consumer buying these kits will probably have a lot of trouble figuring out. Why say "keyed" when it is so much easier for the reader to just say "white dot"? Or "look for the white dots next to the connection"? Or "the white dot on the mother board had been drilled through"? These little "secrets" can get very time consuming to decipher.


Sorry, only registered users may post in this forum.