Home
>
Reprappers
>
Topic
Technique for Printing ABS on Glass HB Glue Stick Juice
Posted by to-the-nth
|
Technique for Printing ABS on Glass HB Glue Stick Juice February 01, 2016 03:07AM |
Registered: 9 years ago Posts: 53 |
The topic of this thread is to share the results of the last three months of my experimentation for printing ABS on glass and to get feedback from the community to improve the technique. I'd really like some help exploring this technique, without getting into discussions of alternate plastics and print surfaces.
I'm getting some stellar results, large prints, no upturned edges or warping, no splitting. Prints stay stuck to the bed, but be careful what you wish for...
Printer is a highly modified Robo3D (still uses the Kick Starter power cord), linear bed rails, aluminum base plate, 320W 24V custom heated bed, E3D V5, sealed acrylic enclosure, re-circulating activated carbon filter, multi-point temperature monitors. Not all that special, but some of the features are relevant for below.
Summary of the technique:
-Clean glass thoroughly with Windex Orignal (or favorite glass cleaner?)
-Put a thin serpentine bead of Elmers Extra Strength glue stick across the entire bed. I'll post some pictures later, but the idea to just apply the lightest force to have a trace bead of glue stick on the bed
-Add some water to the bed, and then with a latex glove, using your finger with a bit of pressure, swirl the water to completely dissolve the glue bead that was just applied. There shouldn't be any big puddles. The slurry should be a touch milky. You should not be able to feel any bead remaining through the glove. It is unclear if this is a cleaning action that somehow helps the glue bond to the glass. The idea is this will create a very thin, almost completely clear film on the glass when dry. If it is too thick, adhesion will suffer. As part of the follow on, need devise a way to premix the glue stick and water in a controlled fashion and then just apply to the bed. I use pieces of white ABS filament for Juice.
-Heat the bed to a high temp, and let it cook for at least 15 minutes. This step seems to be important, like baking a cake. I don't have a handle on min temps or duration. I run a bed temp of 110C for this. If the temperature comes up too fast or the glue slurry was too thick, you may see white streaks containing trapped bubbles. Not desirable, but not the end of the world. You can always re-wet and rework the area if it is really bad.
-Next apply an acetone/abs juice mix. Error on the side of a thinner mix with more acetone. It would be good to come up with some standard recipes, but the acetone tends to evaporate out of the bulk mix over time. The result should be an almost crystal clear coating. Seems like it fills most of any remaining glue stick streaks. I use a poly sandwich bag to spread the ABS Juice. Put your hand in it or grab from the back.
-Bring bed up to temp in prep for printing. If there is any bubbling or foaming of the ABS Juice, it was put on too thick.
-Print first layer 105-110C; 80-95C for remaining layers, Turn Cooling fans on FULL starting on the 2nd or 3rd layer and the rest of the print. ABS temp is 250C. Filament is eSun (Amazon) or ToybuilderLabs ABS. Most times after fully cooled, the parts just pop off the bed.
-(edit) First layer heights of 0.2 or 0.3mm seem to work. Use the first layer overfill feature of Cura (~20%), or dial the actual Z height down to something less than the slicer's first layer height. Also using a 4mm brim. The first layer attach and brim become even important on subsequent prints as the glue layer wears out. Even up to 80-90% infills seem fine.
Scary Part and Warnings
-Don't try to pry the parts off the bed like I used to do with Kapton once the bed drops to 60C. Let it cool down close to ambient. If you force the part off, parts of the glass bed may go with it (see below).
-Reasonably large prints can remain fully attached, even once the bed has cooled to ambient. The plastic is stretched across the glass. I have been successful using a single edge razor blade to separate the part from the glass. Technically, it is actually separating at the ABS Juice/glue film interface. I have also used a cake icing spatula with razor blades to release parts. Can also try putting the bed in a freezer if it is detachable. Not sure what will happen, but there are huge forces at play between the plastic and glass as they cool.
-If is is really stuck, one fall back is to wedge in a razor blade and add some water around the part. Since the ABS Juice layer stays attached to the part, the soluble glue stick layer is exposed. The water just needs some time to do its thing.
Next 5-10 Prints
-It is a bit more work, having to apply two coatings to the glass for prep. But the good news is that the ABS separates from the bed, leaving most the glue film intact. All that is required is couples drops of ABS juice on the used spot, sometimes a squirt of acetone (I use a 5ml syringe with a 4" needle), a quick swirl with the poly bag, and you are ready for the next print.
- I reuse the same bag over and over. Eventually it builds up a crusty layer of ABS, so all that is required is a bit of acetone on the bed and a quick swirl. Usually you have about 10 seconds before the acetone evaporates and things start to stick.
- Acetone is bad stuff, but it is actually produced in trace amounts in the human body. To minimize my exposure to high concentrations, I leave the carbon filter fan running. Just happens if forms a vortex that sucks vapors back into the chamber. There in a bunch of data on line about acceptable exposure limits and blood concentrations, but that is all off topic. Bottom line this technique is no worse that using normal ABS Juice for reprints.
-Everybody knows that ABS Juice doesn't stick directly to glass. It flakes off in a film, and prints don't stick. That's pretty much what happens here after the underlying layer of glue stick gets worn away. I'd say I get a minimum of 5 re-applications of ABS Juice in the same spot before the glue film starts to weaken. I did over a week of heavy printing before it was time to recharge the glue layer.
-So when you can't find any bed spots that are not overused, it is time to re-coat the bed. Easiest way is to wet the bed and then use a razor blade to scrape off the glue and ABS Juice film. Takes about 10 minutes.
-Warning: do not print directly on glue stick, see below
Enclosure
I view a printer enclosure an absolute must for printing ABS both to prevent warping and to contain vapors.
-The enclosure right now is using bed self heating. Ambient print temperature is around 42C. This is warm enough to make ABS layer splitting a thing of the past. Plan was to add a Arduino based secondary heat controller to be able to run around 50-55C.
-The Arduino Nano was hacked from many projects and libraries on line. It has a full graphics 2.6" color display, and logs 10 DS18b20 sensors. Right now, some are sensing ambient, internal ambient as well as stepper core temperature. I was seeing X axis core temperature rise over 16C. After adding yet another fan, the rise is about 4C over internal ambient.
-The eSun ABS is fairly low odor compared to others I have worked with, but even so, since I print indoors, I think there are significant health risks of breathing micro vaporized particles of ABS. The Amazon fish tank activated charcoal filter removes all traces of odors. I change the charcoal every 6 months.
History
I began experimenting with eSun/ToybuilderLabs ABS and observed remarkable adhesion with certain colors on microscopic film layers of glue stick (no ABS Juice). The less pigmented colors like gold, red and purple stuck fairly well, while others like white showed almost no affinity. Higher bed temps up to 115C seems to increase adhesion. Buffing the hot glue stick layer while hot with a paper towel also seemed to increase adhesion.
I was printing the thingiverse digital sundial in gold on just a glue film. Ended up tearing out a 5" jagged shard of glass off of the face of the bed. The bed did not crack. Even with the part removed, the glass was firmly embedded/attached to the bottom of the sundial. I ended up hammering it off, and removed the remainder by soaking in water over night.
Exact replacements for the original Robo3D heated bed were no longer available which is where the new custom design came from. Kind of cool. I'll start a separate thread for it. So enter new bed using Ultibot 250x320 boro glass, and thinking the 5" jagged chip in the Robo bed was a fluke of an old bed, I scaled back on the size of the parts but continued to use glue stick w/o ABS Juice. This time it took out smaller chip near the corner. Bed is still usable. So lesson learned. The take away is to make sure that is ABS Juice covering the bed and that there is no exposed glue stick surface.
Edited 1 time(s). Last edit at 02/01/2016 10:10AM by to-the-nth.
|
Re: Technique for Printing ABS on Glass HB Glue Stick Juice February 02, 2016 01:36AM |
Registered: 9 years ago Posts: 53 |
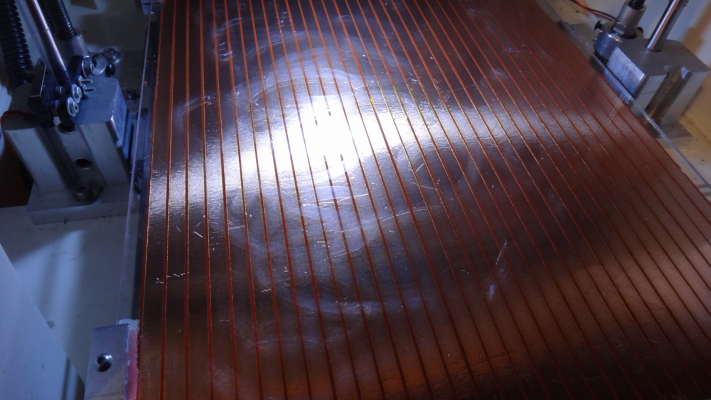
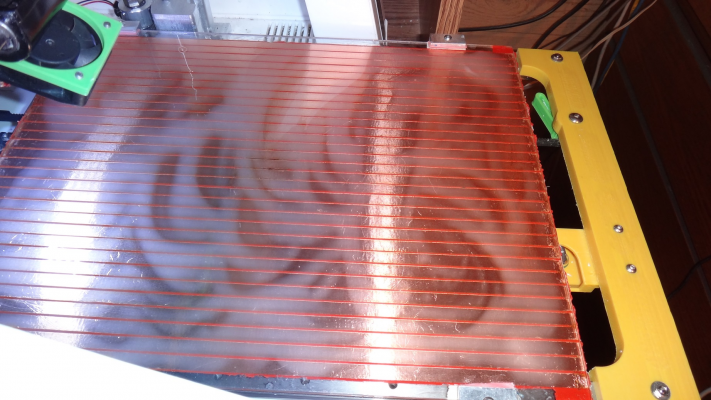
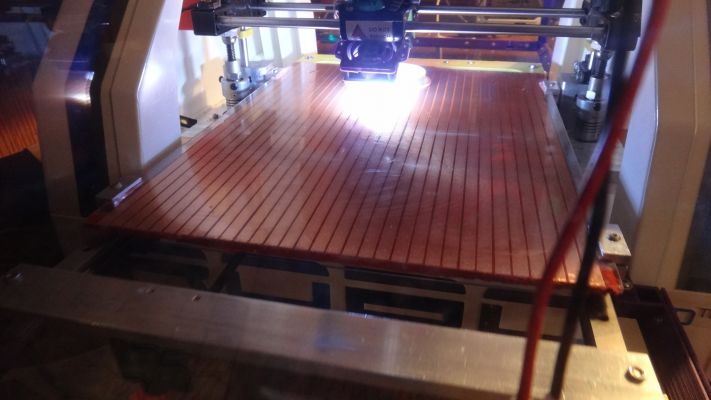
Hard to photograph the steps.
Pic after applying glue stick.
Pic after adding water and swirling. Milkier than I remember it being.
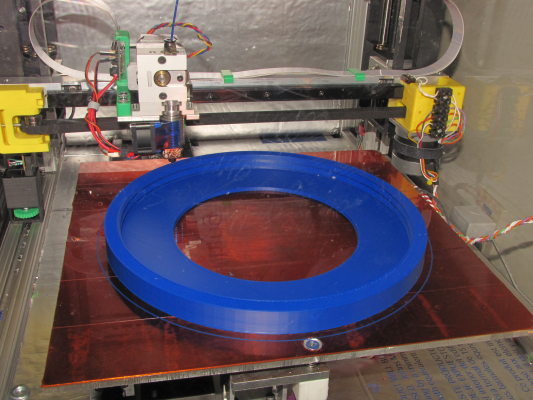
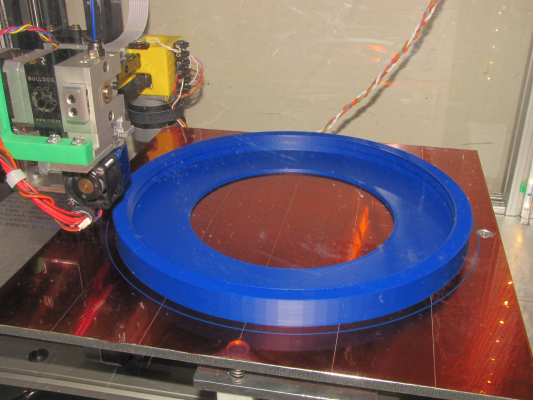
Finally pic shot thru acrylic sheet chamber wall of print in progress. Bed has over half a dozen prints on it and has been recoated in spots with Juice to cover exposed glue.
Pic after applying glue stick.
Pic after adding water and swirling. Milkier than I remember it being.
Finally pic shot thru acrylic sheet chamber wall of print in progress. Bed has over half a dozen prints on it and has been recoated in spots with Juice to cover exposed glue.
|
Re: Technique for Printing ABS on Glass HB Glue Stick Juice February 02, 2016 02:31PM |
Registered: 9 years ago Posts: 1,873 |
That sounds like a lot of work. I seem to get reasonable results with just glue stick on glass using abs at 260C. I don't have an enclosure and have experienced some delamination on taller parts, although since slowing down the print speed a little I've not had a problem. I don't do anything to refresh the surface between prints unless there's an obvious area that's been pulled away with the previous print. As you say, abs generally releases easily once the glass cools down to ambient. I run the bed at 100C throughout the print. Once in a blue moon I wash the glass off and start over. I've never had an abs print release from the glass prematurely.
|
Re: Technique for Printing ABS on Glass HB Glue Stick Juice February 02, 2016 04:50PM |
Registered: 10 years ago Posts: 770 |
|
Re: Technique for Printing ABS on Glass HB Glue Stick Juice February 05, 2016 12:06AM |
Registered: 9 years ago Posts: 53 |
Floyd - Curious how do you apply the glue stick?
JamesK - do you see any lift off at the edges of the part? On a fresh surface or one with only a few recoats, I am seeing absolute flat surfaces. I am sure this is putting tremendous stain on the glass, so I am going to add heaters to get the chamber to 50C. If you are doing prints that are not very tall, I think there is a heating affect from the bed that keeps the prints fairly warm without a chamber.
On a few parts with radical over hangs & 42C chamber temp, I had been getting up turned edges because there just was not enough cooling. Dropping the bed temp down to 80 cooled the chamber enough that the upturn disappeared. Ordered some Uber 0.45A 40mm fans that should let me run at higher temp and fix the upturns.
It is a bit of work doing the initial surface prep, but then it is good for lots of prints with a quick touch up between prints. The results are worth the effort. I am done with Kapton.
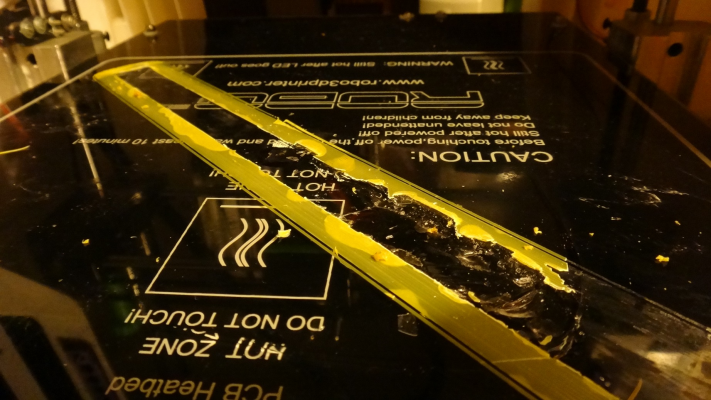
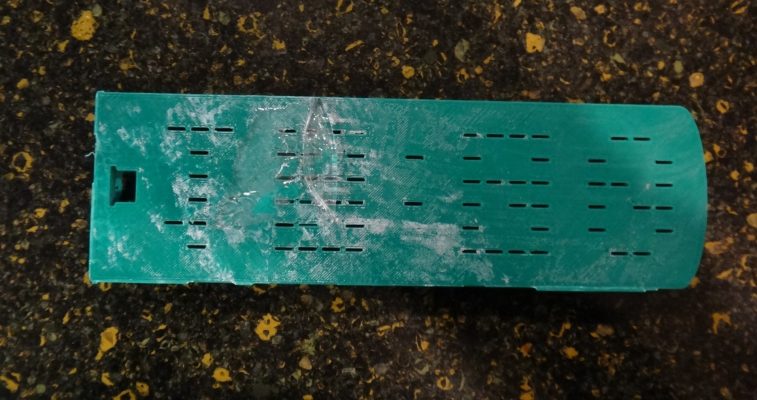
I was completely happy printing directly on glue stick, but there was a wide variation in how well the ABS attached. And like I said, sometimes it would attach too well and would pull a layer of glass off the surface of the bed. Took a small chip out of the new bed as well.
Print that finally did in the bed:
|
Re: Technique for Printing ABS on Glass HB Glue Stick Juice February 05, 2016 12:08AM |
Registered: 10 years ago Posts: 770 |
Just apply back and forth to cover the whole bed. let it dry and apply another layer 90* off from the first layer. After that my ABS sticks no problem. I have to wait for the part and bed to cool to room temp before it will let go.Quote
to-the-nth
Floyd - Curious how do you apply the glue stick?
|
Re: Technique for Printing ABS on Glass HB Glue Stick Juice February 05, 2016 07:09AM |
Registered: 9 years ago Posts: 1,873 |
Quote
JamesK - do you see any lift off at the edges of the part? On a fresh surface or one with only a few recoats, I am seeing absolute flat surfaces. I am sure this is putting tremendous stain on the glass, so I am going to add heaters to get the chamber to 50C. If you are doing prints that are not very tall, I think there is a heating affect from the bed that keeps the prints fairly warm without a chamber.
I haven't seen any lifting with abs, but I have had some problems with nylon, and with acetal I had to use both blue tape + glue stick. Agreed about the strain placed on the glass, I had a chip pull out on a bigger print. And yes, also agreed on taller prints being more prone to splitting than short ones - I really must get on with building an enclosure!
That corner to corner print you show is more extreme than anything I have tried, so it may be that I am just a few steps behind you and have yet to discover the limits.
|
Re: Technique for Printing ABS on Glass HB Glue Stick Juice February 05, 2016 08:08AM |
Registered: 10 years ago Posts: 770 |
|
Re: Technique for Printing ABS on Glass HB Glue Stick Juice February 05, 2016 08:34AM |
Registered: 11 years ago Posts: 5,780 |
3 months?
Here's a 254mm diameter ABS print on clean Kapton:
I attribute the success to three things.
1) A flat bed - cast aluminum tooling plate. The bed plate flatness is maintained by using a 3 point leveling scheme that doesn't flex the bed and undercarriage the way a four point "leveling" scheme does. Keeping the bed flat reduces/eliminates the need for any sort of goo/glue to hold the part down.
2) Adequate and even heating (about 1/2 W per cm^2). The bed plate is 1/4" thick aluminum- thermally conductive, no hot/cool spots like glass plates.
3) Enclosed print chamber operating at 45C. I designed and built the printer to be enclosed for printing ABS. Electronics are out of the heated chamber. All heat is provided by the bed and extruder heaters.
Surprised about the glue chipping the glass? Don't be. Heating glue on glass is an old technique for making decorative glass for tables and windows. Do a web search for "glue chip glass".
Ultra MegaMax Dominator 3D printer: [drmrehorst.blogspot.com]
|
Re: Technique for Printing ABS on Glass HB Glue Stick Juice March 05, 2016 04:57PM |
Registered: 9 years ago Posts: 53 |
Update. It has been over a month of heavy duty printing using the original application of glue stick in the photos above, with spot application of ABS juice or straight acetone between prints. This is a lot more durable than Kapton.
What brand/color of ABS and glue stick? You took out a glass chip, which is exactly why I gave up on printing directly on glue stick. I tried to convince myself that printing directly on gluestick was ok for small prints, and that is when I took out the chip on my new bed. No chips since printing on Juice over Glue. Some colors/brands of ABS can bond extremely well glue stick on glass, others not. I think the ABS juice on glue stick provides better overall consistency. Might need to experiment with the type of ABS used in Juice. Need to try Nylon again on ABS juice.
Floyd - what brand of glue stick and ABS?
Dentist - Nice set up. How do apply you Kapton? I used float on Windex,but wonder if it reduces adhesion. Aluminum plate is a great way to keep uniform bed temp. I found with the passive enclosure, 45C, that I have to keep upping the airflow to prevent up turned edges on some parts. Even small amounts of airflow have a large effect on the glass temperature. However, Glass is a better conductor of heat compared to ABS, so the ABS acts as an insulator. If I don't turn on the fans until the 2nd layer, the only thing that is important is power output under the ABS. My initial power is 0.39W/cm^2 at 25C and drops to 0.28W/cm^2 at 125 as the copper heats up. Supply is dialed back to 19V to handle the start up current, but I have a new 480W supply to drop that should get closer to 24V. I'll search for glue chip glass.
Edited 1 time(s). Last edit at 03/05/2016 04:58PM by to-the-nth.
Quote
JamesK
Quote
JamesK - do you see any lift off at the edges of the part? On a fresh surface or one with only a few recoats, I am seeing absolute flat surfaces. I am sure this is putting tremendous stain on the glass, so I am going to add heaters to get the chamber to 50C. If you are doing prints that are not very tall, I think there is a heating affect from the bed that keeps the prints fairly warm without a chamber.
I haven't seen any lifting with abs, but I have had some problems with nylon, and with acetal I had to use both blue tape + glue stick. Agreed about the strain placed on the glass, I had a chip pull out on a bigger print. And yes, also agreed on taller prints being more prone to splitting than short ones - I really must get on with building an enclosure!
That corner to corner print you show is more extreme than anything I have tried, so it may be that I am just a few steps behind you and have yet to discover the limits.
What brand/color of ABS and glue stick? You took out a glass chip, which is exactly why I gave up on printing directly on glue stick. I tried to convince myself that printing directly on gluestick was ok for small prints, and that is when I took out the chip on my new bed. No chips since printing on Juice over Glue. Some colors/brands of ABS can bond extremely well glue stick on glass, others not. I think the ABS juice on glue stick provides better overall consistency. Might need to experiment with the type of ABS used in Juice. Need to try Nylon again on ABS juice.
Floyd - what brand of glue stick and ABS?
Dentist - Nice set up. How do apply you Kapton? I used float on Windex,but wonder if it reduces adhesion. Aluminum plate is a great way to keep uniform bed temp. I found with the passive enclosure, 45C, that I have to keep upping the airflow to prevent up turned edges on some parts. Even small amounts of airflow have a large effect on the glass temperature. However, Glass is a better conductor of heat compared to ABS, so the ABS acts as an insulator. If I don't turn on the fans until the 2nd layer, the only thing that is important is power output under the ABS. My initial power is 0.39W/cm^2 at 25C and drops to 0.28W/cm^2 at 125 as the copper heats up. Supply is dialed back to 19V to handle the start up current, but I have a new 480W supply to drop that should get closer to 24V. I'll search for glue chip glass.
Edited 1 time(s). Last edit at 03/05/2016 04:58PM by to-the-nth.
|
Re: Technique for Printing ABS on Glass HB Glue Stick Juice March 05, 2016 05:56PM |
Registered: 11 years ago Posts: 5,780 |
I use the soapy water method- just dip the cut piece of tape in slightly soapy water, lay it on the room temperature bed, adjust its position and squeegee the bubbles and water out from under it. Then turn the heat to about 50C or so and push out whatever bubbles appear.
I've used 1 or 2 mil thick kapton on other machines and found it was very fragile. The tape I use is 5 mils thick and lasts for months. I replace only the damaged strips when it is finally time to replace the tape. I don't think the outer strips have been replaced more than once in over 2 years of operating this way. I'm still working on the roll of tape I bought 3 years ago.
Ultra MegaMax Dominator 3D printer: [drmrehorst.blogspot.com]
|
Re: Technique for Printing ABS on Glass HB Glue Stick Juice March 05, 2016 06:08PM |
Registered: 9 years ago Posts: 1,873 |
Quote
What brand/color of ABS and glue stick?
filaments.ca brand in natural and dark red, and a very small amount of unbranded Chinese filament in a variety pack of colours
 The glue stick is Elmers purple.
Glad to hear you've have good results with the glue/abs technique. I'll keep it in mind if I have to improve on what I'm doing. I also have some kapton tape to try, but it's only the thin stuff.
|
Re: Technique for Printing ABS on Glass HB Glue Stick Juice May 12, 2016 02:08AM |
Registered: 9 years ago Posts: 53 |
Update: Ran A LOT of prints since my last post. Only had to re-coat the base glue layer once. Just kept adding ABS juice. Twice now, when I did not apply enough ABS Juice I pulled glass chips out of the bed. The ABS Juice seems to provide a release layer between the Elmers Extra Strength glue stick and the printed part. And if that release layer gets too thin, the part just bonds to the bed. Last go around, I had section of a very large part that did not want to release. I wedged a paint scraper between bed and part with a modest amount of force, figuring sooner or later the part would release. About 30 seconds later, I was on the other side of the room and heard the sound of breaking glass.
Every time I pulled a chip has been when the part & glass were completely room temp. Maybe I need to bring the bed back to like 60C before I start wedging the part off. This would reduce strain on the glass and start to soften the Juice layer.
My conclusion is that the Extra Strength Glue Stick just has too much affinity for glass. Need to find an other type of glue stick.
Jamesk - I tried test print of a large wade extruder gear using Elmers Washable School Glue Disappearing Purple, but got up turned edges and teeth. Is that the same Purple as you are using? What bed temp? at 90C the Purple seems soft an gooey.
Floyd was running " purple glue stick with ABS with my bed at 110c and the ABS at 240c"
Dentist - do you have a part number on the 5-mil tape? thanks for the tip "Do a web search for "glue chip glass"...now I have high levels of anxiety from the crackling sounds as the part cools. I keep searching eBay for 3mm "transparent Aluminum" listings.
|
Re: Technique for Printing ABS on Glass HB Glue Stick Juice May 12, 2016 07:09AM |
Registered: 9 years ago Posts: 1,873 |
Quote
Jamesk - I tried test print of a large wade extruder gear using Elmers Washable School Glue Disappearing Purple, but got up turned edges and teeth. Is that the same Purple as you are using? What bed temp? at 90C the Purple seems soft an gooey.
That sounds like the stuff. Let me see if I can find the link.... [www.amazon.ca]
I've printed several of the herringbone gears without problem, with bed temperatures between 95 and 110. I wouldn't describe it as soft and gooey once the bed has warmed up, although I've never tried touching it when hot. It looks white, dry and slightly powdery. You'd probably be horrified - I haven't cleaned the surface in months, if it starts looking thin after removing parts I just patch over the area with a couple of strokes of fresh glue. As a result the bed looks very messy, but it seems to work well that way. I do print abs with a 5mm brim and put the first layer down very slowly at 15mm/s. Nozzle temperature is around 240 to 250 for the first layer, varying between brands and colours of abs as they seem to need wildly different temperatures for the main part of the model.
|
Re: Technique for Printing ABS on Glass HB Glue Stick Juice May 12, 2016 07:45AM |
Registered: 11 years ago Posts: 5,780 |
Here's one that available now, but it's crazy expensive. [www.amazon.com]
The stuff I bought was made/sold by Lucent Path and at the time it was on sale for $40. I think I got a pretty good deal!
Here's their 1 1/2" wide stuff: [www.amazon.com]
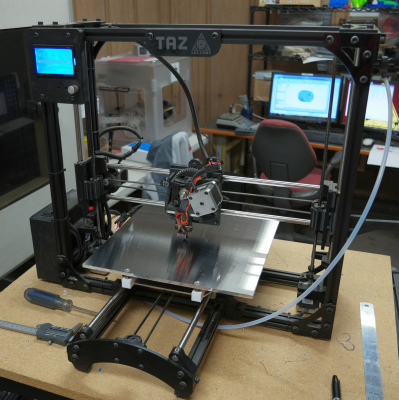
We had a glass bed on a Taz 3 printer at the Milwaukee Makerspace break recently. I wasn't there when it happened but was told that the part was printed after applying glue stick to the glass.
I replaced the broken glass bed with a piece of cast aluminum tooling plate and modified the undercarriage for a 3 point leveling scheme:
Ultra MegaMax Dominator 3D printer: [drmrehorst.blogspot.com]
|
Re: Technique for Printing ABS on Glass HB Glue Stick Juice May 15, 2016 01:29AM |
Registered: 9 years ago Posts: 53 |
JamesK - Same disappearing Purple as I have. Thanks for confirming. I picked the big Wade gear as a random test object, and intentionally tried to stress the print by not using a brim. This may have been too aggressive. The tips of the teeth really do need to be solidly attached. If they let go, the entire part will curl up. Purple deserves a retry with a brim. Sounds like your bed w/Purple is well seasoned..."white, dry and slightly powdery." Maybe the glue really does have to cook to achieve full adhesion.
I did a side experiment using Elmer's Glue-All. Got bad separation between the glue and the print after about 3mm of height. 110C(1st) /90C (>1 layer). Added ABS juice & brim was slightly better, but it appeared the glue layer being pulled apart.
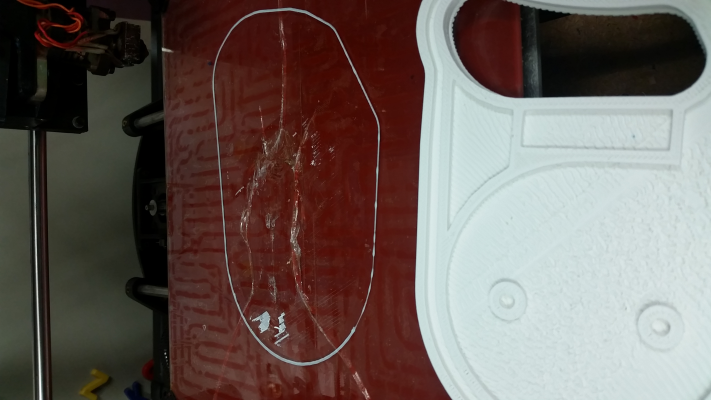
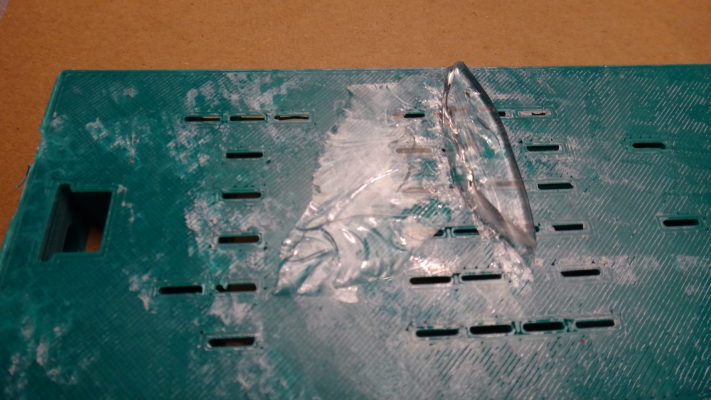
So I am left with trying either Elmer's Xtreme Glue stick next, or back to the Elmer's Extra Strength which will eventually pull chips out of the glass. I've been reading posts on the web, and pulling glass chips out of the bed is not an uncommon occurrence when there is a very thin highly attached film between the print and the glass (glue stick). There were quite a few of examples using Purple, and another using Wolfbite. On this last break, I should have known something was wrong, because I had great difficulty even getting brim off. Again what was strange was I wedged the paint scraper between the bed and the part, and walked away, figuring it might eventually release. Instead the bed snapped about 1/2 minute later. After the glass cracked, part of the print remained firmly attached, so I put it in the freezer for an hour, but still wasn't able to pry it off. You can see the large piece that broke at the bend and can make out the even larger glass chip still attached to the part. Scraper came in from the right. I don't think the glass was damaged as the part cooled down. The bed broke because I was trying to pry the print off. I am hoping there is some standard process to follow to save the bed when you recognize that the print is stuck. In quite a few cases, including mine, the part has been allowed to cool to room temp for a very long time, which means unreleased sections would be under maximum shear stress. I wonder if thermal cycling back to 110C, above the heat deflection point of ABS might help.
So Dentist - Thanks for confirming the Kapton seller lucentpath. Amazon prices are crazy. You got a heck of a deal. I did find another offering of his on eBay. 1" wide will be tedious, but at least prove to me the adhesive is good and the 5-mil does a better job not bubbling.
I was impressed by the TAZ conversion. Did you have to beef up the std whimpy stepper to swing the 12" plate around? You got me thinking about going to a tooling plate bed now. A 320 x 250mm from midwesternmetalwarehouse.com would cost $67, compared to a new boro bed for $45 delivered.
BTW, what is the purpose of the three adjusting screws? Wouldn't it be easier to just design the bed to be level to start with?
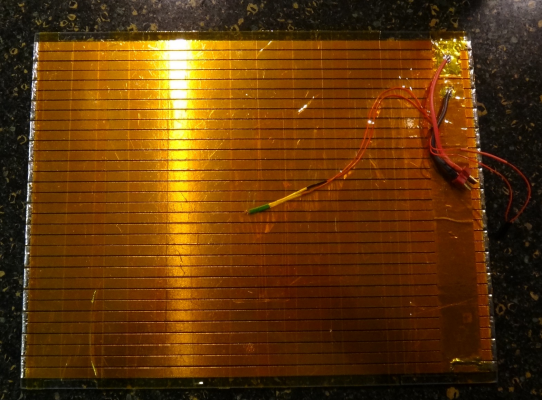
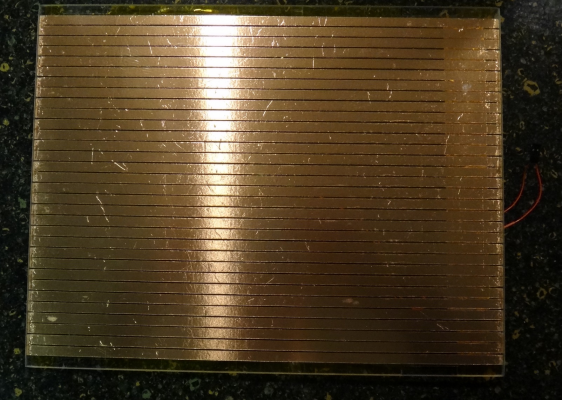
I had to make a new heated bed. Autopsy of the bed that broke showed the copper foil strips were impossibly well bonded to the glass. As I remember, the foil had an acrylic adhesive rated to 120C. So this time around, instead of coating the back with high temp RTV, I opted for multiple layers of Kapton tape to cover the copper foil. Soldered edge straps are still exposed, but eventually will overlay with some polycarbonate strips attached with some 3M 467. Spot on 1.28 Ohms.
I did a side experiment using Elmer's Glue-All. Got bad separation between the glue and the print after about 3mm of height. 110C(1st) /90C (>1 layer). Added ABS juice & brim was slightly better, but it appeared the glue layer being pulled apart.
So I am left with trying either Elmer's Xtreme Glue stick next, or back to the Elmer's Extra Strength which will eventually pull chips out of the glass. I've been reading posts on the web, and pulling glass chips out of the bed is not an uncommon occurrence when there is a very thin highly attached film between the print and the glass (glue stick). There were quite a few of examples using Purple, and another using Wolfbite. On this last break, I should have known something was wrong, because I had great difficulty even getting brim off. Again what was strange was I wedged the paint scraper between the bed and the part, and walked away, figuring it might eventually release. Instead the bed snapped about 1/2 minute later. After the glass cracked, part of the print remained firmly attached, so I put it in the freezer for an hour, but still wasn't able to pry it off. You can see the large piece that broke at the bend and can make out the even larger glass chip still attached to the part. Scraper came in from the right. I don't think the glass was damaged as the part cooled down. The bed broke because I was trying to pry the print off. I am hoping there is some standard process to follow to save the bed when you recognize that the print is stuck. In quite a few cases, including mine, the part has been allowed to cool to room temp for a very long time, which means unreleased sections would be under maximum shear stress. I wonder if thermal cycling back to 110C, above the heat deflection point of ABS might help.
So Dentist - Thanks for confirming the Kapton seller lucentpath. Amazon prices are crazy. You got a heck of a deal. I did find another offering of his on eBay. 1" wide will be tedious, but at least prove to me the adhesive is good and the 5-mil does a better job not bubbling.
I was impressed by the TAZ conversion. Did you have to beef up the std whimpy stepper to swing the 12" plate around? You got me thinking about going to a tooling plate bed now. A 320 x 250mm from midwesternmetalwarehouse.com would cost $67, compared to a new boro bed for $45 delivered.
BTW, what is the purpose of the three adjusting screws? Wouldn't it be easier to just design the bed to be level to start with?

I had to make a new heated bed. Autopsy of the bed that broke showed the copper foil strips were impossibly well bonded to the glass. As I remember, the foil had an acrylic adhesive rated to 120C. So this time around, instead of coating the back with high temp RTV, I opted for multiple layers of Kapton tape to cover the copper foil. Soldered edge straps are still exposed, but eventually will overlay with some polycarbonate strips attached with some 3M 467. Spot on 1.28 Ohms.
|
Re: Technique for Printing ABS on Glass HB Glue Stick Juice May 15, 2016 02:18AM |
Registered: 11 years ago Posts: 5,780 |
This is how the glass bed performed on the Taz:
And this is what the aluminum does:
Gluing a heater directly to glass is not a good way to get even heating.
I didn't change the motor -it seems to be doing OK with the extra mass. I haven't yet had to reduce acceleration, either, though it was already pretty low at 500 mm/sec^2.
Unless you can build the machine's frame and mount the guide rails to micron precision, you need some sort of bed leveling scheme.
Edited 1 time(s). Last edit at 05/15/2016 02:21AM by the_digital_dentist.
Ultra MegaMax Dominator 3D printer: [drmrehorst.blogspot.com]
|
Re: Technique for Printing ABS on Glass HB Glue Stick Juice May 15, 2016 07:14AM |
Registered: 9 years ago Posts: 1,873 |
Quote
Sounds like your bed w/Purple is well seasoned..."white, dry and slightly powdery." Maybe the glue really does have to cook to achieve full adhesion.
It does seem to improve with age, except that it leaves an annoying white residue on the bottom surface of the print. I've had a glass chip pull out on one large print, but it's long enough ago that I don't remember the exact details. Your idea of a heat cycle to relieve the stress sounds quite promising.
I'm looking at switching to a tooling plate bed and was experimenting with peltier heaters yesterday. It seems promising so I think I will carry on with that. The question of what treatment to use on top of the plate is bothering me. I'll give kapton a go, but I'm worried I might damage it too easily. Glue on glass is such an easy to use and abuse resistant surface I may have been spoiled, but I don't want to put glass on top of the aluminum because of the weight and the need for clips.
|
Re: Technique for Printing ABS on Glass HB Glue Stick Juice May 16, 2016 01:32AM |
Registered: 9 years ago Posts: 53 |
dentist - don't quite need micron precision. But I am spoiled, I have dual block linear rails. I find it easier to spot test print one layer thick in roughly all four corners of the bed, measure the prints with a micrometer, and then add permanent shims to the bottom of the glass and use a 4 point attach. That way I don't have to readjust if I remove the glass for cleaning. Also corrects for any warping and variation in the thickness of the glass.
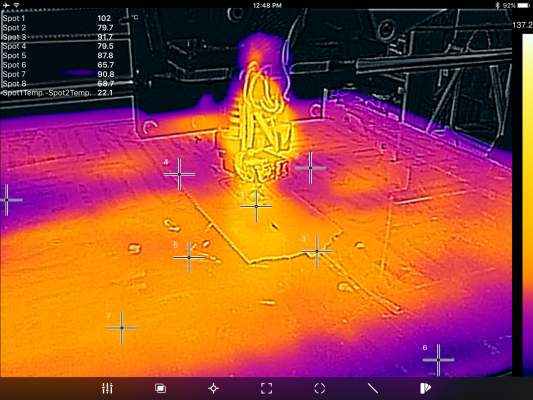
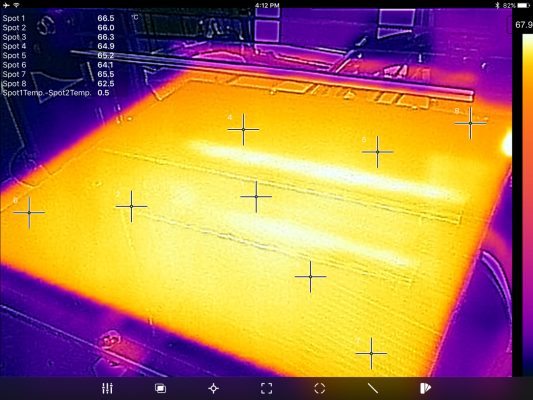
Taz HB is known to have poor heat uniformity. Your pic is similar to others I have seen on the web. Don't have the pic, but somebody did a thermal on my last bed. Not too shabby, but there was a cool spot in the middle we think because of convective airflow. Need to retake. I agree with you that a tooling plate is the only way to go to have uniform bed temp. Since the model for a glass bed is a constant/controlled power sheet attached to the back of the glass, you really have no idea what that surface temp is. It varies tremendously with airflow, both convective and forced. In fairness though, once a section of glass is covered with the print, the glass surface under the print receives roughly uniform power...problem is what is the temp? Copper attaching to glass with 1/2mil thick adhesive is going to be way better than silicone heater mat attaching to glass (Taz). Anyway...
Thanks for confirming no stepper hop up.
How long does it take for your plate to heat up? I'm at 110C in 5 minutes if all the fans are off.
JamesK - Glass over tooling plate wouldn't be the best of all worlds because of the air gaps. Both would have to be darn flat. Might need oil or a heat sink compound between then. I too am spoiled printing on glass without kapton. I will give the 5 mil Kapton a go on glass to see if it sticks better, and doesn't bubble up the way the 1 mil stuff does. I am printing more Wade gears as a test case. 80% infill and 100um layer height now with brim. Turning out to be a challenging print to get mirror flat bed contact surface. Did a print on Topflight Monokote Transparent. Not half bad. Way better than disappearing Purple prints. Stuck pretty good without ABS Juice, and even better with. W/o juice the part just floated off after it cooled. Juice took a little bit of effort, bit did not tear the surface. Totally easy to apply with Windex float. Problem is it was painful to peel the sheet off the bed afterwards.
|
Re: Technique for Printing ABS on Glass HB Glue Stick Juice May 16, 2016 10:35AM |
Registered: 11 years ago Posts: 5,780 |
I reran the PID auto tune and it now takes 9 minutes to go from 23C to 100C. There is no insulation on the underside of the bed and I don't plan to add any.
Ultra MegaMax Dominator 3D printer: [drmrehorst.blogspot.com]
Ultra MegaMax Dominator 3D printer: [drmrehorst.blogspot.com]
|
Re: Technique for Printing ABS on Glass HB Glue Stick Juice May 23, 2016 01:16AM |
Registered: 9 years ago Posts: 53 |
Dentist - 5 mil Tapes Master Kapton from Lucentpath was a bust. Tried floating the tape onto the bed using Windex which normally works fine for 1-2mil Kapton. The tape immediately lost all adhesion. After squeegeeing for 5 minutes, I was able to mostly get it to adhere without the ends curing up. Wiped everything down and applied a second strip with only water. Same result. Then added two more pieces dry without any fluid. The tape edges were frayed, so it was difficult to place the edges of adjacent pieces without gaps. When I went to the heat up the bed, the pieces that had been applied with fluids, blistered. Not just air bubbles that could be worked out. It appeared the adhesive had absorbed some water/Windex and created glue blisters containing micro steam bubbles that did not collapse upon cooling. Even the tape that was applied dry became wavy and uneven. Wondering if this was not a silicone adhesive.
After I added ABS juice and heated the bed, the adjacent edges up the tape lifted up slightly, creating unsightly seams in the Wade gear. After printing and cooling, the part was highly attached to the Kapton. I couldn't get a razor blade under the brim. Ended up cutting into the Kapton to get the part off. $28 down the drain. The printing quality on even bare Monokote was far superior, and the part just popped off. There are some nasty chemicals sold to remove Monokote that work very well, but I am not sure I want to go there.
Anybody have other recommended sources for 5 mil Kapton tape?
Attach results were noticeably better but somewhat inconsistent after the Purple glue stick was cooked for 1/2 hour at 110C. There was still some places where the gear teeth broke free. But in another spot, part of the brim was "welded" to the glass. I chickened out and did not attempt to pry it off. I thermal cycled the bed to 115C and let it cool, but it did not break the part loose. Finally I added some water, and the part broke free within a few minutes, dissolving the glue stick. Didn't try ABS juice on cooked Purple.
I am still interested in investigating an aluminum bed, but need to find a viable brand of 5 mil Kapton first. Glue stick covered with ABS juice might work on the aluminum.
In the mean time, I am going back to the original recipe of Elmers Extra Strength covered with ABS juice. I am spoiled by mirror flat prints with quick bed prep between prints. I guess make sure to put down thick layers of Juice. Apply minimum force if the part gets welded down. Maybe the glass bed gets considered a consumable.
|
Re: Technique for Printing ABS on Glass HB Glue Stick Juice May 23, 2016 06:59AM |
Registered: 11 years ago Posts: 5,780 |
Getting the 5 mil Kapton down is a little tricky. I use soapy water, squeegee out air bubbles as I lay the tape down, then heat the bed to about 50C for 30 min or so then continue squeegeeing out the bubbles. It is easier to get the bubbles out from under thin kapton- I think the steam escapes through the film when it is heated over 100C. Unfortunately, thin kapton tears too easily.
I get tiny lines on the bottoms of prints where the tape's edges meet, though I don't have any problems with edges lifting. Maybe you overlapped the edges a little. "Unsightly" is in the eye of the beholder. The bottom surface of prints looks different from the top and the sides. It's the nature of FDM printing. If you print PLA on painter's tape you get lines where the tape meets, too. If you print on glue you get glue residue. Meh. When I eventually run out of Kapton (still working on a 3 year old roll), I may try a piece of PEI. It is purported to have magical properties, though I have my doubts.
Using glue applied directly to glass will eventually start taking chips out of the glass. See many posts about chipped glass in these forums and: [www.franklinartglass.com]
Ultra MegaMax Dominator 3D printer: [drmrehorst.blogspot.com]
|
Re: Technique for Printing ABS on Glass HB Glue Stick Juice May 23, 2016 08:49AM |
Registered: 9 years ago Posts: 1,873 |
I have been wondering about a thin layer of low viscosity (self levelling) epoxy. The thought was based on the success of printbrite which is a resin based fibre-glass board, though of course the resins they use are likely very different to the ones we can easily use. Might be worth the experiment though.
Edited 1 time(s). Last edit at 05/23/2016 10:35PM by JamesK.
Edited 1 time(s). Last edit at 05/23/2016 10:35PM by JamesK.
|
Re: Technique for Printing ABS on Glass HB Glue Stick Juice May 23, 2016 10:31PM |
Registered: 9 years ago Posts: 53 |
Dentist - Would you be willing to sell part of your magical roll of Kapton? 
Strips weren't overlapped; actually small gaps and uplifts; more like the acetone attacked the adhesive. There were no bubbles when the heat was first turned on. And then it foamed.
Not using rabbit pelt glue, but I agree, seems like glue directly on glass will start taking chips out of bed sooner or later. But it prints flat. Wonder if franklinartglass would want to by my chipped glass beds as works of art? - Glue Chip Glass is sandblasted on one side, coated with animal hide glue, and heated. As the drying glue contracts, chips of the sandblasted surface are pulled off creating the unique fern like or “jack frost”
An open question is do the chips form from prying the part off or cooling?
JamesK - epoxy. Interesting idea. Or maybe Gorilla Glass - "The glass gains its surface strength, ability to contain flaws, and crack-resistance by being immersed in a hot potassium salt ion-exchange bath." . Wonder what we could add to the glue stick to make it release more easily when it cools?
|
Re: Technique for Printing ABS on Glass HB Glue Stick Juice May 29, 2016 08:00PM |
Registered: 9 years ago Posts: 53 |
JamesK - Instead of epoxy.....Minwax Polycrylic polyurethane Clear Gloss directly on glass cut with ~5% Windex for better flow. Applied as thick coating and allowed to float. No ABS Juice. Bed temps 110/90. The Wade gear print was ABSOLUTELY FLAT. No lift off around the edges. Took a 5mm piece of Poly off the bed when I was lifting the part off, but otherwise the part pretty much popped off.
Poly is sort of hard to remove from the bed and is crusty at room temp, but becomes pretty soft at 90C so it can be scraped off with a single edge razor. Acetone aggressively attacks it, making it puff up so it can be scraped off at room temp if you want to go that route. I scraped at 90C and then did an acetone wipe after the bed cooled. The 5mm divot was easily touched up with more Poly and would only have left a slight blemish. I started 3 prints in the same spot with no apparent loss of adhesion. It does leave a frosted outline of the part on the poly after removal which can be glossed up with a really thin coat of Poly if you care.
I am thinking that if the interface layer between the ABS and glass is thick enough, the locally concentrated shear forces that start tearing glass chips out of the bed can't form.
Trying it on a 200mm sundial. What's the worst that can happen?
Dentist - what are you going to do when you run out of Magic 5mil Kapton?
Poly is sort of hard to remove from the bed and is crusty at room temp, but becomes pretty soft at 90C so it can be scraped off with a single edge razor. Acetone aggressively attacks it, making it puff up so it can be scraped off at room temp if you want to go that route. I scraped at 90C and then did an acetone wipe after the bed cooled. The 5mm divot was easily touched up with more Poly and would only have left a slight blemish. I started 3 prints in the same spot with no apparent loss of adhesion. It does leave a frosted outline of the part on the poly after removal which can be glossed up with a really thin coat of Poly if you care.
I am thinking that if the interface layer between the ABS and glass is thick enough, the locally concentrated shear forces that start tearing glass chips out of the bed can't form.
Trying it on a 200mm sundial. What's the worst that can happen?

Dentist - what are you going to do when you run out of Magic 5mil Kapton?

|
Re: Technique for Printing ABS on Glass HB Glue Stick Juice May 29, 2016 08:10PM |
Registered: 9 years ago Posts: 1,873 |
PU - brilliant, hadn't thought of that. Nice find. Be better still if we can make it adhere to the substrate well enough that we don't have to refresh it too often. I'm lazy at heart. I wonder if it would hold better to aluminium, perhaps roughed up a little with coarse sandpaper. I'd love to be able to print abs without the brim 
Edited 1 time(s). Last edit at 05/29/2016 08:11PM by JamesK.

Edited 1 time(s). Last edit at 05/29/2016 08:11PM by JamesK.
|
Re: Technique for Printing ABS on Glass HB Glue Stick Juice May 29, 2016 08:28PM |
Registered: 11 years ago Posts: 5,780 |
When I run out of Kapton I'm going to try PEI. It has mythic resonance!
Here's a 254 mm diameter ABS print on Kapton:
Edited 1 time(s). Last edit at 05/29/2016 08:34PM by the_digital_dentist.
Ultra MegaMax Dominator 3D printer: [drmrehorst.blogspot.com]
Here's a 254 mm diameter ABS print on Kapton:
Edited 1 time(s). Last edit at 05/29/2016 08:34PM by the_digital_dentist.
Ultra MegaMax Dominator 3D printer: [drmrehorst.blogspot.com]
|
Re: Technique for Printing ABS on Glass HB Glue Stick Juice June 04, 2016 01:54PM |
Registered: 9 years ago Posts: 53 |
Update - Mixed results with the Minwax Polycrylic. While it worked great on the smaller Wade gear print (perfect print, easy release), there was significant uplift on the 200mm long 19 hour long Sundial print. What was strange was there was virtually no axial uplift in the long direction of the part. After cooling and gently prying with a single edge razor most of the part released suddenly leaving about a 1mm gap between it an the brim. The Minwax Polycrylic does soften at 90C. ABS juice on the .Minwax Polycrylic produced slightly better results. Wonder if there are higher temp products available.
Dentist - Doing more investigation on the 5 mil Kapton shows there are some tapes out there that use an acrylic instead of silicone based adhesive. Some advertise 3M acrylics which are generally rated to ~125C. The silicone based tapes are rated to ~260C. lucentpath graciously offered to refund my 5 mil tape purchase. Also saw a review on Amazon of someone seeing similar blistering effects after using a water based float for application -probably acrylic. Some of the posts for PEI mention slight uplift. I have a sheet of PEI, but I'd probably want to permanently attach it with 3M adhesive sheets, which means a new bed. To me any uplift is unacceptable which pushes me back to Elmers Extra Strength with Juice. Not sure I would want to do glue stick on Aluminum because the surface would probably get scratched from prying parts off.
While I am printing test Sundials (they still work even with some uplift and can give them away), I should probably run a base line test with 1.5mil Kapton with and without float. The lucentpath Kapton, even without the float was still too wavey to bother with.
Something else to try is raising the chamber temp to 60C with some additional heading elements. X stepper already has a fan; would have to add one to the Extruder stepper.
|
Re: Technique for Printing ABS on Glass HB Glue Stick Juice June 05, 2016 12:40PM |
Registered: 9 years ago Posts: 53 |
Ordered some boro glass to build new beds for surface experiments.
Copper foil heaters are cheap, reliable and easy to build.
One theory is that the glass chips when part is pried off the bed while it is still under extreme tension after cooling. Perhaps re-heating the part prior to removal will reduce the localized strain on the glass.
Planning to compare PEI and PET to gluestick w/ juice.
PEI Threads - lots of good info
[forum.seemecnc.com]
[forum.seemecnc.com]
[forum.lulzbot.com]
|
Re: Technique for Printing ABS on Glass HB Glue Stick Juice June 07, 2016 09:49PM |
Registered: 11 years ago Posts: 19 |
Gorilla glass? Well, I've tried just about every bed surface for Taulman 618 and Oregon Gatorline trimmer line and a very thinly applied, dry film of Gorilla Glue on 70C glass provides the best adhesion (and a nice glossy surface finish) of everything I've tried (Garolite, cotton and linen canvas, poplar, PVA on glass, cardboard, PCB board, etc.). GG (a single part urethane) is my holy grail for printing nylon!
I apply the GG with a wide putty knife, going for the thinnest and most even layer possible. Then I let it dry on the glass. A little heat can speed the drying, but don't overdo it. The glass must be 1/4" thick for large parts (at least when printing 618 or Gatorline) because the GG bond won't fail, but the glass CAN fail! Remove the part while the glass is still warm, because warm glass is stronger than cold glass.
The trick to removal is to use a razor blade scraper (available in a set from Harbor Freight). The idea is to cut under the GG and try not to pry the part up at all. If you pry the part, you will likely pull chunks of glass off your plate (and have craters left in your glass plate). Given that you will break glass from time to time, I don't recommend expensive borosilicate glass; just your cheap, but equally flat, window glass. The window glass manufacturing "float" process makes inherently flat glass.
Sorry, only registered users may post in this forum.
