Home
>
Reprappers
>
Topic
And the extruder problem we all knew was comming
Posted by BrianRowes
|
And the extruder problem we all knew was comming November 28, 2010 11:03PM |
Registered: 13 years ago Posts: 47 |
heyall
having (hopefully) finished my build i have 1 last problem...
my extruder(techzone laser cut wade's) seems to constantly jam
maybe im doing something wrong
it would appear that the filiment gets fed down the extruder as is meant to until it gets to the hot end at which point the gear can no longer drive it. if i add pressure with my hand i can force the filiment to come out a little(it feels like getting past a bubble) but if i tighten my extruder any more the gear stops turning.
can someone tell me standard hole diamater(for repsnapper setup) in case thats set too big/small(default is 0.7)
when i heat up it seems to be getting hot enough(slight ooze)
should i be starting like i have been withe the filiment out then fed down when the tip is hot, or should i i feed into a cold barrel then add heat
im using the "rigid" PLA V2 i saw someone talk about on here a while back(dont know if im aloud to add the site address)
i tested this with the extruder removed from the printer(and unscrewed so i could see what was going on) and cold beforehand and it is definatly able to reach all the way to the end of the hot zone so i dont think its a bad diameter.
tryed tems from 175-250 with no good temps and a few bad ones(seemed to ooze fast for a sec then refuse more plastic)
any idea's?
is this common?
sorry for the longwinded post lol just trying to make sure i tell you everything that might be relevent
thanks
brian
|
Re: And the extruder problem we all knew was comming November 29, 2010 12:53AM |
Registered: 13 years ago Posts: 188 |
I think posting links is accepted. Especially since it would help us see what you are talking about.
I'm fighting with jams myself. I'll think I got it fixed, then 20 or 30 minutes into a build the filament strips.
When starting a build, I start with the filament in the barrel. If I were to turn the gear and it were hot, I would instantly get an extrusion. I think you have to do it this way so that a melt zone develops prior to starting the print. I use a gcode script in the begging of every print to do the following:
1) Begin heating the extruder (I use 218 to 222 for ABS depending on the print size)
2) Begin heating my build plate (110)
3) Zero-out each axis using the end stops as my reference location
5) Go to the purge location and wait for the extruder and bed to reach the setpoint
6) Push out a bit of filament to make sure that what oozed out is replaced
7) Set the origin/home location to a point at the center of my build plate so that the part prints in the center
When you say "tighten my extruder", what part are you tightening? When you put the hot end into the insulator, you really only want it finger tight. I'm not talking death-grip finger tight either. Too tight and it will pinch down on the filament which prevents it from moving. Too loose and a plug will develop though. Getting it just right seems to be something of an art form.
If your barrel is full of plastic, try heating it to extrusion tempurature. Let it cool about 5 to 10 degrees. Hopefully you'll be able to pull out the plug and clear the tube. If not, you may have to drill it out to do this next thing (very risky IMO). You can check your insulator-to-barrel transition by pushing in the filament. Start with the barrel a little loose then tighten down until you feel resistance on the filament as you push it.
If you are talking about the idler clamp, this is also sensitive to adjustments but at least you can visually see what is going on. Generally, you want to tighten the idler as much as you can without causing the filament to go out of round. A barely visible flat spot should be ok, but if it is obviously being smooshed then it will have to melt before it can fit in the barrel and it will cause a jam.
To set the tension, thread in enough filament to observe the indentations. Back it out. If there is an easily visible flat spot, break off the chewed up area loosen the screws and have another go. If you can measure it with calipers, this will give you a fool proof way of seeing how much out of round your chewed up filament is. If you can't see a flat spot, tighten it half a turn and try again. Since you are going tighter, I don't think you have to break off the chewed up end this time. Don't waste your plastic. Eventually you should find the sweet spot.
If you are talking about tightening the hobbed bolt, this is fairly irrelevant. I have just been finger tightening mine since I have to keep taking it out to clean it. (another point worth mentioning.. as soon as the filament jams, don't even bother with trying to print again until you clean the teeth. If even just one tooth is loaded with plastic, chances are the build will gradually fail and you will have to clean it anyhow.
I'm tempted to try this, but I'm afraid that if the filament jams and you keep pumping in more plastic, it will probably break the insulator and make things worse. If the hot end is not working for some reason, the filament stripping becomes a fail safe. Maybe there is a way to put a clutch mechanism on there? The build would probably still fail, but at least it wouldn't strip the filament or destroy your hot end.
|
Re: And the extruder problem we all knew was comming November 29, 2010 01:08AM |
Registered: 13 years ago Posts: 47 |
hey all
thnx for the quick reply dazed.dnc.
i was talking about the idler bracket.
from what your saying it sounds like im not getting near enough power from my motor.
my filiment is either completly untouched or very slightly scraped when i take it out even when its tightened to fail point.
ive never used or even saw a working 1 so i have no idea the kinda power i should be expecting.
the plastic is;
[www.orbi-tech.de]
is there a way to "turn up" the motor.
running techzone electronics if this makes a difference. and its a lin engineering nema 17(all my axis motors have a pin on each side, this only has the front 1 for the gear)
thanks
brian
|
Re: And the extruder problem we all knew was comming November 29, 2010 03:32AM |
Registered: 13 years ago Posts: 47 |
right little to add now.
just dismantled the whole extruder
cleaned everything out and tryed hotend/barrel seperate(by hand feeding) worked fine
put the rest on their side added filiment and it seemed to be working. though still felt quite weak.
however when i then put it all together again i got the familiar jam
it seems to me i need the smallest bit more pressure to push filiment into the hot end.(tiny amount)
also im not sure of a better way to ask this. if im using repsnapper and i set my extrude rate under print(for manual control) and find what looks like the best speed so far how do i save this as the printers speed.
this is so frustrating.
bot loads up models and trys to print, just either nothing or very little comes out. i have a desk full of blobs strung together here
anyways enough complaing
thanks for taking the time guys
brian
|
Re: And the extruder problem we all knew was comming November 29, 2010 06:41AM |
Admin Registered: 17 years ago Posts: 7,879 |
If you can push filament relatively easy by hand it seems your motor does not have enough torque or the current is set too low.
What is the model number of the motor? You need a high torque NEMA17, an average one won't work.
[www.hydraraptor.blogspot.com]
What is the model number of the motor? You need a high torque NEMA17, an average one won't work.
[www.hydraraptor.blogspot.com]
|
Re: And the extruder problem we all knew was comming November 29, 2010 06:52AM |
Registered: 13 years ago Posts: 47 |
hey all
just found the source of that problem(cog on motor was loose. glued the bugger and screwed down the idler bracket) and ran into the last hurdle. i think ....extruder extruding(if still stopping a little occasionally, think i'll be adding those springs.) . axis going in both diections and responding to comp commands, yeah i think its time for a surface to be added(i really did think i could print onto the shiny aluminium bed that came with...... why even give me 1 in aluminium if its no good. whole mendel is wood and the 1 aluminium part i have on here i cant use...)
i dnt think i need help for this 1
i need something sticky to print on yay
tryed wrapping in duct tape and ended up with the extruder stuck to an uneven build platform... lol
so new question. if i dont have a heated bed, am using pla and am a complete noob what should i try to print to(btw my tape skills could be outdone by a 5 year old, i always ended up with a big wavey surface)
very happy
looks like today may be first print day
thanks for the elp guys
brian
|
Re: And the extruder problem we all knew was comming November 29, 2010 06:55AM |
Registered: 13 years ago Posts: 188 |
I wasn't able to find a picture of this, but I think the indentations in your filament should be the approximate inverse of the indentations on your hobbed bolt. So, if the teeth on your bolt are 0.5mm tall then you should probably have a 0.4mm dent in your filament. I use an M6 hobbed bolt, so the teeth on mine are likely different than yours. Even if I could get my camera to capture the teeth marks, it wouldn't match what you would get with an M3 hobbed bolt so I don't know how much that would help.
It sounds like your motor might be too weak or maybe you need to adjust the trim pot on your stepper driver to drive it harder. Be careful if you adjust the trim pot though. Make sure that your stepper driver chip and motor stay cool. The chip can get hot enough to burn your finger, but under normal conditions it will be near or slightly above room temperature.
Is there a label on your motor? Can you give us a part number?
|
Re: And the extruder problem we all knew was comming November 29, 2010 07:58AM |
Admin Registered: 17 years ago Posts: 7,879 |
|
Re: And the extruder problem we all knew was comming November 30, 2010 09:21AM |
Registered: 13 years ago Posts: 47 |
hey all
thnx nophead got that tape works a treat.
now the proud owner of some flat webs with blobs instead of just blobs
now to do the thing every noob does and ask more questions
only 3 then i think i got it enough for me to start cleaning things up myself
1 whats a good height above the bed to extrude from. i seem to be getting a lot of plugging in my early layor or it doesnt stick.
2 without opto's is there a reliable way to always find that
3what are the standard extrusion material width and layor thickness(if it makes a differance i have techzones)
after this i promise to staop asking for my hand held
this isnt something i recon anyone can help me with but my extruder seems to have a problem if the coil is on the floor but be fine with it above. would a reel holder help that or would something else or should i just install a hook above and hang some filiment.
anyone fancy telling me if im actually close yet or am i still miles from printing
looks pretty close i think if its supposed to draw loads of diagonal lines and slowly try to fill the space between them
yay my mendel is actually starting to work
thanks for the help everyone.
hopefully I'll be able to help someone with their build soon and actaully know what im talking about
thanks
brian
|
Re: And the extruder problem we all knew was comming November 30, 2010 10:50AM |
Admin Registered: 17 years ago Posts: 7,879 |
1) ideally the nozzle should be the layer height above the bed for the first layer. When doing PLA onto blue tape it tends to need to be a bit lower to get it to stick. That leaves a ridge round the bottom of the object.
2) Trial and error? I have never run a machine without endstops but if it is too high then it doesn't stick and if it is too low it ends up dragging the nozzle through the plastic when doing the first layer. If it touches the bed then it tends to jam the extruder.
3) A good layer height is 0.8 times the filament diameter and width 1.2 times. The filament diameter can be any value between a bit less than the nozzle diameter up to the diameter it ends up extruded into mid air.
[www.hydraraptor.blogspot.com]
|
Re: And the extruder problem we all knew was comming December 01, 2010 07:47AM |
Registered: 13 years ago Posts: 47 |
ok
thnx nophead, again helped quite a bit(though i modified slightly, seemed to get wide flat builds using 1.2 x diameter, so went for exact nozzle size with slightly more "3d" results
think ithink im getting somewere. had a few more webs start to catch(thugh im sure im trying to get the bed too low, seems to start sticking after about 2 layors, by which time the extruder has built itself a nice blob o drag through everything and destroy.)
im using .5 as the width and .4 for layor height. its pla and the stickiest extrusions seem to be comming out about 120 degrees.
lastnight i acttually printed a bunch of long kinda hard strings stuck together in something that resembled the right shape. so progress..
will try to figure it out when im reliably getting things to stick every time
the plan for today is to use the plot movment tool on hot to try to find a nice bed height then mark off the bottom of it on the lead screw for manual homing. fingers crossed this isnt as dumb as it sounds
sometimes(though rarely now i turned the speed down) my z axis locks up and seems to tighten 1 of the 2 nuts i have on there, or one side suddenly appears lower than the other and a lead screw has managed to lower itself about an inch. any way to stop this as it seems to happen at random?
thanks for the help all
brian
|
Re: And the extruder problem we all knew was comming December 01, 2010 05:43PM |
Registered: 13 years ago Posts: 188 |
On my mendel, I just have two nuts jammed against one another above the z-axis bearing. It doesn't loosen, but I can't tip it upside down without the belt coming off after one of the lead screws drops an inch. I'm starting to think I should have done it a bit different.
You might want to try using two nuts on each end of the z-axis bearing. It might work a little better if you loosely trap the bearing between two nuts and use another two as jam nuts to stop them from moving. Unless you have actual jam nuts, this may require taller feet on your lower vertex pieces to prevent the lead screw hitting the table due to being a few mm lower.
I'm not exactly sure which nut you are trying to say is coming loose, but if you loosely constrain the bearing, the lead screw can't shift up or down, but it will still be able to float side-to-side a little bit within the bearing race. Since the guide rods are what prevents the x-axis from shifting, then it doesn't matter if the lead screws shift side to side and letting it shift may prevent binding. Maybe this and a little thread lock is all you need? I wouldn't thread lock anything if you don't have to or until you are absolutely sure this is how you want it though.
I did not use thread lock on mine and the z-axis lead screw nuts are staying put just fine.
|
Re: And the extruder problem we all knew was comming December 03, 2010 01:16AM |
Registered: 14 years ago Posts: 387 |
|
Re: And the extruder problem we all knew was comming December 03, 2010 02:26AM |
Registered: 13 years ago Posts: 47 |
hey guys
thnx for the update.
I'll get my z screws out asap and get em fixed properly(temp fixed just now with a regular nut run over same tape)
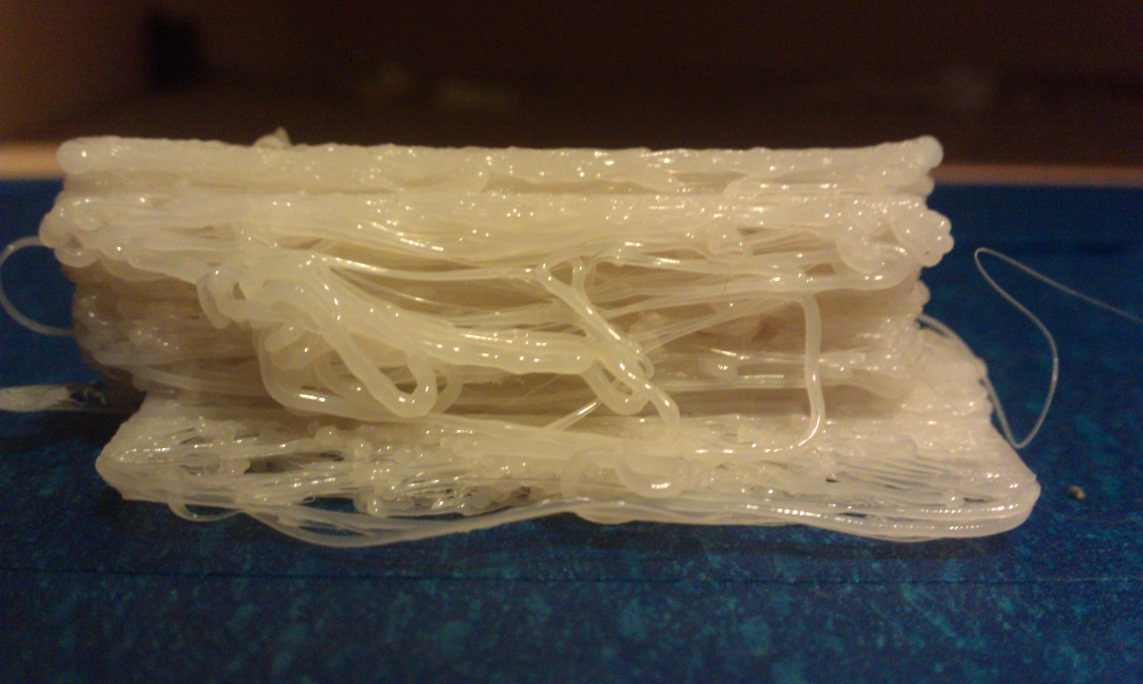
got some picks to upload, newest, latest, and unfortunatly greatest prints of mine so far. the first one is supposed to be the test cube(you'll know why i say supposed to be, x axis jammed about 3 layors in on a blob) and the second is supposed to be the stylus.
my question is how do i change my prints from the stringy melted looking stuff i seem to be getting to proper prints at a decent res
sorry ive needed spoon fed guys, but the advice has got me printing(sort of) so i wanted to show my progress(or lack therof)
anyways
check out my not so pretty prints(does everyone post these when they get to this stage or just me?)
thanks
brian
thnx for the update.
I'll get my z screws out asap and get em fixed properly(temp fixed just now with a regular nut run over same tape)
got some picks to upload, newest, latest, and unfortunatly greatest prints of mine so far. the first one is supposed to be the test cube(you'll know why i say supposed to be, x axis jammed about 3 layors in on a blob) and the second is supposed to be the stylus.
my question is how do i change my prints from the stringy melted looking stuff i seem to be getting to proper prints at a decent res
sorry ive needed spoon fed guys, but the advice has got me printing(sort of) so i wanted to show my progress(or lack therof)
anyways
check out my not so pretty prints(does everyone post these when they get to this stage or just me?)
thanks
brian
|
Bearings clamped by nuts December 03, 2010 05:03AM |
Admin Registered: 17 years ago Posts: 7,879 |
jbayless Wrote:
-------------------------------------------------------
> To perfectly constrain the leadscrew between two
> nuts, I'd recommend using nylock nuts (they won't
> loosen from vibration) and a belleville spring
> washer to supply a preload. With a belleville
> washer, the bearing doesn't need to be tightly
> clamped, but there also won't be any play.
I tried to use nylock nuts on a leadscrew recently and it was a nightmare. I screwed one all the way down the rod so it was facing the right way, but it didn't like it and got very tight and actually marred the stainless steel thread. Also I found nylock nuts sit at an angle to the axis so the bearing was clamped at an angle. I switched to plain nuts and star washers instead. Even those were not very flat.
Belleville washers might help but they are not easy to buy in the UK. I bought some small ones from the US, but the shipping was ridiculous because of the flat rate thing that USPS does. In the UK shipping is by weight so to send a few washers anywhere in the world costs next to nothing.
[www.hydraraptor.blogspot.com]
|
Re: And the extruder problem we all knew was comming December 03, 2010 05:49PM |
Registered: 14 years ago Posts: 387 |
I'm not sure it's necessary to screw them on the "right" way - in fact, it might actually be better to screw them on backwards, so that the narrow circular face of the nut is against the inner ring of the bearing, rather than the hex face.
But, yes, I don't think that any nut can really be relied on to sit flat on a screw. I can't think of any way to really guarantee flatness without using a lathe to put a shoulder in.
Are bellevilles that hard to find in the UK? I thought that's where they were invented. And isn't their main manufacturer, Belleville Springs, UK-based?
(Apologies for the off-topic discussion)
|
Re: Bearings clamped by nuts December 03, 2010 06:03PM |
Registered: 13 years ago Posts: 188 |
That looks like PLA? My only hands-on experience to date is printing with ABS, but the basic principles are likely the same. From what I gather, PLA just extrudes more readily and does not warp as much.
Its tough to say from these pictures, but I think the first and second pic demonstrate skipped steps. It looks like the extruder snagged on plastic and the motors did not have enough torque to pull through it, which then caused subsequent layers to be printed over open air rather than on the part where they were supposed to go.
Potential fixes:
1) Slow down the *flow* rate to extrude just a little bit less material. This might keep the layers from building up thicker than the lift of the z-axis layer shifts.
2) Set your layer thickness higher to lift the extruder a bit more at each layer change.
3) Increase your *feed* rate to stretch the extrusion a bit.
3) Adjust the trim pot on your stepper driver so that the motors produce more torque. Barely turning it at all may be all the adjustment it takes - IE, the width of the screwdriver slot. Don't let the motor or chip run too hot though.
The next two look like maybe there was not enough extruded plastic. If the extruded stand is pulled thin, your layers may not build up as thick as they are supposed to which can cause each extruded line to connect and disconnect at random places.
Potential fixes:
1) Slow down the *feed* rate to allow more plastic to build up. This will give it time and more material to bond with the layer below rather than pulling it thin and ripping it off of the lower layer.
2) Increase the *flow* rate to put down more material.
3) Lower your layer thickness.
As far as stl-to-gcode settings, in my opinion, it is best to adjust nothing else until you have a feed and flow rate that makes your prints almost usable. This assumes, of course, that your temperature settings are good. Even if you get the feed and flow rate close enough to where you can print 10+ layers before you have to abort, this seems the most sensible way to start. Many other settings are dependent on feed and flow rate, so you may get stuck in a continual adjustment loop if you don't do it this way.
From there, start messing with the infill, raft(less) options, and so on until you get whatever level of perfection and reliability you find acceptable. This is perhaps the most frustrating thing about DIY printers, but the amount of time you spend at this stage can pay off several times over in quality and reduced scrap. You may also find that some parts just turn out better with their own specific settings. For example, thick parts that are supposed to be somewhat springy seem to need more shells but some gears may turn out more solid with fewer shells. At least, this has been my experience so far.
|
Re: And the extruder problem we all knew was comming December 05, 2010 07:07PM |
Registered: 13 years ago Posts: 47 |
hey all
thanx for all the respoces
got the z axis screwed tight(2 nuts on each side)
now im gonna post some more pics
latest attempts
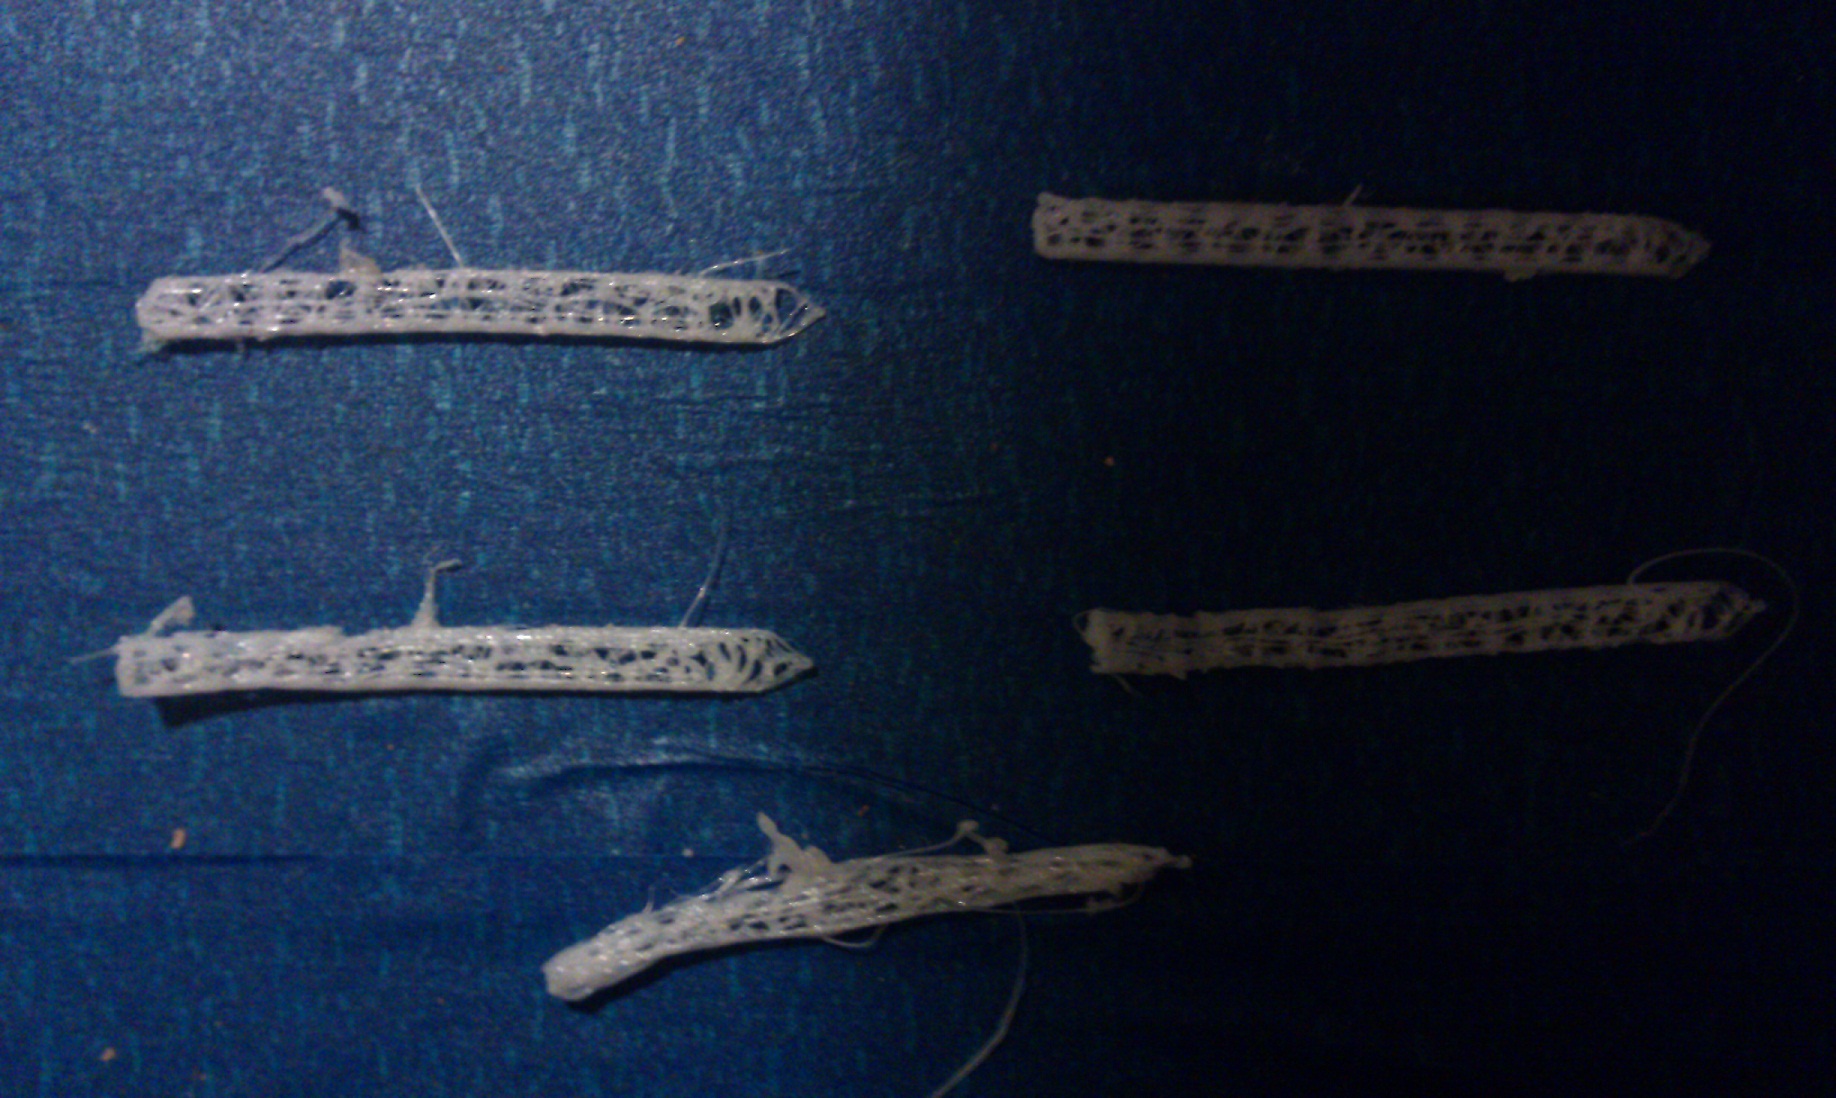
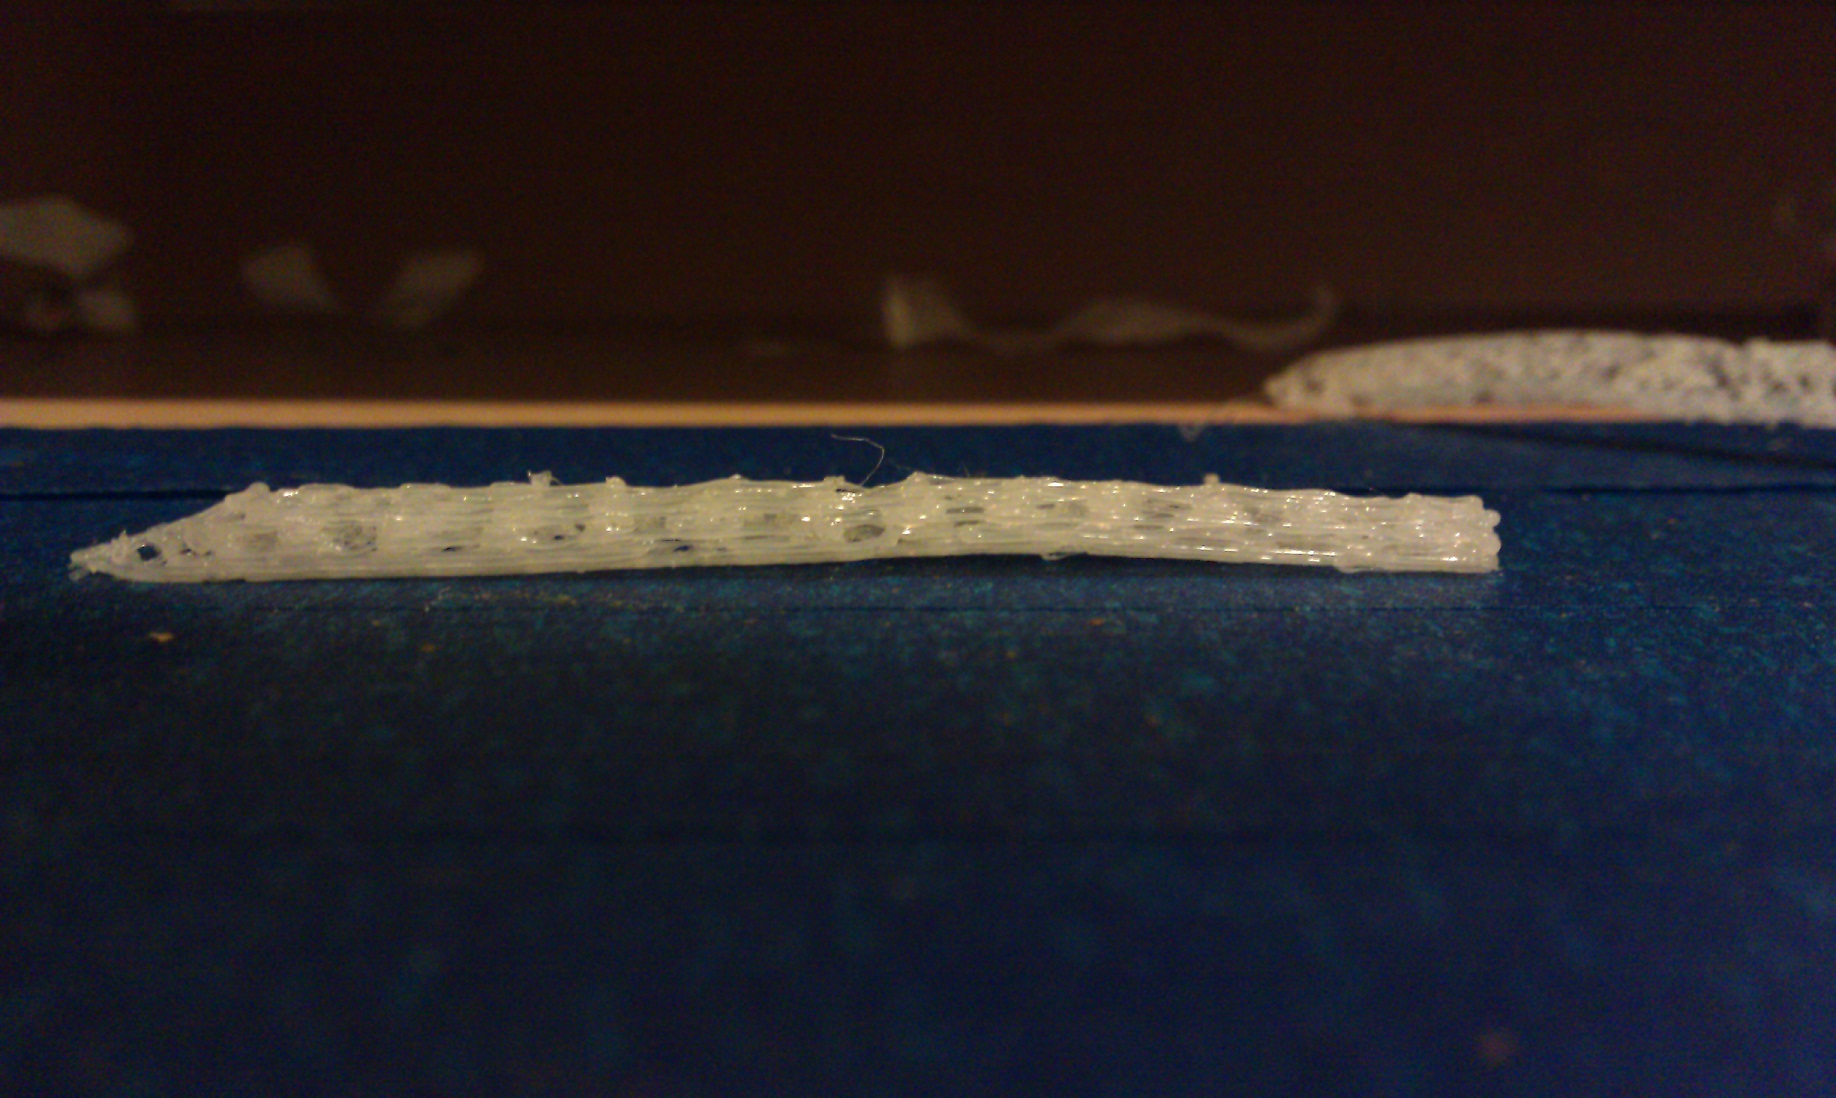
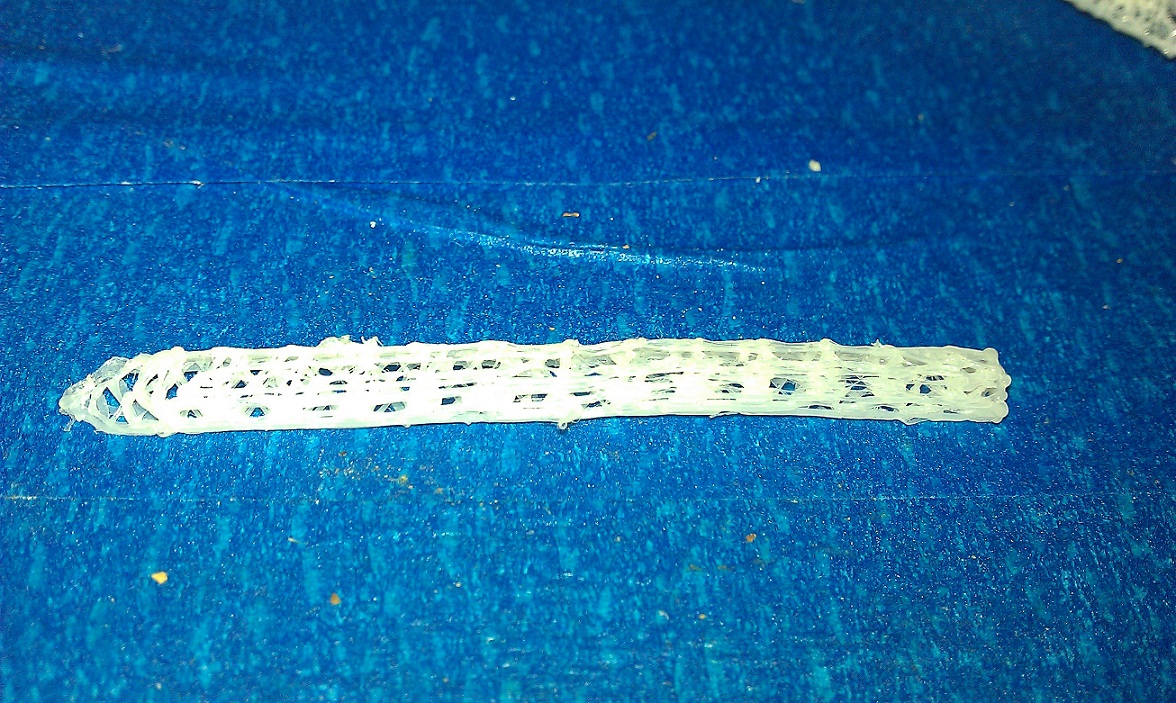
seems to be im getting like a wire outline of my file(this time its all DS stylus's from thingiverse)
tryed infill change
x/y print speed reduction
up the extruder feed
doubled shell added infill
if you have a min take a look at these and please tell me if anyone knows what i should try next(im using repsnapper as i have no endstops(well i do but they dont seem to read))
thanx
brian
thanx for all the respoces
got the z axis screwed tight(2 nuts on each side)
now im gonna post some more pics
latest attempts
seems to be im getting like a wire outline of my file(this time its all DS stylus's from thingiverse)
tryed infill change
x/y print speed reduction
up the extruder feed
doubled shell added infill
if you have a min take a look at these and please tell me if anyone knows what i should try next(im using repsnapper as i have no endstops(well i do but they dont seem to read))
thanx
brian

|
Re: And the extruder problem we all knew was comming December 06, 2010 02:47AM |
Registered: 13 years ago Posts: 188 |
It looks like your infill is set very low. I have looked at repsnapper, but I never use it to slice models so I can only guess. It looks like maybe "infill distance" will change that? Maybe try setting it to the width of your extrusion? It seems to default to 2, and it looks like your infill may very well have 2mm gaps.
I would also recommend adding an extra shell or two. For a stick-like part such as this it will not help much, but I find that it helps when printing round things - IE screw holes. Having more shells seems to keep hole walls from shifting around as much when the infill bumps it.
FYI: I have been trying to slice my models with skeinforge instead of repsnapper or the reprap host because they do not correctly handle making bridges. As of yet, I have not been able to complete a skeinforge processed print though. I think it is because of a firmware bug, but I suppose it could be something that skeinforge is doing too.
|
Re: And the extruder problem we all knew was comming December 06, 2010 05:32PM |
Registered: 13 years ago Posts: 47 |
hey all
thnx dazed.dnc
your suggestion seemed to be working perfect(much tighter looking print looks almost tightly woven, is this what im looking for)
unfortunatly things went tits up on the test cube about 15 layors in after my heater stopped getting a temp and heated up till i noticed smoke comming from the wood extruder and stopped it. still upon cooldown doesnt seem to be any permenent damage. so yay.
will post pics as soon as something finishes without catching fire
thank you so much, actaully had a solid feeling print(what i had before the smoke anyways) though it was dimentionally incorrect. the "cube" was more rectangular. dunno yet why, will get back to you with more informationa and hopefully a first successful print tommorow
cheers
brian
Edited 1 time(s). Last edit at 12/07/2010 02:45AM by BrianRowes.
|
Re: And the extruder problem we all knew was comming December 07, 2010 08:44AM |
Registered: 13 years ago Posts: 47 |
hey all
um
now no matter what happens my temp reading is always around 20-30 degrees and even when switched off my heater LED flickers on and off every few seconds.
i wanna cry, thought we were finally there
from what i can gather it would seem the a/d stopped sending temps during the last build about 15-20 layors in and thats why i overheated.
now i cant switch the heat on without overheating(while reading 20degrees)
i removed the temp sensor and the heater wires from the a/d and it still jumps about between 20 and 30 degrees.
anyone had this b4?
anyone know why it'd give out like that mid print?
this is getting quite frustrating. everytime i figure out a step forward something thats always worked gives out. the a/d had been on in total(lifespan) about 45 mins so i dont thinki its gonna have "just died"
i hope this is fixable, i was trying test prints yesteray for the first time ever.
thnx
brian
|
Re: And the extruder problem we all knew was comming December 07, 2010 08:56AM |
Admin Registered: 17 years ago Posts: 7,879 |
Check that there isn't a connection between the heater and the thermistor. If that happens it usually damages the analogue input on the micro as 5V micros don't like 12V up them.
[www.hydraraptor.blogspot.com]
[www.hydraraptor.blogspot.com]
Sorry, only registered users may post in this forum.