Home
>
Reprappers
>
Topic
Commisioning problem Ormerod V2
Posted by Pelagiman
|
Commisioning problem Ormerod V2 June 16, 2016 01:53PM |
Registered: 7 years ago Posts: 3 |
Hi
I write on the behalf of a buddy of mine, who bought a RepRapPro Ormerod V2 3D-Printer. He followed the checklist, listing up 14 point for commisioning( cabling, LED check etc.) of the device and confirmed, that the basic installation and settings were ok.
Please find enclosed, the problems he faced, when trying to run the 3D-printer:
Currrent state of his 3D Printer: 12.06.2016, V.1.0.0
Brand, Type: RepRapPro Ormerod 2 528.2
Firmware: v 0.78c
Connectivity: USB
PC: Windows 10, i5-5200, 8GB DDR3
Arduino: 1.6.6
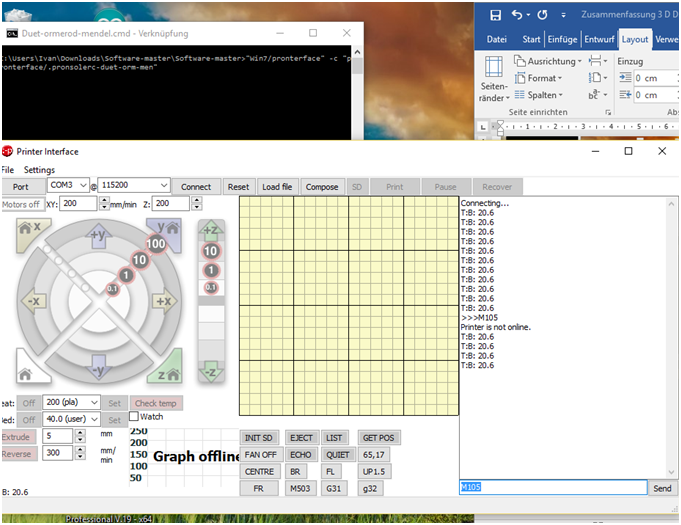
Printer Interface: Win7 / Pronterface «Duet-ormerod-mendel»
Problem: The Printer is ‘offline‘. The M-code to feedback the firmware vesion works, but the heatings doesn’t seem to work nor the temperature feedback (M-code) ?
What he did so far:
• USB cable is connected (PC/ 3D-printer)
• SD card was not inserted
• On/ off oft the power-supply doesnt change the outcome
• The only difference when the the power supply is ‘on‘, the vent oft the power-supply and of the material-feeding are working. The wire won’t heat up, even after 20 minutes ..
Please compare the 2 attachments.
Has anyone some hints or tips, what could be wrong and what we should try next, in order to get the printer running ?
Thank you very much, we appreciate your input,
Best Regards,
Oliver
I write on the behalf of a buddy of mine, who bought a RepRapPro Ormerod V2 3D-Printer. He followed the checklist, listing up 14 point for commisioning( cabling, LED check etc.) of the device and confirmed, that the basic installation and settings were ok.
Please find enclosed, the problems he faced, when trying to run the 3D-printer:
Currrent state of his 3D Printer: 12.06.2016, V.1.0.0
Brand, Type: RepRapPro Ormerod 2 528.2
Firmware: v 0.78c
Connectivity: USB
PC: Windows 10, i5-5200, 8GB DDR3
Arduino: 1.6.6
Printer Interface: Win7 / Pronterface «Duet-ormerod-mendel»
Problem: The Printer is ‘offline‘. The M-code to feedback the firmware vesion works, but the heatings doesn’t seem to work nor the temperature feedback (M-code) ?
What he did so far:
• USB cable is connected (PC/ 3D-printer)
• SD card was not inserted
• On/ off oft the power-supply doesnt change the outcome
• The only difference when the the power supply is ‘on‘, the vent oft the power-supply and of the material-feeding are working. The wire won’t heat up, even after 20 minutes ..
Please compare the 2 attachments.
Has anyone some hints or tips, what could be wrong and what we should try next, in order to get the printer running ?
Thank you very much, we appreciate your input,
Best Regards,
Oliver
|
Re: Commisioning problem Ormerod V2 June 17, 2016 12:43AM |
Registered: 9 years ago Posts: 189 |
Hi Oliver,
The first thing I would do is update the firmware from 0.78c to the latest Reprap firmware 1.11-ch [github.com]
further details on how to do this are here
[reprappro.com]
With a duet set-up the SD card needs to stay in the machine when powered.
The printers settings are done by editing the config.g file in the sys folder upon the SD card rather than from pronterface.
If the printer is off-line the controller won't talk to the firmware upon the printer. Read though the information in the link above and you should be able to get the printer talking to pronterface, which if the basic things have been checked should solve the non heating issue.
With my set-up I use the web interface via the Ethernet connection and only use the USB connection when updating the firmware but even this can be done though the web interface produced by ch further details upon his git hub link above
Let us know how you get on
Chris
Edited 1 time(s). Last edit at 06/17/2016 12:45AM by orictosh.
Supporting 3D Printers with Parts and Build services.
Printer: Ormerod 2 (528.4) Duel extruder set-up with Aluminium X-Rib, RRPro Firmware v1.11-ch (2016-04-08)
|
Re: Commisioning problem Ormerod V2 June 17, 2016 01:43AM |
Registered: 7 years ago Posts: 3 |
|
Re: Commisioning problem Ormerod V2 June 20, 2016 03:45PM |
Registered: 7 years ago Posts: 3 |
Hi
Meanwhile, my buddy put the Ormerod and a Notebook into a huge box .. and gave it to me ..
The good news so far, thanks to Chris (thank you very much), I upgraded the firmware, as per his suggestion. The good news is, I could for the first time move the 3 axles (X/Y/Z) using the Surface indicating the 3 Axles (and pressing the 'arrows') .. even the bed heated up. I guess, the main problem here was, that you first need to upload a file .. and second .. that you need to press the 'connect‘ button ? Looks like, I entered the next level
The bad news – not that bad, just that I have no experience at all with 3D-printers and only with hobby CNC-mills:
I uploaded a test-printing file called ‘whistle‘, which is located almost in the middle of x/y-axes on the heated bed. Let me explain, the logics I’m used to, using my CNC-mill. After uploading the file with the data to mill the part, I have to define an initial point as reference on the material to be milled (X/Y/Z). I do this by :
1) Running a reference procedure, which tells my cnc-mill, where the Zero-points for the x- and y-axes (motors) are ..
2) Afterwards I drive the drill-bit in the x- and y-axle to the point, I refer to as initial reference processing point ..
3) At this point I lower the z-axle to touch the surface of the work-piece, just by using a paper-sheet (to have a tight fit inbetween) and adapting the z-position, to touch the surface of the work-piece. (defines the reference height of the work-piece/ surface).
4) Then I safe this position as the initial x-/y-/z-position, where the machine starts to run and mill ..
Back to the 3D-printer, I could upload the file (‘whistle’), move the axles (heureka) .. press the ‘print’ icon and the bed heated up (checked by touching it). Interestingly the control surface told me, that there are 3 point for reference required ? I have no clou, what was meant by that ..
So, my question is, how to proceed step-by-step (for dummies please), from the uploading of the g-code file, the definition of some initial reference point on the surface .. till the execution (->pressing the print icon ?) ..
Many thanks to Chris and to everybody who helps me to enligthen my scarce knowledge – thank you. It's interesting stuff and I need to understand, in order to explain to my buddy, how to use this machine
Best Regards,
Oliver
P.S: Sorry for my bad English
Edited 2 time(s). Last edit at 06/20/2016 04:15PM by Pelagiman.
|
Re: Commisioning problem Ormerod V2 June 21, 2016 01:43PM |
Registered: 9 years ago Posts: 189 |
Here is the step by step guide that I go though when about to start a print.
1) Take the filament reel, and trim off the end so it square.
2) Turn on main power to printer, ensure that main fan come on, if not turn off and check connections.
3) Set the hot-end and bed temp suitable for the filament being used.
4) If the print head is near/touching the print bed then move it up 20mm, so able to get under it with tweezers.
5) Home the X-axis, then the Y-axis and then the Z axis. This tells the software (aka firmware) where the hardware is. The printer is now in a safe position as it knows it's limits in it's axis travel.
6) By now the hot end will be above 170 degrees c ( it won't feed if below) so you can feed in the filament until it comes out of the nozzle, then retract by 5mm and wipe nozzle with tweezers so it's clean.
7) It's best to slice the STL onto g-code rather than print shared g-code. I have found it's cause problems as the settings for each printer/filament is diffident and unknown.
8) Load the g-code into the controller, check that the bed and hot end are at their set levels
9) Press the print button.
It should start the print in/near middle of the print bed. In your slic3r the printer bed settings should match your printer's bed. You can also place g-codes in your start and end areas in the slicer which will be performed as required.
There are some refinements to the above you can make in relation to your set-up, hopefully the above should get a print off the machine. With a Ormerod it's a good idea to print the Orthogonal Axis Compensation Test Pieces [reprappro.com] as this corrects any difference in the angles of X, Y and Z axis.
Let us know how you get on.
Regards
Chris
Supporting 3D Printers with Parts and Build services.
Printer: Ormerod 2 (528.4) Duel extruder set-up with Aluminium X-Rib, RRPro Firmware v1.11-ch (2016-04-08)
Sorry, only registered users may post in this forum.