Home
>
Reprappers
>
Topic
Successful Wooden Repstrap
Posted by Waiasaur
|
Successful Wooden Repstrap December 26, 2010 10:27PM |
Registered: 13 years ago Posts: 56 |
Hi everyone,
I've completed my wooden reprap. All I have to do now is to fine tune my machine, and incorporate improvements like a heated bed. I thought I'd make this post separate so It's easier to find, my first post was Building a mendel: a noobs tale
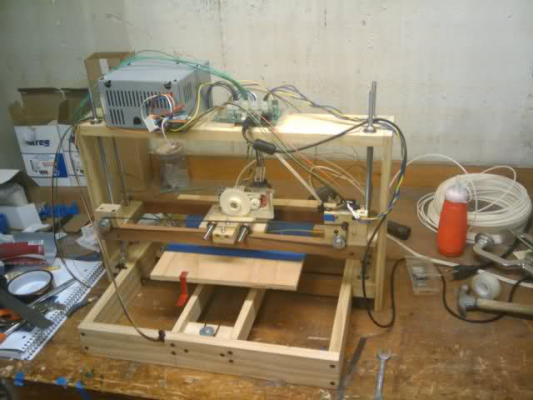
This is a picture of it all wired up to Gen6 electronics
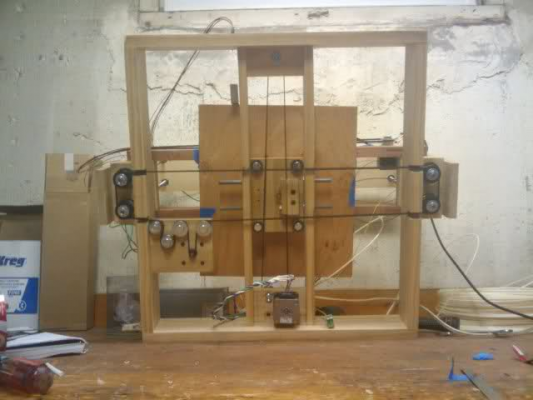
A picture of the bottom, to show the Z axis drive belt and pulleys
A picture of my first and second prints, both are supposed to be 15 mm cubes. The more cube-like one is my 2nd print.
I will post higher resolution pictures later of my printed cubes with a ruler for reference later so that you guys can critique them for me. I want to know what I could do to make my prints even nicer.
|
Re: Successful Wooden Repstrap December 26, 2010 11:19PM |
Registered: 14 years ago Posts: 323 |
|
Re: Successful Wooden Repstrap December 26, 2010 11:35PM |
Admin Registered: 15 years ago Posts: 1,470 |
Very cool! First thing I would recommend is making a spool for the plastic so it doesn't get tangled up. Something like this: [www.thingiverse.com] . I made one, simply cutting it out of cardboard with a hobby knife.
What software are you using? The RepRap Host, Skeinforge, RepSnapper...?
What software are you using? The RepRap Host, Skeinforge, RepSnapper...?
|
Help improve the RepRap wiki!
Just click "Edit" in the top-right corner of the page and start typing. Anyone can edit the wiki! |
|
Re: Successful Wooden Repstrap December 26, 2010 11:40PM |
Registered: 13 years ago Posts: 56 |
|
Re: Successful Wooden Repstrap December 27, 2010 12:19AM |
Registered: 13 years ago Posts: 188 |
|
Re: Successful Wooden Repstrap December 27, 2010 12:56AM |
Registered: 13 years ago Posts: 56 |
Im trying to use the software to manually move the x and y axes. In some cases it will move a little then crash, and in others it crashes once I press the button. When it crashes the java window freezes and I cant interact with it anymore. No error messages are displayed. I need to ctrl alt del to get the java window to close.
|
Re: Successful Wooden Repstrap January 03, 2011 01:09AM |
Registered: 13 years ago Posts: 56 |
I would also like to make a bit of a guide like how so many others before me have made. The community has helped me a bunch in this endeavor and I'd like to contribute back to it. I've read the instructions to make the other wooden repstrap, the wolfstrap, and I have to say they are kind of difficult to follow. What would be the best method/place I could do this?
|
Re: Successful Wooden Repstrap January 03, 2011 01:21AM |
Admin Registered: 17 years ago Posts: 1,791 |
What would be the best method/place I could do this?
... Wiki!
How about:
http://reprap.org/wiki/DireWolfStrap
unless you have a better name.
-Sebastien, RepRap.org library gnome.
Remember, you're all RepRap developers (once you've joined the super-secret developer mailing list), and the wiki, RepRap.org, [reprap.org] is for everyone and everything!
... Wiki!

How about:
http://reprap.org/wiki/DireWolfStrap
unless you have a better name.

-Sebastien, RepRap.org library gnome.
Remember, you're all RepRap developers (once you've joined the super-secret developer mailing list), and the wiki, RepRap.org, [reprap.org] is for everyone and everything!

|
Re: Successful Wooden Repstrap January 03, 2011 01:29AM |
Admin Registered: 17 years ago Posts: 1,791 |
Also, don't forget to join our mailing list since you're probably a developer:
http://reprap.org/pipermail/reprap-dev/

-Sebastien, RepRap.org library gnome.
Remember, you're all RepRap developers (once you've joined the super-secret developer mailing list), and the wiki, RepRap.org, [reprap.org] is for everyone and everything!
http://reprap.org/pipermail/reprap-dev/

-Sebastien, RepRap.org library gnome.
Remember, you're all RepRap developers (once you've joined the super-secret developer mailing list), and the wiki, RepRap.org, [reprap.org] is for everyone and everything!

|
Re: Successful Wooden Repstrap January 12, 2011 04:09PM |
Registered: 13 years ago Posts: 56 |
c2tb34 asked me:
Hey,
Congratulations on your wooden repstrap!
I'm currently on the end bit of building my own, and I have a couple of questions.
How did you modify belt tension? I'm having trouble mechanically getting the tension just right.
What did you use as bearings for your z axis? I have some linear bearings that I'm using but I seem to be getting a good bit of friction which is leading to belt slipping.
I know it might be hard to answer any of these without simply saying "do a better job of building it," but any insight would be great.
Thanks so much!
I'll try to answer it here so others with the same questions can benefit.
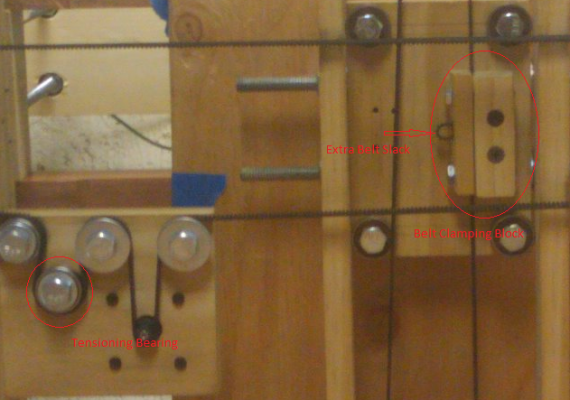
For my X and Y axis the belt tension was handled within the belt clamp. I had one block that was fastened to the moving cart, and fastened onto this block was a piece of wood with 3 holes. The outer 2 holes were for the fastening screws and the middle hole was so that i could pull a loop of belt out and draw it tight to lessen the slack. I would tighten one of the fastening screws so the other end is free, Pull the belt out as much as i could so that its tight, then fasten the other screw to set it in place. You can kinda see how this is done in the picture of the bottom of my repstrap, above.
For my Z axis I tensioned the belt with an extra bearing, pictured above next to the motor. The extra bearing was put in after everything else. I strung everything up and put my finger where that bearing would be to see how much slack i needed to take care of. Then I marked that location, drilled a hole, and used a round file to elongate that hole for fine adjustments. To install the belt, I would loosen the bolt that held this tensioner bearing in, put the belt in, then tighten up the bolt to tension it up. While you dont need super human strength to pull the belt tight, everything should be as tight as you can reasonably pull by hand.
The entire repstrap was constructed using 608 bearings due to their low price of 87 cents. I bought the bearings first then I improved my design, so they are not the best choice for the application. Bearings aside, I too experienced a bit of tension in my Z axis and through much headache and sadness, I've realized that most of my tension is coming from the rods not being straight enough. As a poor mans fix to this problem, I set my print bed higher so that Z=0 is higher up on the rod, about 1/4 the way up. As you get away from the mounting bearings that hold the threaded rods in place, the tension generated from slightly bent rods decreases.
If you can post a picture of your Z assembly perhaps i can think of a reason for all your friction.
Edit:
Here is a closeup picture of the bits im takling about:
Edited 2 time(s). Last edit at 01/12/2011 04:28PM by Waiasaur.
|
Re: Successful Wooden Repstrap January 12, 2011 06:56PM |
Registered: 13 years ago Posts: 19 |
Hey everyone, I'm the author of those particular questions.
I have tried attaching a picture of my repstrap so that you guys can better see what I am trying to describe. The y axis gantry is suspended beneath the x axis gantry. Both of these work very well; however, the y axis belt needs a little bit of adjustment. My real problem lies with the z axis. The build platform travels on the vertical threaded rods. Two of the rods ( top left and bottom right in the picture ) are powered by the pulley. They are sitting inside of linear bearings on the top and bottom. The other two threaded rods are meant as guides to prevent wobble. The pulleys atop them are just idlers. My trouble comes from creating proper tension on the z belt while not causing too much friction. As is, the z axis moves with occasional belt slip and eventually stops due to friction.
Thank you all for the help!
[db.tt]. <- pic
|
Re: Successful Wooden Repstrap January 13, 2011 04:06AM |
Registered: 13 years ago Posts: 56 |
I see that your pulleys are kinda far away from your linear bearings for the Z axis. Try to get them as close to the linear bearings as possible. The further away the pulleys are to the linear bearings the greater the moment arm is to bend the threaded rod. In my case even the slightest bend in my rods caused massive friction. By putting them closer, most of the force becomes sheer force which should minimize rod deflection.
I cant really see how the Z axis belt is interfacing with the stepper motor, but Try to get it as wrapped around the stepper motor drive gear as you can. As you can see in my Z axis set up, I have bearings there to guide the timing belt so that it is touching as much of the motor gear as possible.
I cant really see how the Z axis belt is interfacing with the stepper motor, but Try to get it as wrapped around the stepper motor drive gear as you can. As you can see in my Z axis set up, I have bearings there to guide the timing belt so that it is touching as much of the motor gear as possible.
|
Re: Successful Wooden Repstrap January 13, 2011 05:21AM |
Registered: 13 years ago Posts: 128 |
|
Re: Successful Wooden Repstrap January 13, 2011 12:07PM |
Registered: 13 years ago Posts: 19 |
Ah! Waiasaur that's exactly the insight I was looking for!
I never thought about the bearings as a pivot, but that's exactly how they're behaving. I'm going to try moving the pulleys down closer to the bearings. I'll let you guys know how that works out
A micro Mendel sounds interesting...
I never thought about the bearings as a pivot, but that's exactly how they're behaving. I'm going to try moving the pulleys down closer to the bearings. I'll let you guys know how that works out

A micro Mendel sounds interesting...
|
Re: Successful Wooden Repstrap January 13, 2011 04:33PM |
Registered: 13 years ago Posts: 3 |
Hey c2tb34, what are those black plastic pieces you're using to mount the bushings to your gantry? I'm in the planning stages of making a wooden repstrap with rods and bushings, and one of the things I've been trying to figure out is how best to mount a platform to my bushings. Your method sure looks a lot cleaner than my currently planned method of using epoxy.
|
Re: Successful Wooden Repstrap January 13, 2011 08:03PM |
Registered: 13 years ago Posts: 19 |
The bushings and black plastic are a single piece flanged bearing. They are neat in that they are a little bit self aligning. This allows a bit of forgiveness as far as perfectly straight goes. Also, only use three bearings per gantry. One rod with two bearings, the other rod with one. This allows for some tolerance as far as perfectly parallel goes.
You can find flanged linear bearings on Amazon for cheap. That's where I purchased mine. I'm sure they aren't the best of quality, but they're working just fine and the price is right
Also, my z axis is working great now. Thanks Waiasaur
You can find flanged linear bearings on Amazon for cheap. That's where I purchased mine. I'm sure they aren't the best of quality, but they're working just fine and the price is right

Also, my z axis is working great now. Thanks Waiasaur

|
Re: Successful Wooden Repstrap January 14, 2011 04:22PM |
Registered: 13 years ago Posts: 56 |
Sorry, only registered users may post in this forum.


