Home
>
Reprappers
>
Topic
X Axis Motor Moving Away From Heatbed
Posted by thegamersite
|
X Axis Motor Moving Away From Heatbed October 22, 2016 05:09PM |
Registered: 7 years ago Posts: 34 |
This is making me really angry as I have tried to do a lot to fix this. I have follow a lot of tutorials on how to fix it from different forums and still it won't work. I have edit the Marlin Firmware many times to see if that's the case but it is not. It also happens to the Y axis too. I have an endstop to stop the Y axis from moving to that position but it forces and keeps pushing to the endstop. stepper Here is a few screenshot from Slic3r and Marlin.
Here is a video on YouTube that shows you how crazy these motors are.
[www.youtube.com]
Here is a video on YouTube that shows you how crazy these motors are.
[www.youtube.com]
Attachments:
open | download - 843fd0a16696d66d6bf41b180cbbe312.png (37 KB)
open | download - d53a11b0492e000b451424f4e6d6371e.png (24.1 KB)
open | download - e229975fb701644912f7c525defcd4e9.png (33.2 KB)
open | download - 02dc4f2b12323021a985a6e4d548633e.png (22.7 KB)
open | download - e9f28fd330e52c20826cbcb427b6cf77.png (22.5 KB)
open | download - 3f1a3620a8c661ab3c5df5b3ea976878.png (41.7 KB)
open | download - 6e9a3af2891d224995297a89651f39f4.png (42 KB)
open | download - 675835db5f44fe111949c8072c902cdf.png (48.4 KB)
open | download - ca1799f1c95774ba555569b55f52918c.png (47.2 KB)
|
Re: X Axis Motor Moving Away From Heatbed October 23, 2016 02:59AM |
Admin Registered: 13 years ago Posts: 7,000 |
please post your configuration.h to pastebin not pictures of it that we can't copy/paste/edit
secondly your issue "X Axis Motor Moving Away From Heatbed" makes no sense
The X axis goes left to right, its always parallel to the heatbed
The Y axis goes front to back
The Z axis goes up and down.
I'm guessing you mean its always going right. Most probably a endstop issue... see below.
You have provided zero information on your controller board
I cant see your endstosp, but im guessing they are all badly configured..... or they wouldn’t try to over run them.
Firstly I suspect you haven’t set the steps/mm to match your hardware... cant help you with this, since you provided no details on your controller.
but most boards have a way to set the stepper micro stepping. This should be be to 1/16th micro stepping
end stops are machine specific, so randomly copying someone else configuration.h will not work unless you understand what it means.
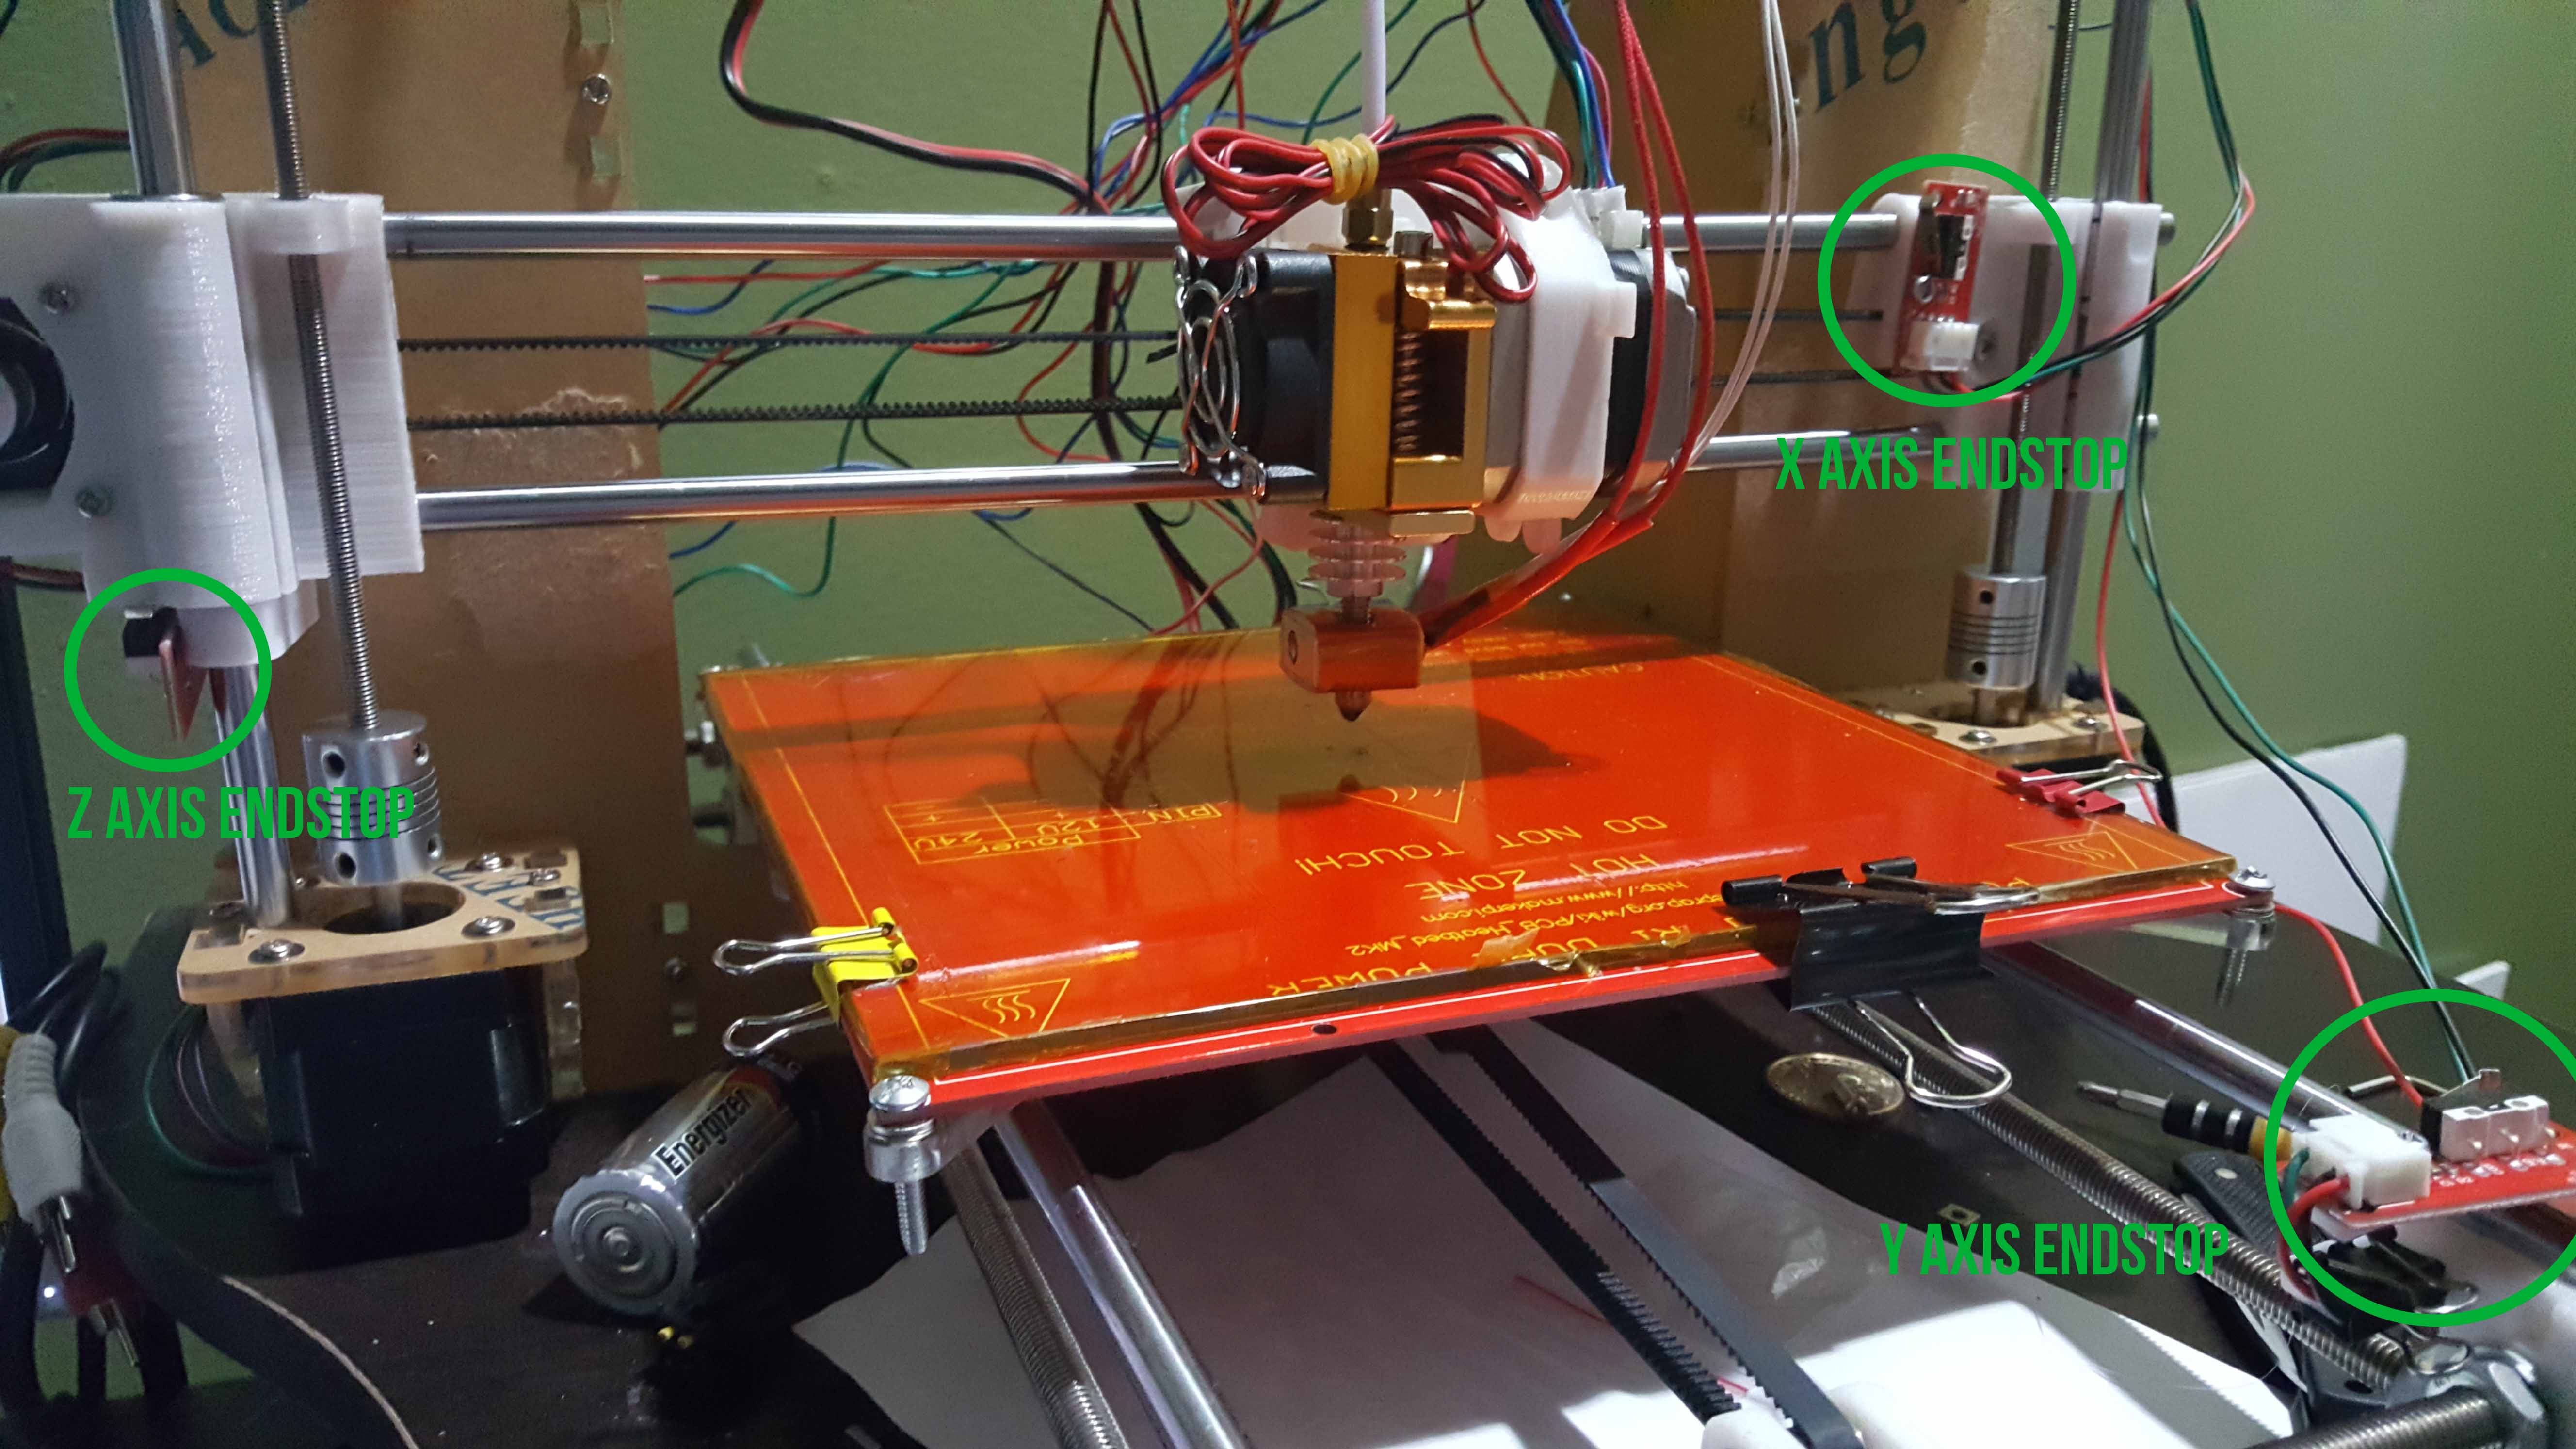
Firstly you need to identify what end stops you have.
On the X axis if the end stop is on the left its a minimum end stop, if it at the right it a maximum end stop.
On the Y axis if the end stop is at the back its a minimum end stop, if its at the front its a maximum end stop
On the Z axis if the end stop is at the bottom its a minimum end stop, if its at the top its a maximum end stop.
Now with this information setup your endstops in configuration.h to match your hardware
find the section
// ENDSTOP SETTINGS:
// Sets direction of endstops when homing; 1=MAX, -1=MIN
// :[-1,1]
#define X_HOME_DIR -1
#define Y_HOME_DIR -1
#define Z_HOME_DIR -1
and edit it for your machine if you have min endstops set to -1 and you have max endstops set to 1
now check the direction of movement.
If your click X+ the head should move right, if you click X- the head should move left.
If you click Y+ the bed should move forward, if you click Y- the bed should move back.
If you click on Z+ the head should move up, if you click Z- the head should move down.
If any of these are incorrect, find the following section in configuration.h
// Invert the stepper direction. Change (or reverse the motor connector) if an axis goes the wrong way.
#define INVERT_X_DIR
#define INVERT_Y_DIR
#define INVERT_Z_DIR
each of these will say either true of false, if they are wrong, change it to the opposite one. Ie if it says true make it false, if is said false make it true
Next test your endstops.
Move the head and bed so that no endstops are being touched.
Send the machine the command "M119" this will tell you the current status of endstops.
It should report that all endstops are current open.
Now mechanically hold down your X endstop and send the printer another M119, the X endstop should change to a triggered
Release X and Hold down Y, and send another M119, this time the Y endstop should change to triggered
Release the Y and hold done Z endstop, send another M119, this time the Z endstop should change to triggered.
If all goes well you can now home each axis as it will stop when it hits the switch.
Edited 2 time(s). Last edit at 10/23/2016 05:18AM by Dust.
secondly your issue "X Axis Motor Moving Away From Heatbed" makes no sense
The X axis goes left to right, its always parallel to the heatbed
The Y axis goes front to back
The Z axis goes up and down.
I'm guessing you mean its always going right. Most probably a endstop issue... see below.
You have provided zero information on your controller board
I cant see your endstosp, but im guessing they are all badly configured..... or they wouldn’t try to over run them.
Firstly I suspect you haven’t set the steps/mm to match your hardware... cant help you with this, since you provided no details on your controller.
but most boards have a way to set the stepper micro stepping. This should be be to 1/16th micro stepping
end stops are machine specific, so randomly copying someone else configuration.h will not work unless you understand what it means.
Firstly you need to identify what end stops you have.
On the X axis if the end stop is on the left its a minimum end stop, if it at the right it a maximum end stop.
On the Y axis if the end stop is at the back its a minimum end stop, if its at the front its a maximum end stop
On the Z axis if the end stop is at the bottom its a minimum end stop, if its at the top its a maximum end stop.
Now with this information setup your endstops in configuration.h to match your hardware
find the section
// ENDSTOP SETTINGS:
// Sets direction of endstops when homing; 1=MAX, -1=MIN
// :[-1,1]
#define X_HOME_DIR -1
#define Y_HOME_DIR -1
#define Z_HOME_DIR -1
and edit it for your machine if you have min endstops set to -1 and you have max endstops set to 1
now check the direction of movement.
If your click X+ the head should move right, if you click X- the head should move left.
If you click Y+ the bed should move forward, if you click Y- the bed should move back.
If you click on Z+ the head should move up, if you click Z- the head should move down.
If any of these are incorrect, find the following section in configuration.h
// Invert the stepper direction. Change (or reverse the motor connector) if an axis goes the wrong way.
#define INVERT_X_DIR
#define INVERT_Y_DIR
#define INVERT_Z_DIR
each of these will say either true of false, if they are wrong, change it to the opposite one. Ie if it says true make it false, if is said false make it true
Next test your endstops.
Move the head and bed so that no endstops are being touched.
Send the machine the command "M119" this will tell you the current status of endstops.
It should report that all endstops are current open.
Now mechanically hold down your X endstop and send the printer another M119, the X endstop should change to a triggered
Release X and Hold down Y, and send another M119, this time the Y endstop should change to triggered
Release the Y and hold done Z endstop, send another M119, this time the Z endstop should change to triggered.
If all goes well you can now home each axis as it will stop when it hits the switch.
Edited 2 time(s). Last edit at 10/23/2016 05:18AM by Dust.
|
Re: X Axis Motor Moving Away From Heatbed October 23, 2016 06:00AM |
Registered: 7 years ago Posts: 759 |
|
Re: X Axis Motor Moving Away From Heatbed October 23, 2016 11:47AM |
Registered: 7 years ago Posts: 34 |
How does it not make any sense? I only said that the X axis is moving out of the heatbed, meaning that if that heatbed is 200mm x 200mm the X axis moves 230mm. It does not stay in the middle where the object has to be printed.
The Y axis goes both directions but most of the time, probably like 80% of the time goes to the front pushing the endstop with force.
When sending the code M119 it does says that the min for X, Y, and Z are open.
The Y axis goes both directions but most of the time, probably like 80% of the time goes to the front pushing the endstop with force.
When sending the code M119 it does says that the min for X, Y, and Z are open.
|
Re: X Axis Motor Moving Away From Heatbed October 23, 2016 11:56AM |
Registered: 7 years ago Posts: 34 |
|
Re: X Axis Motor Moving Away From Heatbed October 23, 2016 12:02PM |
Registered: 7 years ago Posts: 34 |
|
Re: X Axis Motor Moving Away From Heatbed October 23, 2016 12:04PM |
Registered: 7 years ago Posts: 34 |
This is my Marlin configure.h
//===========================================================================
//============================== Endstop Settings ===========================
//===========================================================================
// @section homing
// Specify here all the endstop connectors that are connected to any endstop or probe.
// Almost all printers will be using one per axis. Probes will use one or more of the
// extra connectors. Leave undefined any used for non-endstop and non-probe purposes.
#define USE_XMIN_PLUG
#define USE_YMIN_PLUG
#define USE_ZMIN_PLUG
//#define USE_XMAX_PLUG
//#define USE_YMAX_PLUG
//#define USE_ZMAX_PLUG
// coarse Endstop Settings
#define ENDSTOPPULLUPS // Comment this out (using // at the start of the line) to disable the endstop pullup resistors
#if DISABLED(ENDSTOPPULLUPS)
// fine endstop settings: Individual pullups. will be ignored if ENDSTOPPULLUPS is defined
#define ENDSTOPPULLUP_XMAX
#define ENDSTOPPULLUP_YMAX
#define ENDSTOPPULLUP_ZMAX
#define ENDSTOPPULLUP_XMIN true
#define ENDSTOPPULLUP_YMIN true
#define ENDSTOPPULLUP_ZMIN true
#define ENDSTOPPULLUP_ZMIN_PROBE
#endif
// Mechanical endstop with COM to ground and NC to Signal uses "false" here (most common setup).
#define X_MIN_ENDSTOP_INVERTING true // set to true to invert the logic of the endstop.
#define Y_MIN_ENDSTOP_INVERTING true // set to true to invert the logic of the endstop.
#define Z_MIN_ENDSTOP_INVERTING true // set to true to invert the logic of the endstop.
#define X_MAX_ENDSTOP_INVERTING false // set to true to invert the logic of the endstop.
#define Y_MAX_ENDSTOP_INVERTING false // set to true to invert the logic of the endstop.
#define Z_MAX_ENDSTOP_INVERTING false // set to true to invert the logic of the endstop.
#define Z_MIN_PROBE_ENDSTOP_INVERTING false // set to true to invert the logic of the endstop.
//===========================================================================
//============================= Z Probe Options =============================
//===========================================================================
//
// Probe Type
// Probes are sensors/switches that are activated / deactivated before/after use.
//
// Allen Key Probes, Servo Probes, Z-Sled Probes, FIX_MOUNTED_PROBE, etc.
// You must activate one of these to use AUTO_BED_LEVELING_FEATURE below.
//
// Use M851 to set the Z probe vertical offset from the nozzle. Store with M500.
//
// A Fix-Mounted Probe either doesn't deploy or needs manual deployment.
// For example an inductive probe, or a setup that uses the nozzle to probe.
// An inductive probe must be deactivated to go below
// its trigger-point if hardware endstops are active.
//#define FIX_MOUNTED_PROBE
// The BLTouch probe emulates a servo probe.
//#define BLTOUCH
// Z Servo Probe, such as an endstop switch on a rotating arm.
//#define Z_ENDSTOP_SERVO_NR 0
//#define Z_SERVO_ANGLES {70,0} // Z Servo Deploy and Stow angles
// Enable if you have a Z probe mounted on a sled like those designed by Charles Bell.
//#define Z_PROBE_SLED
//#define SLED_DOCKING_OFFSET 5 // The extra distance the X axis must travel to pickup the sled. 0 should be fine but you can push it further if you'd like.
// Z Probe to nozzle (X,Y) offset, relative to (0, 0).
// X and Y offsets must be integers.
//
// In the following example the X and Y offsets are both positive:
// #define X_PROBE_OFFSET_FROM_EXTRUDER 10
// #define Y_PROBE_OFFSET_FROM_EXTRUDER 10
//
// +-- BACK ---+
// | |
// L | (+) P | R <-- probe (20,20)
// E | | I
// F | (-) N (+) | G <-- nozzle (10,10)
// T | | H
// | (-) | T
// | |
// O-- FRONT --+
// (0,0)
#define X_PROBE_OFFSET_FROM_EXTRUDER -24.3 // X offset: -left +right [of the nozzle]
#define Y_PROBE_OFFSET_FROM_EXTRUDER 31.4 // Y offset: -front +behind [the nozzle]
#define Z_PROBE_OFFSET_FROM_EXTRUDER -5.1 // Z offset: -below +above [the nozzle]
// X and Y axis travel speed (mm/m) between probes
#define XY_PROBE_SPEED 6000
// Speed for the first approach when double-probing (with PROBE_DOUBLE_TOUCH)
#define Z_PROBE_SPEED_FAST HOMING_FEEDRATE_Z
// Speed for the "accurate" probe of each point
#define Z_PROBE_SPEED_SLOW (Z_PROBE_SPEED_FAST / 2)
// Use double touch for probing
//#define PROBE_DOUBLE_TOUCH
//
// Allen Key Probe is defined in the Delta example configurations.
//
// Enable Z_MIN_PROBE_ENDSTOP to use _both_ a Z Probe and a Z-min-endstop on the same machine.
// With this option the Z_MIN_PROBE_PIN will only be used for probing, never for homing.
//
// *** PLEASE READ ALL INSTRUCTIONS BELOW FOR SAFETY! ***
//
// To continue using the Z-min-endstop for homing, be sure to disable Z_SAFE_HOMING.
// Example: To park the head outside the bed area when homing with G28.
//
// To use a separate Z probe, your board must define a Z_MIN_PROBE_PIN.
//
// For a servo-based Z probe, you must set up servo support below, including
// NUM_SERVOS, Z_ENDSTOP_SERVO_NR and Z_SERVO_ANGLES.
//
// - RAMPS 1.3/1.4 boards may be able to use the 5V, GND, and Aux4->D32 pin.
// - Use 5V for powered (usu. inductive) sensors.
// - Otherwise connect:
// - normally-closed switches to GND and D32.
// - normally-open switches to 5V and D32.
//
// Normally-closed switches are advised and are the default.
//
// The Z_MIN_PROBE_PIN sets the Arduino pin to use. (See your board's pins file.)
// Since the RAMPS Aux4->D32 pin maps directly to the Arduino D32 pin, D32 is the
// default pin for all RAMPS-based boards. Some other boards map differently.
// To set or change the pin for your board, edit the appropriate pins_XXXXX.h file.
//
// WARNING:
// Setting the wrong pin may have unexpected and potentially disastrous consequences.
// Use with caution and do your homework.
//
//#define Z_MIN_PROBE_ENDSTOP
// Enable Z_MIN_PROBE_USES_Z_MIN_ENDSTOP_PIN to use the Z_MIN_PIN for your Z_MIN_PROBE.
// The Z_MIN_PIN will then be used for both Z-homing and probing.
#define Z_MIN_PROBE_USES_Z_MIN_ENDSTOP_PIN
// To use a probe you must enable one of the two options above!
// This option disables the use of the Z_MIN_PROBE_PIN
// To enable the Z probe pin but disable its use, uncomment the line below. This only affects a
// Z probe switch if you have a separate Z min endstop also and have activated Z_MIN_PROBE_ENDSTOP above.
// If you're using the Z MIN endstop connector for your Z probe, this has no effect.
//#define DISABLE_Z_MIN_PROBE_ENDSTOP
// Enable Z Probe Repeatability test to see how accurate your probe is
//#define Z_MIN_PROBE_REPEATABILITY_TEST
//
// Probe Raise options provide clearance for the probe to deploy, stow, and travel.
//
#define Z_PROBE_DEPLOY_HEIGHT 15 // Raise to make room for the probe to deploy / stow
#define Z_PROBE_TRAVEL_HEIGHT 5 // Raise between probing points.
//
// For M851 give a range for adjusting the Z probe offset
//
#define Z_PROBE_OFFSET_RANGE_MIN -20
#define Z_PROBE_OFFSET_RANGE_MAX 20
// For Inverting Stepper Enable Pins (Active Low) use 0, Non Inverting (Active High) use 1
// :{0:'Low',1:'High'}
#define X_ENABLE_ON 0
#define Y_ENABLE_ON 0
#define Z_ENABLE_ON 0
#define E_ENABLE_ON 0 // For all extruders
// Disables axis stepper immediately when it's not being used.
// WARNING: When motors turn off there is a chance of losing position accuracy!
#define DISABLE_X false
#define DISABLE_Y false
#define DISABLE_Z false
// Warn on display about possibly reduced accuracy
//#define DISABLE_REDUCED_ACCURACY_WARNING
// @section extruder
#define DISABLE_E false // For all extruders
#define DISABLE_INACTIVE_EXTRUDER true //disable only inactive extruders and keep active extruder enabled
// @section machine
// Invert the stepper direction. Change (or reverse the motor connector) if an axis goes the wrong way.
#define INVERT_X_DIR true
#define INVERT_Y_DIR true
#define INVERT_Z_DIR true
// @section extruder
// For direct drive extruder v9 set to true, for geared extruder set to false.
#define INVERT_E0_DIR true // true for your direct drive extruder
#define INVERT_E1_DIR false
#define INVERT_E2_DIR false
#define INVERT_E3_DIR false
// @section homing
//#define Z_HOMING_HEIGHT 4 // (in mm) Minimal z height before homing (G28) for Z clearance above the bed, clamps, ...
// Be sure you have this distance over your Z_MAX_POS in case.
// ENDSTOP SETTINGS:
// Sets direction of endstops when homing; 1=MAX, -1=MIN
// :[-1,1]
#define X_HOME_DIR -1
#define Y_HOME_DIR -1
#define Z_HOME_DIR -1
#define min_software_endstops true // If true, axis won't move to coordinates less than HOME_POS.
#define max_software_endstops true // If true, axis won't move to coordinates greater than the defined lengths below.
// @section machine
// Travel limits after homing (units are in mm)
#define X_MIN_POS 0
#define Y_MIN_POS 0
#define Z_MIN_POS 0
#define X_MAX_POS 203
#define Y_MAX_POS 190
#define Z_MAX_POS 200
//===========================================================================
//========================= Filament Runout Sensor ==========================
//===========================================================================
//#define FILAMENT_RUNOUT_SENSOR // Uncomment for defining a filament runout sensor such as a mechanical or opto endstop to check the existence of filament
// In RAMPS uses servo pin 2. Can be changed in pins file. For other boards pin definition should be made.
// It is assumed that when logic high = filament available
// when logic low = filament ran out
#if ENABLED(FILAMENT_RUNOUT_SENSOR)
const bool FIL_RUNOUT_INVERTING = false; // set to true to invert the logic of the sensor.
#define ENDSTOPPULLUP_FIL_RUNOUT // Uncomment to use internal pullup for filament runout pins if the sensor is defined.
#define FILAMENT_RUNOUT_SCRIPT "M600"
#endif
//===========================================================================
//============================ Mesh Bed Leveling ============================
//===========================================================================
//#define MESH_BED_LEVELING // Enable mesh bed leveling.
#if ENABLED(MESH_BED_LEVELING)
#define MESH_INSET 10 // Mesh inset margin on print area
#define MESH_NUM_X_POINTS 3 // Don't use more than 7 points per axis, implementation limited.
#define MESH_NUM_Y_POINTS 3
#define MESH_HOME_SEARCH_Z 4 // Z after Home, bed somewhere below but above 0.0.
//#define MESH_G28_REST_ORIGIN // After homing all axes ('G28' or 'G28 XYZ') rest at origin [0,0,0]
//#define MANUAL_BED_LEVELING // Add display menu option for bed leveling.
#if ENABLED(MANUAL_BED_LEVELING)
#define MBL_Z_STEP 0.025 // Step size while manually probing Z axis.
#endif // MANUAL_BED_LEVELING
#endif // MESH_BED_LEVELING
//===========================================================================
//============================ Bed Auto Leveling ============================
//===========================================================================
// @section bedlevel
//#define AUTO_BED_LEVELING_FEATURE // Delete the comment to enable (remove // at the start of the line)
// Enable this feature to get detailed logging of G28, G29, M48, etc.
// Logging is off by default. Enable this logging feature with 'M111 S32'.
// NOTE: Requires a huge amount of PROGMEM.
//#define DEBUG_LEVELING_FEATURE
#if ENABLED(AUTO_BED_LEVELING_FEATURE)
// There are 2 different ways to specify probing locations:
//
// - "grid" mode
// Probe several points in a rectangular grid.
// You specify the rectangle and the density of sample points.
// This mode is preferred because there are more measurements.
//
// - "3-point" mode
// Probe 3 arbitrary points on the bed (that aren't collinear)
// You specify the XY coordinates of all 3 points.
// Enable this to sample the bed in a grid (least squares solution).
// Note: this feature generates 10KB extra code size.
#define AUTO_BED_LEVELING_GRID
#if ENABLED(AUTO_BED_LEVELING_GRID)
#define LEFT_PROBE_BED_POSITION 0
#define RIGHT_PROBE_BED_POSITION 170
#define FRONT_PROBE_BED_POSITION 200
#define BACK_PROBE_BED_POSITION 0
#define MIN_PROBE_EDGE 10 // The Z probe minimum square sides can be no smaller than this.
// Set the number of grid points per dimension.
// You probably don't need more than 3 (squared=9).
#define AUTO_BED_LEVELING_GRID_POINTS 2
#else // !AUTO_BED_LEVELING_GRID
// Arbitrary points to probe.
// A simple cross-product is used to estimate the plane of the bed.
#define ABL_PROBE_PT_1_X 15
#define ABL_PROBE_PT_1_Y 180
#define ABL_PROBE_PT_2_X 15
#define ABL_PROBE_PT_2_Y 20
#define ABL_PROBE_PT_3_X 170
#define ABL_PROBE_PT_3_Y 20
#endif // !AUTO_BED_LEVELING_GRID
//#define Z_PROBE_END_SCRIPT "G1 Z10 F12000\nG1 X15 Y330\nG1 Z0.5\nG1 Z10" // These commands will be executed in the end of G29 routine.
// Useful to retract a deployable Z probe.
// If you've enabled AUTO_BED_LEVELING_FEATURE and are using the Z Probe for Z Homing,
// it is highly recommended you also enable Z_SAFE_HOMING below!
#endif // AUTO_BED_LEVELING_FEATURE
// @section homing
// The center of the bed is at (X=0, Y=0)
//#define BED_CENTER_AT_0_0
// Manually set the home position. Leave these undefined for automatic settings.
// For DELTA this is the top-center of the Cartesian print volume.
//#define MANUAL_X_HOME_POS 0
//#define MANUAL_Y_HOME_POS 0
//#define MANUAL_Z_HOME_POS 0 // Distance between the nozzle to printbed after homing
// Use "Z Safe Homing" to avoid homing with a Z probe outside the bed area.
//
// With this feature enabled:
//
// - Allow Z homing only after X and Y homing AND stepper drivers still enabled.
// - If stepper drivers time out, it will need X and Y homing again before Z homing.
// - Move the Z probe (or nozzle) to a defined XY point before Z Homing when homing all axes (G28).
// - Prevent Z homing when the Z probe is outside bed area.
//#define Z_SAFE_HOMING
#if ENABLED(Z_SAFE_HOMING)
#define Z_SAFE_HOMING_X_POINT ((X_MIN_POS + X_MAX_POS) / 2) // X point for Z homing when homing all axis (G28).
#define Z_SAFE_HOMING_Y_POINT ((Y_MIN_POS + Y_MAX_POS) / 2) // Y point for Z homing when homing all axis (G28).
#endif
// Homing speeds (mm/m)
#define HOMING_FEEDRATE_XY (50*60)
#define HOMING_FEEDRATE_Z (2*60)
//
// MOVEMENT SETTINGS
// @section motion
//
// default settings
#define DEFAULT_AXIS_STEPS_PER_UNIT {80,80,2560,94} // default steps per unit for Ultimaker
#define DEFAULT_MAX_FEEDRATE {300, 300, 2, 25} // (mm/sec)
#define DEFAULT_MAX_ACCELERATION {3000,3000,100,10000} // X, Y, Z, E maximum start speed for accelerated moves. E default values are good for Skeinforge 40+, for older versions raise them a lot.
#define DEFAULT_ACCELERATION 3000 // X, Y, Z and E acceleration in mm/s^2 for printing moves
#define DEFAULT_RETRACT_ACCELERATION 3000 // E acceleration in mm/s^2 for retracts
#define DEFAULT_TRAVEL_ACCELERATION 3000 // X, Y, Z acceleration in mm/s^2 for travel (non printing) moves
// The speed change that does not require acceleration (i.e. the software might assume it can be done instantaneously)
#define DEFAULT_XYJERK 20.0 // (mm/sec)
#define DEFAULT_ZJERK 0.4 // (mm/sec)
#define DEFAULT_EJERK 5.0 // (mm/sec)
//===========================================================================
//============================== Endstop Settings ===========================
//===========================================================================
// @section homing
// Specify here all the endstop connectors that are connected to any endstop or probe.
// Almost all printers will be using one per axis. Probes will use one or more of the
// extra connectors. Leave undefined any used for non-endstop and non-probe purposes.
#define USE_XMIN_PLUG
#define USE_YMIN_PLUG
#define USE_ZMIN_PLUG
//#define USE_XMAX_PLUG
//#define USE_YMAX_PLUG
//#define USE_ZMAX_PLUG
// coarse Endstop Settings
#define ENDSTOPPULLUPS // Comment this out (using // at the start of the line) to disable the endstop pullup resistors
#if DISABLED(ENDSTOPPULLUPS)
// fine endstop settings: Individual pullups. will be ignored if ENDSTOPPULLUPS is defined
#define ENDSTOPPULLUP_XMAX
#define ENDSTOPPULLUP_YMAX
#define ENDSTOPPULLUP_ZMAX
#define ENDSTOPPULLUP_XMIN true
#define ENDSTOPPULLUP_YMIN true
#define ENDSTOPPULLUP_ZMIN true
#define ENDSTOPPULLUP_ZMIN_PROBE
#endif
// Mechanical endstop with COM to ground and NC to Signal uses "false" here (most common setup).
#define X_MIN_ENDSTOP_INVERTING true // set to true to invert the logic of the endstop.
#define Y_MIN_ENDSTOP_INVERTING true // set to true to invert the logic of the endstop.
#define Z_MIN_ENDSTOP_INVERTING true // set to true to invert the logic of the endstop.
#define X_MAX_ENDSTOP_INVERTING false // set to true to invert the logic of the endstop.
#define Y_MAX_ENDSTOP_INVERTING false // set to true to invert the logic of the endstop.
#define Z_MAX_ENDSTOP_INVERTING false // set to true to invert the logic of the endstop.
#define Z_MIN_PROBE_ENDSTOP_INVERTING false // set to true to invert the logic of the endstop.
//===========================================================================
//============================= Z Probe Options =============================
//===========================================================================
//
// Probe Type
// Probes are sensors/switches that are activated / deactivated before/after use.
//
// Allen Key Probes, Servo Probes, Z-Sled Probes, FIX_MOUNTED_PROBE, etc.
// You must activate one of these to use AUTO_BED_LEVELING_FEATURE below.
//
// Use M851 to set the Z probe vertical offset from the nozzle. Store with M500.
//
// A Fix-Mounted Probe either doesn't deploy or needs manual deployment.
// For example an inductive probe, or a setup that uses the nozzle to probe.
// An inductive probe must be deactivated to go below
// its trigger-point if hardware endstops are active.
//#define FIX_MOUNTED_PROBE
// The BLTouch probe emulates a servo probe.
//#define BLTOUCH
// Z Servo Probe, such as an endstop switch on a rotating arm.
//#define Z_ENDSTOP_SERVO_NR 0
//#define Z_SERVO_ANGLES {70,0} // Z Servo Deploy and Stow angles
// Enable if you have a Z probe mounted on a sled like those designed by Charles Bell.
//#define Z_PROBE_SLED
//#define SLED_DOCKING_OFFSET 5 // The extra distance the X axis must travel to pickup the sled. 0 should be fine but you can push it further if you'd like.
// Z Probe to nozzle (X,Y) offset, relative to (0, 0).
// X and Y offsets must be integers.
//
// In the following example the X and Y offsets are both positive:
// #define X_PROBE_OFFSET_FROM_EXTRUDER 10
// #define Y_PROBE_OFFSET_FROM_EXTRUDER 10
//
// +-- BACK ---+
// | |
// L | (+) P | R <-- probe (20,20)
// E | | I
// F | (-) N (+) | G <-- nozzle (10,10)
// T | | H
// | (-) | T
// | |
// O-- FRONT --+
// (0,0)
#define X_PROBE_OFFSET_FROM_EXTRUDER -24.3 // X offset: -left +right [of the nozzle]
#define Y_PROBE_OFFSET_FROM_EXTRUDER 31.4 // Y offset: -front +behind [the nozzle]
#define Z_PROBE_OFFSET_FROM_EXTRUDER -5.1 // Z offset: -below +above [the nozzle]
// X and Y axis travel speed (mm/m) between probes
#define XY_PROBE_SPEED 6000
// Speed for the first approach when double-probing (with PROBE_DOUBLE_TOUCH)
#define Z_PROBE_SPEED_FAST HOMING_FEEDRATE_Z
// Speed for the "accurate" probe of each point
#define Z_PROBE_SPEED_SLOW (Z_PROBE_SPEED_FAST / 2)
// Use double touch for probing
//#define PROBE_DOUBLE_TOUCH
//
// Allen Key Probe is defined in the Delta example configurations.
//
// Enable Z_MIN_PROBE_ENDSTOP to use _both_ a Z Probe and a Z-min-endstop on the same machine.
// With this option the Z_MIN_PROBE_PIN will only be used for probing, never for homing.
//
// *** PLEASE READ ALL INSTRUCTIONS BELOW FOR SAFETY! ***
//
// To continue using the Z-min-endstop for homing, be sure to disable Z_SAFE_HOMING.
// Example: To park the head outside the bed area when homing with G28.
//
// To use a separate Z probe, your board must define a Z_MIN_PROBE_PIN.
//
// For a servo-based Z probe, you must set up servo support below, including
// NUM_SERVOS, Z_ENDSTOP_SERVO_NR and Z_SERVO_ANGLES.
//
// - RAMPS 1.3/1.4 boards may be able to use the 5V, GND, and Aux4->D32 pin.
// - Use 5V for powered (usu. inductive) sensors.
// - Otherwise connect:
// - normally-closed switches to GND and D32.
// - normally-open switches to 5V and D32.
//
// Normally-closed switches are advised and are the default.
//
// The Z_MIN_PROBE_PIN sets the Arduino pin to use. (See your board's pins file.)
// Since the RAMPS Aux4->D32 pin maps directly to the Arduino D32 pin, D32 is the
// default pin for all RAMPS-based boards. Some other boards map differently.
// To set or change the pin for your board, edit the appropriate pins_XXXXX.h file.
//
// WARNING:
// Setting the wrong pin may have unexpected and potentially disastrous consequences.
// Use with caution and do your homework.
//
//#define Z_MIN_PROBE_ENDSTOP
// Enable Z_MIN_PROBE_USES_Z_MIN_ENDSTOP_PIN to use the Z_MIN_PIN for your Z_MIN_PROBE.
// The Z_MIN_PIN will then be used for both Z-homing and probing.
#define Z_MIN_PROBE_USES_Z_MIN_ENDSTOP_PIN
// To use a probe you must enable one of the two options above!
// This option disables the use of the Z_MIN_PROBE_PIN
// To enable the Z probe pin but disable its use, uncomment the line below. This only affects a
// Z probe switch if you have a separate Z min endstop also and have activated Z_MIN_PROBE_ENDSTOP above.
// If you're using the Z MIN endstop connector for your Z probe, this has no effect.
//#define DISABLE_Z_MIN_PROBE_ENDSTOP
// Enable Z Probe Repeatability test to see how accurate your probe is
//#define Z_MIN_PROBE_REPEATABILITY_TEST
//
// Probe Raise options provide clearance for the probe to deploy, stow, and travel.
//
#define Z_PROBE_DEPLOY_HEIGHT 15 // Raise to make room for the probe to deploy / stow
#define Z_PROBE_TRAVEL_HEIGHT 5 // Raise between probing points.
//
// For M851 give a range for adjusting the Z probe offset
//
#define Z_PROBE_OFFSET_RANGE_MIN -20
#define Z_PROBE_OFFSET_RANGE_MAX 20
// For Inverting Stepper Enable Pins (Active Low) use 0, Non Inverting (Active High) use 1
// :{0:'Low',1:'High'}
#define X_ENABLE_ON 0
#define Y_ENABLE_ON 0
#define Z_ENABLE_ON 0
#define E_ENABLE_ON 0 // For all extruders
// Disables axis stepper immediately when it's not being used.
// WARNING: When motors turn off there is a chance of losing position accuracy!
#define DISABLE_X false
#define DISABLE_Y false
#define DISABLE_Z false
// Warn on display about possibly reduced accuracy
//#define DISABLE_REDUCED_ACCURACY_WARNING
// @section extruder
#define DISABLE_E false // For all extruders
#define DISABLE_INACTIVE_EXTRUDER true //disable only inactive extruders and keep active extruder enabled
// @section machine
// Invert the stepper direction. Change (or reverse the motor connector) if an axis goes the wrong way.
#define INVERT_X_DIR true
#define INVERT_Y_DIR true
#define INVERT_Z_DIR true
// @section extruder
// For direct drive extruder v9 set to true, for geared extruder set to false.
#define INVERT_E0_DIR true // true for your direct drive extruder
#define INVERT_E1_DIR false
#define INVERT_E2_DIR false
#define INVERT_E3_DIR false
// @section homing
//#define Z_HOMING_HEIGHT 4 // (in mm) Minimal z height before homing (G28) for Z clearance above the bed, clamps, ...
// Be sure you have this distance over your Z_MAX_POS in case.
// ENDSTOP SETTINGS:
// Sets direction of endstops when homing; 1=MAX, -1=MIN
// :[-1,1]
#define X_HOME_DIR -1
#define Y_HOME_DIR -1
#define Z_HOME_DIR -1
#define min_software_endstops true // If true, axis won't move to coordinates less than HOME_POS.
#define max_software_endstops true // If true, axis won't move to coordinates greater than the defined lengths below.
// @section machine
// Travel limits after homing (units are in mm)
#define X_MIN_POS 0
#define Y_MIN_POS 0
#define Z_MIN_POS 0
#define X_MAX_POS 203
#define Y_MAX_POS 190
#define Z_MAX_POS 200
//===========================================================================
//========================= Filament Runout Sensor ==========================
//===========================================================================
//#define FILAMENT_RUNOUT_SENSOR // Uncomment for defining a filament runout sensor such as a mechanical or opto endstop to check the existence of filament
// In RAMPS uses servo pin 2. Can be changed in pins file. For other boards pin definition should be made.
// It is assumed that when logic high = filament available
// when logic low = filament ran out
#if ENABLED(FILAMENT_RUNOUT_SENSOR)
const bool FIL_RUNOUT_INVERTING = false; // set to true to invert the logic of the sensor.
#define ENDSTOPPULLUP_FIL_RUNOUT // Uncomment to use internal pullup for filament runout pins if the sensor is defined.
#define FILAMENT_RUNOUT_SCRIPT "M600"
#endif
//===========================================================================
//============================ Mesh Bed Leveling ============================
//===========================================================================
//#define MESH_BED_LEVELING // Enable mesh bed leveling.
#if ENABLED(MESH_BED_LEVELING)
#define MESH_INSET 10 // Mesh inset margin on print area
#define MESH_NUM_X_POINTS 3 // Don't use more than 7 points per axis, implementation limited.
#define MESH_NUM_Y_POINTS 3
#define MESH_HOME_SEARCH_Z 4 // Z after Home, bed somewhere below but above 0.0.
//#define MESH_G28_REST_ORIGIN // After homing all axes ('G28' or 'G28 XYZ') rest at origin [0,0,0]
//#define MANUAL_BED_LEVELING // Add display menu option for bed leveling.
#if ENABLED(MANUAL_BED_LEVELING)
#define MBL_Z_STEP 0.025 // Step size while manually probing Z axis.
#endif // MANUAL_BED_LEVELING
#endif // MESH_BED_LEVELING
//===========================================================================
//============================ Bed Auto Leveling ============================
//===========================================================================
// @section bedlevel
//#define AUTO_BED_LEVELING_FEATURE // Delete the comment to enable (remove // at the start of the line)
// Enable this feature to get detailed logging of G28, G29, M48, etc.
// Logging is off by default. Enable this logging feature with 'M111 S32'.
// NOTE: Requires a huge amount of PROGMEM.
//#define DEBUG_LEVELING_FEATURE
#if ENABLED(AUTO_BED_LEVELING_FEATURE)
// There are 2 different ways to specify probing locations:
//
// - "grid" mode
// Probe several points in a rectangular grid.
// You specify the rectangle and the density of sample points.
// This mode is preferred because there are more measurements.
//
// - "3-point" mode
// Probe 3 arbitrary points on the bed (that aren't collinear)
// You specify the XY coordinates of all 3 points.
// Enable this to sample the bed in a grid (least squares solution).
// Note: this feature generates 10KB extra code size.
#define AUTO_BED_LEVELING_GRID
#if ENABLED(AUTO_BED_LEVELING_GRID)
#define LEFT_PROBE_BED_POSITION 0
#define RIGHT_PROBE_BED_POSITION 170
#define FRONT_PROBE_BED_POSITION 200
#define BACK_PROBE_BED_POSITION 0
#define MIN_PROBE_EDGE 10 // The Z probe minimum square sides can be no smaller than this.
// Set the number of grid points per dimension.
// You probably don't need more than 3 (squared=9).
#define AUTO_BED_LEVELING_GRID_POINTS 2
#else // !AUTO_BED_LEVELING_GRID
// Arbitrary points to probe.
// A simple cross-product is used to estimate the plane of the bed.
#define ABL_PROBE_PT_1_X 15
#define ABL_PROBE_PT_1_Y 180
#define ABL_PROBE_PT_2_X 15
#define ABL_PROBE_PT_2_Y 20
#define ABL_PROBE_PT_3_X 170
#define ABL_PROBE_PT_3_Y 20
#endif // !AUTO_BED_LEVELING_GRID
//#define Z_PROBE_END_SCRIPT "G1 Z10 F12000\nG1 X15 Y330\nG1 Z0.5\nG1 Z10" // These commands will be executed in the end of G29 routine.
// Useful to retract a deployable Z probe.
// If you've enabled AUTO_BED_LEVELING_FEATURE and are using the Z Probe for Z Homing,
// it is highly recommended you also enable Z_SAFE_HOMING below!
#endif // AUTO_BED_LEVELING_FEATURE
// @section homing
// The center of the bed is at (X=0, Y=0)
//#define BED_CENTER_AT_0_0
// Manually set the home position. Leave these undefined for automatic settings.
// For DELTA this is the top-center of the Cartesian print volume.
//#define MANUAL_X_HOME_POS 0
//#define MANUAL_Y_HOME_POS 0
//#define MANUAL_Z_HOME_POS 0 // Distance between the nozzle to printbed after homing
// Use "Z Safe Homing" to avoid homing with a Z probe outside the bed area.
//
// With this feature enabled:
//
// - Allow Z homing only after X and Y homing AND stepper drivers still enabled.
// - If stepper drivers time out, it will need X and Y homing again before Z homing.
// - Move the Z probe (or nozzle) to a defined XY point before Z Homing when homing all axes (G28).
// - Prevent Z homing when the Z probe is outside bed area.
//#define Z_SAFE_HOMING
#if ENABLED(Z_SAFE_HOMING)
#define Z_SAFE_HOMING_X_POINT ((X_MIN_POS + X_MAX_POS) / 2) // X point for Z homing when homing all axis (G28).
#define Z_SAFE_HOMING_Y_POINT ((Y_MIN_POS + Y_MAX_POS) / 2) // Y point for Z homing when homing all axis (G28).
#endif
// Homing speeds (mm/m)
#define HOMING_FEEDRATE_XY (50*60)
#define HOMING_FEEDRATE_Z (2*60)
//
// MOVEMENT SETTINGS
// @section motion
//
// default settings
#define DEFAULT_AXIS_STEPS_PER_UNIT {80,80,2560,94} // default steps per unit for Ultimaker
#define DEFAULT_MAX_FEEDRATE {300, 300, 2, 25} // (mm/sec)
#define DEFAULT_MAX_ACCELERATION {3000,3000,100,10000} // X, Y, Z, E maximum start speed for accelerated moves. E default values are good for Skeinforge 40+, for older versions raise them a lot.
#define DEFAULT_ACCELERATION 3000 // X, Y, Z and E acceleration in mm/s^2 for printing moves
#define DEFAULT_RETRACT_ACCELERATION 3000 // E acceleration in mm/s^2 for retracts
#define DEFAULT_TRAVEL_ACCELERATION 3000 // X, Y, Z acceleration in mm/s^2 for travel (non printing) moves
// The speed change that does not require acceleration (i.e. the software might assume it can be done instantaneously)
#define DEFAULT_XYJERK 20.0 // (mm/sec)
#define DEFAULT_ZJERK 0.4 // (mm/sec)
#define DEFAULT_EJERK 5.0 // (mm/sec)
|
Re: X Axis Motor Moving Away From Heatbed October 23, 2016 08:57PM |
Admin Registered: 13 years ago Posts: 7,000 |
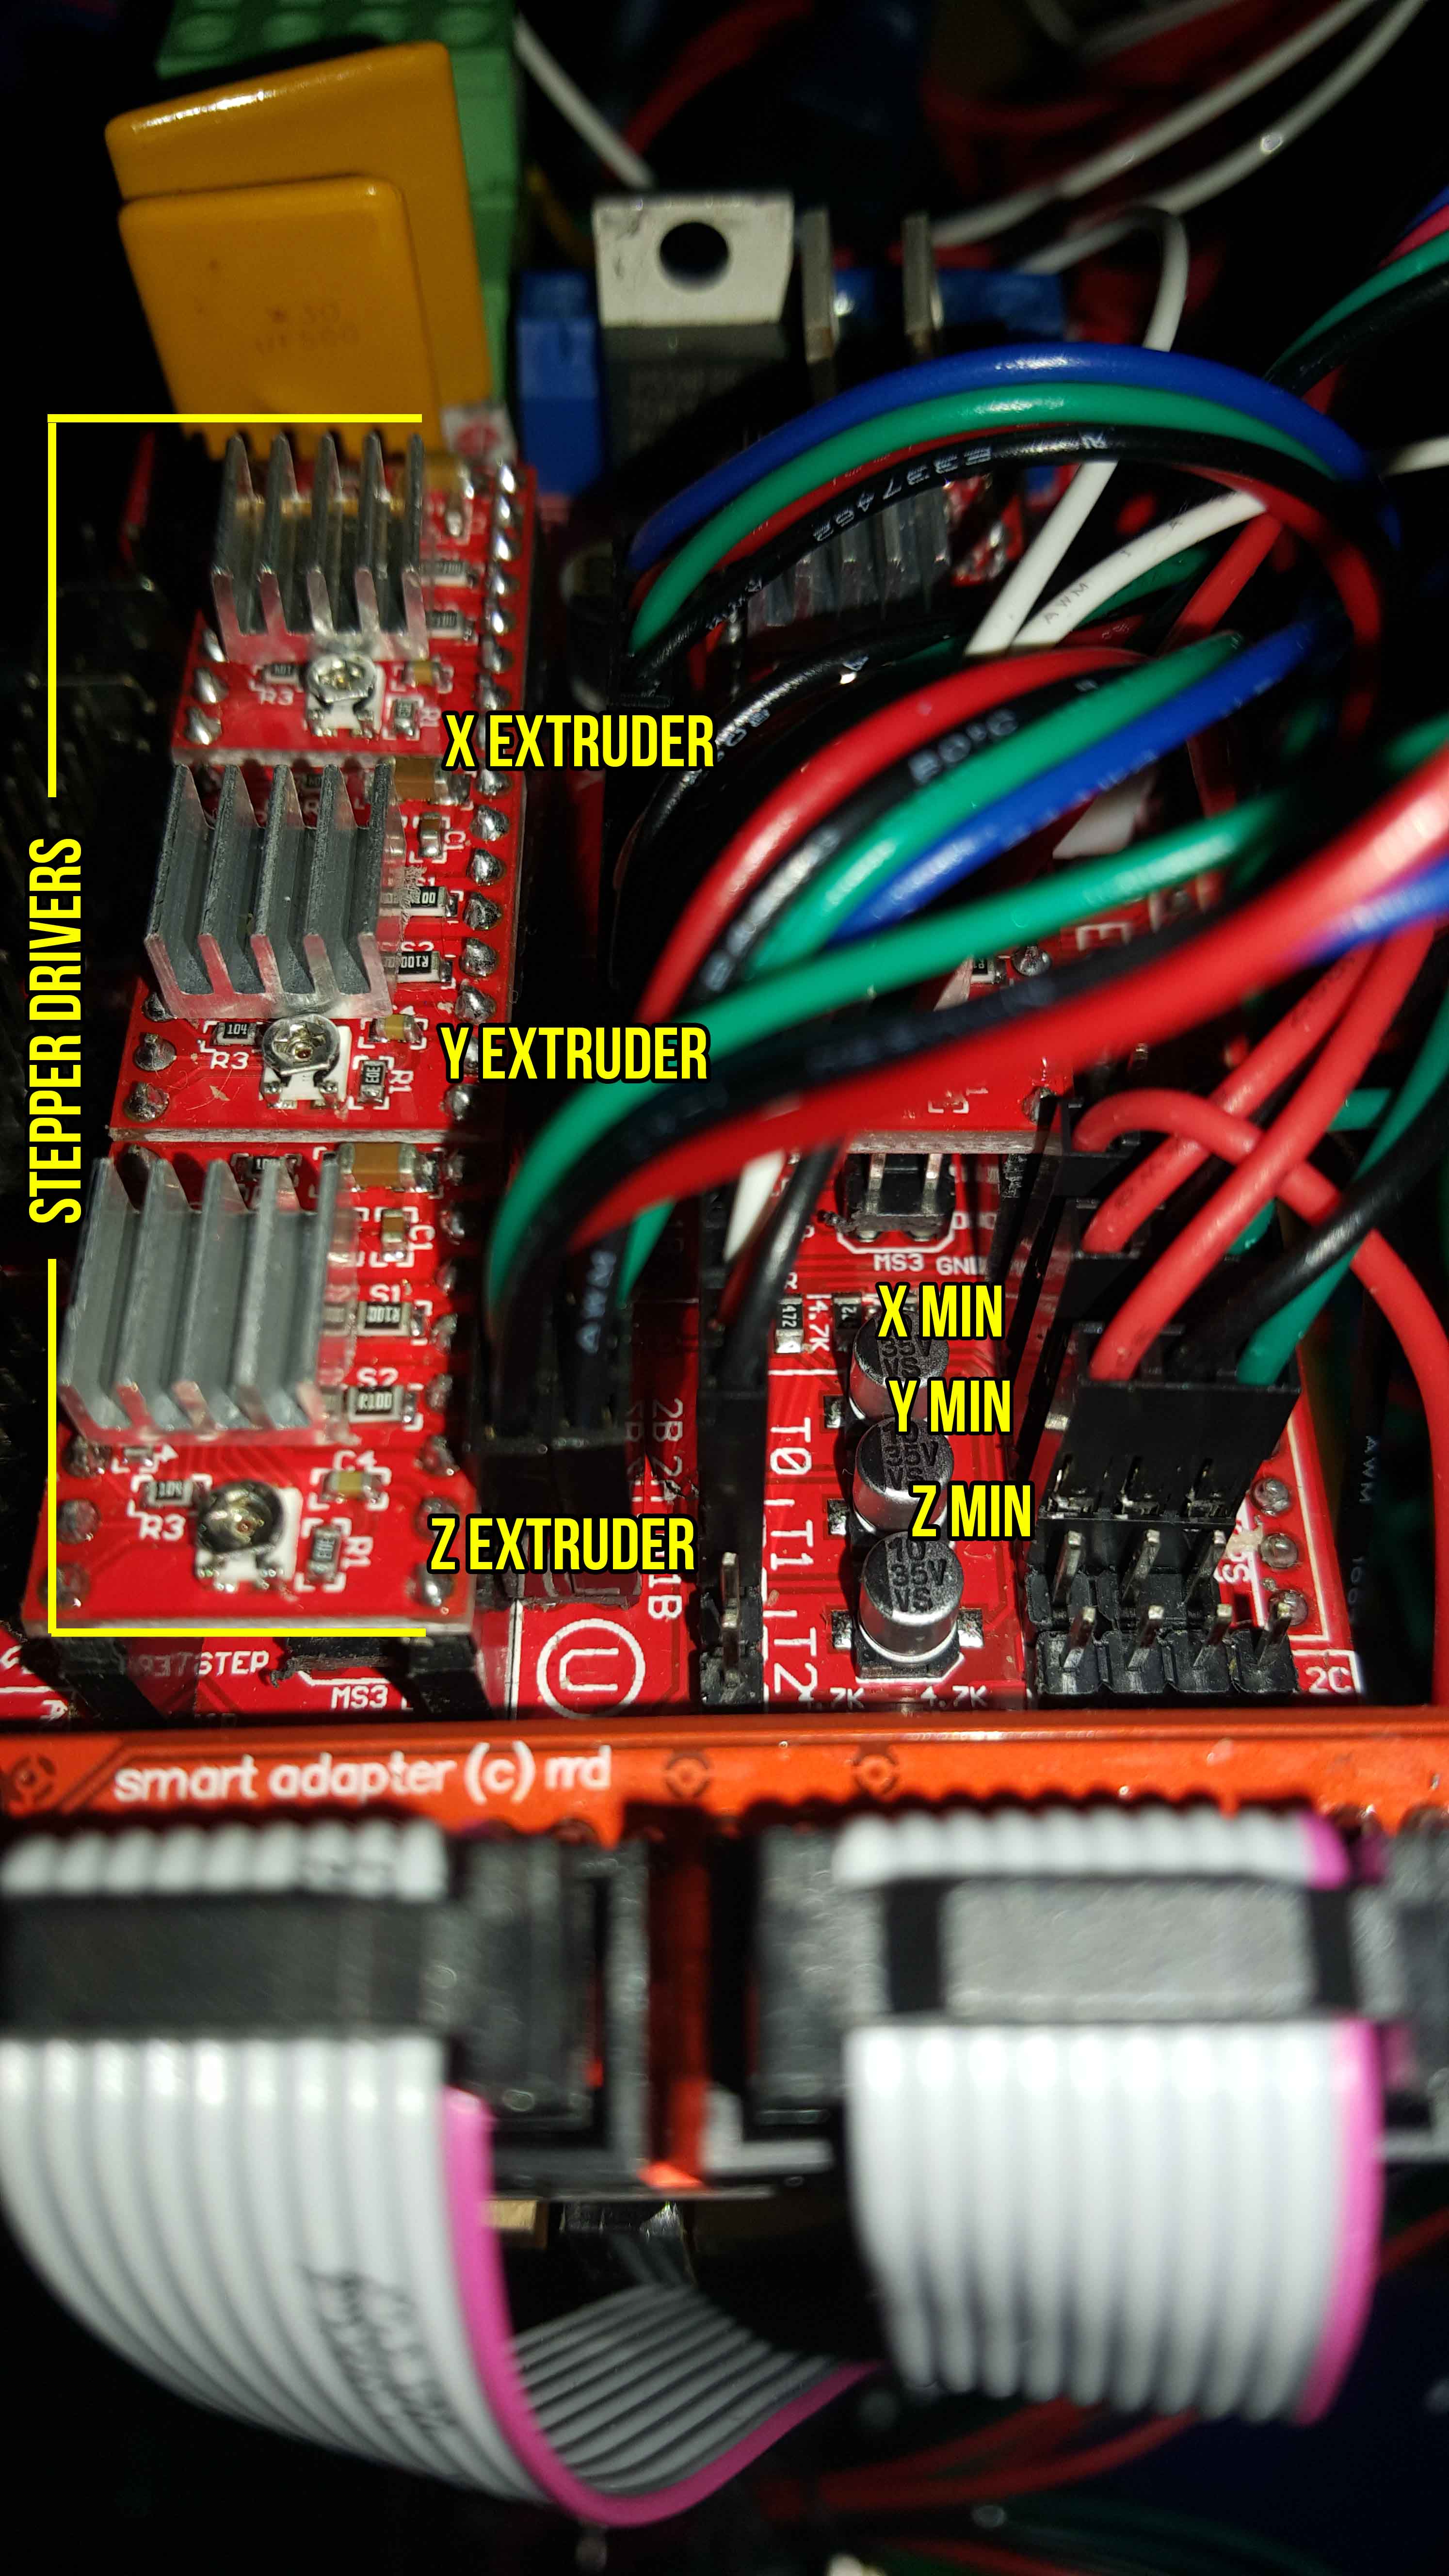
Your new pictures have confirmed that your end stops are miss configured
you have a max X end stop
you have a max Y end stop
you have a min Z end stop
therefor your endstop section should be
// ENDSTOP SETTINGS:
// Sets direction of endstops when homing; 1=MAX, -1=MIN
// :[-1,1]
#define X_HOME_DIR 1
#define Y_HOME_DIR 1
#define Z_HOME_DIR -1
Also with ramps there are separate min and max endstop plugs, you will have to move where they are plugged in.
NB It look like you have no microstepping jumpers install under the pololu modules. Please install 3 jumpers under each pololu module.
like so (this board has colored jumpers to its easy to see them)
Edited 1 time(s). Last edit at 10/23/2016 08:59PM by Dust.
you have a max X end stop
you have a max Y end stop
you have a min Z end stop
therefor your endstop section should be
// ENDSTOP SETTINGS:
// Sets direction of endstops when homing; 1=MAX, -1=MIN
// :[-1,1]
#define X_HOME_DIR 1
#define Y_HOME_DIR 1
#define Z_HOME_DIR -1
Also with ramps there are separate min and max endstop plugs, you will have to move where they are plugged in.
NB It look like you have no microstepping jumpers install under the pololu modules. Please install 3 jumpers under each pololu module.
like so (this board has colored jumpers to its easy to see them)

Edited 1 time(s). Last edit at 10/23/2016 08:59PM by Dust.
|
Re: X Axis Motor Moving Away From Heatbed October 24, 2016 08:01AM |
Registered: 7 years ago Posts: 759 |
If you use the x and y max locations, you allso have to tell repetier or pronterface (or other program) that you are
using xmax and ymax for homing, otherwise they will print in reverse.
Easier option is to move x and y to min positions,then your config is already correct (as far as i can see )
)
using xmax and ymax for homing, otherwise they will print in reverse.
Easier option is to move x and y to min positions,then your config is already correct (as far as i can see
)
|
Re: X Axis Motor Moving Away From Heatbed October 24, 2016 01:18PM |
Registered: 7 years ago Posts: 34 |
|
Re: X Axis Motor Moving Away From Heatbed October 24, 2016 02:16PM |
Registered: 10 years ago Posts: 770 |
// Invert the stepper direction. Change (or reverse the motor connector) if an axis goes the wrong way.
#define INVERT_X_DIR true
#define INVERT_Y_DIR true
#define INVERT_Z_DIR true
Change the X_DIR to false and then try again.
As for the Z axis you have to adjust your Z adjustment screw to get Z0 to right above the glass (about .1mm)
If its too low you can mess up a lot of things fast.
#define INVERT_X_DIR true
#define INVERT_Y_DIR true
#define INVERT_Z_DIR true
Change the X_DIR to false and then try again.
As for the Z axis you have to adjust your Z adjustment screw to get Z0 to right above the glass (about .1mm)
If its too low you can mess up a lot of things fast.
|
Re: X Axis Motor Moving Away From Heatbed October 24, 2016 02:24PM |
Registered: 10 years ago Posts: 477 |
From the video I would guess the motor pairs aren't correct.
[reprap.org]
Also what are the stepper voltages set at?
Unplug the 12v supply and leave USB power plugged in, measure from ground to the pot on the stepper with your voltmeter on 2V DC scale
As mentioned your configuration.h is set for min endstops, so X on the left side and Y at the back
[reprap.org]
Also what are the stepper voltages set at?
Unplug the 12v supply and leave USB power plugged in, measure from ground to the pot on the stepper with your voltmeter on 2V DC scale
As mentioned your configuration.h is set for min endstops, so X on the left side and Y at the back
|
Re: X Axis Motor Moving Away From Heatbed October 24, 2016 02:26PM |
Registered: 7 years ago Posts: 34 |
I already tried adjusting the Z to about .1mm. It keeps pushing down to the glass, forcing it so i have to emergency stop. I was just trying to set everything to home in repetier host, but I also notice that the Y axis is also pushing to the right really hard. It touches the endstop but it keeps pushing that way.
|
Re: X Axis Motor Moving Away From Heatbed October 24, 2016 02:28PM |
Registered: 7 years ago Posts: 34 |
|
Re: X Axis Motor Moving Away From Heatbed October 24, 2016 03:15PM |
Registered: 10 years ago Posts: 770 |
If your machine is going past the end stops then you have something wired wrong also.
Where are your ends stops on the machine?
if they are set to MIN then make sure they are in the MIN endstop pins on the board. If they are MAX then they should be plugged into MAX.
You have 6 sets of pins for the endstops 3 MIN and 3 MAX. Double check them!
Where are your ends stops on the machine?
if they are set to MIN then make sure they are in the MIN endstop pins on the board. If they are MAX then they should be plugged into MAX.
You have 6 sets of pins for the endstops 3 MIN and 3 MAX. Double check them!
|
Re: X Axis Motor Moving Away From Heatbed October 24, 2016 04:04PM |
Registered: 7 years ago Posts: 34 |
|
Re: X Axis Motor Moving Away From Heatbed October 26, 2016 01:07PM |
Registered: 10 years ago Posts: 477 |
|
Re: X Axis Motor Moving Away From Heatbed October 26, 2016 02:02PM |
Registered: 7 years ago Posts: 34 |
They are working just fine. Here is a new video I just recorded of what's happening. Whenever I tried to home the axis it just keeps moving the opposite direction of the endstop. If I try to move the motors to the endstop and hit home, it will just stay there.
YouTube Video
YouTube Video
|
Re: X Axis Motor Moving Away From Heatbed October 26, 2016 02:50PM |
Registered: 10 years ago Posts: 651 |
Providing this is correct (that's what it should be for where the endstop is placed)
#define Y_HOME_DIR 1
You will have to do 1 of 2 things
Change this to false:
#define INVERT_Y_DIR true
OR, but not both
Unplug the Y motor connector from your RAMPS and turn it around (with the power off)
Edited 1 time(s). Last edit at 10/26/2016 02:53PM by FA-MAS.
#define Y_HOME_DIR 1
You will have to do 1 of 2 things
Change this to false:
#define INVERT_Y_DIR true
OR, but not both
Unplug the Y motor connector from your RAMPS and turn it around (with the power off)
Edited 1 time(s). Last edit at 10/26/2016 02:53PM by FA-MAS.
|
Re: X Axis Motor Moving Away From Heatbed October 26, 2016 03:10PM |
Registered: 7 years ago Posts: 34 |
|
Re: X Axis Motor Moving Away From Heatbed October 26, 2016 03:45PM |
Registered: 10 years ago Posts: 651 |
Your X looks fine
Your Y Endstop is at the front of the printer, the bed should be moving towards it when you hit the home button.
I bet you the bed stops moving if you press the Y Endstop manually.
Flip the motor connector around for your Y Axis.
Edited 2 time(s). Last edit at 10/26/2016 03:50PM by FA-MAS.
Your Y Endstop is at the front of the printer, the bed should be moving towards it when you hit the home button.
I bet you the bed stops moving if you press the Y Endstop manually.
Flip the motor connector around for your Y Axis.
Edited 2 time(s). Last edit at 10/26/2016 03:50PM by FA-MAS.
|
Re: X Axis Motor Moving Away From Heatbed October 26, 2016 03:57PM |
Registered: 10 years ago Posts: 770 |
|
Re: X Axis Motor Moving Away From Heatbed October 26, 2016 05:11PM |
Registered: 7 years ago Posts: 34 |
|
Re: X Axis Motor Moving Away From Heatbed October 26, 2016 05:15PM |
Registered: 10 years ago Posts: 651 |
You can't always trust the color of the wires, what may be right for one of the motors may not be for another. It's not working the way it's mechanically supposed to. Really, flip the Y motor connection around.
Edit: Well in your case you probably can. It's clear that the motor is moving the wrong way when you home it. It should go towards the endstop. Only 2 ways to fix it, flip the motor connector around and the motor moves the other way. Or if you prefer all the wires to look standard, you have to go into your firmware and change #define INVERT_Y_DIR to whatever the opposite value is from what it currently is. That will tell it to move the motor the other way too. Choose one method, but only one. Do both and they'll negate themselves, you'll be back to where you started.
Edited 1 time(s). Last edit at 10/26/2016 05:28PM by FA-MAS.
|
Re: X Axis Motor Moving Away From Heatbed October 26, 2016 05:45PM |
Registered: 7 years ago Posts: 759 |
I see from the video you are testing useing repetier,
1st you need to check that your homing directions are correct by using the movement menu on your ramps lcd control, when you get that correct,
then you can change the homing directions in repetier/print settings/printer shape menu.
But you must 1st make sure the lcd menu is correct.
1st you need to check that your homing directions are correct by using the movement menu on your ramps lcd control, when you get that correct,
then you can change the homing directions in repetier/print settings/printer shape menu.
But you must 1st make sure the lcd menu is correct.
|
Re: X Axis Motor Moving Away From Heatbed October 26, 2016 08:27PM |
Registered: 10 years ago Posts: 477 |
I use pronterface, but repitier should be the same
When you tell X to move 10mm + (or right) it should move right - if not flip the plug around on your RAMPS
When you tell Y to move 10mm + (or to the front) the bed should move toward the front - if not flip the plug around on your RAMPS
If the X endstop is on the left side it is a MIN endstop, goes on the 1st set of endstop pins on RAMPS board and set as -1 in configuration.h
If the X endstop is on the right side it is a MAX endstop, goes on the 2nd set of pins on RAMPS board and set as 1 in configuration.h
If the Y endstop is at the back it is a MIN endstop, goes on the 3rd set of pins on RAMPS and is set as -1 in configuration.h
If the Y endstop is at the front it is a MAX endstop, goes on the 4th set of pins on RAMPS and is set as 1 in configuration.h
The Z is at the bottom and therefore a MIN endstop, goes on the 5th set of pins on RAMPS and is set as -1 in configuration.h
NO or NC switches are set in configuration.h and everything is tested with an M119 command to the printer
Steve
|
Re: X Axis Motor Moving Away From Heatbed October 26, 2016 08:41PM |
Registered: 7 years ago Posts: 34 |
|
Re: X Axis Motor Moving Away From Heatbed October 26, 2016 08:44PM |
Registered: 7 years ago Posts: 34 |
|
Re: X Axis Motor Moving Away From Heatbed October 26, 2016 08:47PM |
Registered: 10 years ago Posts: 770 |
Id ignore the LCD until later.
You need to get the axis moving right first.
again... The wire colors mean NOTHING on the steppers. Even though they "look" fine they are actually 180* out and need to be flipped either in the firmware or physically on the Ramps board (remove power before flipping the connector!)
You need to get the axis moving right first.
again... The wire colors mean NOTHING on the steppers. Even though they "look" fine they are actually 180* out and need to be flipped either in the firmware or physically on the Ramps board (remove power before flipping the connector!)
|
Re: X Axis Motor Moving Away From Heatbed October 27, 2016 12:08AM |
Registered: 10 years ago Posts: 477 |

Sorry, only registered users may post in this forum.