Heated bed
Posted by brupje
|
Re: Heated bed June 06, 2011 08:51PM |
Registered: 13 years ago Posts: 862 |
I have changed my voltage to 18V from a 60W universal laptop charger and it seems to have done the trick, haven't checked what temp I'm getting as Wife is home and I need to use her cooking thermometer
__________________________________________________________________________
Experimenting in 3D in New Zealand
__________________________________________________________________________
Experimenting in 3D in New Zealand
|
Re: Heated bed June 07, 2011 01:07PM |
Registered: 14 years ago Posts: 52 |
Wes, thank you very much for a great reply.
BRNRD - Please communicate with Wes. He is a real customer and has been working with us for quite some time now.
We absolutely do not post any comments ourselves.
Best Wishes,
BotMill Support
support@botmill.com
www.BotMill.com
----------------------------------------
www.BotMill.com
Follow us on twitter @BotMill
|
Re: Heated bed June 08, 2011 04:25PM |
Registered: 13 years ago Posts: 55 |
Does anyone have detailed instructions on how to hook up the Prusa heatedbed to the electronics so the heat can be monitored/controlled? I'm not great with the electronics.. I have a Mendel w/ techzone Gen3 remix. Also, I'm guessing I'll need another thermistor or thermocouple to attach to the setup?
Pls help or point towards a detailed wiki
Pls help or point towards a detailed wiki
|
Re: Heated bed June 08, 2011 04:57PM |
Registered: 13 years ago Posts: 1,780 |
@sxt173 - I did this by following the instructions in the wiki by Adrian: [reprap.org]. You don't need a thermocouple for the heated bed. It's not really clear to me that you need one on the tip either. Thermistor seems to work just fine.
If you use the RAMPS electronics as I will be doing soon, then you don't have to go through that trouble since it's supported in the board already.
Edited 1 time(s). Last edit at 06/08/2011 04:57PM by brnrd.
If you use the RAMPS electronics as I will be doing soon, then you don't have to go through that trouble since it's supported in the board already.
Edited 1 time(s). Last edit at 06/08/2011 04:57PM by brnrd.
|
Re: Heated bed June 11, 2011 04:13PM |
Registered: 13 years ago Posts: 862 |
My prints are now sticking amazingly well to glass placed on top of my heated bed, no more problems so far with models deforming or lifting a corner, I'm getting somewhere around 55C now
__________________________________________________________________________
Experimenting in 3D in New Zealand
__________________________________________________________________________
Experimenting in 3D in New Zealand
|
Re: Heated bed June 23, 2011 09:08AM |
Registered: 13 years ago Posts: 55 |
Hey guys, I'm finally done with my heated bed. I went a different route as I did not want to mess with the firmware or running things through the reprap and am getting great results:
Parts:
What I did is to 1st weld on the connectors for the PCB board:
Another view with cables going to power supply
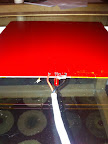
I sandwiched the Thermocouple wire between the glass and PCB board. This does create a tiny gap between the glass and board, but I doubt I am loosing too much heat/efficiency. I used kapton tape across the whole thing, which is also what I print on. I think this also helps keep the heat from escaping from the sides to a certain degree.
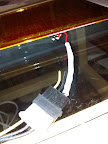
And I used a standard PC connector at the end of the heated board. I accidentally hooked up the wrong cable, it should have been the yellow that gets connected since it carries 12V. I compensate for this by crossing the red to the yellow on the power supply side.
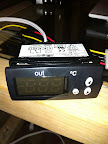
Here is what makes the magic happen. It's a temperature controller I got from Grainger, with which I have had a lot of success in other projects (I use it almost every day in my DIY sous-vides oven, that's for another post/forum). It does 0-777 C, 110V since I am in the US and lets you set a target temperature at which point it switches on (below target for cooling, above for heating as an example). Accuracy is within 1%.
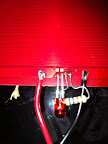
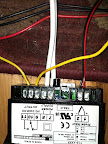
This is with the wires all hooked up. The Red/Black wire on the right goes to the thermocouple. The white cable coming in to positions 7 & 8 is an extension cord I gutted and is delivering the 110V to the temp controller. 9 is empty as it is the 'off' in my application. Then I have the live 12V lead from the ATX power supply going into 10 and coming out of 11 and going to the PCB heated bed. The ground from the heated bed is directly going back to the ATX power supply.
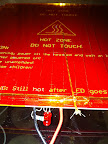
In testing with the heated bed just sitting on a glass table on a plate, I got it up to 100 C. It hits 50-60 C within 3 minutes. 90 C took about 6-7 minutes. Here it is showing that the build platform is at 79 C, with the 'Out' led on indicating that there is current going to the heated bed.
At 88 C
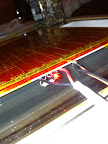
LED lit up on heated bed
I mounted the board directly on top of my aluminum build platform. This seems to work well and I think the aluminum further helps evenly distribute the heat. I may add a thin layer of insulation to the bottom of the aluminum plate to reduce heat loss.
In my 1st experiments, this setup was a huge improvement to all my failed attempts to print on a non-heated surface. I seem to get 60-70% success at 70 C and ~200 C on the 1st layer, and almost 100% success at 88 C on the bed. Now I'm just playing with skeinforge to figure out adhesion issues with tall structures, not on the bed but higher up.
Parts:
- Prusa PCB Heated Bed
- 1 LED
- 1 Resistor
- Thermocouple Wire (I think Type J)
- Love Industries TCS-4011 Temperature Switch from Grainger.com
- An old ATX PC power supply
- 3/8 inch Pyrex Glass cut to order at onedayglass.com
What I did is to 1st weld on the connectors for the PCB board:
 |
| From 2011 - Mendel Heated Bed |
Another view with cables going to power supply
 |
| From 2011 - Mendel Heated Bed |
I sandwiched the Thermocouple wire between the glass and PCB board. This does create a tiny gap between the glass and board, but I doubt I am loosing too much heat/efficiency. I used kapton tape across the whole thing, which is also what I print on. I think this also helps keep the heat from escaping from the sides to a certain degree.
 |
| From 2011 - Mendel Heated Bed |
And I used a standard PC connector at the end of the heated board. I accidentally hooked up the wrong cable, it should have been the yellow that gets connected since it carries 12V. I compensate for this by crossing the red to the yellow on the power supply side.
 |
| From 2011 - Mendel Heated Bed |
Here is what makes the magic happen. It's a temperature controller I got from Grainger, with which I have had a lot of success in other projects (I use it almost every day in my DIY sous-vides oven, that's for another post/forum). It does 0-777 C, 110V since I am in the US and lets you set a target temperature at which point it switches on (below target for cooling, above for heating as an example). Accuracy is within 1%.
 |
| From 2011 - Mendel Heated Bed |
This is with the wires all hooked up. The Red/Black wire on the right goes to the thermocouple. The white cable coming in to positions 7 & 8 is an extension cord I gutted and is delivering the 110V to the temp controller. 9 is empty as it is the 'off' in my application. Then I have the live 12V lead from the ATX power supply going into 10 and coming out of 11 and going to the PCB heated bed. The ground from the heated bed is directly going back to the ATX power supply.
 |
| From 2011 - Mendel Heated Bed |
In testing with the heated bed just sitting on a glass table on a plate, I got it up to 100 C. It hits 50-60 C within 3 minutes. 90 C took about 6-7 minutes. Here it is showing that the build platform is at 79 C, with the 'Out' led on indicating that there is current going to the heated bed.
 |
| From 2011 - Mendel Heated Bed |
At 88 C
 |
| From 2011 - Mendel Heated Bed |
LED lit up on heated bed
 |
| From 2011 - Mendel Heated Bed |
I mounted the board directly on top of my aluminum build platform. This seems to work well and I think the aluminum further helps evenly distribute the heat. I may add a thin layer of insulation to the bottom of the aluminum plate to reduce heat loss.
In my 1st experiments, this setup was a huge improvement to all my failed attempts to print on a non-heated surface. I seem to get 60-70% success at 70 C and ~200 C on the 1st layer, and almost 100% success at 88 C on the bed. Now I'm just playing with skeinforge to figure out adhesion issues with tall structures, not on the bed but higher up.
|
Re: Heated bed June 23, 2011 09:41AM |
Registered: 13 years ago Posts: 1,780 |
|
Re: Heated bed June 23, 2011 09:51AM |
Registered: 13 years ago Posts: 55 |
True, I did go the more expensive route. Thing is, I had been working on my Mendel for 5-6 months now, and this is the 1st time I am getting consistent good prints. Being a noob, I was kinda fed up and just wanted something reliable without having to reload and figure out new firmware, change out the electronics, etc etc. I took me 1-2 months just to get any front end to see the Mendel, baby steps..
I do totally see your point and knew that RAMPS was a good option. I will probably upgrade or use that for my 2nd printer, I just wanted to get this working quick.
I do totally see your point and knew that RAMPS was a good option. I will probably upgrade or use that for my 2nd printer, I just wanted to get this working quick.
|
Re: Heated bed June 23, 2011 10:52AM |
Registered: 13 years ago Posts: 49 |
Hi All:
If people want to go the route of a real temperature controller, they are available on ebay for <$30. You need a temperature controller, temperature probe (I use a thermocouple), zero crossing switch, and heater (I use a flexible silicone rubber heater glued to the plate, but properly sized resistors are OK). Check out the web site omega.com for instructions on how to wire it up and the use of various sensors (most controllers can use type K and J thermocouples, various standard thermistors and RTDs. With careful scrounging it should be possible to do for <$50.
Note that this method normally uses 110V AC to drive the heater, a potential safety issue (fatigue in wires, etc.). Probably best to use a step down transformer and run the zero crossing switch at its lowest rated voltage. For these reasons, I will build the Pololu electronics and go with resistors and low voltage DC for my subsequent builds.
One nice thing about the separate controller is that it is independent of the rest of the machine. I turn it on 10 minutes before printing, and leave it on until the last print is almost done... Better for skeinforge output and host software, I think.
john
|
Re: Heated bed June 23, 2011 10:54AM |
Registered: 13 years ago Posts: 55 |
j_andberg Wrote:
-------------------------------------------------------
>
> One nice thing about the separate controller is
> that it is independent of the rest of the machine.
> I turn it on 10 minutes before printing, and leave
> it on until the last print is almost done...
> Better for skeinforge output and host software, I
> think.
>
> john
That's one thing I really like about my setup, is that it's independent. I can turn it and let it heat up / cool down separate from the rest of the setup.
|
Re: Heated bed June 23, 2011 12:16PM |
Registered: 13 years ago Posts: 1,780 |
Quote
j_andberg
One nice thing about the separate controller is that it is independent of the rest of the machine. I turn it on 10 minutes before printing, and leave it on until the last print is almost done... Better for skeinforge output and host software, I think.
I do the same thing with RAMPS and with my Gen 3 before that. And since the heater is under computer control, have a g-code command at the end of the print to turn the heater off. I leave my printer running a lot. This way, it doesn't waste electricity after the print and I don't have to wait for the bed to cool down to take the part out when I return.

Sorry, only registered users may post in this forum.