|
Build Advice March 03, 2017 07:06PM |
Registered: 12 years ago Posts: 72 |
Hello all,
So I was hoping for some advice on where I should go with my printer.
I currently have an old Prusa i2 frame that I had started to build a few years ago - I'd shelved the project due to hot-end issues but I've just recently finished it off and got it printing. As I'm sure most of you know the i2 is about as rigid as a wet piece of pasta and is really limited in build volume, therefore I went with the bowden route which gained some Z height and reduced a lot of the X carriage mass. Due to the age of the frame, it has T5 belts and M8 threaded rod "leadscrews" so print quality is limited in a number of ways. (Although the z banding I get isn't too bad, all things considered.) As it has the horizontal X bars, there's very little space for cooling fans - I currently have two 40mm fans angled down but they are a bit far away from the hot end and they reduce my X travel to around 130mm.
I do have some decent parts in my current printer that I'd like to retain in a new printer:
I was initially thinking about a CoreXY build with Chinese linear rails on all axes and rolled ballscrews for the Z axes. Having seen the P3 Steel and Prusa i3 MK2 however, I'm considering basing my design off of these. I'd like to use a direct extruder setup to allow for flexible filament, which I think would defeat the point of building a CoreXY.
One thing I'd quite like about the i3-based designs is that the rails are out of the way and there's a lot of parts available on Thingiverse. I also really like the way that the P3 Steel (and Mendel90) keep the X and Y axes aligned. One thing that does concern me is the rigidity of the unsupported 8mm rails that are often used in these designs - I'm thinking that a single 15mm linear rail would be a better option for the X axis and double linear rails for the other axes. Is this likely to be a worthwhile upgrade ? It would mean moving away from a lot of the carriage designs available and would mean I'd have to design something myself ?
If I was to go with the i3-based route, I'd probably build a cross between the Prusa i3 MK2 (But with this carriage: [www.thingiverse.com], modified to use real cable chains and the IR sensor) and the P3 Steel frame. (Modified for a larger build volume and using 12mm ballscrews rather than M5 threaded rod) Sadly the i3 MK2 heatbed is only 12V, so I'd probably go with the E3D varipower heatbed for an even larger print volume: [www.filastruder.com] I'd also go with 10mm GT2 belt to reduce stretching.
I'm tempted to drive both Z ballscrews with a single NEMA 17 motor and a large belt across the top, although this does add belt stretch to the Z axis.
So essentially I'm looking for ideas and advice. I'd love to be able to take a kit such as the Prusa i3 MK2 and just modify the X carriage to suit my parts, but sadly the heatbed is an odd size and not 24V so I can't use theirs and I can't find a replacement without reducing the build volume - I'd also have to add some bracing to tie the X/Z sheet of metal to the Y axis as that's mostly unsupported out of the box. There are a number of designs out there that are nearly right, but just not quite there in my opinion. Another option would be to build a Prusa i3 MK2 style frame out of aluminium extrusion which may end up being more rigid and would allow for a different heatbed: [www.thingiverse.com]
Edited 2 time(s). Last edit at 03/03/2017 08:23PM by yngndrw.
So I was hoping for some advice on where I should go with my printer.
I currently have an old Prusa i2 frame that I had started to build a few years ago - I'd shelved the project due to hot-end issues but I've just recently finished it off and got it printing. As I'm sure most of you know the i2 is about as rigid as a wet piece of pasta and is really limited in build volume, therefore I went with the bowden route which gained some Z height and reduced a lot of the X carriage mass. Due to the age of the frame, it has T5 belts and M8 threaded rod "leadscrews" so print quality is limited in a number of ways. (Although the z banding I get isn't too bad, all things considered.) As it has the horizontal X bars, there's very little space for cooling fans - I currently have two 40mm fans angled down but they are a bit far away from the hot end and they reduce my X travel to around 130mm.
I do have some decent parts in my current printer that I'd like to retain in a new printer:
- An E3D Titan Extruder
- An E3D V6 hot-end
- A Duet Wifi control board
- A DC42 IR sensor for Z probing (Not fitted to the current printer, but I already have it)
I was initially thinking about a CoreXY build with Chinese linear rails on all axes and rolled ballscrews for the Z axes. Having seen the P3 Steel and Prusa i3 MK2 however, I'm considering basing my design off of these. I'd like to use a direct extruder setup to allow for flexible filament, which I think would defeat the point of building a CoreXY.
One thing I'd quite like about the i3-based designs is that the rails are out of the way and there's a lot of parts available on Thingiverse. I also really like the way that the P3 Steel (and Mendel90) keep the X and Y axes aligned. One thing that does concern me is the rigidity of the unsupported 8mm rails that are often used in these designs - I'm thinking that a single 15mm linear rail would be a better option for the X axis and double linear rails for the other axes. Is this likely to be a worthwhile upgrade ? It would mean moving away from a lot of the carriage designs available and would mean I'd have to design something myself ?
If I was to go with the i3-based route, I'd probably build a cross between the Prusa i3 MK2 (But with this carriage: [www.thingiverse.com], modified to use real cable chains and the IR sensor) and the P3 Steel frame. (Modified for a larger build volume and using 12mm ballscrews rather than M5 threaded rod) Sadly the i3 MK2 heatbed is only 12V, so I'd probably go with the E3D varipower heatbed for an even larger print volume: [www.filastruder.com] I'd also go with 10mm GT2 belt to reduce stretching.
I'm tempted to drive both Z ballscrews with a single NEMA 17 motor and a large belt across the top, although this does add belt stretch to the Z axis.
So essentially I'm looking for ideas and advice. I'd love to be able to take a kit such as the Prusa i3 MK2 and just modify the X carriage to suit my parts, but sadly the heatbed is an odd size and not 24V so I can't use theirs and I can't find a replacement without reducing the build volume - I'd also have to add some bracing to tie the X/Z sheet of metal to the Y axis as that's mostly unsupported out of the box. There are a number of designs out there that are nearly right, but just not quite there in my opinion. Another option would be to build a Prusa i3 MK2 style frame out of aluminium extrusion which may end up being more rigid and would allow for a different heatbed: [www.thingiverse.com]
Edited 2 time(s). Last edit at 03/03/2017 08:23PM by yngndrw.
|
Re: Build Advice March 04, 2017 02:09AM |
Registered: 8 years ago Posts: 5,232 |
I was in your shoes a few weeks ago: Should I redesign my i3 to work with 3 extruders or build a CoreXY?
I did the latter and I'm glad I did. ( Also using mgn12 linear rails and 1204 ballscrews )
Keep one printer functional and make all the bits and pieces you need to build the new printer.
Later, when the CoreXY is working, give your i3 an overhaul.
I did the latter and I'm glad I did. ( Also using mgn12 linear rails and 1204 ballscrews )
Keep one printer functional and make all the bits and pieces you need to build the new printer.
Later, when the CoreXY is working, give your i3 an overhaul.
|
Re: Build Advice March 04, 2017 08:04AM |
Registered: 11 years ago Posts: 5,780 |
Don't worry about belt stretch when driving the Z axis screws. My printer has been working that way for 3 years and it is fine, especially compared to the alternative of trying to keep two motors synchronized, which is one of the weakest points of typical i3 type designs.
The point of building CoreXY vs an i3 type architecture is that the massive bed moves in the Z axis instead of in the Y axis. That allows better quality printing at higher speeds because you don't have to throw the weight of the bed back and forth at print speed. CoreXY works fine and prints fast enough even with the weight of a direct extruder mounted on the carriage, and you're going to print pretty slowly with flexible filament because of the way it interacts with the extruder.
Ultra MegaMax Dominator 3D printer: [drmrehorst.blogspot.com]
|
Re: Build Advice March 04, 2017 03:57PM |
Registered: 12 years ago Posts: 72 |
Thank you both.
o_lampe: Do you have a build thread you can link me to ? I tried searching for it but couldn't spot it.
I suppose one consideration with the proper linear guides is that they weigh quite a lot, I'm thinking of the MGN15's especially for the X span although it's quite a lot of weight to move. On the other hand, rigidity should allow me to move a larger mass without any quality issues.
My old printer is an i2 so to be honest I'm not sure it's worth an overhaul - There's just not very much space and build volume in the frame design. I'll have to keep it around to prototype parts for the new one, of course.
the_digital_dentist: Your printer with the belt-driven Z towers is what inspired me to consider using a single motor.
As above, I need to keep track of the X axis weight and make sure that the rail / blocks / extruder / hotend doesn't end up weighing more than the whole bed, but on the flip side I am going with a larger bed and I want it to be nice and rigid. I don't want to be re-leveling the bed at all, once it's all setup. Speaking of which, I was thinking of having two Z rails and two Z ballscrews, on opposite corners. This should get away from the usual cantilever design while not needing four Z rails.
While I do want to be able to print flexibles, most of the time I will be using regular filaments such as PLA. I'm hoping to be able to both increase speed and maintain / improve print quality and consistency with a more rigid design. I'd be over the moon if I could double the speeds that I'm currently getting, but I don't know if that's even feasible - I guess there's only one way to find out though !
I'll draw something up now that there's a rough plan.
|
Re: Build Advice March 06, 2017 01:26PM |
Registered: 12 years ago Posts: 72 |
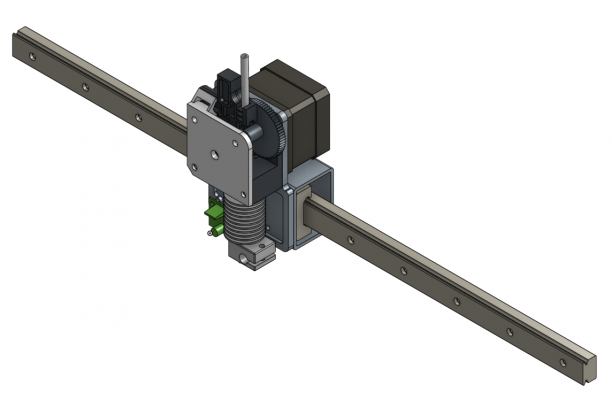
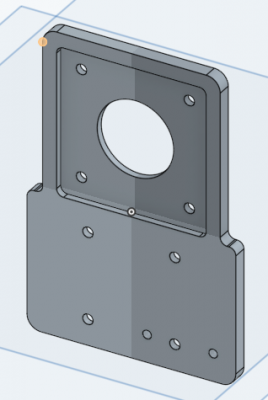
I've started designing the business end - Currently work in progress of course: (I'll use a short 13Ncm 20mm stepper motor for the extruder)
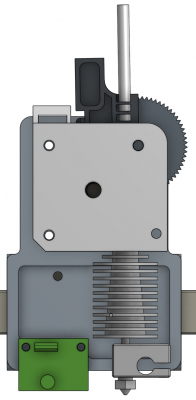
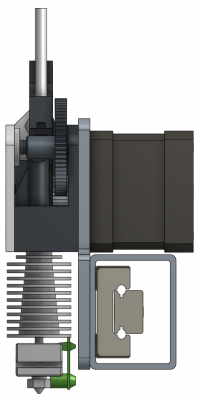
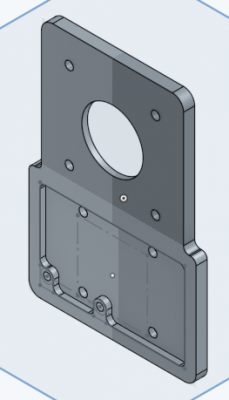
The carriage is built around a single MGN15H block, a 4mm thick aluminium plate (Carved out to a thickness of 2mm, with a 4mm edge for rigidity) and a 40x30x2mm aluminium box section piece to support the belts and cable carrier:
[www.ebay.co.uk]
[www.ebay.co.uk]
There's space on the front of the plate for a DC42 IR Differential Z Probe.
The part cooling fans will mount on the front of the plate (Not decided what I'll use yet, I'm currently using two 40mm fans opposite each other with no ducts - I was planning on using a 50mmx50mmx15mm blower and a circular duct, but it moves much less air and I don't know if it will be enough ? As mentioned above, the the belts will terminate on the back of the aluminium tube along with a cable carrier - These will need to be above the block so I'll probably use a 2mm sheet of milled aluminium for that. I'll probably use rivnuts in the back of the aluminium tube to mount the rear plate, given its thickness.
An online calculator suggests that the plate will weigh 30g, so I might add some more 4mm ribs in the front cutout once I'm done.
The main sheet is shown below, with the front and back respectively:
I just hope it's not too heavy with the way I've designed it. Any thoughts / advice on this so far ?
Edit: Last night I was considering what to do for the belt clamps and tensioners and I've come up with a plan after seeing this:
[www.thingiverse.com]
My plan is to turn that tensioner on it's side (So that the belt is vertical rather than horizontal) and then stack one on top of another. I'll then switch the 40x30x2mm tube for a 40x40x3mm tube and put the tensioner inside the tube, behind the rail. A tensioner of this design cannot easily be machined, so it will have to be a printed part - But it will have captive nuts which will be bolted into through the tube wall, removing the need for rivnuts. The cable chain will then be supported off the back of the tube by a sheet of plastic (Delrin ? Printed ? It's not a critical part) at around the height of the motor.
Edited 5 time(s). Last edit at 03/07/2017 08:52AM by yngndrw.
Sorry, only registered users may post in this forum.
