Home
>
Reprappers
>
Topic
Gap between outer shell and inner portion
Posted by yngndrw
|
Gap between outer shell and inner portion March 06, 2017 08:29PM |
Registered: 12 years ago Posts: 72 |
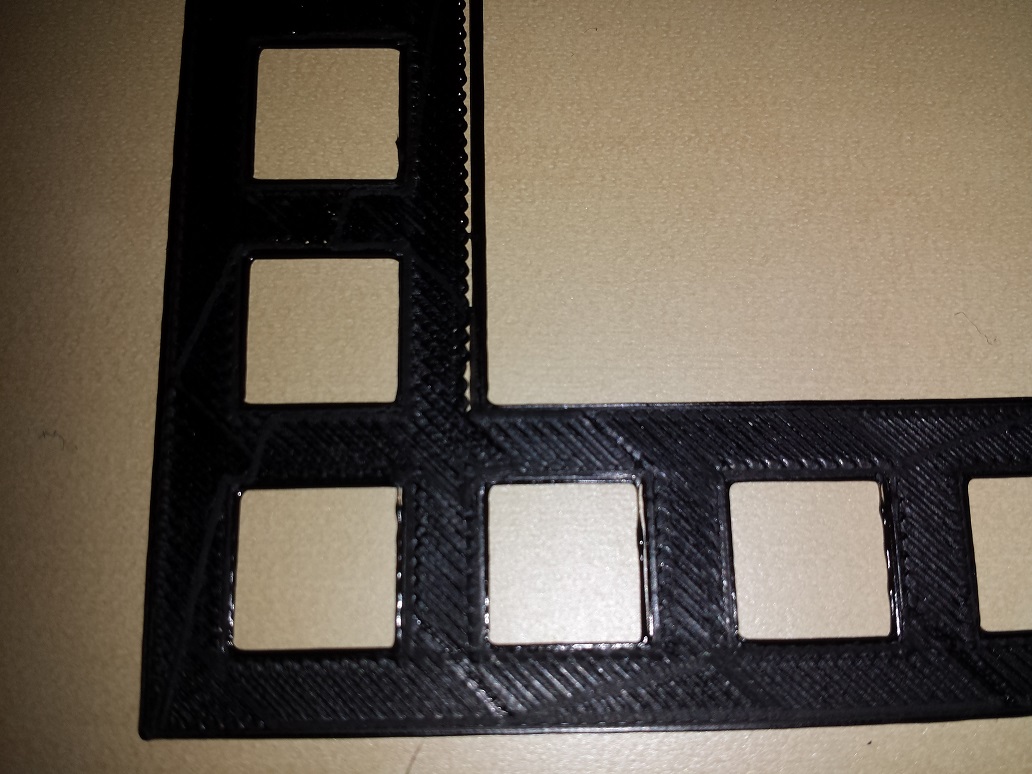
I have a problem with my prints, please see attached picture - Sorry for the low quality image.
Essentially there seems to be a gap between the outer shell of my print and the filled portion - The test print was just two layers high, but it happens across all layers including infill.
I've just tried reversing my belt so that the smooth side runs over the idler but this didn't help. The belt is nice and tight and I'm using aluminium pulleys - I can't feel any backlash but that's just by feel. The issue only seems to happen on the X axis.
The machine itself is a Prusa i2 with an E3D hot-end (0.4mm nozzle) and an E3D Titan extruder, configured in a bowden arrangement. I've tried with coasting both enabled and disabled.
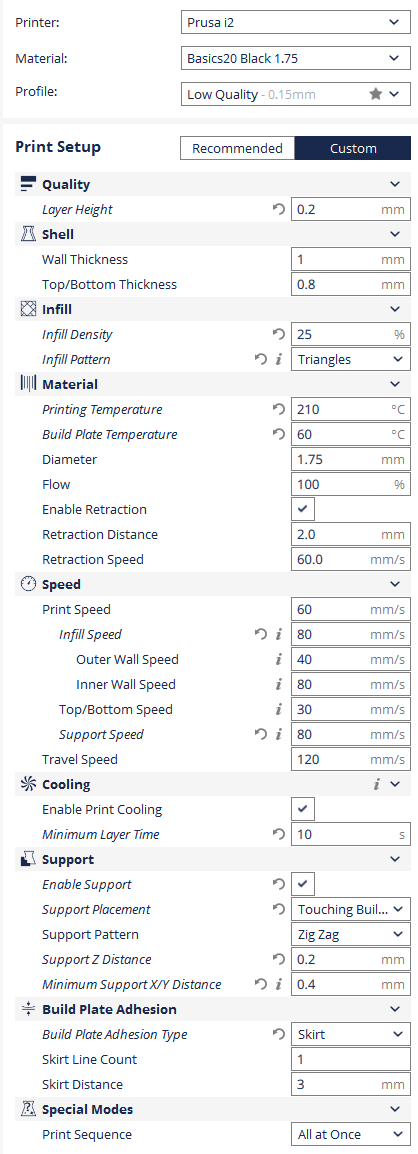
Attached is a picture showing my Cura settings. I've calibrated the X, Z and Z steps, along with the extruder. I'm just using the nominal filament diameter of 1.75mm rather than measured, but it's SpoolWorls Basics 20 Black PLA.
Any ideas as to what could be causing this ?
Essentially there seems to be a gap between the outer shell of my print and the filled portion - The test print was just two layers high, but it happens across all layers including infill.
I've just tried reversing my belt so that the smooth side runs over the idler but this didn't help. The belt is nice and tight and I'm using aluminium pulleys - I can't feel any backlash but that's just by feel. The issue only seems to happen on the X axis.
The machine itself is a Prusa i2 with an E3D hot-end (0.4mm nozzle) and an E3D Titan extruder, configured in a bowden arrangement. I've tried with coasting both enabled and disabled.
Attached is a picture showing my Cura settings. I've calibrated the X, Z and Z steps, along with the extruder. I'm just using the nominal filament diameter of 1.75mm rather than measured, but it's SpoolWorls Basics 20 Black PLA.
Any ideas as to what could be causing this ?
|
Re: Gap between outer shell and inner portion March 06, 2017 09:59PM |
Registered: 7 years ago Posts: 267 |
Try slowing down your infill print speed, if the infill is printed too fast, it will not have enough time to bond to the outline perimeters. Start at say 60mm/s then work your way back up.
I dont use cura myself but seeing a shell wall thickness of 1mm makes me think this could be the issue, with a 0.4mm nozzle try a wall thickness of 0.8mm or 1.2mm and see if that changes the print.
I dont use cura myself but seeing a shell wall thickness of 1mm makes me think this could be the issue, with a 0.4mm nozzle try a wall thickness of 0.8mm or 1.2mm and see if that changes the print.
|
Re: Gap between outer shell and inner portion March 07, 2017 07:27AM |
Registered: 12 years ago Posts: 72 |
I don't believe it was using the infill speed setting as this print was only 2 layers thick, so it was instead using the top / bottom layer speed which is 30mm/s. I can certianly try slowing this down some more though and I can also reduce the X / Y accelerations to see if that helps. I'll also try the thickness change when I get back as well - I'd have hoped that Cura would be smart enough to round the wall thickness as appropriate, you never really know with this sort of things. I'll report back once I've given it a go anyway.Quote
scottybfg
Try slowing down your infill print speed, if the infill is printed too fast, it will not have enough time to bond to the outline perimeters. Start at say 60mm/s then work your way back up.
I dont use cura myself but seeing a shell wall thickness of 1mm makes me think this could be the issue, with a 0.4mm nozzle try a wall thickness of 0.8mm or 1.2mm and see if that changes the print.
Thanks.
|
Re: Gap between outer shell and inner portion March 07, 2017 10:55AM |
Registered: 7 years ago Posts: 558 |
|
Re: Gap between outer shell and inner portion March 07, 2017 04:40PM |
Registered: 12 years ago Posts: 72 |
So I've just tried another print with the following changes:
Old accelerations: (mm/s^2)
New accelerations: (mm/s^2)
In the new print, the two outer walls were put where they were meant to be, but the third inner wall had a gap between it and the outer walls. In this print the issue also affected the Y axis as well as the X, where previously it just showed up on the X axis.
I can see that it is not caused by bed leveling, as the bed's too far away on one side of the print and the issue is still happening in the part of the bed which is at the correct height.
Any other ideas as to what I can do to resolve this issue ?
Edit: Just noticed that there's a separate printing issues forum, please could someone move this thread into there ? Thanks.
Edited 1 time(s). Last edit at 03/07/2017 04:59PM by yngndrw.
- Wall thickness changed from 1.0mm to 1.2mm
- Verified that cura set the line width to 0.4mm and the wall line count to 3
- Changed the infill speed, inner wall speed and support speed from 80mm/s to 60mm/s
- Lowered the accelerations
Old accelerations: (mm/s^2)
M201 X3200 Y3200 Z128 E3200
New accelerations: (mm/s^2)
M201 X1600 Y1600 Z64 E1600
In the new print, the two outer walls were put where they were meant to be, but the third inner wall had a gap between it and the outer walls. In this print the issue also affected the Y axis as well as the X, where previously it just showed up on the X axis.
I can see that it is not caused by bed leveling, as the bed's too far away on one side of the print and the issue is still happening in the part of the bed which is at the correct height.
Any other ideas as to what I can do to resolve this issue ?
Edit: Just noticed that there's a separate printing issues forum, please could someone move this thread into there ? Thanks.
Edited 1 time(s). Last edit at 03/07/2017 04:59PM by yngndrw.
|
Re: Gap between outer shell and inner portion March 07, 2017 07:56PM |
Registered: 7 years ago Posts: 267 |
You changed too many parameters at the same time to get any useful information.
You should change one at a time to see what affect it had, now that the problem has shifted we know its something to do with cura or the acceleration.
Try a print changing the acceleration back to the old, if the print looks the same as #2 (shells not joined) then you know its something to do with the shell width as changing the acceleration had no affect
|
Re: Gap between outer shell and inner portion March 08, 2017 02:12AM |
Registered: 8 years ago Posts: 5,232 |
|
Re: Gap between outer shell and inner portion March 08, 2017 05:04AM |
Registered: 7 years ago Posts: 51 |
|
Re: Gap between outer shell and inner portion March 08, 2017 07:51AM |
Registered: 12 years ago Posts: 72 |
I'm not sure the print I did shows nothing of value at all, but you're right - I should have split it up a bit more. As Cura supports different settings per instance, I could print a few at a time - Each with difference slicing settings. The part itself prints quite quickly, but most of the time is spent waiting for the bed to cool so that I can remove them.Quote
scottybfg
You changed too many parameters at the same time to get any useful information.
You should change one at a time to see what affect it had, now that the problem has shifted we know its something to do with cura or the acceleration.
Try a print changing the acceleration back to the old, if the print looks the same as #2 (shells not joined) then you know its something to do with the shell width as changing the acceleration had no affect
I'll do a load more when I get back tonight, each with a single change.
The infill overlap is set to the default, which from memory I believe is the nozzle width - 0.4mm. I'll confirm when I get home tonight and do a print with it changed.Quote
o_lampe
How did you set the infill overlapping percentage?
Have you tried to use a different slicer?
I haven't tried a different slicer yet but will also try Slic3r as most people seem to be using that.
I can certainly try rotating the part and also try different positions. I'll try and get a better picture of the issue as well, the photograph I took is terrible - That's what I get for using black PLA and my phone's camera.Quote
Ed would
My first thought was infill overlapping percentage
But look at your other walls - they look ok.
I have seen Cura do this before - stopping the infill too short of a perimeter. Try rotating the .STL on the print bed.
Ed
Thanks all, will report back this evening with the results.
|
Re: Gap between outer shell and inner portion March 08, 2017 05:43PM |
Registered: 12 years ago Posts: 72 |
Results:
Infill Overlap Percentage: 10%
Infill Overlap: 0.04mm
Skin Overlap Percentage: 5%
Skin Overlap: 0.02mm
Print 1 - Wall Thickness: 1.0mm -> 0.8mm
- No difference.
Print 2 - Infill, Inner Wall & Support Speeds: 80mm/s -> 60mm/s
- No difference.
Print 3 - Infill Overlap Percentage: 10% -> 15%
- No difference.
Print 4 - Rotated Print (180 Degrees)
- Error was on opposite side, it followed the rotation of the model.
Print 5 - Acceleration: M201 X3200 Y3200 Z128 E3200 -> M201 X1600 Y1600 Z64 E1600
- No difference except that the X axis skipped a step - I think the nozzle hit a blob of plastic.
Print 6 - Slic3r (Tried to get the settings as close as they were to Cura's settings)
- Much wider fill width, issue still existed but in different place. (Now on the side of the squares as well as the outer edge)
Print 7 - Axis Step Calibration: M92 X64.5871559633 Y64.2922374429 Z2560 -> M92 X64 Y64 Z2560
- No difference.
I'm starting to wonder if it is due to backlash - Looking very closely I've noticed that in some of the filled in sections where it has gone back to fill in a gap, there's also a slight gap where it has changed direction. (But it only ever shifts on the X axis.)
I'm using T5 belts and Ebay metal pulleys, the same setup for both the X and Y. I've also reversed the X belt half way around so that the smooth side is against the bearing. The belts are also nice and tight. (The X is actually slightly tighter than the Y)
How much of an effect should I expect to see with backlash due to an incorrect T5 pulley ? I've ordered some GT2 belts and pulleys so will replace them to see if that's the issue.
Edited 1 time(s). Last edit at 03/08/2017 07:06PM by yngndrw.
|
Re: Gap between outer shell and inner portion March 09, 2017 01:15AM |
Registered: 8 years ago Posts: 5,232 |
|
Re: Gap between outer shell and inner portion March 09, 2017 05:04PM |
Registered: 12 years ago Posts: 72 |
So I double checked the pulley and that is fine, but I then put my finger on the belt while it was printing that portion and the filled in portion moved right over to the inner shell - Clearly it's a tension issue.
My printer uses this X carriage, which uses an M3 screw pressed against the belt to create tension - It looks like the screw has been pushing through the belt, meaning that tension can no-longer be maintained:
[www.thingiverse.com]
It's a good thing I've got some new GT2 belts on the way, although I'm going to have to find a better way of tensioning the new belts. I might try some of those clip-on springs to get it going, I don't really like them as a tensioning method but they can't be any worse than what I have now !
I'll report back when I receive the parts and hopefully will be able to confirm that this was the cause.
Thanks all.
|
Re: Gap between outer shell and inner portion March 09, 2017 05:37PM |
Registered: 7 years ago Posts: 267 |
|
Re: Gap between outer shell and inner portion March 09, 2017 05:46PM |
Registered: 12 years ago Posts: 72 |
Thanks for the tip, I don't think I'll be able to do that with the current T5 belts as the gap is only small, but I should be able to fit a nyloc nut in with the new belts as these are thinner. It should certainly keep me going until I get something more reliable. (Or finish my new CoreXY design) I need to do some test prints of the belt tensioner for my new design so this might be a good guinea pig !
|
Re: Gap between outer shell and inner portion March 13, 2017 09:54AM |
Registered: 7 years ago Posts: 154 |
I always - on any Printer - use this extremely simple and self adjusting Belt tensioner
|
Re: Gap between outer shell and inner portion March 13, 2017 10:32AM |
Registered: 12 years ago Posts: 72 |
Well I don't usually like the idea of using a spring for tensioning as the belt is already a giant spring, but in this case it seems that I don't have the option.
My new belts haven't arrived yet, but I used some cable ties to re-tension my current T5 belt so that I could print some 2mm pitch belt clamps. While printing I noticed that the motor stalled when moving towards the motor side and the cause ended up being that the belt isn't parallel with the X axis - What a horrible design. Long story short I'm now using less tension than I'd like, but I have some springs like you mentioned to go on the new belts when they are fitted to make up for the design flaw.
I need to get on with my core XY design - It will have correctly aligned belts and I've currently designed in an adaptation of this belt tensioner: (Essentially I'm stacking two of these and putting them inside a 40mmx40mm tube, right behind the bearing block so it doesn't twist)
[www.thingiverse.com]
|
Re: Gap between outer shell and inner portion March 14, 2017 09:22PM |
Registered: 12 years ago Posts: 72 |
I've just recieved and installed the new belt on the X axis. My test print now comes out perfectly.
I printed a couple of these belt clamps using my old belt and my dodgy ziptie tensioner, then compared to the new belt, tweaked the size and re-printed to get it spot on - I've attached my modified .scad file with the parameters I used in case it's of use to anyone)
[www.thingiverse.com]
I did away with the dodgy M3 tensioning bolt and used fixed clamps with a tensioning spring like Dancer suggested - This worked really well:
[www.ebay.co.uk]
The X axis is much smoother now and works nicely even with the dodgy X axis geometry on this printer, I've left the Y axis as a T5 belt for now as it's working fine but I have a spare pulley and some spare belt in case I run into issues with that axis.
Thank you all for all of the help, it's much appreciated.
Sorry, only registered users may post in this forum.