Home
>
Reprappers
>
Topic
Y and Z axis moving in wrong direction to end stop
Posted by johnvictor
|
Y and Z axis moving in wrong direction to end stop August 04, 2017 11:31PM |
Registered: 8 years ago Posts: 12 |
I have built this 3d printer [www.thingiverse.com]
I have a 5x Smoothie board - all the motors move as they should
This is my problem:
I send signal M119 - all 3 axis read 0
I send signal M119 and press each axis individually and read 1 as expected
Axis X moves correctly and homes as it should
Axis Y and Z move in the direction they should, but when I press the home they each move in the opposite direction, when I trigger the end stop they stop as expected
One reply suggested I:
"The ! inverts the signal, not the direction of the axis.
To invert the direction of the axis you need to invert the step pin for that axis."
I did this and there was no difference in performance
I am set up as:
beta_step_pin 2.1!
beta_dir_pin 0.11!
gamma_step_pin 2.2!
gamma_dir_pin 0.20!
beta_min_endstop 1.26^!
gamma_min_endstop 1.28^!
I'm getting to my wits end to get this project finalized
|
Re: Y and Z axis moving in wrong direction to end stop August 04, 2017 11:51PM |
Admin Registered: 13 years ago Posts: 6,998 |
If they move correctly, it not related to step and direction.
my guess would be your wrong about moving correctly..
moment is relative to the hotend.. so often movement is reverse of what you think it should be
so on that printer
X+ moves the head right, X- moves the head left
Y+ moves the head back, Y- moves the head forward
Z+ moves the bed down, Z- moves the bed up
Are these correct?
Next where are the endsrops at min or max position?
set the alpha_homing_direction, beta_homing_direction and gamma_homing_direction correct to where your endstops are
either home_to_min or home_to_max
the provided marlin configuration shows
// Sets direction of endstops when homing; 1=MAX, -1=MIN
#define X_HOME_DIR -1
#define Y_HOME_DIR 1
#define Z_HOME_DIR -1
so you need
alpha_homing_direction home_to_min
beta_homing_direction home_to_max
gamma_homing_direction home_to_min
Edited 2 time(s). Last edit at 08/04/2017 11:56PM by Dust.
|
Re: Y and Z axis moving in wrong direction to end stop August 05, 2017 12:30AM |
Registered: 8 years ago Posts: 12 |
The printer head moves as it should - I am using Simplify3d as my interface
When I press homeY - the print head moves towards me not to the back of the print bed - I manually press the end stop it goes through the motion of hitting the stop backs off and runs at the stop again and stops - this is what is expected except the print head is going in the wrong direction
The Z axis moves up and down correctly when I jog the print head but when I homeZ it travels down until I manually trip the end stop and works as expected
homing_direction is set to home_to_min on all three end stops as this is where the end stops are positioned
I am using a Smoothieboard not a Marlin board
Thanks for the reply
|
Re: Y and Z axis moving in wrong direction to end stop August 05, 2017 12:41AM |
Admin Registered: 13 years ago Posts: 6,998 |
|
Re: Y and Z axis moving in wrong direction to end stop August 05, 2017 07:17AM |
Registered: 7 years ago Posts: 759 |
|
Re: Y and Z axis moving in wrong direction to end stop August 05, 2017 11:39AM |
Registered: 11 years ago Posts: 5,780 |
johnvictor
the directions of rotation of both motors determine which way the mechanism moves in X and Y. The individual motors are not X and Y motors. You can't simply reverse one motor's direction without considering the rotation of the other to make things move the way you want.
I wrote up a simple explanation of setting up the endstops, motor rotation, etc. for corexy here: [drmrehorst.blogspot.com]
Let me know if anything isn't crystal clear...
In short, you are going to set the motor rotation direction last, after you've told the firmware whether it should home to min or max in each axis. Homing to min or max depends on where you have placed the endstops and where you have chosen the printer's origin to be. Homing should always drive the mechanism toward the endstop switches, whether they are at the origin or not. The origin must be at the left-front or right-rear corner of the printer or your prints will come out mirrored.
Edited 1 time(s). Last edit at 08/05/2017 11:57AM by the_digital_dentist.
Ultra MegaMax Dominator 3D printer: [drmrehorst.blogspot.com]
|
Re: Y and Z axis moving in wrong direction to end stop August 05, 2017 03:20PM |
Registered: 8 years ago Posts: 12 |
Thanks for all the replies
I am confident that I have done all that was asked
Obewan when I set Y to max it does not work
DD I followed the instructions and I believe all is as it should be
Dust I use gedit for configuring - I copied using wordPad
Here is my config file:
# Smoothieboard configuration file, see [smoothieware.org]
# NOTE Lines must not exceed 132 characters, and '#' characters mean what follows is ignored
## Robot module configurations : general handling of movement G-codes and slicing into moves
# Basic motion configuration
default_feed_rate 4000 # Default speed (mm/minute) for G1/G2/G3 moves
default_seek_rate 4000 # Default speed (mm/minute) for G0 moves
mm_per_arc_segment 0.0 # Fixed length for line segments that divide arcs, 0 to disable
#mm_per_line_segment 5 # Cut lines into segments this size
mm_max_arc_error 0.01 # The maximum error for line segments that divide arcs 0 to disable
# note it is invalid for both the above be 0
# if both are used, will use largest segment length based on radius
# Arm solution configuration : Cartesian robot. Translates mm positions into stepper positions
# See [smoothieware.org]
arm_solution corexy
alpha_steps_per_mm 80 # Steps per mm for alpha ( X ) stepper
beta_steps_per_mm 80 # Steps per mm for beta ( Y ) stepper
gamma_steps_per_mm 1600 # Steps per mm for gamma ( Z ) stepper
# Planner module configuration : Look-ahead and acceleration configuration
# See [smoothieware.org]
acceleration 3000 # Acceleration in mm/second/second.
#z_acceleration 500 # Acceleration for Z only moves in mm/s^2, 0 uses acceleration which is the default. DO NOT SET ON A DELTA
junction_deviation 0.05 # See [smoothieware.org]
#z_junction_deviation 0.0 # For Z only moves, -1 uses junction_deviation, zero disables junction_deviation on z moves DO NOT SET ON A DELTA
# Cartesian axis speed limits
x_axis_max_speed 30000 # Maximum speed in mm/min
y_axis_max_speed 30000 # Maximum speed in mm/min
z_axis_max_speed 300 # Maximum speed in mm/min
# Stepper module configuration
# Pins are defined as ports, and pin numbers, appending "!" to the number will invert a pin
#Â See [smoothieware.org] and [smoothieware.org]
alpha_step_pin 2.0 # Pin for alpha stepper step signal
alpha_dir_pin 0.5! # Pin for alpha stepper direction, add '!' to reverse direction
alpha_en_pin 0.4 # Pin for alpha enable pin
alpha_current 1.5 # X stepper motor current
alpha_max_rate 30000.0 # Maximum rate in mm/min
beta_step_pin 2.1! # Pin for beta stepper step signal
beta_dir_pin 0.11! # Pin for beta stepper direction, add '!' to reverse direction
beta_en_pin 0.10 # Pin for beta enable
beta_current 1.5 # Y stepper motor current
beta_max_rate 30000.0 # Maxmimum rate in mm/min
gamma_step_pin 2.2! # Pin for gamma stepper step signal
gamma_dir_pin 0.20 # Pin for gamma stepper direction, add '!' to reverse direction
gamma_en_pin 0.19 # Pin for gamma enable
gamma_current 1.5 # Z stepper motor current
gamma_max_rate 300.0 # Maximum rate in mm/min
## Extruder module configuration
# See [smoothieware.org]
extruder.hotend.enable true # Whether to activate the extruder module at all. All configuration is ignored if false
extruder.hotend.steps_per_mm 140 # Steps per mm for extruder stepper
extruder.hotend.default_feed_rate 600 # Default rate ( mm/minute ) for moves where only the extruder moves
extruder.hotend.acceleration 500 # Acceleration for the stepper motor mm/sec²
extruder.hotend.max_speed 50 # Maximum speed in mm/s
extruder.hotend.step_pin 2.3 # Pin for extruder step signal
extruder.hotend.dir_pin 0.22 # Pin for extruder dir signal ( add '!' to reverse direction )
extruder.hotend.en_pin 0.21 # Pin for extruder enable signal
# Extruder offset
#extruder.hotend.x_offset 0 # X offset from origin in mm
#extruder.hotend.y_offset 0 # Y offset from origin in mm
#extruder.hotend.z_offset 0 # Z offset from origin in mm
# Firmware retract settings when using G10/G11, these are the defaults if not defined, must be defined for each extruder if not using the defaults
#extruder.hotend.retract_length 3 # Retract length in mm
#extruder.hotend.retract_feedrate 45 # Retract feedrate in mm/sec
#extruder.hotend.retract_recover_length 0 # Additional length for recover
#extruder.hotend.retract_recover_feedrate 8 # Recover feedrate in mm/sec (should be less than retract feedrate)
#extruder.hotend.retract_zlift_length 0 # Z-lift on retract in mm, 0 disables
#extruder.hotend.retract_zlift_feedrate 6000 # Z-lift feedrate in mm/min (Note mm/min NOT mm/sec)
delta_current 1.5 # First extruder stepper motor current
# Second extruder module configuration
#extruder.hotend2.enable true # Whether to activate the extruder module at all. All configuration is ignored if false
#extruder.hotend2.steps_per_mm 140 # Steps per mm for extruder stepper
#extruder.hotend2.default_feed_rate 600 # Default rate ( mm/minute ) for moves where only the extruder moves
#extruder.hotend2.acceleration 500 # Acceleration for the stepper motor, as of 0.6, arbitrary ratio
#extruder.hotend2.max_speed 50 # mm/s
#extruder.hotend2.step_pin 2.8 # Pin for extruder step signal
#extruder.hotend2.dir_pin 2.13 # Pin for extruder dir signal ( add '!' to reverse direction )
#extruder.hotend2.en_pin 4.29 # Pin for extruder enable signal
#extruder.hotend2.x_offset 0 # x offset from origin in mm
#extruder.hotend2.y_offset 25.0 # y offset from origin in mm
#extruder.hotend2.z_offset 0 # z offset from origin in mm
epsilon_current 1.5 # Second extruder stepper motor current
## Laser module configuration
# See [smoothieware.org]
laser_module_enable false # Whether to activate the laser module at all
laser_module_pwm_pin 2.5 # This pin will be PWMed to control the laser.
# Only pins 2.0, 2.1, 2.2, 2.3, 2.4, 2.5, 1.18, 1.20, 1.21, 1.23, 1.24, 1.26, 3.25 and 3.26
# can be used since laser requires hardware PWM, see [smoothieware.org]
#laser_module_ttl_pin 1.30 # This pin turns on when the laser turns on, and off when the laser turns off.
#laser_module_maximum_power 1.0 # This is the maximum duty cycle that will be applied to the laser
#laser_module_minimum_power 0.0 # This is a value just below the minimum duty cycle that keeps the laser
# active without actually burning.
#laser_module_default_power 0.8 # This is the default laser power that will be used for cuts if a power has not been specified. The value is a scale between
# the maximum and minimum power levels specified above
#laser_module_pwm_period 20 # This sets the pwm frequency as the period in microseconds
## Temperature control configuration
# See [smoothieware.org]
# First hotend configuration
temperature_control.hotend.enable true # Whether to activate this ( "hotend" ) module at all.
temperature_control.hotend.thermistor_pin 0.23 # Pin for the thermistor to read
temperature_control.hotend.heater_pin 2.7 # Pin that controls the heater, set to nc if a readonly thermistor is being defined
temperature_control.hotend.thermistor Semitec # See [smoothieware.org]
#temperature_control.hotend.beta 4066 # Or set the beta value
temperature_control.hotend.set_m_code 104 # M-code to set the temperature for this module
temperature_control.hotend.set_and_wait_m_code 109 # M-code to set-and-wait for this module
temperature_control.hotend.designator T # Designator letter for this module
#temperature_control.hotend.max_temp 300 # Set maximum temperature - Will prevent heating above 300 by default
#temperature_control.hotend.min_temp 0 # Set minimum temperature - Will prevent heating below if set
# Safety control is enabled by default and can be overidden here, the values show the defaults
# See [smoothieware.org]
#temperature_control.hotend.runaway_heating_timeout 900 # How long it can take to heat up, max is 2040 seconds.
#temperature_control.hotend.runaway_cooling_timeout 0 # How long it can take to cool down if temp is set lower, max is 2040 seconds
#temperature_control.hotend.runaway_range 20 # How far from the set temperature it can wander, max setting is 63°C
# PID configuration
# See [smoothieware.org]
#temperature_control.hotend.p_factor 13.7 # P ( proportional ) factor
#temperature_control.hotend.i_factor 0.097 # I ( integral ) factor
#temperature_control.hotend.d_factor 24 # D ( derivative ) factor
#temperature_control.hotend.max_pwm 64 # Max pwm, 64 is a good value if driving a 12v resistor with 24v.
# Second hotend configuration
#temperature_control.hotend2.enable true # Whether to activate this ( "hotend" ) module at all.
#temperature_control.hotend2.thermistor_pin 0.25 # Pin for the thermistor to read
#temperature_control.hotend2.heater_pin 1.23 # Pin that controls the heater
#temperature_control.hotend2.thermistor EPCOS100K # See [smoothieware.org]
##temperature_control.hotend2.beta 4066 # or set the beta value
#temperature_control.hotend2.set_m_code 104 # M-code to set the temperature for this module
#temperature_control.hotend2.set_and_wait_m_code 109 # M-code to set-and-wait for this module
#temperature_control.hotend2.designator T1 # Designator letter for this module
#temperature_control.hotend2.p_factor 13.7 # P ( proportional ) factor
#temperature_control.hotend2.i_factor 0.097 # I ( integral ) factor
#temperature_control.hotend2.d_factor 24 # D ( derivative ) factor
#temperature_control.hotend2.max_pwm 64 # Max pwm, 64 is a good value if driving a 12v resistor with 24v.
temperature_control.bed.enable true # Whether to activate this ( "hotend" ) module at all.
temperature_control.bed.thermistor_pin 0.24 # Pin for the thermistor to read
temperature_control.bed.heater_pin 2.5 # Pin that controls the heater
temperature_control.bed.thermistor Honeywell100K # See [smoothieware.org]
#temperature_control.bed.beta 3974 # Or set the beta value
temperature_control.bed.set_m_code 140 # M-code to set the temperature for this module
temperature_control.bed.set_and_wait_m_code 190 # M-code to set-and-wait for this module
temperature_control.bed.designator B # Designator letter for this module
# Bang-bang ( simplified ) control
# See [smoothieware.org]
#temperature_control.bed.bang_bang false # Set to true to use bang bang control rather than PID
#temperature_control.bed.hysteresis 2.0 # Set to the temperature in degrees C to use as hysteresis
## Switch modules
# See [smoothieware.org]
# Switch module for fan control
switch.fan.enable true # Enable this module
switch.fan.input_on_command M106 # Command that will turn this switch on
switch.fan.input_off_command M107 # Command that will turn this switch off
switch.fan.output_pin 2.6 # Pin this module controls
switch.fan.output_type pwm # PWM output settable with S parameter in the input_on_comand
#switch.fan.max_pwm 255 # Set max pwm for the pin default is 255
#switch.misc.enable true # Enable this module
#switch.misc.input_on_command M42 # Command that will turn this switch on
#switch.misc.input_off_command M43 # Command that will turn this switch off
#switch.misc.output_pin 2.4 # Pin this module controls
#switch.misc.output_type digital # Digital means this is just an on or off pin
## Temperatureswitch
# See [smoothieware.org]
# Automatically toggle a switch at a specified temperature. Different ones of these may be defined to monitor different temperatures and switch different swithxes
# Useful to turn on a fan or water pump to cool the hotend
#temperatureswitch.hotend.enable true #
#temperatureswitch.hotend.designator T # first character of the temperature control designator to use as the temperature sensor to monitor
#temperatureswitch.hotend.switch misc # select which switch to use, matches the name of the defined switch
#temperatureswitch.hotend.threshold_temp 60.0 # temperature to turn on (if rising) or off the switch
#temperatureswitch.hotend.heatup_poll 15 # poll heatup at 15 sec intervals
#temperatureswitch.hotend.cooldown_poll 60 # poll cooldown at 60 sec intervals
## Endstops
# See [smoothieware.org]
endstops_enable true # The endstop module is enabled by default and can be disabled here
corexy_homing true # Set to true if homing on a hbot or corexy
alpha_min_endstop 1.24^! # Pin to read min endstop, add a ! to invert if endstop is NO connected to ground
#alpha_max_endstop 1.25^ # Pin to read max endstop, uncomment this and comment the above if using max endstops
alpha_homing_direction home_to_min # Or set to home_to_max and set alpha_max and uncomment the alpha_max_endstop
alpha_min 0 # This gets loaded as the current position after homing when home_to_min is set
alpha_max 300 # This gets loaded as the current position after homing when home_to_max is set
beta_min_endstop 1.26^! # Pin to read min endstop, add a ! to invert if endstop is NO connected to ground
#beta_max_endstop 1.27^ # Pin to read max endstop, uncomment this and comment the above if using max endstops
beta_homing_direction home_to_min # Or set to home_to_max and set alpha_max and uncomment the alpha_max_endstop
beta_min 0 # This gets loaded as the current position after homing when home_to_min is set
beta_max 200 # This gets loaded as the current position after homing when home_to_max is set
gamma_min_endstop 1.28^!` # Pin to read min endstop, add a ! to invert if endstop is NO connected to ground
#gamma_max_endstop 1.29^ # Pin to read max endstop, uncomment this and comment the above if using max endstops
gamma_homing_direction home_to_min # Or set to home_to_max and set alpha_max and uncomment the alpha_max_endstop
gamma_min 0 # This gets loaded as the current position after homing when home_to_min is set
gamma_max 300 # This gets loaded as the current position after homing when home_to_max is set
alpha_max_travel 500 # Max travel in mm for alpha/X axis when homing
beta_max_travel 500 # Max travel in mm for beta/Y axis when homing
gamma_max_travel 500 # Max travel in mm for gamma/Z axis when homing
# Optional enable limit switches, actions will stop if any enabled limit switch is triggered
#alpha_limit_enable false # Set to true to enable X min and max limit switches
#beta_limit_enable false # Set to true to enable Y min and max limit switches
#gamma_limit_enable false # Set to true to enable Z min and max limit switches
# Endstops home at their fast feedrate first, then once the endstop is found they home again at their slow feedrate for accuracy
alpha_fast_homing_rate_mm_s 25 # Alpha/X fast homing feedrate in mm/second
alpha_slow_homing_rate_mm_s 15 # Alpha/X slow homing feedrate in mm/second
beta_fast_homing_rate_mm_s 25 # Beta/Y fast homing feedrate in mm/second
beta_slow_homing_rate_mm_s 15 # Beta/Y slow homing feedrate in mm/second
gamma_fast_homing_rate_mm_s 4 # Gamma/Z fast homing feedrate in mm/second
gamma_slow_homing_rate_mm_s 2 # Gamma/Z slow homing feedrate in mm/second
alpha_homing_retract_mm 5 # Distance to retract from the endstop after it is hit for alpha/X
beta_homing_retract_mm 5 # Distance to retract from the endstop after it is hit for beta/Y
gamma_homing_retract_mm 1 # Distance to retract from the endstop after it is hit for gamma/Z
# Optional enable limit switches, actions will stop if any enabled limit switch is triggered (all are set for delta)
#alpha_limit_enable false # Set to true to enable X min and max limit switches
#beta_limit_enable false # Set to true to enable Y min and max limit switches
#gamma_limit_enable false # Set to true to enable Z min and max limit switches
# Optional order in which axis will home, default is they all home at the same time,
# If this is set it will force each axis to home one at a time in the specified order
#homing_order XYZ # X axis followed by Y then Z last
#move_to_origin_after_home false # Move XY to 0,0 after homing
#endstop_debounce_count 100 # Uncomment if you get noise on your endstops, default is 100
#endstop_debounce_ms 1 # Uncomment if you get noise on your endstops, default is 1 millisecond debounce
#home_z_first true # Uncomment and set to true to home the Z first, otherwise Z homes after XY
# End of endstop config
# Delete the above endstop section and uncomment next line and copy and edit Snippets/abc-endstop.config file to enable endstops for ABC axis
#include abc-endstop.config
## Z-probe
# See [smoothieware.org]
zprobe.enable false # Set to true to enable a zprobe
zprobe.probe_pin 1.28!^ # Pin probe is attached to, if NC remove the !
zprobe.slow_feedrate 5 # Mm/sec probe feed rate
#zprobe.debounce_count 100 # Set if noisy
zprobe.fast_feedrate 100 # Move feedrate mm/sec
zprobe.probe_height 5 # How much above bed to start probe
#gamma_min_endstop nc # Normally 1.28. Change to nc to prevent conflict,
# Levelling strategy
# Example for 3-point levelling strategy, see wiki documentation for other strategies
#leveling-strategy.three-point-leveling.enable true # a leveling strategy that probes three points to define a plane and keeps the Z parallel to that plane
#leveling-strategy.three-point-leveling.point1 100.0,0.0 # the first probe point (x,y) optional may be defined with M557
#leveling-strategy.three-point-leveling.point2 200.0,200.0 # the second probe point (x,y)
#leveling-strategy.three-point-leveling.point3 0.0,200.0 # the third probe point (x,y)
#leveling-strategy.three-point-leveling.home_first true # home the XY axis before probing
#leveling-strategy.three-point-leveling.tolerance 0.03 # the probe tolerance in mm, anything less that this will be ignored, default is 0.03mm
#leveling-strategy.three-point-leveling.probe_offsets 0,0,0 # the probe offsets from nozzle, must be x,y,z, default is no offset
#leveling-strategy.three-point-leveling.save_plane false # set to true to allow the bed plane to be saved with M500 default is false
## Panel
# See [smoothieware.org]
# Please find your panel on the wiki and copy/paste the right configuration here
panel.enable false # Set to true to enable the panel code
# Example for reprap discount GLCD
# on glcd EXP1 is to left and EXP2 is to right, pin 1 is bottom left, pin 2 is top left etc.
# +5v is EXP1 pin 10, Gnd is EXP1 pin 9
#panel.lcd reprap_discount_glcd #
#panel.spi_channel 0 # SPI channel to use ; GLCD EXP1 Pins 3,5 (MOSI, SCLK)
#panel.spi_cs_pin 0.16 # SPI chip select ; GLCD EXP1 Pin 4
#panel.encoder_a_pin 3.25!^ # Encoder pin ; GLCD EXP2 Pin 3
#panel.encoder_b_pin 3.26!^ # Encoder pin ; GLCD EXP2 Pin 5
#panel.click_button_pin 1.30!^ # Click button ; GLCD EXP1 Pin 2
#panel.buzz_pin 1.31 # Pin for buzzer ; GLCD EXP1 Pin 1
#panel.back_button_pin 2.11!^ # Back button ; GLCD EXP2 Pin 8
panel.menu_offset 0 # Some panels will need 1 here
panel.alpha_jog_feedrate 6000 # X jogging feedrate in mm/min
panel.beta_jog_feedrate 6000 # Y jogging feedrate in mm/min
panel.gamma_jog_feedrate 200 # Z jogging feedrate in mm/min
panel.hotend_temperature 185 # Temp to set hotend when preheat is selected
panel.bed_temperature 60 # Temp to set bed when preheat is selected
## Custom menus : Example of a custom menu entry, which will show up in the Custom entry.
# NOTE _ gets converted to space in the menu and commands, | is used to separate multiple commands
custom_menu.power_on.enable true #
custom_menu.power_on.name Power_on #
custom_menu.power_on.command M80 #
custom_menu.power_off.enable true #
custom_menu.power_off.name Power_off #
custom_menu.power_off.command M81 #
## Network settings
# See [smoothieware.org]
network.enable false # Enable the ethernet network services
network.webserver.enable true # Enable the webserver
network.telnet.enable true # Enable the telnet server
network.ip_address auto # Use dhcp to get ip address
# Uncomment the 3 below to manually setup ip address
#network.ip_address 192.168.3.222 # The IP address
#network.ip_mask 255.255.255.0 # The ip mask
#network.ip_gateway 192.168.3.1 # The gateway address
#network.mac_override xx.xx.xx.xx.xx.xx # Override the mac address, only do this if you have a conflict
## System configuration
# Serial communications configuration ( baud rate defaults to 9600 if undefined )
# For communication over the UART port, *not* the USB/Serial port
uart0.baud_rate 115200 # Baud rate for the default hardware ( UART ) serial port
second_usb_serial_enable false # This enables a second USB serial port
#leds_disable true # Disable using leds after config loaded
#play_led_disable true # Disable the play led
# Kill button maybe assigned to a different pin, set to the onboard pin by default
# See [smoothieware.org]
kill_button_enable true # Set to true to enable a kill button
kill_button_pin 2.12 # Kill button pin. default is same as pause button 2.12 (2.11 is another good choice)
#msd_disable false # Disable the MSD (USB SDCARD), see [smoothieware.org]
#dfu_enable false # For linux developers, set to true to enable DFU
# Only needed on a smoothieboard
# See [smoothieware.org]
currentcontrol_module_enable true # Control stepper motor current via the configuration file
|
Re: Y and Z axis moving in wrong direction to end stop August 05, 2017 04:10PM |
Registered: 11 years ago Posts: 5,780 |
Where is the printer's origin and where are the x, y, and z endstops? Are the motors on the front or back of the machine?
Ultra MegaMax Dominator 3D printer: [drmrehorst.blogspot.com]
Ultra MegaMax Dominator 3D printer: [drmrehorst.blogspot.com]
|
Re: Y and Z axis moving in wrong direction to end stop August 05, 2017 04:39PM |
Registered: 8 years ago Posts: 12 |
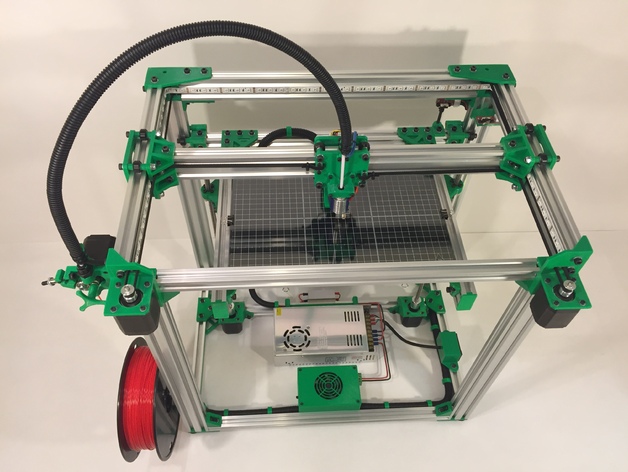
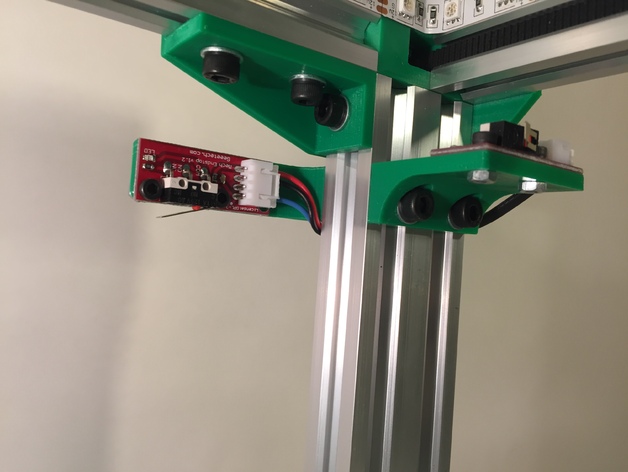
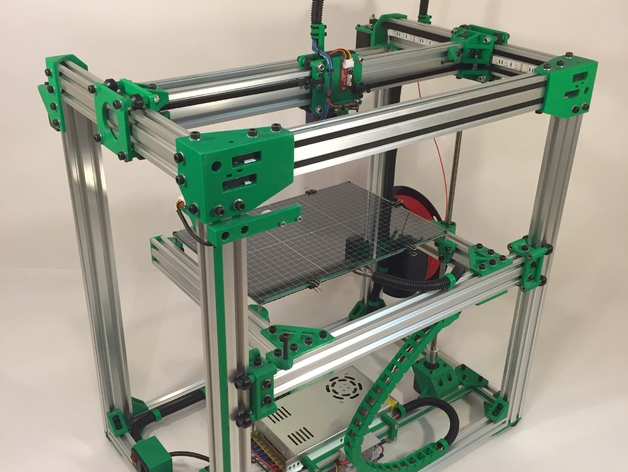
DD here are the images:
1st pic shows both motors front and Y and Z stops in RR
2nd shows closeup of the Y and Z stops
3rd shows the end stop on the print head carriage with the bolt at the end of the carriage
I am not sure where the printer's origins are
Hope this helps
1st pic shows both motors front and Y and Z stops in RR
2nd shows closeup of the Y and Z stops
3rd shows the end stop on the print head carriage with the bolt at the end of the carriage
I am not sure where the printer's origins are
Hope this helps
|
Re: Y and Z axis moving in wrong direction to end stop August 05, 2017 06:01PM |
Registered: 7 years ago Posts: 759 |
The X endstop is mounted on the back of the X carriage and acts as a MIN endstop
The Y endstop is mounted top rear of the frame, this is a Y MAX location
The Z enstop is mounted top rear of the frame, this i s a Z MIN location
In S3D when you send Z- the bed should move upwards toward the hotend, Z+ should move the bed downwards
In your config, you have the Y endstop set as Y min
Change the above to
#beta_min_endstop 1.26^! # Pin to read min endstop, add a ! to invert if endstop is NO connected to ground
beta_max_endstop 1.27^ # Pin to read max endstop, uncomment this and comment the above if using max endstops
beta_homing_direction home_to_max # Or set to home_to_max and set alpha_max and uncomment the alpha_max_endstop
and plug the Y enstop into the Y max connector
your print origin should then be at X=0 Y=0, front left of bed.
The Y endstop is mounted top rear of the frame, this is a Y MAX location
The Z enstop is mounted top rear of the frame, this i s a Z MIN location
In S3D when you send Z- the bed should move upwards toward the hotend, Z+ should move the bed downwards
In your config, you have the Y endstop set as Y min
Quote
beta_min_endstop 1.26^! # Pin to read min endstop, add a ! to invert if endstop is NO connected to ground
#beta_max_endstop 1.27^ # Pin to read max endstop, uncomment this and comment the above if using max endstops
beta_homing_direction home_to_min # Or set to home_to_max and set alpha_max and uncomment the alpha_max_endstop
Change the above to
#beta_min_endstop 1.26^! # Pin to read min endstop, add a ! to invert if endstop is NO connected to ground
beta_max_endstop 1.27^ # Pin to read max endstop, uncomment this and comment the above if using max endstops
beta_homing_direction home_to_max # Or set to home_to_max and set alpha_max and uncomment the alpha_max_endstop
and plug the Y enstop into the Y max connector
your print origin should then be at X=0 Y=0, front left of bed.
|
Re: Y and Z axis moving in wrong direction to end stop August 05, 2017 06:44PM |
Registered: 11 years ago Posts: 5,780 |
If you don't know where the origin is, how can you set the homing direction? You have to decide if the origin is going to be at the left-front or right-rear, then set the rest of the configuration to reflect that choice. Choosing the left-front is generally most convenient because the slicers default to that view of the plater and pronterface and similar hosts jog controls are based on that origin. But you don't have to do it that way if you don't want to...
Does the X endstop bump on the right end or the left end of the X axis?
Do you have the left motor connected to the alpha output on the smoothieboard and the right motor connected to the beta output? If not, put them there.
Here's what you have to do:
1) decide on the location of the origin, either left-front or right-rear. For the statements below, I'll assume you have selected the left-front for the origin.
2) connect the left motor to the alpha output and the right motor to the beta output
3) measure the limits of motion of the X, Y, and Z axes and put them in the X_max, Y_max, and Z max statements in the config file and set X_min, Y_min, and Z_min to 0.
4) if the origin is at the left-front, and the Y axis endstop switch is at the back of the machine, set Y to home_to_max in the config file and plug the endstop into the Y_max endstop input on the controller.
5) if the origin is at the left-front, and the X axis endstop is on the left side, set X to home_to_min in the config file and plug the endstop into the X_minendstop input on the controller. Otherwise, set X to home_to_max and plug the endstop into the X_max input.
6) manually move the extruder to the central area of the printer, power on, and send a home all axes command. The alpha motor should turn clockwise. If it doesn't, invert the alpha direction pin in the config file.
7) manually move the extruder to the central area of the printer, power on, and send a home all axes command. The extruder carriage should move toward the left and rear. If it doesn't, invert the beta direction pin in the config file.
The Z axis should move up toward the Z min endstop which should be plugged into the Z_min input on the controller. The Z axis should be set to home_to_min in the config file.
Now when you home the machine, the mechanism should move toward the endstop switches. The bed will stop at the top of the Z axis, the extruder carriage should be at the left rear of the machine.
Ultra MegaMax Dominator 3D printer: [drmrehorst.blogspot.com]
|
Re: Y and Z axis moving in wrong direction to end stop August 05, 2017 08:16PM |
Registered: 8 years ago Posts: 12 |
Obewan and DD
Obewan I changed beta_homing_dir to max and beta_max_endstop
Now when I send M119 = X_min 0: Y_max 1: Z_min 0
DD - I did #3 and #4 and #6 moved as you said and continued on to the Z axis and moved it down - I manually triggered the Z end stop no joy so I powered off
I am sure I am following directions - I'm at a complete loss as what to do next?
|
Re: Y and Z axis moving in wrong direction to end stop August 05, 2017 08:57PM |
Registered: 11 years ago Posts: 5,780 |
So if I understand correctly, the XY mechanism is now working as expected and the Z axis still isn't working right.
How is the Z endstop switch wired, NO or NC, and which input is it connected to on the board? What do the config lines for the Z endstop say (home to min/max, pin number, pullup on/off, etc.)?
Ultra MegaMax Dominator 3D printer: [drmrehorst.blogspot.com]
How is the Z endstop switch wired, NO or NC, and which input is it connected to on the board? What do the config lines for the Z endstop say (home to min/max, pin number, pullup on/off, etc.)?
Ultra MegaMax Dominator 3D printer: [drmrehorst.blogspot.com]
|
Re: Y and Z axis moving in wrong direction to end stop August 08, 2017 12:25AM |
Registered: 8 years ago Posts: 12 |
Obewan and DD
Long weekend in my province
I now have axis Z working - changed the -Z to move up and +Z to move down
Now X and Z move correctly and trigger the end stop as required
The Y axis moves forward and back properly, the max endstop would not function correctly, changed back to min_endstop - now I home Y axis, print head moves to the front of the printer until I manually trigger the end stop - tried a number of different configurations !,^,v,- neither seemed to make any difference
My config :
alpha_step_pin 2.0
alpha_dir_pin 0.5!
beta_step_pin 2.1
beta_dir_pin 0.11!^
gamma_step_pin 2.2!
gamma_dir_pin 0.20!^
alpha_min_endstop 1.24^!
beta_min_endstop 1.26^!
gamma_min_stop 1.28^!
I am sooo close - just the Y axis to trigger
|
Re: Y and Z axis moving in wrong direction to end stop August 08, 2017 01:02PM |
Registered: 8 years ago Posts: 12 |
SOLVED finally!!
These are my changes:
beta_dir_pin 0.11!
beta_max_endstops 1.27!^
homing direction home to max
changed the beta min endstop plugin to beta max plugin on the board
Now it seems so simple - I was over complicating it with sooo many combinations to play with
Again obewan and DD thanks very much
You both make this forum worth while
Sorry, only registered users may post in this forum.