Home
>
Reprappers
>
Topic
Woes of ABS and part warping
Posted by dlc60
|
Woes of ABS and part warping September 20, 2017 12:52AM |
Registered: 7 years ago Posts: 619 |
I have no problems getting PLA to print on blue tape without warping - no surprise, but I am designing a custom delta and need to use something tougher than PLA for the plastic pieces, so I am working with ABS.
One word. Ick.
Nothing but warping and splitting between layers. This is my 3D printer:
I started middle of the road at 240C and bed at 100C on Kapton with Aquanet Super Hold and an infill of 50% and 0.3mm layers. I have a Folgertech Kossel delta with a DIY 3.54:1 geared extruder that works incredibly well and an E3Dv6, which I am only marginally impressed with. I am using both eSun ABS and MakerGeek ABS, 1.75mm filament.
ABS works OK with smaller pieces, Monster lower corners are warping and splitting. So I combed the 'net for solutions that didn't involve expensive and exotic bed surfaces...
All of these steps are sworn solutions from someone, somewhere. None of them completely worked. Some of them did some good, some made it worse.
I put up a breeze wall all around and removed vent air flow from my area.
Raised nozzle temp to 260.
Dropped nozzle temp to 230.
raised bed temp to 105.
Dropped bed temp to 80 after 10 layers.
Glass only with hairspray
Kapton with hairspray.
Slowed print speed down
Sped print speed up
Put "mouse ears" on corners
Put 15 line brim on part
Dropped infill to 25%
Increased number of bottom layers
Added solid layers at intervals between infill layers
Glue stick on glass
Glue stick on Kapton tape
Increased "squish" by to 90% first layer
Increased "squish" by increasing first layer extrusion by 50%
Changed layers to 0.2mm
I have only a few options left. ABS slurry and using a raft. Then I will need to get exotic. Before I go suppy messy, super crappy first layer or super exotic, I will try more combinations of the suggestions that I have read. I will keep the breeze walls, they make sense. I am going to experiment with glue stick, Kapton tape and lower nozzle temperature on a 100C bed. I have been using glue stick with Kapton tape for both PLA and some ABS parts with this combo of solutions and practically had to either PLA or ABS off of the print bed. So, tonight, the BIG part using this combo. I shall report what the results!
I have a friend making me an enclosure and I recently added an E3D Titan extruder so I could fully enclose my printer.
Stay tuned. I do NOT give up easily!
Hmm, I wonder of 3mm works better? Lulzbot machines are all 3mm and are nearly "best of class". Hmm...
DLC
|
Re: Woes of ABS and part warping September 20, 2017 01:44AM |
Registered: 9 years ago Posts: 483 |
|
Re: Woes of ABS and part warping September 20, 2017 09:19AM |
Registered: 7 years ago Posts: 257 |
I don't use PLA as it is weak and easily damaged by sun or water. I use an aluminum heated bed with a PrintBite top. When necessary on large prints, I use ABS slurry. At times I have difficulty removing my prints from the bed, but I get little warping. I set my bed at 120 and my hot end at 265!
|
Re: Woes of ABS and part warping September 20, 2017 10:11AM |
Registered: 11 years ago Posts: 5,780 |
A warm enclosure (45-50C) helps for keeping ABS stuck to the bed and keeps layers stuck together. Another thing that helps is not having very long, straight sides on the print. Reduced infill helps, too. 50% is awfully dense infill. You can probably reduce that to 20% with minimal impact on the strength of the part, especially parts being used in a 3D printer where stresses are minimal. A flat, level, evenly heated bed also helps- prints won't stick if there's big temperature variation across the bed surface. Glass does not generally present an evenly heated surface. I used to use clean kapton tape on cast tooling plate, but found that a 30 mil layer PEI works more reliably than kapton, and is less expensive in terms of $ and time spent replacing it.
Ultra MegaMax Dominator 3D printer: [drmrehorst.blogspot.com]
Ultra MegaMax Dominator 3D printer: [drmrehorst.blogspot.com]
|
Re: Woes of ABS and part warping September 20, 2017 02:04PM |
Registered: 7 years ago Posts: 619 |
All good suggestions, but I have some questions.
How do you get the beds that hot? It is all my system can do to reach 105C, and that takes half an hour at least.
If you don't use a glass topper for the bed (so it is really flat, aluminum beds are always warped in slight amounts) do you apply your tape/slurry directly to the bed plate? If you use some other liner for the bed, how do you hold it down? Is the stuff easily cut? There are lots of bed sizes out there and they are not all square either...
I have avoided a complete enclosure because the electronics are under my bed. If I put my whole unit in a box I guarantee the driver electronics will fail. I have a fan blowing across the heat sinks over the stepper drivers to avoid this. And this solution was needed for a printer that isn't fully enclosed! If I put my delta in a box and raise the temperature I am pretty sure my drivers will over-temp limit. How do you avoid that?
My last run had this configuration:
Bed: 100C, nozzle: 240C, Infill 40%, "Mouse ears" on the sharp corners, 5 rings of brim, 0.3mm layers, 40mm/s print speed, 20% speed first layer
Glass topper with Kapton tape and plenty of glue stick
Walls around the printer with a vent for the electronics fan, the top was 80% enclosed, the sides fully enclosed - No clue of internal temperature.
Results:
Less than 1mm warp on the corners (pretty good from my experience).
Several layer separation cracks, one severe.
Analysis:
Higher infill % might reduce, but not remove the cracks. Higher nozzle temp might improve layer adhesion. However, this setup works fine on parts that are only 10-20mm high. This part is probably 100mm high. There are serious stresses as the upper levels cool and shrink, the base level is not cooling as much and not shrinking much - This means high stress on those sharp edges, if the part cannot warp because it is solid to the bed, then something is going to give, hence cracks. This implies that I should get those first layers to cool and shrink right away so that upper layers don't pull apart. But the "wisdom" that I read says we need to slow the cooling process. Huh? The ABS is gonna shrink whether it cools fast or slow, so I am experiencing cognative dissonance here.
The common wisdom doesn't seem so wise in the face of these conflicting needs.
So.
It seems to me that what needs to happen is that I need to bring the entire environment to the same temperature as the print bed (100C or so) and hold it there for the entire print, then cool the bed and the air inside down at the same rate. IOW, I don't need to heat the bed, I need the entire build volume enclosed in a temperature controlled chamber or have no hope of getting this to work.
In my mind, heating my electronics to 100C is a bad idea. Temperatures over 60C will seriously stress most commercial components, so THIS means I need the electronics to be outside of the temperature chamber. This means also that I need to have stepper motors that can survive temperatures around 100C comfortably to provide long term service. Chinese steppers do not provide their specs, so this means getting lots of steppers for replacements or spending $$ on quality steppers that are warrented at these temperatures. This is not sounding like a hobby anymore, now it is an engineering challenge.
I will work on this and see what I come up with. I need to find a supplier of cheap ABS for all this experimentation. Either that or move to PETG as my building material - At least PETG doesn't smell so bad...
Keep the ideas coming, I am listening closely,
DLC
How do you get the beds that hot? It is all my system can do to reach 105C, and that takes half an hour at least.
If you don't use a glass topper for the bed (so it is really flat, aluminum beds are always warped in slight amounts) do you apply your tape/slurry directly to the bed plate? If you use some other liner for the bed, how do you hold it down? Is the stuff easily cut? There are lots of bed sizes out there and they are not all square either...
I have avoided a complete enclosure because the electronics are under my bed. If I put my whole unit in a box I guarantee the driver electronics will fail. I have a fan blowing across the heat sinks over the stepper drivers to avoid this. And this solution was needed for a printer that isn't fully enclosed! If I put my delta in a box and raise the temperature I am pretty sure my drivers will over-temp limit. How do you avoid that?
My last run had this configuration:
Bed: 100C, nozzle: 240C, Infill 40%, "Mouse ears" on the sharp corners, 5 rings of brim, 0.3mm layers, 40mm/s print speed, 20% speed first layer
Glass topper with Kapton tape and plenty of glue stick
Walls around the printer with a vent for the electronics fan, the top was 80% enclosed, the sides fully enclosed - No clue of internal temperature.
Results:
Less than 1mm warp on the corners (pretty good from my experience).
Several layer separation cracks, one severe.
Analysis:
Higher infill % might reduce, but not remove the cracks. Higher nozzle temp might improve layer adhesion. However, this setup works fine on parts that are only 10-20mm high. This part is probably 100mm high. There are serious stresses as the upper levels cool and shrink, the base level is not cooling as much and not shrinking much - This means high stress on those sharp edges, if the part cannot warp because it is solid to the bed, then something is going to give, hence cracks. This implies that I should get those first layers to cool and shrink right away so that upper layers don't pull apart. But the "wisdom" that I read says we need to slow the cooling process. Huh? The ABS is gonna shrink whether it cools fast or slow, so I am experiencing cognative dissonance here.
The common wisdom doesn't seem so wise in the face of these conflicting needs.
So.
It seems to me that what needs to happen is that I need to bring the entire environment to the same temperature as the print bed (100C or so) and hold it there for the entire print, then cool the bed and the air inside down at the same rate. IOW, I don't need to heat the bed, I need the entire build volume enclosed in a temperature controlled chamber or have no hope of getting this to work.
In my mind, heating my electronics to 100C is a bad idea. Temperatures over 60C will seriously stress most commercial components, so THIS means I need the electronics to be outside of the temperature chamber. This means also that I need to have stepper motors that can survive temperatures around 100C comfortably to provide long term service. Chinese steppers do not provide their specs, so this means getting lots of steppers for replacements or spending $$ on quality steppers that are warrented at these temperatures. This is not sounding like a hobby anymore, now it is an engineering challenge.
I will work on this and see what I come up with. I need to find a supplier of cheap ABS for all this experimentation.
Either that or move to PETG as my building material - At least PETG doesn't smell so bad...Keep the ideas coming, I am listening closely,
DLC
|
Re: Woes of ABS and part warping September 20, 2017 02:57PM |
Registered: 9 years ago Posts: 483 |
1. Mic6 (or other cast aluminum) can be as flat as glass plates. Glass plates may or may not be flat.
2. My aluminum bed is loosely anchored on 3 supports which allow it to expand and contract without bowing.
3. I use a silicon heater glued to the underside of the bed and underneath that is .5" insulation. There is an air gap between the insulation and the base.
4. The base is a torsion box with .1" aluminum plate attached to horizontal extrusions as well as to the vertical towers. There is no structural plastic in the printer.
5. I have a small 50mm fan in the base with airflow directly across the controller. The temperature inside the base doesn't get more than 5 degrees above ambient.
6. My enclosure is .5" insulation on two sides and a plastic curtain on the front. Temperature inside maintains 40C.
p.s. The heater is 120v and heats the 320mm diameter bed to 128C in 5 minutes when ambient temperature is 20C.
Edited 1 time(s). Last edit at 09/20/2017 03:00PM by etfrench.
|
Re: Woes of ABS and part warping September 20, 2017 03:32PM |
Registered: 11 years ago Posts: 5,780 |
Cast aluminum tooling plate comes milled flat. It stays flat when heated. Put a thin layer of PEI on it and prints will stick without any goo or slop. Aluminum is easily cut and drilled.
You can print very small ABS parts and single walled vases of any size with ABS without an enclosure. To print anything else you need a warm (45-50C) enclosure. Yes, heat is bad for electronics, so it's best to get the electronics out of the enclosed area. It even best if you can get the motors out of the warm enclosure. Motors usually operate just fine at 60C, so as long as they run relatively cool anyway, having them inside the enclosure should be OK. If they run hot, you might have to reduce current if they're going to be inside a warm enclosure.
The print bed top surface needs to be about 100-110C to get the first layer of ABS to stick. If you put a thermal insulator like glass on the bed, the surface temperature will be several degrees lower than the set temperature (you're also unlikely to have even heating). You have to turn the temperature up to compensate. You get the bed heated up by having an adequately rated heater supplied with adequate power. Power levels of 0.4-0.5W per cm^2 will heat things up reasonably quickly. My 300x300x8 mm cast aluminum bed has a line powered 750W heater that gets the temperature up to 105C in 4.5 minutes.
Ultra MegaMax Dominator 3D printer: [drmrehorst.blogspot.com]
|
Re: Woes of ABS and part warping September 21, 2017 08:41AM |
Registered: 7 years ago Posts: 257 |
|
Re: Woes of ABS and part warping September 21, 2017 06:49PM |
Registered: 7 years ago Posts: 619 |
|
Re: Woes of ABS and part warping September 21, 2017 08:16PM |
Registered: 9 years ago Posts: 483 |
I used this silicon heater. You also need an SSR. You should be aware that many Fotek counterfeits are sold on ebay and other chinese vendors. Keenovo sells the genuine Fotek SSR. Keenovo will also supply the wiring schematic.
|
Re: Woes of ABS and part warping September 21, 2017 11:16PM |
Registered: 11 years ago Posts: 1,592 |
|
Re: Woes of ABS and part warping September 22, 2017 12:56AM |
Registered: 11 years ago Posts: 5,780 |
Line power requires extra safety precautions. Use a fuse to protect against broken/shorted wires. Ground the printer's frame. Add a TCO to the heater or bed plate to prevent thermal runaway if the SSR fails. Here's the wiring diagram for the bed heater in my printer:
I used a Keenovo 750W heater and Crydom D1225 SSR -an expensive part that I got for free, but there are plenty of others that will work just fine for lower cost. The Keenovo heater seems to be very well made.
Full details of the bed mechanical design are here: [drmrehorst.blogspot.com]
Ultra MegaMax Dominator 3D printer: [drmrehorst.blogspot.com]
|
Re: Woes of ABS and part warping September 22, 2017 09:44AM |
Registered: 7 years ago Posts: 257 |
With a solid state relay. I simply used my 12 volt output from my old heater to control the relay on the 120 volt heater. You can also use GPIO pins, but 3.5 volts may not be enough to trigger the relay. My heater came with a thermal fuse. My 120 volt input to my system is fused.
Edited 1 time(s). Last edit at 09/22/2017 09:47AM by cwaa.
Edited 1 time(s). Last edit at 09/22/2017 09:47AM by cwaa.
|
Re: Woes of ABS and part warping September 22, 2017 07:56PM |
Registered: 7 years ago Posts: 619 |
Quote
waitaki
You haven't told us what your nozzle gap is set at and if your bed has been truly leveled? Major contributors to print problems if they are not correct.
Hmm, nope, I guess that I just assumed that since every tutorial, manual and video starts out with that advice, it would be foolish to ignore it.
Yes, this is a delta printer, leveling the bed is half hardware and half firmware. Measuring from the tower limit switches to the bed, all are the same. I have adjusted the end effector radius and rod lengths until my three tower points and the center report less than 0.1mm difference, worse case. This is about as level as you can get a delta printer. An incredibly tedious process, this is (in best Yoda voice.) I plan to improve this even more by replacing my default mechanical switches with optical ones.
Thanks,
DLC
|
Re: Woes of ABS and part warping September 23, 2017 03:56AM |
Registered: 9 years ago Posts: 893 |
Have you considered trying a totally different filament material, such as PETG? More durable than PLA, less demanding to print than ABS (and less smelly).
It's not the easiest stuff to use - I found that I had to print at a much slower speed to avoid stringing - and the colour choices are limited. The hot-end temp is 230 - 250 (similar to ABS) but the bed is 50C to 80C, and if you're really lucky you can print with a bed temp of 0C. It can warp when printing, but in my experience it's less troublesome than ABS.
It's not the easiest stuff to use - I found that I had to print at a much slower speed to avoid stringing - and the colour choices are limited. The hot-end temp is 230 - 250 (similar to ABS) but the bed is 50C to 80C, and if you're really lucky you can print with a bed temp of 0C. It can warp when printing, but in my experience it's less troublesome than ABS.
|
Re: Woes of ABS and part warping September 23, 2017 04:31AM |
Registered: 10 years ago Posts: 14,672 |
Quote
dlc60
Yes, this is a delta printer, leveling the bed is half hardware and half firmware. Measuring from the tower limit switches to the bed, all are the same. I have adjusted the end effector radius and rod lengths until my three tower points and the center report less than 0.1mm difference, worse case. This is about as level as you can get a delta printer. An incredibly tedious process, this is (in best Yoda voice.)
It sounds to me that you are very out of date with delta printer technology, probably using old electronics and firmware. With a good Z probe (preferably of the nozzle-contact type) and the right electronics and firmware, calibration is automatic and takes less than 30 seconds. I run it every time I turn the printer on. It doesn't just calibrate the endstop corrections and delta radius, it handles tower position corrections and bed tilt too.
More info at [duet3d.com]. This page is written for Duet electronics, but apart from the detailed calibration instructions, most of the content is relevant to any linear delta printer.
Quote
dlc60
I plan to improve this even more by replacing my default mechanical switches with optical ones.
Mechanical switches are accurate enough unless they are really bad ones, or used the wrong way.
Large delta printer [miscsolutions.wordpress.com], E3D tool changer, Robotdigg SCARA printer, Crane Quad and Ormerod
Disclosure: I design Duet electronics and work on RepRapFirmware, [duet3d.com].
|
Re: Woes of ABS and part warping September 23, 2017 10:13AM |
Registered: 7 years ago Posts: 619 |
Quote
dc42
Quote
dlc60
Yes, this is a delta printer, leveling the bed is half hardware and half firmware. Measuring from the tower limit switches to the bed, all are the same. I have adjusted the end effector radius and rod lengths until my three tower points and the center report less than 0.1mm difference, worse case. This is about as level as you can get a delta printer. An incredibly tedious process, this is (in best Yoda voice.)
It sounds to me that you are very out of date with delta printer technology, probably using old electronics and firmware. With a good Z probe (preferably of the nozzle-contact type) and the right electronics and firmware, calibration is automatic and takes less than 30 seconds. I run it every time I turn the printer on. It doesn't just calibrate the endstop corrections and delta radius, it handles tower position corrections and bed tilt too.
More info at [duet3d.com]. This page is written for Duet electronics, but apart from the detailed calibration instructions, most of the content is relevant to any linear delta printer.
I am a little out of date, but not THAT far. I run an auto bed level using a magnetic zero offset probe I modified from a Thingiverse project. I get a very good first layer that normally needs good leverage to get off the bed. I am using the Marlin firmware that came with the printer whose vintage is unknown since they didn't bother to label or date the source, my guess is at least four years old. I am currently setting up the most recent Marlin from the repo for my printer. There is always a project that gets in the way. I run it at the start of every print. I am using the old traditional Arduino Mega/Ramps 1.4 combo. I have several ChipKIT 32 boards that will use the Ramps board, but have not had the time to port what is certainly an Atmel hardware tied code base to it. The ChipKIT boards are all supported by the Arduino environment, I am sure the Marlin code is tuned and optimized to the ATMega chips, so, nontrivial task ahead. At the moment the Arduino works well enough to move on with, but the thought of a 32 bit platform with hardware math support is very enticing... The duet looks pretty good, but moving to another platform with an entirely new development platform gives one pause.
Quote
dlc60
I plan to improve this even more by replacing my default mechanical switches with optical ones.
Mechanical switches are accurate enough unless they are really bad ones, or used the wrong way.
So far they seem to be working fine. In my experience the single best thing that I upgraded was to a geared extruder that I got from Thingiverse. It made a world of difference in the detail of my models.
I have gotten some great ideas here so far, but I have not yet gotten a perfect 8cm tall, bulky delta printer corner printed. I am going to try a BuildTack surface next with a full print bed enclosure. Right now I use either a glass plate or glass with Kapton tape and cardboard breeze walls. If the part does not warp, it practically takes a chisel to get it off when I use Elmers "Extra" school glue stick. The amount of force exerted to pull those layers off the bed is amazing!
Oh, to answer another question, I have a 1.75mm system with a 0.4 mm nozzle laying down either .2 or .3 mm layers and am printing at 50mm/s with moves at 140mm/s. I have slowed down quite a bit from my normal 80mm/s PLA rate.
Thanks,
DLC
|
Re: Woes of ABS and part warping September 25, 2017 07:57PM |
Registered: 6 years ago Posts: 70 |
Sometimes it is the filament that causes the issue. I have a roll of black ABS from Hatchbox that warps like heck on a long run, but the same part with other ABS filaments, does fine.
Try lowering your layer height too. .2427 (yep, weird number, but proven to work with Deltas) and try again.
I have an enclosed printer that I use exclusively for ABS and run the bed at 110° and hotend at 220°. Glass and hair spray.
Are you making a 2040 corner piece or just 2020?
Edited 1 time(s). Last edit at 09/25/2017 07:58PM by number40fan.
|
Re: Woes of ABS and part warping September 26, 2017 12:45AM |
Registered: 7 years ago Posts: 619 |
Quote
number40fan
Sometimes it is the filament that causes the issue. I have a roll of black ABS from Hatchbox that warps like heck on a long run, but the same part with other ABS filaments, does fine.
Try lowering your layer height too. .2427 (yep, weird number, but proven to work with Deltas) and try again.
I have an enclosed printer that I use exclusively for ABS and run the bed at 110° and hotend at 220°. Glass and hair spray.
Are you making a 2040 corner piece or just 2020?
2020 corners. They are about 2x most deltas so the power supply can sit under the bed instead of all the other weird places people have to put them.
I will try the oddball height. I am also working on full enclosure. It isn't that easy when I don't want my electronics in the enclosure, my delta has "rollers" on it so I can't snug up against the rails anywhere, I have to craft up some offsets.
Thanks,
DLC
|
Re: Woes of ABS and part warping September 26, 2017 05:55PM |
Registered: 6 years ago Posts: 70 |
|
Re: Woes of ABS and part warping September 26, 2017 06:14PM |
Registered: 7 years ago Posts: 619 |
Quote
number40fan
Do you live in the states? I have some injection molded corners from an HE3D delta that I don't need any more. There are 9 pieces in total.
I am building a new flavor designed by some guys at Microchip whose design does some different stuff. For one, they put the psu under the deck and electronics outside. That boosts the deck up a bit so I will need these corners. Thanks for the offer, but I really want to find the magic to get my ABS to work. There is a certain joy to getting a difficult project to work. And, I am really stubborn!
Thanks,
DLC
|
Re: Woes of ABS and part warping September 26, 2017 06:19PM |
Registered: 7 years ago Posts: 619 |
I may not yet have perfected ABS, but what I have learned has me now printing perfect PLA without heating the plate at all.
I print right on glass using Elmers Extra school glue stick. For tricky ones I print at 60C on Kapton tape with glue stick and need to chisel the parts off.
Next is PETg when I get ABS down.
Thanks,
DLC
I print right on glass using Elmers Extra school glue stick. For tricky ones I print at 60C on Kapton tape with glue stick and need to chisel the parts off.
Next is PETg when I get ABS down.
Thanks,
DLC
|
Re: Woes of ABS and part warping September 26, 2017 08:00PM |
Registered: 6 years ago Posts: 70 |
|
Re: Woes of ABS and part warping September 27, 2017 12:50AM |
Registered: 7 years ago Posts: 619 |
Quote
number40fan
I just looked at your list of tried "fixes", but one that I didn't see was either changing the orientation of the part on the build plate or changing your layer directions. Have you tried any of those?
I have not. I assume you mean the infill angle offsets? I use Simplify3D as my slicer/printer.
Interesting idea! I have not tried either of these, it simply didn't occur to me.
Hmm,
DLC
|
Re: Woes of ABS and part warping September 28, 2017 04:41PM |
Registered: 6 years ago Posts: 70 |
|
Re: Woes of ABS and part warping September 28, 2017 04:50PM |
Registered: 7 years ago Posts: 619 |
Quote
number40fan
Yep, that is what I meant. Changing the offsets so they aren't pulling on the effected areas as much.
I am going to try this. I already completely enclose my printer and I just put a "BuildTak" surface on the bed. I will add this angle change to the process and see what happens.
Thanks!,
DLC
|
Re: Woes of ABS and part warping October 02, 2017 01:04PM |
Registered: 7 years ago Posts: 619 |
In the ongoing saga of getting ABS to print I have found something that works, mostly well. I do not believe that perfection is possible. I hate this stuff...
But,
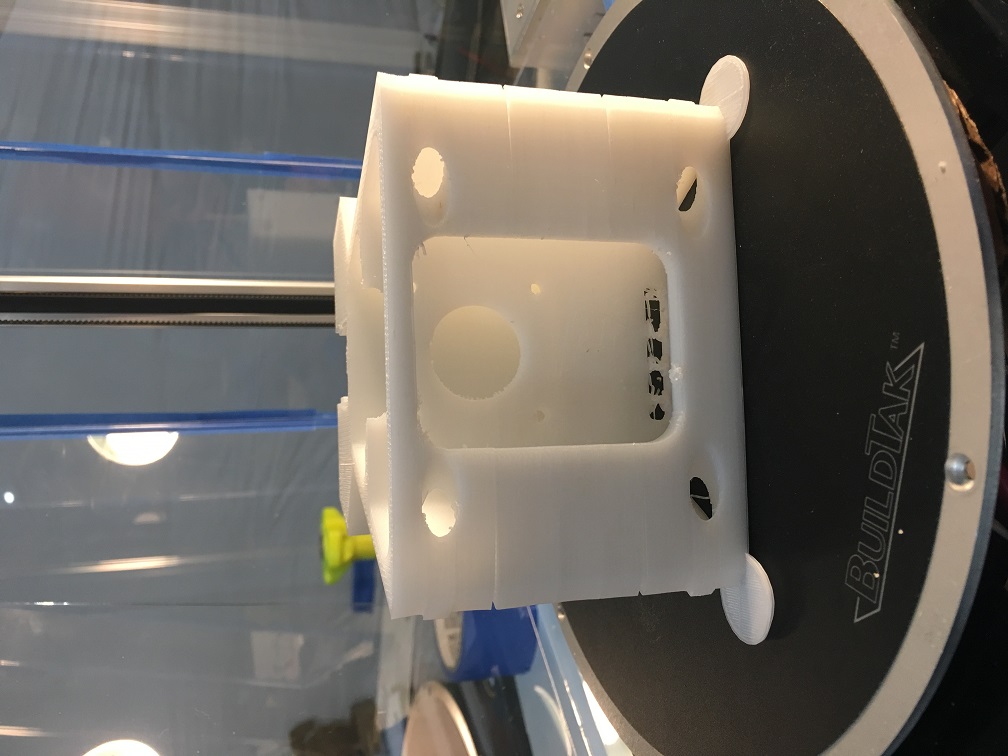
I have fully enclosed my delta printer (see image).
I tried rotating the part so that the infill was different.
I dropped the hotend temperature 5 degrees (250 to 245)
and raised the bed temperature to 110 C.
AND added BuildTak to replace my glass/Kapton tape/glue stick combo.
This full sequence got a 98% good print. The corners still lifted, but probably only about .5-.7mm. Easily the best I have achieved.
The bed at 110C stuck a lot harder than at 100C, so that is a real thing.
Rotating the part might have contributed, it is hard to tell.
The BuildTak really grips, so that is a big contributor. In fact it gripped SO well that I needed to find another way to get parts off of the bed.
So even though the part was stuck like set concrete to the bed, the corner STILL LIFTED, just not nearly as much. I am going to do another print to make sure this wasn't a fluke, and if I STILL have issues I'm going to go with either PETg or MakerGeek Raptor PLA for high temperature parts. Life is too short for futile efforts. I think that for large pieces, you just have to live with imperfect prints...
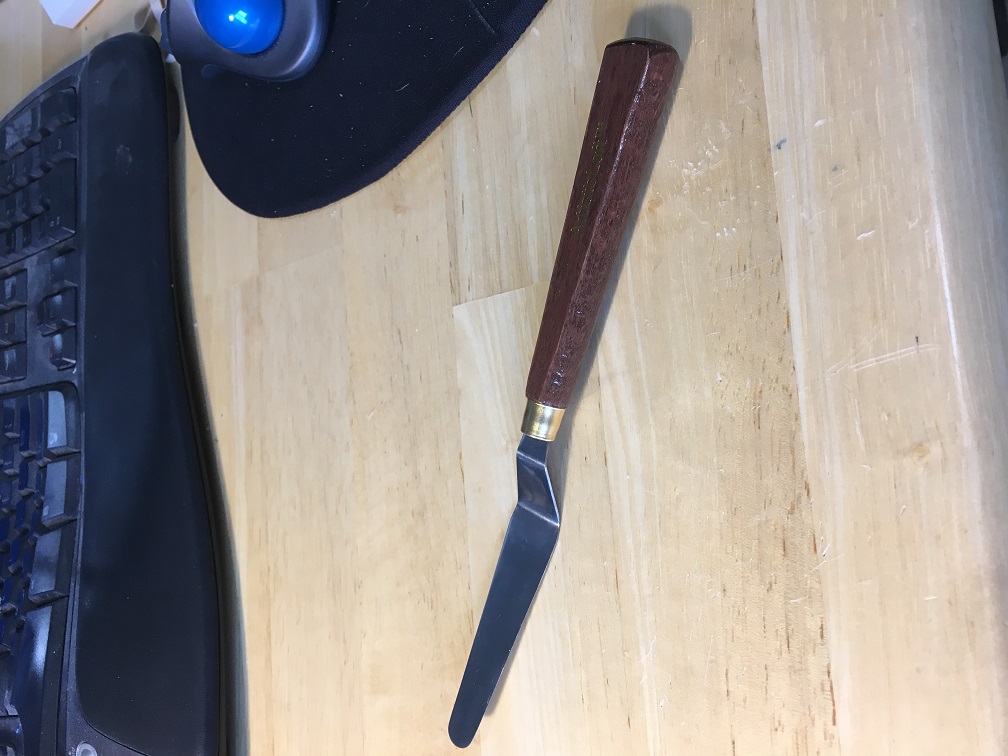
Anyway, the best thing, bar none, that I have found to remove parts from a printer bed is called a palate knife (image attached). I got this one at Michael's arts and crafts store for $4.00. It works fabulously.
Thanks all,
DLC
But,
I have fully enclosed my delta printer (see image).
I tried rotating the part so that the infill was different.
I dropped the hotend temperature 5 degrees (250 to 245)
and raised the bed temperature to 110 C.
AND added BuildTak to replace my glass/Kapton tape/glue stick combo.
This full sequence got a 98% good print. The corners still lifted, but probably only about .5-.7mm. Easily the best I have achieved.
The bed at 110C stuck a lot harder than at 100C, so that is a real thing.
Rotating the part might have contributed, it is hard to tell.
The BuildTak really grips, so that is a big contributor. In fact it gripped SO well that I needed to find another way to get parts off of the bed.
So even though the part was stuck like set concrete to the bed, the corner STILL LIFTED, just not nearly as much. I am going to do another print to make sure this wasn't a fluke, and if I STILL have issues I'm going to go with either PETg or MakerGeek Raptor PLA for high temperature parts. Life is too short for futile efforts. I think that for large pieces, you just have to live with imperfect prints...
Anyway, the best thing, bar none, that I have found to remove parts from a printer bed is called a palate knife (image attached). I got this one at Michael's arts and crafts store for $4.00. It works fabulously.
Thanks all,
DLC
|
Re: Woes of ABS and part warping October 02, 2017 06:00PM |
Registered: 10 years ago Posts: 14,672 |
What temperature does the chamber reach? Perhaps it's still too low to prevent warping effectively.
Large delta printer [miscsolutions.wordpress.com], E3D tool changer, Robotdigg SCARA printer, Crane Quad and Ormerod
Disclosure: I design Duet electronics and work on RepRapFirmware, [duet3d.com].
Large delta printer [miscsolutions.wordpress.com], E3D tool changer, Robotdigg SCARA printer, Crane Quad and Ormerod
Disclosure: I design Duet electronics and work on RepRapFirmware, [duet3d.com].
|
Re: Woes of ABS and part warping October 02, 2017 09:40PM |
Registered: 7 years ago Posts: 619 |
Quote
dc42
What temperature does the chamber reach? Perhaps it's still too low to prevent warping effectively.
The last temperature I took at the end of the print was 31C.
I'll have to attach a print of the piece. It looks pretty well stuck to the bed, with a little warping, but the big problem is that about every 30 layers or so the print cracked, big time. ☹️
If the part warps, the model doesn't crack, if the part doesn't warp, it cracks. I just can't find the magic, and at five hours a print, I am getting discouraged.
I am now using the following parts and settings:
E3Dv6 Bowden 1.75mm hotend and E3D Titan extruder.
Kossel printer, 50mm/s print speed, 0.5mm nozzle, 0.3mm layer
First layer 90% height, 110% extrusion volume and 40% rectilinear infill.
Bed 110C, hotend 245C
BuildTak surface, and the layer goes down consistent and well stuck.
Completely enclosed print volume
MakerGeek ABS filament
Simplify3D slicer/printer, and I rotated the infill to see if that changes the force out on the perimeter.
Marlin firmware using 15 point mesh bed leveling G29 setting.
30 Amp supply delivering 12.05V to the RAMPS 1.4 board.
I have this thing tuned very well and it creates beautiful small ABS and any sized PLA prints at 80mm/s print speeds.
But...
I plan on burning all the ABS I have left experimenting, so I will let you all know if I ever get a good print.
Thanks,
DLC
|
Re: Woes of ABS and part warping October 02, 2017 09:58PM |
Registered: 11 years ago Posts: 335 |
I print almost exclusively ABS. With the brands I've been using the build chamber must be >45c and <50c. I have a vent at the top of my enclosure that is partially blocked by a piece of cardboard. I leave a multimeter thermocouple in the chamber and open/close the vent to adjust temperature.
In my experience there is really no way to reliably print ABS if the chamber is <45c. I used to play with ABS juice and other tricks, but even if you keep the first layer in place the print will just delaminate somewhere else and you end up chasing your tail trying to improve layer adhesion while maintaining crisp print quality.
I print on bare Kapton at 95c and scale my parts up to 100.6% to compensate for shrinkage. The parts pop off the bed themselves as the bed cools.
Here are some examples of challenging ABS prints:
I find that ABS is a very nice plastic to print in because aside from the warping it is very well behaved. PLA and PETG are very goopy when hot whereas the ABS kind of slides through and off the nozzle and overhangs/bridges very well.
I've also had problems with PLA creeping under load over time. When I'm printing functional components I can't risk them bending out of shape if left in the sun on a hot day.
(I wish slicers would let you define a per-filament scaling factor because sometimes I forget to print ABS at 100.6%. I mean I could change my firmware steps/mm but that screws up prints in other plastics and is a pretty dirty hack that could have other consequences.)
Edited 1 time(s). Last edit at 10/02/2017 10:00PM by 691175002.
In my experience there is really no way to reliably print ABS if the chamber is <45c. I used to play with ABS juice and other tricks, but even if you keep the first layer in place the print will just delaminate somewhere else and you end up chasing your tail trying to improve layer adhesion while maintaining crisp print quality.
I print on bare Kapton at 95c and scale my parts up to 100.6% to compensate for shrinkage. The parts pop off the bed themselves as the bed cools.
Here are some examples of challenging ABS prints:


I find that ABS is a very nice plastic to print in because aside from the warping it is very well behaved. PLA and PETG are very goopy when hot whereas the ABS kind of slides through and off the nozzle and overhangs/bridges very well.
I've also had problems with PLA creeping under load over time. When I'm printing functional components I can't risk them bending out of shape if left in the sun on a hot day.
(I wish slicers would let you define a per-filament scaling factor because sometimes I forget to print ABS at 100.6%. I mean I could change my firmware steps/mm but that screws up prints in other plastics and is a pretty dirty hack that could have other consequences.)
Edited 1 time(s). Last edit at 10/02/2017 10:00PM by 691175002.

Sorry, only registered users may post in this forum.