Home
>
Reprappers
>
Topic
Rotary Print Bed on a RepRap
Posted by Shank man
|
Rotary Print Bed on a RepRap June 24, 2018 03:04PM |
Registered: 9 years ago Posts: 204 |
|
Re: Rotary Print Bed on a RepRap June 24, 2018 06:12PM |
Registered: 10 years ago Posts: 814 |
|
Re: Rotary Print Bed on a RepRap June 25, 2018 07:19AM |
Registered: 9 years ago Posts: 204 |
Quote
madmike8
That’s pretty cool. You want to give us some details?
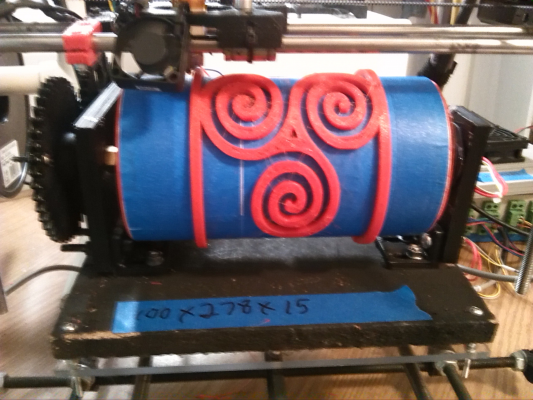
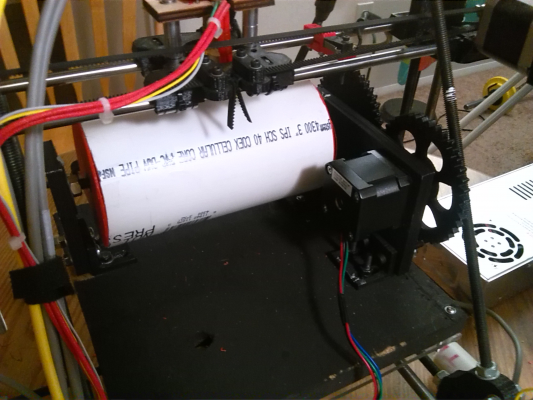
The bed was cobbled together from a 160mm piece of 3" PVC pipe with
some printed ends to hold a 8mm nut, a 230mm piece of 8mm threaded
rod, a couple of 608zz bearings, a nema 17 motor and a limit switch. All
left over material from past projects and rebuilds. The gears are nothing
more than large Wades geared extruder gears. One modified to fit on a
5mm motor shaft. I built the bed for curiositys sake and didn't want to
spend a whole lot of money for a precise mechanism. Although now that I
know it works I'm going to make a better setup. I'm open to suggestions
by the way.
I set the axes travel limits in Teacup to 100 x 278 x 15. I might be
able to get a little more travel in the X & Z. 278mm is the OD of the 3"
pipe. I'm using this bed on Ye Olde Prusa I2 and there isn't a whole lot of
room to work with. The bed size in Slic3r was also set to these
dimensions. In order to remove the print when its done, I wrapped the
pipe with a piece of loose leaf paper and taped down the edges of the
paper. I wrapped blue painters tape around the paper rather than applying
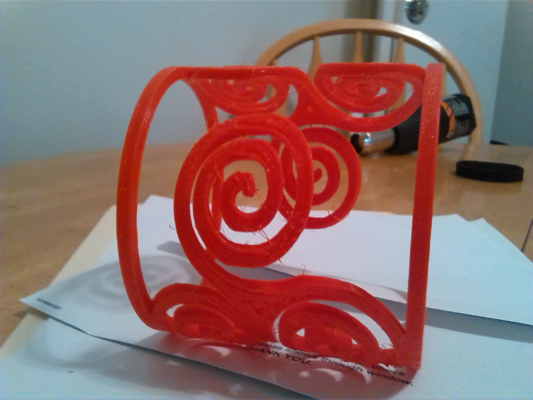
it directly to the pipe. When the print is finished I peeled up the tape
holding the paper and slid the print off of the pipe with no damage to the
print. If a print sticks a little too good to the tape, I soak the print in some
warm water to loosen up the tape and peel it off.
There is nothing special about the STL file. It is made to fit
in the print area of the bed. It took some tweaking with the slicer settings
to get a good first layer as the PVC pipe is not perfectly round. But PLA is
a friendly material and pretty much sticks to everything. I did have to
slow down the travel speed settings in Slic3r quite a bit.
The teeth on the printed gears don't mesh quite so well and makes ripples
in print. It would be easier for you to see if I had a better camera. I'll
make it a point to get one.
Ray
Prusa I2
Gen7-ARM 2.0 / Teacup
Genuine J-Head Mk V-BV
Hypercube
RAMPS 1.4 / Marlin
E3D V6
Piper 1 Version 2
Gen7-ARM 2.0 / Teacup
E3D V6
MPCNC
RAMPS 1.4/ Marlin
|
Re: Rotary Print Bed on a RepRap June 25, 2018 09:17AM |
Registered: 7 years ago Posts: 507 |
Out of curiosity, are you doing anything to compensate for the fact that as you go further out (z axis goes up) the circumference increases? If you slicer is assuming its constant then you'd end up under extruding and the gaps between extrusion lines that aren't perpendicular to the rotation axis will get bigger which I think I can see happening in the pictures. Otherwise awesome build.
A quick and easy mod you could do is swap your gears for herringbone ones, that should help reduce some of the backlash/make gear mesh smoother.
A quick and easy mod you could do is swap your gears for herringbone ones, that should help reduce some of the backlash/make gear mesh smoother.
|
Re: Rotary Print Bed on a RepRap June 25, 2018 10:34AM |
Registered: 9 years ago Posts: 204 |
. I've been sticking to shallow prints for now where the increase in height isn't noticeable. I'm not sure how to compensate for the increase in circumference although I was aware of that from the start.I think designing a part with this into consideration might be an optionQuote
Trakyan
Out of curiosity, are you doing anything to compensate for the fact that as you go further out (z axis goes up) the circumference increases? If you slicer is assuming its constant then you'd end up under extruding and the gaps between extrusion lines that aren't perpendicular to the rotation axis will get bigger which I think I can see happening in the pictures. Otherwise awesome build.
A quick and easy mod you could do is swap your gears for herringbone ones, that should help reduce some of the backlash/make gear mesh smoother.
Prusa I2
Gen7-ARM 2.0 / Teacup
Genuine J-Head Mk V-BV
Hypercube
RAMPS 1.4 / Marlin
E3D V6
Piper 1 Version 2
Gen7-ARM 2.0 / Teacup
E3D V6
MPCNC
RAMPS 1.4/ Marlin
|
Re: Rotary Print Bed on a RepRap June 25, 2018 11:05PM |
Registered: 7 years ago Posts: 507 |
|
Re: Rotary Print Bed on a RepRap June 26, 2018 12:30AM |
Registered: 8 years ago Posts: 5,232 |
In slic3r you can define the y-step/mm after each layer. That way you could compensate for the growing circumfence.
But the e-steps would still be wrong I guess?
The best way is to modify the .stl file and let it grow in Y with height. It's a constant factor, but I haven't had enough coffee yet to specify. ( something based on PI )
Depending on the way you placed the origin of the bed, it should grow only in one direction ( when origin is at a corner ) or grow in both directions. ( when origin is at bed-center )
|
Re: Rotary Print Bed on a RepRap June 26, 2018 05:03AM |
Registered: 7 years ago Posts: 507 |
|
Re: Rotary Print Bed on a RepRap June 26, 2018 12:22PM |
Registered: 10 years ago Posts: 814 |
Sorry, only registered users may post in this forum.


