Home
>
Reprappers
>
Topic
Configuring old Ultimachine RAMPS V1.3
Posted by kosatomi
|
Configuring old Ultimachine RAMPS V1.3 February 13, 2019 04:59PM |
Registered: 5 years ago Posts: 6 |
Dear All, We have an old ultimachine.com RAMPS V1.3 3D printer collecting dust; I'd like to bring it back to life. Put a new Win7 x64 box to it with latest Arduino IDE, Repetier Host.
Printer has some upgrades: proper, flexible Al coupler on the Z axis motors and a more sophisticated looking extruder. As it is, I printed Benchy and the main issue was that he Z dimension came out ~30% shorter.
I did some digging on the net...decided to look at/into firmware settings in Configuration.h file. Since I did not have any of it, I download latest firmware, Marlin 119. I do not know what firmware is in currently, probably would benefit from newest version...
With the Marlin downloads come a bunch of Configuration.h sample files but I do not know which one to use for my system. I also would appreciate any help/pointers on how to fix the Z-axis squishing issue. Thanks.
|
Re: Configuring old Ultimachine RAMPS V1.3 February 13, 2019 05:28PM |
Registered: 9 years ago Posts: 465 |
Well, with the new firmware, you're starting over from scratch, but if you have the old configuration.h file, then you can copy any settings over. You'll have to go through both files to see what they are. F3(search) is your friend using most Windows based text editors. If you don't. then you're going to have to really start over.
For the squished Z, if it's evenly happening, it's possibly the steps/mm setting, which can be bumped up, but there are other possibilities, depending on the mechanical attributes of your printer. If it's happening very evenly, then it was probably the steps/mm setting, but if it's uneven, it may point to a more fundamental problem.
I'll guess from the contents of your post that you don't have the original firmware for your printer. |The title you've given is for a control board, and tells us nothing about the kinematics of the machine at all, so we can't help you for just about anything else. Pictures would probably help.
Most printers that I've seen which might use a board like this are Cartesian, similar to the Prusa style printer, which lifts an X axis using 2 motors, and slides the bed back and forth on the Y axis.
In this case, at 16X microstepping, and 1.8 degree stepper motors (Most common configuration I've seen) with 16 tooth pulleys on the motors, 80 steps/mm is a good place to start.
If the Z screws are 5mm 0.8mm pitch/lead, then 4000 steps/mm for the Z works. If they're 8mm 1.25mm pitch/lead, then 2560 steps/mm should work (Again assuming 16X microstepping) 8mm 4 start 2mm pitch 8mm lead screws are 400 steps/mm.
For the extruder, your guess is as good as mine. Probably the only way to really know is to pick a starting point (I use 100 steps/mm for this, because then the math is easy :p ) Tell the printer to extrude 100mm of filament, and measure how much it actually extruded. Adjust your steps/mm accordingly.
You may have trouble with motor directions, endstops, and various other things, but people will need more information in order to help you.
MBot3D Printer
MakerBot clone Kit from Amazon
Added heated bed.
Leadscrew self-built printer (in progress)
Duet Wifi, Precision Piezo parts
|
Re: Configuring old Ultimachine RAMPS V1.3 February 14, 2019 03:21PM |
Registered: 5 years ago Posts: 6 |
Hi SupraGuy, thanks for your reply. I completely understand what you are saying. Yes, I do not have the original Configuration.h, so I do not know all those conversion factors... I assume I cannot quiz it from the controller, like one can do it with TinyG?
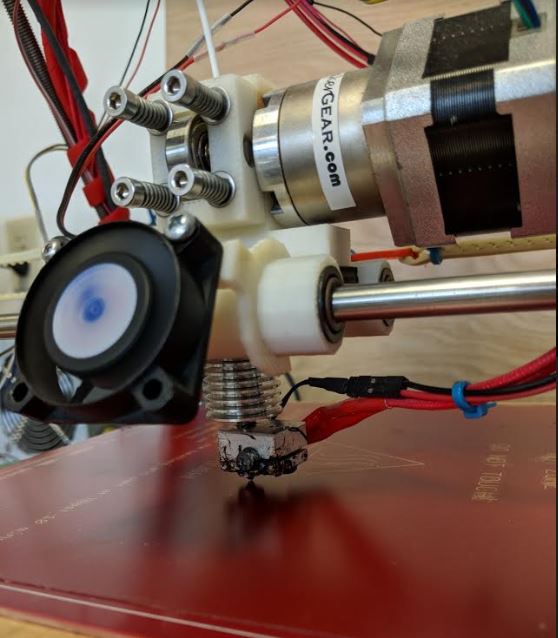
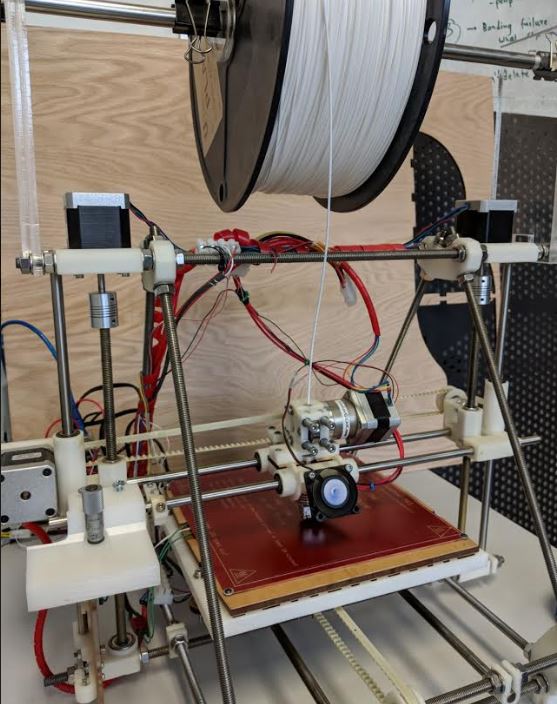
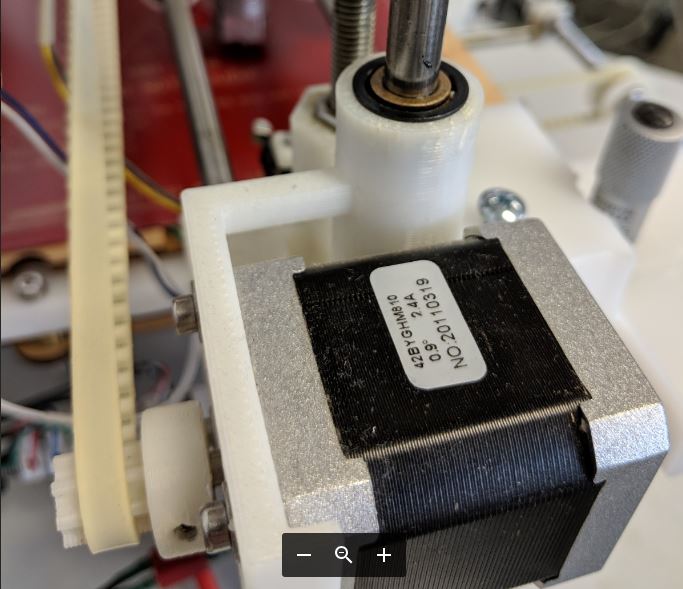
Here I add a bunch of pictures about the printer; looks like that in the past we might have modified bits and pieces on this machine since it does not have the more common specs...?
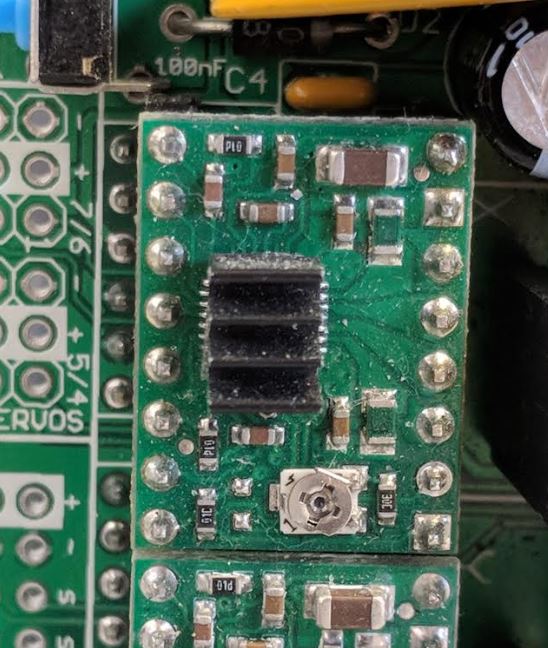
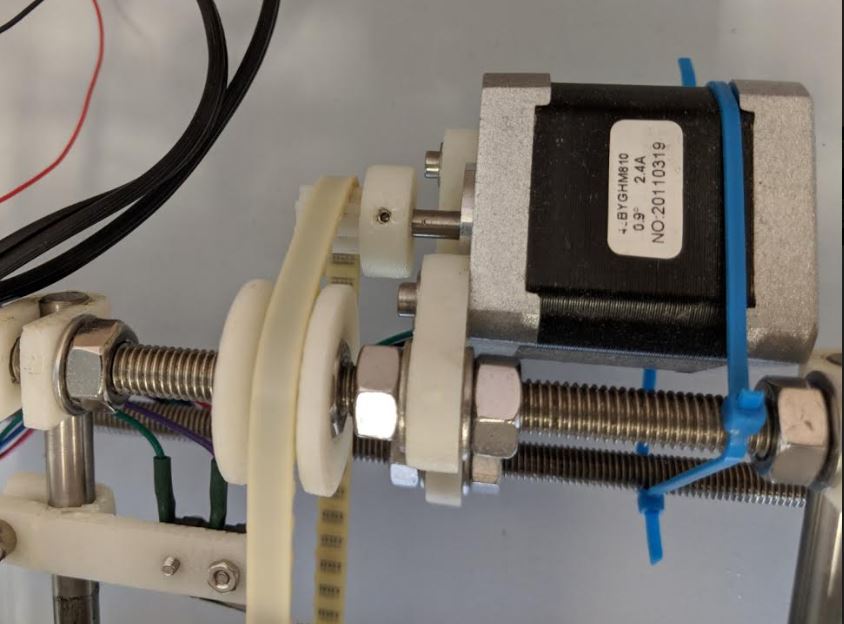
The lead screws for the z-axis is 0.3" in diameter and the pitch is 0.05". All motors are 0.9degree/step. I did not pull the motor drivers to see any print on the back side, I wonder if you recognize it? For the X and Y axis the motors have a 8-toothed pulley on them.
The Z-axis squishing was not random but nice uniform. Is there a way to just tweak the z axis settings (steps/mm)?
If I understand correctly what you are saying, I need to calibrate all 3 axis and the extrusion steps/mm settings, for all the other settings I can use some typical/default setting that I can find in a Configuration.h file for which printer?
So I just need to adjust the sep/mm settings until the head moves the exact amount it is asked for...
Thanks again.
Here I add a bunch of pictures about the printer; looks like that in the past we might have modified bits and pieces on this machine since it does not have the more common specs...?
The lead screws for the z-axis is 0.3" in diameter and the pitch is 0.05". All motors are 0.9degree/step. I did not pull the motor drivers to see any print on the back side, I wonder if you recognize it? For the X and Y axis the motors have a 8-toothed pulley on them.
The Z-axis squishing was not random but nice uniform. Is there a way to just tweak the z axis settings (steps/mm)?
If I understand correctly what you are saying, I need to calibrate all 3 axis and the extrusion steps/mm settings, for all the other settings I can use some typical/default setting that I can find in a Configuration.h file for which printer?
So I just need to adjust the sep/mm settings until the head moves the exact amount it is asked for...
Thanks again.
Attachments:
open | download - Capture1.JPG (56.3 KB)
open | download - Capture2.JPG (82.6 KB)
open | download - Capture3.JPG (90.6 KB)
open | download - Capture4.JPG (63.4 KB)
open | download - Capture5.JPG (81.5 KB)
open | download - Capture6.JPG (63.7 KB)
open | download - Capture7.JPG (56.9 KB)
open | download - Capture8.JPG (65.1 KB)
|
Re: Configuring old Ultimachine RAMPS V1.3 February 14, 2019 04:03PM |
Registered: 9 years ago Posts: 465 |
Okay...
Well, those 9 tooth pulleys are new to me, but that looks like a standard belt to me.
There should be jumpers underneath those drivers, but it's probably safe to assume that they're set to 16X microstepping. All bets are off for that extruder, since it looks like it have a gear reduction box on it.
So at .9degree steppers, each rotation is 400 full steps, at 16X microstepping, that's 6400/rotation. 9 tooth gears means about 18mm, so 355.56 steps/mm. Of course if those aren't GT2 belts, that'll be a bit off. (177,78 steps/mm if that's 8X microstepping, which it might be. It'll depend on the jumpers underneath the stepper driver.) That should be a good starting point for X and Y
For the threaded rod, 1/4"/20 is a fairly common threaded rod for CNC machines, so maybe that? In any case...
400 steps/rotation at 16X microstepping is 6400/rotation, each rotation moves 1.27mm, so 5039.37 steps/mm. At 8X microstepping, this is 2519.69, at 4X 1259.84.
Each stepper driver will have its own jumper settings, so check them all.
Most Arduino/RAMPS based boards will have 3 jumpers. Those look like A4988 drivers to me, so all jumpers on = 16X microstepping.
MBot3D Printer
MakerBot clone Kit from Amazon
Added heated bed.
Leadscrew self-built printer (in progress)
Duet Wifi, Precision Piezo parts
|
Re: Configuring old Ultimachine RAMPS V1.3 February 15, 2019 01:16PM |
Registered: 5 years ago Posts: 6 |
Thanks for the further explanation.
So the pulley on the X&Y motors are 8 tooth, not 9...
I checked again the z leadsrew pitch, came to ~1.22, if 1.27mm is a standard then that must be it.
If I understand correctly:
I cannot just change the steps/mm for the 3axis and extruder on the fly; I need to set them in Configuration.h, compile the Arduino project and upload as a new firmware.
To get my machine working properly, I need to determine these conversion factors, so the axis move the same much as they are told to, end the extruder dispenses the amount it is asked...and that is it, right? Cheers.
|
Re: Configuring old Ultimachine RAMPS V1.3 February 15, 2019 01:22PM |
Registered: 10 years ago Posts: 651 |
That's a Makergear Mendel, You might find some documentation here.
http://makergear.wikidot.com/prusa
The Google docs might be helpful.
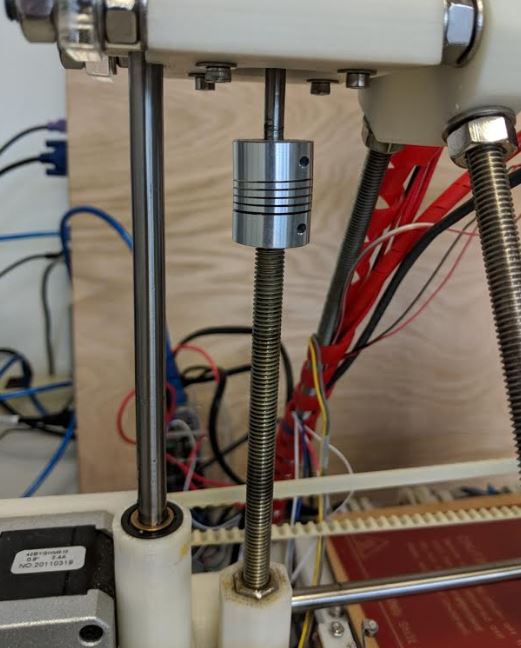
I'd double check those aluminum couplers on the Z axis, they look like they're way down on the motor shafts, almost to the point of falling off. Of course double check that they're firmly attached.
Those look like 8mm rods, in which case the pitch would be 1.25 mm/revolution
Providing 0.9 degree steppers, and 1/16 microstepping, your steps per mm should be set to 5120
The Prusa calculator would help here
https://www.prusaprinters.org/calculator/
Edit: you may be able to get some info from the controller depending on how new.
Try sending M503 through Gcode Console and it may reply with some information
M503 would also give you the necessary settings you'd need to transplant into a new copy of the firmware if you were updating it.
You may also be able to temporarily change the steps per mm until the machine is powered off by sendding M92 Z5120
Edit: Hopefully those aren't imperial screws, cause the closest would be 5/16" and you'd have to use weird layer heights.
Edited 4 time(s). Last edit at 02/15/2019 01:42PM by FA-MAS.
http://makergear.wikidot.com/prusa
The Google docs might be helpful.
I'd double check those aluminum couplers on the Z axis, they look like they're way down on the motor shafts, almost to the point of falling off. Of course double check that they're firmly attached.
Those look like 8mm rods, in which case the pitch would be 1.25 mm/revolution
Providing 0.9 degree steppers, and 1/16 microstepping, your steps per mm should be set to 5120
The Prusa calculator would help here
https://www.prusaprinters.org/calculator/
Edit: you may be able to get some info from the controller depending on how new.
Try sending M503 through Gcode Console and it may reply with some information
M503 would also give you the necessary settings you'd need to transplant into a new copy of the firmware if you were updating it.
You may also be able to temporarily change the steps per mm until the machine is powered off by sendding M92 Z5120
Edit: Hopefully those aren't imperial screws, cause the closest would be 5/16" and you'd have to use weird layer heights.
Edited 4 time(s). Last edit at 02/15/2019 01:42PM by FA-MAS.
|
Re: Configuring old Ultimachine RAMPS V1.3 February 18, 2019 04:30PM |
Registered: 5 years ago Posts: 6 |
Thanks FA-MAS for the extra info, So I went to research the topic and decided to send M115 (firmware info) to Marlin, that surely must be implemented even in my older version...
I tried three different serial terminal to talk to my Arduino Mega: a) Arduino IDE: when I open 'serial monitor' I get two squares but after that nothing, no response for anything.
b) tried CoolTerm but I am not sure about the proper settings for the serial communication... 9600kbs, 8data, no parity, 1 stop, no flow ctrl,... get some gibberish at the beginning, þê, then no reply to anything... c) also tried Universal GCode Sender.... with that I don't understand the firmware settings at the Connection section ( clearly not TimyG and not SmoothyB, and not GRBL either,,,)
I thought this would be an easy task to quiz the driver board...what am I missing?
Thank you All!
|
Re: Configuring old Ultimachine RAMPS V1.3 February 19, 2019 06:14PM |
Registered: 5 years ago Posts: 6 |
Hm... I cannot get CoolTerm to communicate to my controller.
When it connects, it echoes two extended ascii characters, but after that all command is taken and I see no response, like firmware info after M115...
I am not configuring CoolTerm properly, or something else...? Please let me know if anyone has some pointers for me... Thanks
When it connects, it echoes two extended ascii characters, but after that all command is taken and I see no response, like firmware info after M115...
I am not configuring CoolTerm properly, or something else...? Please let me know if anyone has some pointers for me... Thanks
|
Re: Configuring old Ultimachine RAMPS V1.3 February 19, 2019 06:31PM |
Admin Registered: 13 years ago Posts: 6,998 |
|
Re: Configuring old Ultimachine RAMPS V1.3 February 20, 2019 03:09PM |
Registered: 5 years ago Posts: 6 |
Thank you Dust, it was the speed, @115.2kbd the communication is up.
So back to my firmware issue:
It turns out I have some pretty old stuff in here, to M115 i got:
FIRMWARE_NAME: Sprinter FIRMWARE_URL:http%%3A/github.com/kliment/Sprinter/ PROTOCOL_VERSION:1.0 MACHINE_TYPE:Mendel EXTRUDER_COUNT:1 UUID:00000000-0000-0000-0000-000000000000
ok
And I could not get anything out from the setup...
M503
ok
I figure the best course of action would be to put a new firmware, say latest Merlin ?, and re-calibrate everything...practically starting from scratch... I will do that unless sby has a better suggestion for me. Thank you guys for all the help, much appreciated.
Edited 1 time(s). Last edit at 02/20/2019 10:20PM by kosatomi.
Sorry, only registered users may post in this forum.