Home
>
Reprappers
>
Topic
A8 clone kit troubles.
Posted by PhatFil
|
A8 clone kit troubles. March 28, 2019 04:42PM |
Registered: 5 years ago Posts: 10 |
Hi all,
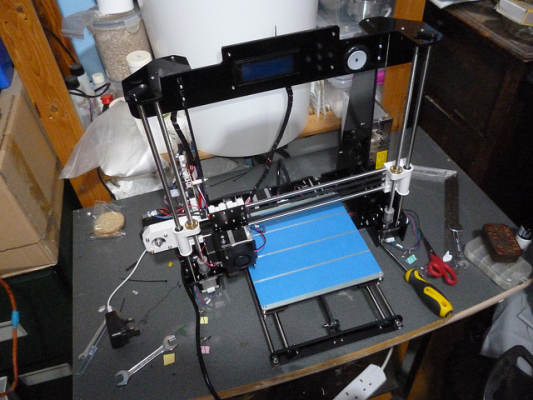
I am the proud owner of a just built I3 a8 clone kit.
[www.amazon.co.uk]
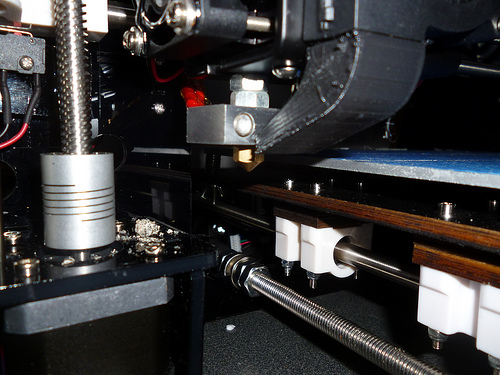
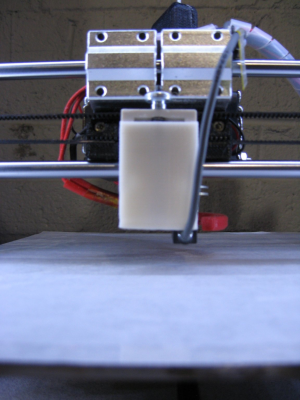
However i cant print my first half of a benchy3d with the few meteres of supplied filament as with the bed screwed down to the lowest point, the extruder sits below the bed level???
2 options seem open to me, 1) raise the Z axis stop switch about 1cm or removing the locknut from the 2nut assembly securing the extruder in place. I may still need to adjust the stop trigger though to provide some freedom to level the bed from fully compressed down too? the 2nd nut looks to be circa 4-5mm deep?
I had a look through the firmware menus but nothing struck me as relevant, but i do not know what to look for atm
Also can someone confirm the firmware running and where i can find a manual? all i got with the kit was a cd with a lego style pictogram build guide pdf in english..
Also there was no mention of squaring the frame built from threaded rods?? and should i cable tie the threaded rods to the open frame where its fixed with compression by nuts but can pu;; out if the printer is lifted?
I wanna print a benchy blob!!
|
Re: A8 clone kit troubles. March 28, 2019 09:18PM |
Registered: 5 years ago Posts: 10 |
camera battery has charged
the extruder sat well below the bed level and showing the lock nuts i could remove?
the 2 x spacers inserted under the bed to keep the connecting screws from bottoming out on the frame, I ?could? pull 1 x or both but will need to buy new shorter of cut off the bottoms of the screws used to secure the bed to the running bearings though?
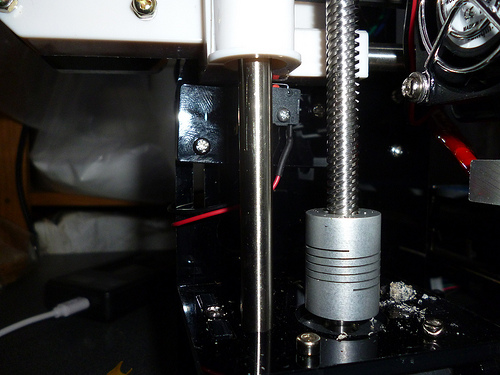
the z axis stop switch
How should i progress???? is there another option??
thank you in advance ..
|
Re: A8 clone kit troubles. March 28, 2019 10:26PM |
Registered: 6 years ago Posts: 1,863 |
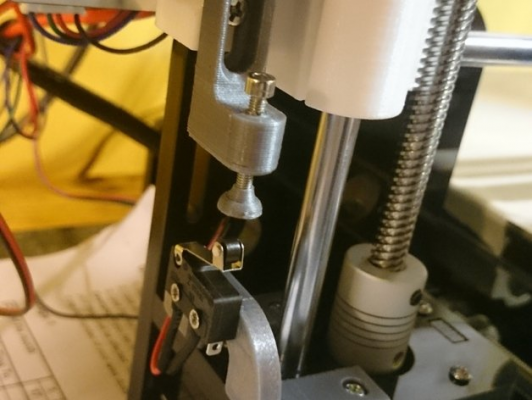
I would change the Z-Axis end-stop So that I had an adjustable Screw to hit the switch.
Example photo attached, this way you could calibrate the Z-Axis when needed.
Edited 1 time(s). Last edit at 03/28/2019 10:27PM by Roberts_Clif.
Computer Programmer / Electronics Technician
Example photo attached, this way you could calibrate the Z-Axis when needed.
Edited 1 time(s). Last edit at 03/28/2019 10:27PM by Roberts_Clif.
Computer Programmer / Electronics Technician
|
Re: A8 clone kit troubles. March 28, 2019 11:45PM |
Registered: 5 years ago Posts: 10 |
|
Re: A8 clone kit troubles. March 29, 2019 07:10PM |
Registered: 6 years ago Posts: 1,863 |
My 3D Printer had one of those mounted end-stop switches, working in electronics most of my life never ran across anything so hard to calibrate.
When I ran across a Proximity sensor thumb screw adjustable slide mount I knew this would make my life much easier.
Before running across this adjustable mount though, I tried manually adjusting the end-stop mount and just tightening the screws would throw is out of calibration.
I learned to use the Z-Offset in Marlin in the calibrations, however when a mistake was made the Z-Axis would move the tightened mount and again have to start from scratch adjusting.
This new Proximity sensor thumb screw adjustable Z-Axis slide mount can calibrate an un-level bed to level in under a minute.
Using the 4 bed leveling nuts and the thumb screw proximity slide mount.
Edited 1 time(s). Last edit at 03/29/2019 07:11PM by Roberts_Clif.
Computer Programmer / Electronics Technician
|
Re: A8 clone kit troubles. May 16, 2019 02:44AM |
Registered: 4 years ago Posts: 13 |
|
Re: A8 clone kit troubles. May 16, 2019 04:15AM |
Admin Registered: 11 years ago Posts: 3,096 |
Quote
SoundsDigital
I would seriously consider ditching the endstop altogether and fitting a probe for a much better job which will allow auto levelling. I find the twin lead screws on the Z axis are a pain to keep in sync.
Lead screws should not run out of sync. Are you using two of the same stepper motors? Is your vref calibrated correctly on your stepper driver? Are the cables connected well? Is one of the leadscrews out of lubrication? Is your frame square or can it be that one of the leadscrews is binding because it's carrying most of the weight of the X-gantry?
http://www.marinusdebeer.nl/
|
Re: A8 clone kit troubles. May 16, 2019 04:55AM |
Registered: 4 years ago Posts: 13 |
Quote
Ohmarinus
Quote
SoundsDigital
I would seriously consider ditching the endstop altogether and fitting a probe for a much better job which will allow auto levelling. I find the twin lead screws on the Z axis are a pain to keep in sync.
Lead screws should not run out of sync. Are you using two of the same stepper motors? Is your vref calibrated correctly on your stepper driver? Are the cables connected well? Is one of the leadscrews out of lubrication? Is your frame square or can it be that one of the leadscrews is binding because it's carrying most of the weight of the X-gantry?
Hard to pinpoint why they go out of sync in post cases unless something obvious like a collision has happened but 1:3 times I level my bed I find one of the Z screws is out by a step or two. Wasn't so noticeable with the M8 threaded bar but with ACME lead screws, it's a far greater amount on the Z axis to lose or gain a step.
|
Re: A8 clone kit troubles. May 16, 2019 06:08PM |
Registered: 7 years ago Posts: 619 |
Quote
Roberts_Clif
I would change the Z-Axis end-stop So that I had an adjustable Screw to hit the switch.
Example photo attached, this way you could calibrate the Z-Axis when needed.
[attachment 110773 Z-AxidScrewAdjustment.JPG]
This is exactly the Z end stop I put on my Anet A8. I hated the four bed level screws and modified my A8 to use three screws, but it required me to modify my bed by drilling a central hole on one side and soldering a wire jumper around the heater trace that I cut. I then replaced my four crappy bed linear bearings with three drylin ones. Much quieter. I just move my hot end to three points, adjust to level, repeat a couple of times and boom! bed level, no mesh leveling required. I find that I have to re-zero the head on occasion, and with the thumb adjust z end-stop, that is another minute's work.
My A8 is significantly modified with frame stiffeners and a different print head. But is still pretty much looks like an Anet A8.
Another thing that I recommend that you do is get the Marlin 1.1.8 firmware that is customized for the Anet A8 (from the Marlin github site) and replace the (almost certainly) outdated junk that came with your printer. Just sayin... My original A8 firmware lasted one week before I needed to change something that I couldn't change.
These hacks may not be for the faint at heart, but I cannot resist the urge to hack!
DLC
Kits: Folgertech Kossel 2020 upgraded E3Dv6, Anet A8 upgraded E3Dv6, Tevo Tarantula enhanced parts and dual-head, TronXY X5SA Pro(E3DHemera).
Scratch: Large bed Cartesian, exchangeable heads, Linear slide Delta, Maker-Beam XL Micro Delta, 220x220CoreXY.
Sorry, only registered users may post in this forum.
