Home
>
Reprappers
>
Topic
Preventing excessive gear wear on Wade extruder? (lubrication, retraction, etc.)
Posted by qrp-gaijin
|
Preventing excessive gear wear on Wade extruder? (lubrication, retraction, etc.) February 15, 2021 05:07PM |
Registered: 3 years ago Posts: 93 |
The Wade’s Geared Extruder implementation on my Portabee printer has always, since the beginning, had a problem with excessive wear on the large plastic gears due to poor fit of the gears. The particular extruder design uses a 9-tooth smaller PLA printed plastic gear wheel mounted on the extruder motor, which then drives a larger 53-tooth PLA printed plastic gear wheel, which then pushes the filament.
I already had one 9-tooth gear break – the teeth were shaved off when the extruder jammed for some reason. (This happened to another Portabee user also – [gergely.imreh.net].) I’m now using a spare 9-tooth gear, but after a few hours of only normal use (no jams or anything similar), it too is showing signs of wear. Small bits of the gear get ground off – especially during the violent, sudden, and rapid reversal of motor rotation caused by retractions during a print – and small flakes and chips of PLA from the gears fall down on the print bed. I am afraid it is only a matter of time before my current 9-tooth gear (and maybe also the larger 53-tooth gear) suffer the same fate as before – breakage.
In desperation I tried to print a spare 9-tooth gear myself, but my printer calibration is not yet sufficiently good to allow printing a precision part like the gear. The STL files for the extruder design can be seen here: [github.com] .
My immediate goal is to prolong the life of the PLA printed plastic gear wheels. I’m hoping to keep the existing plastic gear wheels intact long enough so that I can run extensive calibration and flow tests on the printer. Then, with a properly-calibrated printer, I can finally print with sufficient precision to print my own replacement for the 9-tooth gear.
So far, I examined and adjusted the extruder motor’s mounting angle so that the motor-mounted plastic gear meshes a little better with the larger plastic gear. Still, I could not achieve a perfect meshing fit, probably due to some imprecisions in the original plastic gears themselves, and/or imprecisions in the overall support structure of the extruder (the motor’s rotation axis might not be perfectly parallel to larger gear wheel’s rotation axis).
Here are my ideas as for how to prolong the life of the plastic gears on the extruder:
1. Print at a slower speed, extruding filament more slowly, leading to slower motor rotation and causing less wear on the gears. This is easy enough to accomplish (except for retraction – see #3 below).
2. Lubricate the plastic gear wheels, to reduce gear stress even during rapid rotations (such as during retraction).
3. Eliminate retraction altogether, to prevent the violent and rapid reversal of the plastic gear motion, which causes the most stress on the plastic gears. (As I understand it, retraction physically must be a rapid and reversed rotation, and it makes no sense to try to slow down the retraction – so eliminating retraction completely would seem to be the only option.)
As for #2: Is it allowable and helpful to apply some lubricant to the plastic gear wheels on the extruder? What kind of lubricant would be advisable? Would petroleum jelly work?
As for #3: first, it possible to achieve accurate 3D prints – particularly, accurate 3D prints of gears – without using retraction at all? What kind of print settings would be advisable if I wanted to avoid retraction altogether? Second, how can I reliably disable retraction? I tried setting retraction distance to 0 in slic3r, but that didn’t seem to affect anything – my prints still used a lot of retraction.
I am still rather new to 3D printing – I bought this printer long ago but haven’t used it much.
Thanks for any advice.
Attached images:
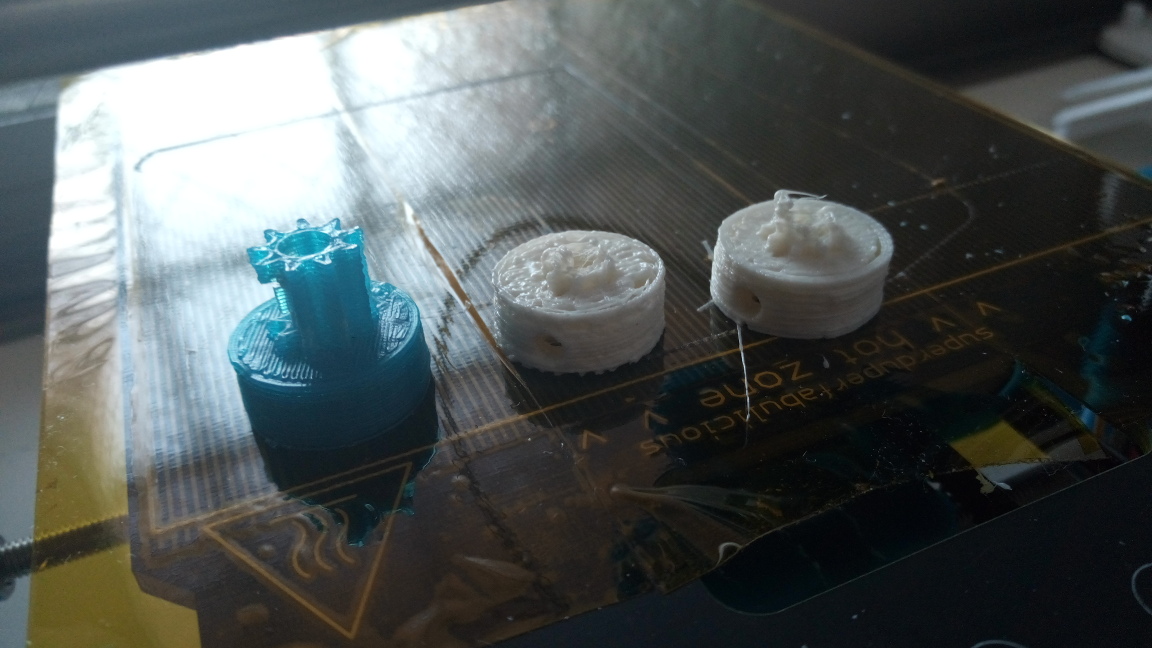
gears1.jpg - Original broken gear (left, blue, with shaved-off teeth), and failed attempts at printing the gear. Small blue flakes/chips of PLA at the right of the image are ground-off bits from the replacement blue gear.
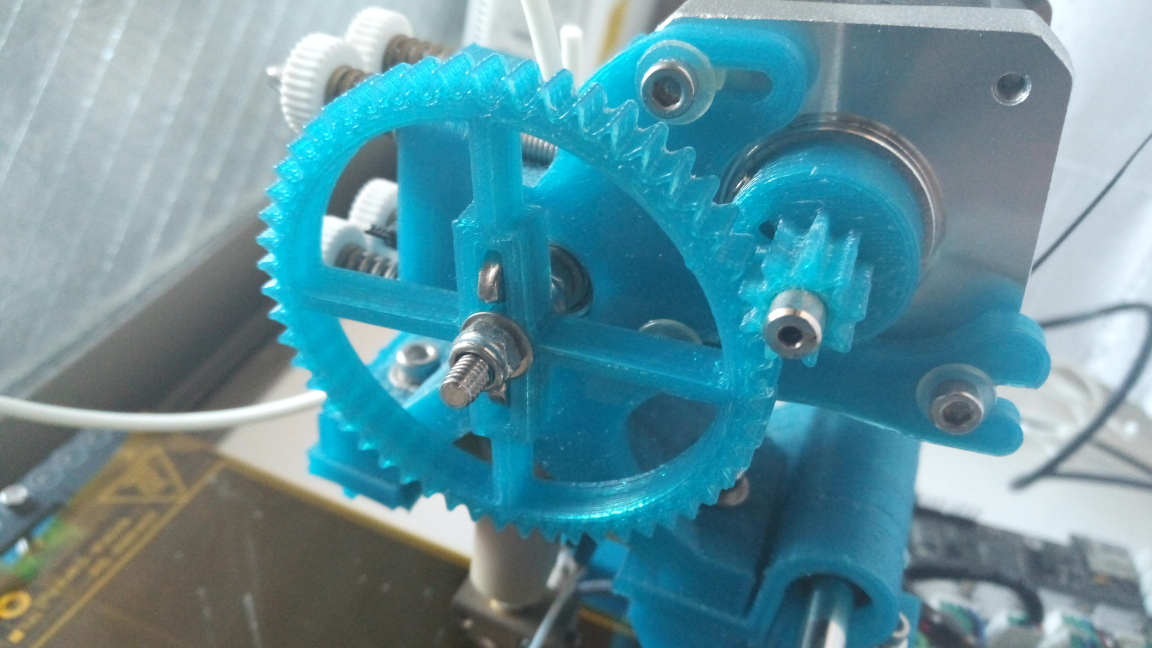
extruder-top.jpg: Top view of the extruder. A faint white trace is barely visible on the teeth of the smaller gear (attached to the motor), indicating areas of excessive wear, where the PLA has changed color from blue to white due to stress and/or abrasion. The right edge of the larger 53-tooth wheel also is showing some white discoloration and signs of stress.
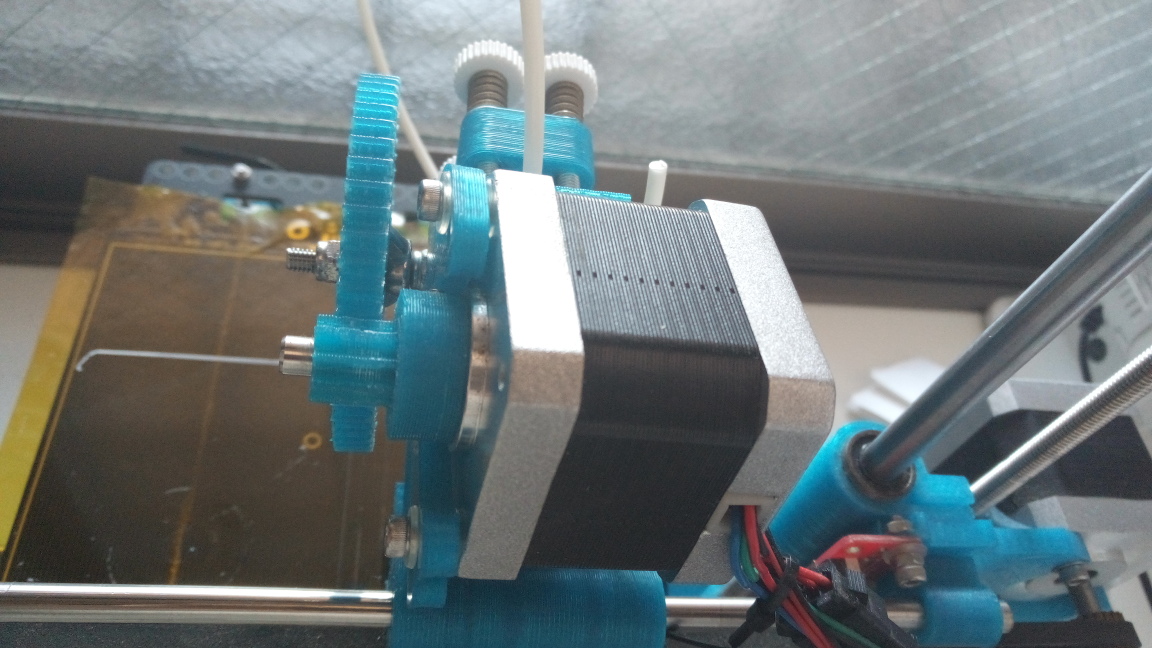
extruder-side.jpg: Side view of the extruder.
I already had one 9-tooth gear break – the teeth were shaved off when the extruder jammed for some reason. (This happened to another Portabee user also – [gergely.imreh.net].) I’m now using a spare 9-tooth gear, but after a few hours of only normal use (no jams or anything similar), it too is showing signs of wear. Small bits of the gear get ground off – especially during the violent, sudden, and rapid reversal of motor rotation caused by retractions during a print – and small flakes and chips of PLA from the gears fall down on the print bed. I am afraid it is only a matter of time before my current 9-tooth gear (and maybe also the larger 53-tooth gear) suffer the same fate as before – breakage.
In desperation I tried to print a spare 9-tooth gear myself, but my printer calibration is not yet sufficiently good to allow printing a precision part like the gear. The STL files for the extruder design can be seen here: [github.com] .
My immediate goal is to prolong the life of the PLA printed plastic gear wheels. I’m hoping to keep the existing plastic gear wheels intact long enough so that I can run extensive calibration and flow tests on the printer. Then, with a properly-calibrated printer, I can finally print with sufficient precision to print my own replacement for the 9-tooth gear.
So far, I examined and adjusted the extruder motor’s mounting angle so that the motor-mounted plastic gear meshes a little better with the larger plastic gear. Still, I could not achieve a perfect meshing fit, probably due to some imprecisions in the original plastic gears themselves, and/or imprecisions in the overall support structure of the extruder (the motor’s rotation axis might not be perfectly parallel to larger gear wheel’s rotation axis).
Here are my ideas as for how to prolong the life of the plastic gears on the extruder:
1. Print at a slower speed, extruding filament more slowly, leading to slower motor rotation and causing less wear on the gears. This is easy enough to accomplish (except for retraction – see #3 below).
2. Lubricate the plastic gear wheels, to reduce gear stress even during rapid rotations (such as during retraction).
3. Eliminate retraction altogether, to prevent the violent and rapid reversal of the plastic gear motion, which causes the most stress on the plastic gears. (As I understand it, retraction physically must be a rapid and reversed rotation, and it makes no sense to try to slow down the retraction – so eliminating retraction completely would seem to be the only option.)
As for #2: Is it allowable and helpful to apply some lubricant to the plastic gear wheels on the extruder? What kind of lubricant would be advisable? Would petroleum jelly work?
As for #3: first, it possible to achieve accurate 3D prints – particularly, accurate 3D prints of gears – without using retraction at all? What kind of print settings would be advisable if I wanted to avoid retraction altogether? Second, how can I reliably disable retraction? I tried setting retraction distance to 0 in slic3r, but that didn’t seem to affect anything – my prints still used a lot of retraction.
I am still rather new to 3D printing – I bought this printer long ago but haven’t used it much.
Thanks for any advice.
Attached images:
gears1.jpg - Original broken gear (left, blue, with shaved-off teeth), and failed attempts at printing the gear. Small blue flakes/chips of PLA at the right of the image are ground-off bits from the replacement blue gear.
extruder-top.jpg: Top view of the extruder. A faint white trace is barely visible on the teeth of the smaller gear (attached to the motor), indicating areas of excessive wear, where the PLA has changed color from blue to white due to stress and/or abrasion. The right edge of the larger 53-tooth wheel also is showing some white discoloration and signs of stress.
extruder-side.jpg: Side view of the extruder.
|
Re: Preventing excessive gear wear on Wade extruder? (lubrication, retraction, etc.) February 17, 2021 03:43PM |
Registered: 3 years ago Posts: 26 |
PLA can be lubricated with pretty much anything as it is not damaged by most solvents, so, yes, petroleum jelly would possibly be OK. Note, however, that it will attract dust and grit and that might even accelerate your wear problem.
I sometimes use a PTFE-containing bicycle chain lubricant and it works very well. The PTFE is suspended in a very light oil that evaporates to leave the PTFE behind. On 3D printed parts the PTFE accumulates perfectly in the grooves and so is available as the parts attempt to wear away. There is a huge range of lubrication options for bicycle chains and many of them are designed to avoid the problem of dust and dirt accumulation.
You do not need retractions for some prints (e.g. any done with vase-mode), but you will need it quite often.
The Wade extruder is nowadays pretty 'old-school' and there are many superior options available. If you prefer to print your own then I would suggest you look at the Voron extruders. The Voron M4 would be my pick as a replacement for Wade's extruder: [vorondesign.com]
|
Re: Preventing excessive gear wear on Wade extruder? (lubrication, retraction, etc.) February 18, 2021 04:47AM |
Registered: 3 years ago Posts: 93 |
Thanks for the advice about the lubricant possibly attracting grit which would increase wear on the plastic gears, rather than decrease it.  I'm rather hesitant now to lubricate the plastic gears and will instead just go with reducing print speed and eliminating retraction.
Is it correct that if there are no negative E values in my gcode file, there will be no retraction? I want to make sure before firing up my printer again, because every rapid retraction brings the gears that much closer to failure.
I'm rather hesitant now to lubricate the plastic gears and will instead just go with reducing print speed and eliminating retraction.Is it correct that if there are no negative E values in my gcode file, there will be no retraction? I want to make sure before firing up my printer again, because every rapid retraction brings the gears that much closer to failure.
|
Re: Preventing excessive gear wear on Wade extruder? (lubrication, retraction, etc.) February 18, 2021 04:55AM |
Registered: 12 years ago Posts: 2,470 |
I have a Wade running for several years now processing quite a few kilos of ABS. I use herringbone gears printed in ABS. There was a little bit of wear initially, after that the gears mesh up smoothly and i expect it to run for quite a few kilos of filament more. PLA is imo to brittle, you are better off printing the gears in ABS, PETG or if possible even Nylon. A hard TPU might be even better, i had good results with that in other situations where i needed printed gears.
[www.bonkers.de]
[merlin-hotend.de]
[www.hackerspace-ffm.de]
[www.bonkers.de]
[merlin-hotend.de]
[www.hackerspace-ffm.de]
|
Re: Preventing excessive gear wear on Wade extruder? (lubrication, retraction, etc.) February 19, 2021 03:30PM |
Registered: 3 years ago Posts: 26 |
|
Re: Preventing excessive gear wear on Wade extruder? (lubrication, retraction, etc.) February 20, 2021 11:37AM |
Registered: 3 years ago Posts: 93 |
Thanks for getting back with me. About checking for retractions, it seems that an E value that is less than a previous E value will cause a retraction. This makes it tedious to check for retractions by reading gcode. On the other hand, I found that the gcode viewer on [gcode.ws] will display retractions as colored dots, making it easy to detect if there are any retractions in a particular gcode file. And I could verify that setting retraction distance to 0 in slic3r does prevent any retractions from taking place.Quote
MJLew
If there are no negative E values and no G10 commands (firmware retraction) then there should be no retractions.
I really think that lubrication is likely to be better than doing without retractions...
Instead of lubrication, I went ahead and fired up the printer and tried some prints without retraction and a slow print speed, which also implies slow extrusion and slow wear on the extruder's plastic gears. The object I want to print is the replacement gear, and a gear is a pretty simple shape that does not really require retraction. And there's also a slic3r option to (mostly) prevent the nozzle from crossing perimeters (such as holes) which basically eliminates undesired stringing across the holes (for the motor shaft and the lock nut) in the gear shape. By using a very slow print speed, I almost got a workable gear, but I'm still having some problems with underextrusion. I'm going to try upping the temperature on the PLA and fiddling with the extrusion multiplier, though I know that the extrusion multiplier is something of a hack.
About lubrication, I went ahead and bought some silicone oil but I haven't applied it to the plastic extruder gears yet. I'll continue to monitor the gear wear and see if the oil seems warranted.
|
Re: Preventing excessive gear wear on Wade extruder? (lubrication, retraction, etc.) February 21, 2021 03:30PM |
Registered: 3 years ago Posts: 26 |
Oh, yes, I forgot that not every slicer uses relative E values. Sorry. Maybe your slicer has an option that would give you the setting.
Disabling retractions is a good idea for prints where they are unnecessary, but you will want to be able to retract for many prints. I will note that if the strings are fine then they can be effectively removed with a hot air gun. (Not too hot, and not too long, of course...)
Increasing the temperature is a sensible first step for dealing with under-extrusion. Extrusion multiplier is a 'hack', but it's often a useful hack. All extruders will under-extrude in some circumstances, mostly where the extrusion rate is high and the hotend temperature is low. Even if your E-steps are correctly set there can be a need to change the extrusion multiplier for some filaments and some prints.
|
Re: Preventing excessive gear wear on Wade extruder? (lubrication, retraction, etc.) February 21, 2021 07:24PM |
Registered: 3 years ago Posts: 93 |
Do I understand correctly that E-step setting does not require recompilation and reflashing of the firmware, and can be done simply with an M92 command (https://marlinfw.org/docs/gcode/M092.html)? (As you might guess, I have never calibrated the E-steps yet, simply relying on the original settings in the firmware.)Quote
MJLew
Even if your E-steps are correctly set
In my Portabee printer, there are four nuts (which I replaced with finger-adjustable nuts housed in a plastic collar) used to adjust the tension of the idler block. I always loosen this idler block when removing filament at the end of a print session, and then re-tighten it again after inserting new filament when starting a new print session. This means that the physical tightness of the idler block is very likely to change (even if only slightly) every time I re-tighten it, which would imply that the E-steps also need to be recalibrated every time I loosen and re-tighten the idler block. Is that right?
Slowly but surely, as my understanding is increasing, the quality of my prints is also increasing.
|
Re: Preventing excessive gear wear on Wade extruder? (lubrication, retraction, etc.) February 23, 2021 10:42AM |
Registered: 3 years ago Posts: 93 |
Quote
MJLew
Disabling retractions is a good idea for prints where they are unnecessary, but you will want to be able to retract for many prints.
Sigh. After several failed experiments to print the replacement small 9-tooth gear, I think I need to enable retraction (and risk breaking the existing 9-tooth gear due to the increased gear wear from abrupt and reversed motion of the extruder motor).
Here's what seems to happen:
1. Printing at full speed (40 mm/s) with 2 mm layer height, the large, untoothed base of the gear (2 cm diameter) comes out fine, but the small gear teeth on top (gear diameter 1 cm) turn into a blobby mess, because the high print speed does not allow the previous layer to cool before the next layer starts.
2. Printing only the round base at full speed, and then reducing the speed -- when printing the detailed gear teeth -- to very slow (5% or 10% of the top 40 mm/s speed), with 2 mm layer height, the 2 cm-diameter base looks fine (printed at high speed), but the 1 cm-diameter 9-tooth part of the gear, printed at slow speed, always shows under-extrusion and gaps. Increasing temperature from 180 to 190 made no difference in the under-extrusion.
3. Repeating #2, but with lower 1 mm layer height, allows the 2 cm-diameter base again to look fine and high-resolution, but then when printing the detailed 9-tooth gear part, the slow-moving nozzle is so close to the previous layer that it melts the previous layer, leading again to a blobby mess for the detailed gear teeth.
Analysis:
1. I have no problems with under-extrusion at high speed.
2. I have problems with under-extrusion at low speed. I don't know why -- maybe the poorly meshing gears on my extruder lead to under-extrusion when the motor is turning slowly. Or maybe the too-slow print speed is burning the filament in the nozzle, reducing the ability of the filament to flow.
3. I have no problems with still-molten filament when drawing the large base, due to long filament paths allowing enough time for the molten filament to solidify. The large 2 cm-diameter base, even when printed at full 40 mm/s speed, and even when printed with the smallest layer height of 0.1 mm, still looks fine.
4. I have problems with still-molten filament when drawing the small 9-tooth gear part, due to short filament paths not allowing enough time for the molten filament to solidify. The gear teeth become a blobby mess.
Therefore, I think I must:
1. Print the detailed 9-tooth part at high speed, to ensure good extrusion.
2. After printing one layer of the detailed 9-tooth part, move the nozzle away from the object and allow the layer time to cool.
3. After the layer cools, move the nozzle back to the 9-tooth part, and print the next layer on top of the previous solid layer.
Achieving the movement of the nozzle away from the object, to allow the just-printed layer time to cool, can I think easily be accomplished by placing another object (like another copy of the gear) on the print bed, at a large distance away from the first object.
But then, to prevent stringing when the nozzle moves from one object to another, I guess I need to enable retraction. Until recently, I had no idea about the recommended retraction settings for my Portabee printer, but fortunately I could finally find a recommended slic3r configuration for the Portabee, which I uploaded to [reprap.org]. According to that configuration,
retract_before_travel = 2
retract_length = 1
retract_lift = 0
retract_restart_extra = 0
retract_speed = 10
Finally, perhaps an alternate approach might also work. I previously said: "maybe the too-slow print speed is burning the filament in the nozzle, reducing the ability of the filament to flow." If that is the reason, then perhaps another approach would be to print the large base part at full speed. Then when the print reaches the layer where the small-diameter detailed gear part starts, I would need to: pause the print, move the nozzle away from the print, reduce the temperature (to reduce burning filament in the nozzle), wait for the temperature to stabilize, purge the nozzle by extruding some cm of filament, confirm good filament flow (at the new lower temperature), then resume the print. Hmm... I guess that resuming the print could very likely lead to an unwanted blob of filament where the print resumes, so this approach might not be so good, which means that the previous approach of printing 2 separate objects (allowing each object's layers more time to cool) with retraction (to prevent stringing) might be better.
Whew. As I said, I'm rather new to 3D printing, and I didn't expect that fine-tuning prints would be this tricky! I would appreciate any comments on my above analysis, plan of action, and proposed retraction settings.
|
Re: Preventing excessive gear wear on Wade extruder? (lubrication, retraction, etc.) February 25, 2021 08:51PM |
Registered: 3 years ago Posts: 93 |
Just to follow-up with the solution -- the following approach basically worked, with an almost-usable small printed gear as a result:
Retraction settings in slic3r were set to 1 mm distance at 10 mm/s speed, as described above.
The overall results were much better. The printed gears had the correct shape and the small shape of the small gear teeth looked usable without major deformations.
I got just a little bit of stringing (thin hair-like strings between islands, plus some thicker blobby strings within each island, where oozed filament accumulated layer after layer in the same place), but the strings and blobs could be removed with needle-nose pliers.
However, looking at the gear teeth through a strong light, the inner gear wall still seems too thin and irregular in certain spots -- a typical sign of under-extrusion.
This means I am getting both under-extrusion and stringing at the same time. More overall tweaking of parameters is needed (reference: [forum.duet3d.com]).
Edited 1 time(s). Last edit at 02/25/2021 08:52PM by qrp-gaijin.
#2 and #3 were achieved by configuring the slicer program (slic3r) to place 4 copies of the gear at the 4 corners of the print bed.Quote
1. Print the detailed 9-tooth part at high speed, to ensure good extrusion.
2. After printing one layer of the detailed 9-tooth part, move the nozzle away from the object and allow the layer time to cool.
3. After the layer cools, move the nozzle back to the 9-tooth part, and print the next layer on top of the previous solid layer.
Retraction settings in slic3r were set to 1 mm distance at 10 mm/s speed, as described above.
The overall results were much better. The printed gears had the correct shape and the small shape of the small gear teeth looked usable without major deformations.
I got just a little bit of stringing (thin hair-like strings between islands, plus some thicker blobby strings within each island, where oozed filament accumulated layer after layer in the same place), but the strings and blobs could be removed with needle-nose pliers.
However, looking at the gear teeth through a strong light, the inner gear wall still seems too thin and irregular in certain spots -- a typical sign of under-extrusion.
This means I am getting both under-extrusion and stringing at the same time. More overall tweaking of parameters is needed (reference: [forum.duet3d.com]).
Edited 1 time(s). Last edit at 02/25/2021 08:52PM by qrp-gaijin.
|
Re: Preventing excessive gear wear on Wade extruder? (lubrication, retraction, etc.) February 26, 2021 03:51PM |
Registered: 3 years ago Posts: 26 |
|
Re: Preventing excessive gear wear on Wade extruder? (lubrication, retraction, etc.) February 26, 2021 04:00PM |
Registered: 3 years ago Posts: 26 |
I assume that you are using 0.2mm layers. If it really is 2mm then I have no idea how you are doing it!
I have now searched out your Portabee printer (http://allabout3dprinting.com/portabee-3d-printer/) and I do not see a part cooling fan. Do you have a part-cooling fan? Are you printing PLA? If the answers are no and yes, then you will not be able to achieve a good result because the PLA needs to be cooled before the subsequent layer is applied. A part cooling fan would be a substantial upgrade at minimal cost.
I have now searched out your Portabee printer (http://allabout3dprinting.com/portabee-3d-printer/) and I do not see a part cooling fan. Do you have a part-cooling fan? Are you printing PLA? If the answers are no and yes, then you will not be able to achieve a good result because the PLA needs to be cooled before the subsequent layer is applied. A part cooling fan would be a substantial upgrade at minimal cost.
|
Re: Preventing excessive gear wear on Wade extruder? (lubrication, retraction, etc.) February 27, 2021 03:02AM |
Registered: 3 years ago Posts: 93 |
Right, my mistake -- my experiments so far have been with 0.2 mm layers and 0.1 mm layers.Quote
MJLew
I assume that you are using 0.2mm layers.
That's right; the Portabee did not come with a part-cooling fan, only a barrel-cooling fan. I'm not sure if the electronics board (gen6.d) can control another fan, or not, but I'll do some research. And yes, I'm printing in PLA. For now, printing multiple objects at once (forcing the nozzle to travel between islands after each layer is printed) seems to give the previous layers enough time to cool.Quote
MJLew
I do not see a part cooling fan.
Printing multiple objects simultaneously on the print bed requires enabling retraction. But the plastic drive gear on the extruder motor had immediately started to show signs of increased wear as soon as I enabled retraction again. And, exactly as feared -- the plastic drive gear broke, again.

Luckily, I had already succeeded (just a few days earlier) in printing out some halfway-usable-looking replacements. Saved by the skin of my (gear-) teeth.

So it was sink-or-swim time -- would the replacement gears work? The center mounting hole of the gear was too tight to fit on the extruder motor's shaft, so I had to grind out the center hole (by gouging it with a screwdriver) to make it fit. It was an extremely tight fit, and I imagine it will be quite a challenge to remove it again when this gear eventually breaks...

The mounting support for the extruder motor is a thin slab of plastic that has become deformed over time, likely due to proximity to the hot end. This deformity causes the motor axis not to be parallel to the axis of the extruder's bearing. I inserted a cardboard shim to force the motor to be more parallel to the axis of the extruder's bearing.

Even with the shim, the axis alignment of the drive gear and the driven gear is not always perfect, because there is some eccentricity or deformity in the driven gear itself (since it is itself a non-perfect 3D-printed part). So perfect gear meshing is impossible, and the extruder motor does "wobble" a bit as it rotates the drive gear, to accommodate the deformity of the driven gear.
And the result? The printer is back in operation, for now at least. The printed replacement drive gear isn't perfect -- there is some under-extrusion and irregularity in the teeth, since the drive gear is so small -- but it's good enough to drive the extruder.
First order of business, of course, is to print more replacement parts. I'm still playing with retraction settings to try to get better prints. I think for a direct drive extruder, I shouldn't retract more than 2 mm, so I'm currently trying retraction of 2 mm with speed of 15 mm/s.

Let's hope I can print enough replacement parts before the gears break again. This time, the large driven gear is showing signs of wear.
-----
POSTSCRIPT
Above, I wrote:
Now, the motor support itself has broken, again leaving me with no working printer.Quote
The mounting support for the extruder motor is a thin slab of plastic that has become deformed over time, likely due to proximity to the hot end. This deformity causes the motor axis not to be parallel to the axis of the extruder's bearing. I inserted a cardboard shim to force the motor to be more parallel to the axis of the extruder's bearing.
...
the extruder motor does "wobble" a bit as it rotates the drive gear, to accommodate the deformity of the driven gear.
Upon closer inspection, the plastic y-shaped bracket that supports the motor should have been an integral part of the larger plastic extruder housing that holds the hobbed bolt and hot end. But as far as I can remember (ever since I received the printer pre-assembled from the manufacturer), this y-bracket to support the motor has been slightly separated from the rest of the plastic extruder housing. My inserting of the cardboard shim temporarily improved the axis alignment of the extruder motor and the hobbed bolt, but at the same time the shim accelerated the separation of the y-bracket from the main extruder housing, leading to its eventual breakage. I think I can superglue the y-bracket back to the main housing, which should hold it together long enough to print a replacement. In the worst case, if the bracket cannot be repaired, then I might need to make a DIY extruder mount from wood, and use that to print the replacement extruder block.
Edited 1 time(s). Last edit at 02/28/2021 08:15AM by qrp-gaijin.
|
Re: Preventing excessive gear wear on Wade extruder? (lubrication, retraction, etc.) February 28, 2021 06:48PM |
Registered: 3 years ago Posts: 26 |
If you are unable or unwilling to use a better extruder then perhaps you could print an improved version of the Wade extruder, there are several on Thingiverse, e.g. [www.thingiverse.com]
|
Re: Preventing excessive gear wear on Wade extruder? (lubrication, retraction, etc.) March 02, 2021 04:11AM |
Registered: 6 years ago Posts: 1,007 |
Quote
MJLew
If you are unable or unwilling to use a better extruder then perhaps you could print an improved version of the Wade extruder, there are several on Thingiverse, e.g. [www.thingiverse.com]
Even this "improved" extruder is not worth the pain considering the availability of good metal/nylon gears to build a proper lightweight extruder or buy a good one.
"A comical prototype doesn't mean a dumb idea is possible" (Thunderf00t)
|
Re: Preventing excessive gear wear on Wade extruder? (lubrication, retraction, etc.) March 03, 2021 01:00AM |
Registered: 3 years ago Posts: 93 |
For now, I find it interesting and educational to be able to print out my own improved versions of the Wade extruder. My super-glue repair to my current plastic extruder block (to fix the broken y-bracket motor mount) seems to be holding together, hopefully enough to print out a couple of replacement extruder blocks and possibly some improved Wade extruder variants (with thicker gears, herringbone gears, etc.). I will find out when I fire up the printer on the weekend (I need to set aside a block of time so that I can constantly monitor the super-glued extruder block for any signs of undue stress during the print).
Having now repaired my existing extruder block with super-glue, the drive gear and the driven gear seem to be in better alignment than before, and there is significantly less rotational backlash in the driven gear. The Portabee design grips the driven gear onto an M3 bolt by means of two Nyloc locking nuts, one on each side of the driven gear, such that the locking nuts "sandwich" the driven gear between them, and rotational motion on the driven gear causes the M3 bolt and the hobbed bolt to rotate, thus pushing the filament. The locking nuts can be loosened to allow the driven gear to rotate freely for some degrees and to travel along the bolt's threads until it hits the other locking nut, which creates some rotational backlash but allows for compensating for poor gear alignment. Previously, I had to loosen the locking nuts significantly, but after rebuilding everything again, now the locking nuts tightly grip the driven gear as they should. The previously poor fit of the gears, plus the previous play in the gears, probably led to inconsistent extrusion and/or inconsistent retraction. It's a small miracle that I was able to print usable replacement drive gears before the extruder self-destructed.
The physical mounting of the hot end onto the extruder seems a bit different in the Portabee, compared to some of the Wade extruders I saw on Thingiverse, so I may need to cut-and-paste some bits and pieces together (using Boolean operations such as union or difference in Blender to remove or add parts from different STL files) to create a new extruder that actually will physically fit my hot end. That said, I'll probably need to replace the hot end eventually, as it is an older part that takes 3 mm filament instead of the more modern 1.75 mm filament.
Just as a matter of curiosity, what are the major disadvantages of the Wade extruder compared to more modern extruders? Long-term reliability? Weight? Extrusion consistency?
|
Re: Preventing excessive gear wear on Wade extruder? (lubrication, retraction, etc.) March 03, 2021 08:40AM |
Registered: 3 years ago Posts: 93 |
Perhaps another way to avoid retraction while reducing stringing between multiple objects would be to print at a moderately lower print speed to reduce pressure in the nozzle and reduce oozing when the extruder motor stops (although the speed cannot be reduced too low, or else under-extrusion might occur).Quote
qrp-gaijin
Printing multiple objects simultaneously on the print bed requires enabling retraction. But the plastic drive gear on the extruder motor had immediately started to show signs of increased wear as soon as I enabled retraction again. And, exactly as feared -- the plastic drive gear broke, again.
Any opinions if reducing print speed can reduce stringing due to lower nozzle pressure?
|
Re: Preventing excessive gear wear on Wade extruder? (lubrication, retraction, etc.) March 04, 2021 04:28AM |
Registered: 6 years ago Posts: 1,007 |
Quote
qrp-gaijin
....
Just as a matter of curiosity, what are the major disadvantages of the Wade extruder compared to more modern extruders? Long-term reliability? Weight? Extrusion consistency?
Just refer to "qrp-gaijin" posts ! That and what you just mentioned.
Edited 1 time(s). Last edit at 03/04/2021 04:28AM by MKSA.
"A comical prototype doesn't mean a dumb idea is possible" (Thunderf00t)
|
Re: Preventing excessive gear wear on Wade extruder? (lubrication, retraction, etc.) March 13, 2021 08:07AM |
Registered: 3 years ago Posts: 93 |
I was able to keep the printer running well enough to print out replacements for the extruder block, the 9-tooth drive gear, and the 53-tooth driven gear. After reassembling the extruder with my new replacement parts, the whole thing seems sturdier and in better alignment. Most importantly, retractions (with their rapid reversal of motor direction and high stress on the drive gear) no longer cause the gears to visibly disintegrate. The extruder does still make "squeaking" noises now and then, probably where the gears are not meshing smoothly; that might be fixable with some lubrication. (The root cause is, I think, the "elephant foot" effect on the first layer of the driven gear, making the teeth somewhat "wider" on one edge.)
The lesson learned is to print enough replacement extruder parts before problems occur, so that when the extruder starts to disintegrate, it's not necessary to try and use the disintegrating and no longer reliable extruder to print a replacement.
Edited 1 time(s). Last edit at 03/13/2021 08:08AM by qrp-gaijin.
|
Re: Preventing excessive gear wear on Wade extruder? (lubrication, retraction, etc.) March 13, 2021 04:01PM |
Registered: 3 years ago Posts: 26 |
Elephant's foot can be dealt with in (at least) three ways. First, a small chamfer on the bottom of the gear will allow the foot to be where the gear teeth do not meet. Second, some slicers have a setting that reduces or eliminates elephant's foot (e.g. Prusa Slicer). Third, get a cheap set of needle files and file it off!
|
Re: Preventing excessive gear wear on Wade extruder? (lubrication, retraction, etc.) March 15, 2021 09:18AM |
Registered: 3 years ago Posts: 93 |
Something like this, then?Quote
MJLew
First, a small chamfer on the bottom of the gear will allow the foot to be where the gear teeth do not meet.

So even if the bottom layer ends up being printed wider, it doesn't matter, because the narrower chamfered part of the gear will never be in contact with the drive gear, nor anything else. An excellent solution!
I previously was trying to eliminate elephant's foot by incrementally raising (physically) the home Z height bit by bit, so that the first layer just barely sticks to the print surface, without getting squashed too much. This is rather tedious, and I think my bed is slightly warped, meaning that a just-barely-adhering home Z height at one location on the bed will lead to no adhesion on other parts of the bed, which messes up the first layer adhesion and messes up the fine details on the gear teeth. In contrast, the chamfer approach seems like it should be easy and reliable.
I'm definitely interested in minimizing the amount of physical reworking I must do after printing out replacement parts. I spent some time adjusting hole sizes so that the printed parts will have holes just large enough to accommodate the corresponding motor shafts or bolts that must pass through the holes. I found that I needed to increase the hole radius (in the xy plane) by about 0.3 mm if doing manual adjustments, or I could use slic3r's "xy size compensation" parameter set to about -0.15 mm.
I found out that although the "xy size compensation" works fine for a simple part with a hole in it, it also shrinks the outer perimeter of the object inwards. This doesn't work well for a gear with a hole in the center, because enlarging the hole with "xy size compensation" then shrinks all the gear teeth inwards, so for the gears, manual hole enlargement was needed.
It's quite satisfying to be able to print parts that fit almost perfectly, with no physical filing, reaming, drilling, or grinding needed. And these acceptable results are still before I have rigorously calibrated my printer.
Edited 1 time(s). Last edit at 03/16/2021 01:25AM by qrp-gaijin.
Sorry, only registered users may post in this forum.