My Replikeo Prusa i3 Rework Build
Posted by Trike
|
Re: My Replikeo Prusa i3 Rework Build December 21, 2014 08:23PM |
Registered: 9 years ago Posts: 137 |
Thanks for the tips! Do post the pics of tensioning screws, I'm having trouble tightening mine to correct tension level.Quote
Blue Ice
Quote
Bratan
Can someone recommend me a better hotend? I'm having so many issues with this one such as I spend about 15 minutes trying to get new filament inside the hole, and it clogs and backs out frequently, doesn't feed correct length no matter how many extrusion steps I take, and so on. No a single print is the same... I tried a lot of things for the many months that I had this printer, that I'm now convinced it's the HE that's the problem...
Hi Bratan,
Been away from this thread for a while, but I've been reading all of the posts. After reading yours, I thought I'd share a few tips about the hotend that I found out that might be helpful for you:
- When I withdraw filament, I just loosen the screws holding the filament against the drive gear, with the extruder up to temperature. Then I pull it out. At the end, the tip of the filament is pointed.
- My filament hole in the extruder and in the hotend don't line up. I find the easiest way to reinsert filament is to keep the pointed end from the step before (I used to trim it off). Now when I insert filament it just guides itself in.
- Make sure that you have a fan for PLA. I tried printing PLA without a fan and it was very tough to get things to work out.
- I have been running my printer for 3 months with spacers instead of springs on the tensioning screws that press the filament against the drive gear (picture later tonight). It has worked very well and very accurately.
- If the print comes out wobbly, try replacing the screws that hold the hotend in place with slightly larger screws (only if the hotend wobbles when you pull on it). Worked wonders for me.
Pointed end of filament is fatter then the rest, so it doesn't fit back
 I also tried sharpening it, still have issues inserting it...
On the last one, I followed your advise from previous posts and used #8 screws instead of metric. They do fit better...
I have huge issue right now, can't print at all. After about 5 minutes filament clogs hot end. Every freaking time
Also question to all who use 1.75 mm filament in standard J-head that came with the kit: Is it suppose to double on itself inside the hot end? Meaning that inside it melts and becomes 3mm, or is it just my glitch?
Edited 2 time(s). Last edit at 12/22/2014 01:41PM by Bratan.
|
Re: My Replikeo Prusa i3 Rework Build December 23, 2014 02:39AM |
Registered: 9 years ago Posts: 120 |
Quote
Bratan
Thanks for the tips! Do post the pics of tensioning screws, I'm having trouble tightening mine to correct tension level.
Pictures:


The spacers are all garden variety 1 in. long nylon spacers. They work perfectly with the Replikeo screws and require little tightening. I strongly recommend that you try them, and I frankly don't see any reason to use springs anymore- this setup is much more rigid and reliable, and allows for stronger tightening. I was getting filament in my drive gear after every couple prints before I did this, but not any more.
Sorry the post took a bit long- I'm a total gearhead and have been super busy with restoration of my next power tool, a Delta Rockwell 12" Lathe, left out in the elements for a year:


Quote
Bratan
Pointed end of filament is fatter then the rest, so it doesn't fit back
Hmmmmm. I don't know why it's doing that- mine usually works out fine. On the other hand, I did disassemble and reassemble my hotend before, so maybe that helped? I wouldn't recommend doing that, though.
Quote
Bratan
On the last one, I followed your advise from previous posts and used #8 screws instead of metric. They do fit better...
That's great! Glad I could help.
Quote
Bratan
I have huge issue right now, can't print at all. After about 5 minutes filament clogs hot end. Every freaking time
ABS or PLA? If PLA, I had the same issue before adjusting my fan to blow air the proper direction onto the hotend (blow on the hotend, not suck air from the hotend). Extruder cooling I've found is crucial for proper PLA printing.
Quote
Bratan
Also question to all who use 1.75 mm filament in standard J-head that came with the kit: Is it suppose to double on itself inside the hot end? Meaning that inside it melts and becomes 3mm, or is it just my glitch?
I've never used 1.75mm filament with a 3mm hotend. But if you are not using the 3mm filament, then that may be causing the issues you are describing above.
Good luck and let me know what happens!
Edited 2 time(s). Last edit at 12/23/2014 02:40AM by Blue Ice.
Blue Ice
blog at [contemporarymaker.com]
|
Re: My Replikeo Prusa i3 Rework Build December 23, 2014 12:02PM |
Registered: 9 years ago Posts: 137 |
Thanks Blue Ice, that's interesting idea with spaces. I might do that, just need to find correct length.
I'm printing with white ABS 1.75mm filament. I'm starting to think that J-Head that came with the kit is not meant for 1.75 filament.
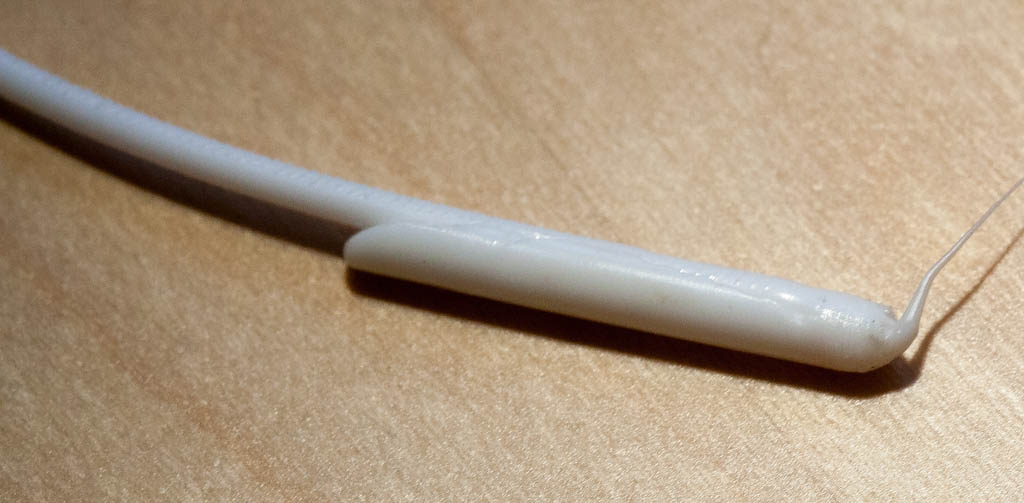
I'm attaching pictures of what "doubled up" filament looks like, I really wanted to know if that's normal.
Also how do I disassemble this J-head to clean it? It might be glued together? I want to buy guitar string but not sure what thickness I need for 0.4mm nozzle? I live in US so strings are most likely not metric...
I'm printing with white ABS 1.75mm filament. I'm starting to think that J-Head that came with the kit is not meant for 1.75 filament.
I'm attaching pictures of what "doubled up" filament looks like, I really wanted to know if that's normal.
Also how do I disassemble this J-head to clean it? It might be glued together? I want to buy guitar string but not sure what thickness I need for 0.4mm nozzle? I live in US so strings are most likely not metric...
|
Re: My Replikeo Prusa i3 Rework Build December 24, 2014 04:17AM |
Registered: 9 years ago Posts: 30 |
|
Re: My Replikeo Prusa i3 Rework Build December 27, 2014 07:17AM |
Registered: 9 years ago Posts: 124 |
Quote
Bratan
Thanks Blue Ice, that's interesting idea with spaces. I might do that, just need to find correct length.
I'm printing with white ABS 1.75mm filament. I'm starting to think that J-Head that came with the kit is not meant for 1.75 filament.
I'm attaching pictures of what "doubled up" filament looks like, I really wanted to know if that's normal.
Also how do I disassemble this J-head to clean it? It might be glued together? I want to buy guitar string but not sure what thickness I need for 0.4mm nozzle? I live in US so strings are most likely not metric...
You are right, original extruder is not for 1.75mm, but for 3mm filament
Also cleaning extruder is easy. Aluminium end is just screwed into black plastic barrel without glue. Only thing that will be damaged is capton tape around extruder body
|
Re: My Replikeo Prusa i3 Rework Build December 27, 2014 10:05AM |
Registered: 9 years ago Posts: 518 |
Hey guys,
I have constructed a holder for a 17mm outer diameter inductive/capazitive probe. It fits in the standard Prusa i3 eMotiontec extruder.
You can find it here:
[www.thingiverse.com]
I would be happy, if you guys can give me some feedback!
Greetings
I have constructed a holder for a 17mm outer diameter inductive/capazitive probe. It fits in the standard Prusa i3 eMotiontec extruder.
You can find it here:
[www.thingiverse.com]
I would be happy, if you guys can give me some feedback!
Greetings
|
Re: My Replikeo Prusa i3 Rework Build December 27, 2014 10:47AM |
Registered: 9 years ago Posts: 137 |
This is fantastic! I never got my servo probe to work. Can you explain more how this works? Does it just replace Z endstop, or there's some kind of calibration sequence I need to program? Also where can you get the probe, is there any specific model you used? Is eMotiontec extruder what comes with Replikeo's kit?Quote
TheZippyMan
Hey guys,
I have constructed a holder for a 17mm outer diameter inductive/capazitive probe. It fits in the standard Prusa i3 eMotiontec extruder.
You can find it here:
[www.thingiverse.com]
I would be happy, if you guys can give me some feedback!
Greetings
|
Re: My Replikeo Prusa i3 Rework Build December 27, 2014 10:48AM |
Registered: 9 years ago Posts: 137 |
Thanks man! How do you clean it after it's disasambled? I removed mine and it has a lot of ABS in it. If I just hit it up and invert would it pour out?Quote
Allnei
You are right, original extruder is not for 1.75mm, but for 3mm filament
Also cleaning extruder is easy. Aluminium end is just screwed into black plastic barrel without glue. Only thing that will be damaged is capton tape around extruder body
|
Re: My Replikeo Prusa i3 Rework Build December 27, 2014 11:01AM |
Registered: 9 years ago Posts: 15 |
Hey guys,
I'm having some trouble with my heated bed.
It won't turn on if I run it through the ramps. The fuses both measure 0.2 ohm and the bed itself 2 ohm which should be fine. I've measured the voltage coming through the fuses and its 12v on all 4 posts.
When I measure the terminals there is no voltage coming through, maybe one of the mosfets died?
When I connect the bed directly it heats up just fine.
How do I know this is a mosfet problem or something else?
Edited 2 time(s). Last edit at 12/27/2014 11:19AM by Zippit.
|
Re: My Replikeo Prusa i3 Rework Build December 27, 2014 12:01PM |
Registered: 9 years ago Posts: 137 |
|
Re: My Replikeo Prusa i3 Rework Build December 27, 2014 01:06PM |
Registered: 9 years ago Posts: 15 |
|
Re: My Replikeo Prusa i3 Rework Build December 27, 2014 02:40PM |
Registered: 9 years ago Posts: 30 |
|
Re: My Replikeo Prusa i3 Rework Build December 27, 2014 03:58PM |
Registered: 9 years ago Posts: 137 |
|
Re: My Replikeo Prusa i3 Rework Build December 27, 2014 04:01PM |
Registered: 9 years ago Posts: 137 |
I just received J-head made by SainSmart to replace mine, and it doesn't fit at all. I realized it's because it has this brass part on top, while hotend that came with Replikeo kit has same brass piece inside plastic. Is there an alternative extruded that will hold it?
|
Re: My Replikeo Prusa i3 Rework Build December 27, 2014 05:47PM |
Registered: 9 years ago Posts: 30 |
Quote
Bratan
Why do you think they were cut?Quote
Jonny Five
Why are the fan power wires cut at the halfway point and then re-soldered back together? What does this accomplish?
The build instructions for the prusa i3 rework on the reprap page actually tell you to cut the fan wires halfway, then resolder, that's what really confused me. Step 7: [reprap.org].
|
Re: My Replikeo Prusa i3 Rework Build December 28, 2014 12:50PM |
Registered: 9 years ago Posts: 518 |
Quote
Bratan
This is fantastic! I never got my servo probe to work. Can you explain more how this works? Does it just replace Z endstop, or there's some kind of calibration sequence I need to program? Also where can you get the probe, is there any specific model you used? Is eMotiontec extruder what comes with Replikeo's kit?Quote
TheZippyMan
Hey guys,
I have constructed a holder for a 17mm outer diameter inductive/capazitive probe. It fits in the standard Prusa i3 eMotiontec extruder.
You can find it here:
[www.thingiverse.com]
I would be happy, if you guys can give me some feedback!
Greetings
Yeah this probe holder fits the standard replikeo kit!
The probe acts as a z endswitch and its like the microswitch on your servo. I got the probe from amazon. I used this type of sensor: LJC18A3-BZ/AX. Its an NPN normally closed probe and you can simply connect the signal wire of the probe with the signal input of the RAMPS. You need to find your offset settings and simply type them it in Marlin.I hope I cleared some of your questions. If you have more questions just contact me via private message, I will help you!
|
Re: My Replikeo Prusa i3 Rework Build December 28, 2014 08:35PM |
Registered: 9 years ago Posts: 120 |
|
Re: My Replikeo Prusa i3 Rework Build December 28, 2014 08:50PM |
Registered: 9 years ago Posts: 120 |
Quote
Bratan
Thanks Blue Ice, that's interesting idea with spaces. I might do that, just need to find correct length.
I'm printing with white ABS 1.75mm filament. I'm starting to think that J-Head that came with the kit is not meant for 1.75 filament.
I'm attaching pictures of what "doubled up" filament looks like, I really wanted to know if that's normal.
Also how do I disassemble this J-head to clean it? It might be glued together? I want to buy guitar string but not sure what thickness I need for 0.4mm nozzle? I live in US so strings are most likely not metric...
Spot on. As Allnei said, the Replikeo kit is meant for 3mm filament. I've been using Replikeo's spool (white 3mm ABS for me) and it's worked really well.
That's a real bummer that you've been using the printer for months with the wrong size of filament
But when you get 3mm filament for it, post pictures of your first prints! I'd love to see what they look like.Also, it's not all bad that you have been printing with the wrong sized filament. Surely you learned a lot about your printer along the way!
Quote
Bratan
I just received J-head made by SainSmart to replace mine, and it doesn't fit at all. I realized it's because it has this brass part on top, while hotend that came with Replikeo kit has same brass piece inside plastic. Is there an alternative extruded that will hold it?
I would have probably just purchased a 3mm J-Head or used the stock one because the cold end part of the extruder is designed for 3mm filament. But that's okay if you want to do 1.75mm filament too.
I think that the extruder you picked is one of the three (?) types of 1.75mm J-Head type hotends that is popular between manufacturers. One type (non-bowden) appears to have that brass part:
http://www.ebay.com/itm/like/171214152165?lpid=82&chn=ps
http://www.banggood.com/J-Head-Nozzle-MKIV-MKV-Hotend-Extrusion-Head-For-3D-Printer-RepRap-p-949224.html?currency=USD&refreshTmp=1&utm_source=google&utm_medium=shopping&utm_content=ruby&utm_campaign=Electronic-xie-us&gclid=COOympSN6sICFepaMgod328Aug
And the other non-bowden one appears to look flat, just like the 3mm Replikeo hotend:
http://www.amazon.com/RepRap-J-Head-Hotend-Filamnet-Printer/dp/B00EC1OT6O
http://www.makerfarm.com/index.php/printer-electronics/j-head-hot-end-for-1-75mm-filament.html
The third type, the bowden 1.75mm J-Head, has a brass press-fit connector on the top, not the same thing that you have:
http://www.3dprintingstore.co.za/extruders-hotends/j-head-hot-end-for-1-75mm-filament-0-4mm-nozzle-with-bowden-connection/
http://www.aliexpress.com/item/Peek-Bowden-feed-J-head-hot-end-assembled-with-0-5mm-Nozzle-Cartridge-heater-1m-PTFE/2020452503.html
I'm not sure how your kind of extruder is used. Maybe ask on the main RepRap forum?
Edited 1 time(s). Last edit at 12/28/2014 08:50PM by Blue Ice.
Blue Ice
blog at [contemporarymaker.com]
|
Re: My Replikeo Prusa i3 Rework Build December 28, 2014 08:54PM |
Registered: 9 years ago Posts: 103 |
Hey all,
Sorry, I have been totally out of the loops with real life and had to put my printer build on hold. Would someone be so kind as to refresh my memory, please? I've almost completed the build using the wiki instructions and I'm stuck on the last part - wiring the extruder fan. I thought I recall some people saying not to solder it to D2 like in the instructions. Where have you all connected it to and what are the pros and cons to each set up? I really want to get this thing up and running so I can calibrate and start printing!
Sorry, I have been totally out of the loops with real life and had to put my printer build on hold. Would someone be so kind as to refresh my memory, please? I've almost completed the build using the wiki instructions and I'm stuck on the last part - wiring the extruder fan. I thought I recall some people saying not to solder it to D2 like in the instructions. Where have you all connected it to and what are the pros and cons to each set up? I really want to get this thing up and running so I can calibrate and start printing!
|
Re: My Replikeo Prusa i3 Rework Build December 28, 2014 08:57PM |
Registered: 9 years ago Posts: 120 |
Quote
Bratan
Thanks man! How do you clean it after it's disasambled? I removed mine and it has a lot of ABS in it. If I just hit it up and invert would it pour out?Quote
Allnei
You are right, original extruder is not for 1.75mm, but for 3mm filament
Also cleaning extruder is easy. Aluminium end is just screwed into black plastic barrel without glue. Only thing that will be damaged is capton tape around extruder body
I ran into a similar issue when I had filament in the extruder after disassembling my Replikeo hotend. However, I had 3mm PLA in it instead. I ended up reassembling mine and then heating it up to about 190 degrees Celsius for a while with no other filament in it. In the end, all of the PLA just oozed out. I only had PLA in the metal part, in the end. The stuff that was stuck in the PEEK liner I drilled out (carefully).
Does your hotend have plastic stuck just to the metal heating block, or to the tube as well?
I would heat your hotend up to 220 degrees or something, then see if you can push out the ABS plastic in there with a 3mm piece. If it is still stuck, then I would take it apart (again, I know) and then drill out the plastic in the inner liner. Then I would reassemble it and try the ooze/push thing again.
You could also drop the metal tip (alone) in acetone, which will dissolve ABS in about a day.
Good luck
Edited 1 time(s). Last edit at 12/28/2014 08:57PM by Blue Ice.
Blue Ice
blog at [contemporarymaker.com]
|
Re: My Replikeo Prusa i3 Rework Build December 28, 2014 11:01PM |
Registered: 9 years ago Posts: 120 |
Quote
LittleMike
Hey all,
Sorry, I have been totally out of the loops with real life and had to put my printer build on hold. Would someone be so kind as to refresh my memory, please? I've almost completed the build using the wiki instructions and I'm stuck on the last part - wiring the extruder fan. I thought I recall some people saying not to solder it to D2 like in the instructions. Where have you all connected it to and what are the pros and cons to each set up? I really want to get this thing up and running so I can calibrate and start printing!
Sure!
I connected the fan by doing a quick and dirty solder job on the ends of the fan connector to a strip of male 0.1 in header. It does the job, and I didn't really want to wait for a crimping tool to ship to me just to connect the part with a proper connector. I just used what I had on hand. When I do the next big round of upgrades on my Pi3R I'll probably fix that too. I'm not really worried about the wires crossing as of now- it's set up pretty well.
Here is a picture that I just took:

Pros:
- Quick
- Cheap
- Sturdy if you use heat shrink (too late for me now)
Cons:
- Risky if you do it wrong
- You need to be handy with a soldering iron
EDIT: Yep, D2 is the right connector, by the way. I think the Replikeo kit has a male header preinstalled on the board, but it's a little strange that they don't have the matching connector for the fan.
Edited 2 time(s). Last edit at 12/28/2014 11:04PM by Blue Ice.
Blue Ice
blog at [contemporarymaker.com]
|
Re: My Replikeo Prusa i3 Rework Build December 28, 2014 11:11PM |
Registered: 9 years ago Posts: 120 |
Quote
TheZippyMan
Hey guys,
I have constructed a holder for a 17mm outer diameter inductive/capazitive probe. It fits in the standard Prusa i3 eMotiontec extruder.
You can find it here:
[www.thingiverse.com]
I would be happy, if you guys can give me some feedback!
Greetings
It seems in the pictures on Thingiverse that you have a metal bed with no glass on top. I have a bed with glass on top of the heating circuit board. Will your setup work for me?
Thanks.
Blue Ice
blog at [contemporarymaker.com]
|
Re: My Replikeo Prusa i3 Rework Build December 29, 2014 09:47AM |
Registered: 9 years ago Posts: 137 |
Quote
Blue Ice
Spot on. As Allnei said, the Replikeo kit is meant for 3mm filament. I've been using Replikeo's spool (white 3mm ABS for me) and it's worked really well.
That's a real bummer that you've been using the printer for months with the wrong size of filament
Also, it's not all bad that you have been printing with the wrong sized filament. Surely you learned a lot about your printer along the way!
Quote
Bratan
I just received J-head made by SainSmart to replace mine, and it doesn't fit at all. I realized it's because it has this brass part on top, while hotend that came with Replikeo kit has same brass piece inside plastic. Is there an alternative extruded that will hold it?
I would have probably just purchased a 3mm J-Head or used the stock one because the cold end part of the extruder is designed for 3mm filament. But that's okay if you want to do 1.75mm filament too.
I think that the extruder you picked is one of the three (?) types of 1.75mm J-Head type hotends that is popular between manufacturers. One type (non-bowden) appears to have that brass part:
http://www.ebay.com/itm/like/171214152165?lpid=82&chn=ps
http://www.banggood.com/J-Head-Nozzle-MKIV-MKV-Hotend-Extrusion-Head-For-3D-Printer-RepRap-p-949224.html?currency=USD&refreshTmp=1&utm_source=google&utm_medium=shopping&utm_content=ruby&utm_campaign=Electronic-xie-us&gclid=COOympSN6sICFepaMgod328Aug
And the other non-bowden one appears to look flat, just like the 3mm Replikeo hotend:
http://www.amazon.com/RepRap-J-Head-Hotend-Filamnet-Printer/dp/B00EC1OT6O
http://www.makerfarm.com/index.php/printer-electronics/j-head-hot-end-for-1-75mm-filament.html
The third type, the bowden 1.75mm J-Head, has a brass press-fit connector on the top, not the same thing that you have:
http://www.3dprintingstore.co.za/extruders-hotends/j-head-hot-end-for-1-75mm-filament-0-4mm-nozzle-with-bowden-connection/
http://www.aliexpress.com/item/Peek-Bowden-feed-J-head-hot-end-assembled-with-0-5mm-Nozzle-Cartridge-heater-1m-PTFE/2020452503.html
I'm not sure how your kind of extruder is used. Maybe ask on the main RepRap forum?
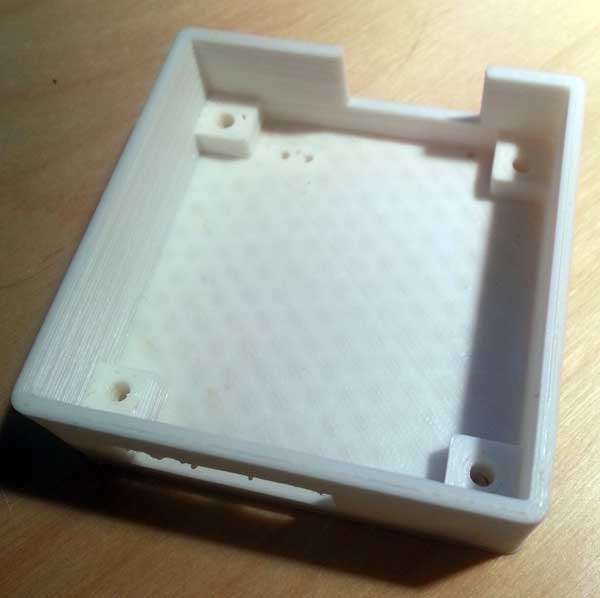
Thaks man! I actually figured it out. Found a thread here describing same issue (with long brass fitting). It was very easy to unscrew. While someone mentioned that it works without brass top, I decided to be on the safe side (after all it's there for a reason, probably to hold inner plastic tube and also cool down top of the filament) and transplanted fitting from Replikeo's J-head to this SainsSmart J-head. I also removed all that kapton tape that blocked air vents and redid it so it only covers metal parts. I'm extremely happy, now finally I'm getting some good prints! I'm starting to think that all 6 months that I had this printer most issues were from the crappy J-head... I did print with 3mm filament in the beginning and only switched to 1.75 mm to see if get better results.
I'll save original J-head and use it for 3mm filament, just going to soak metal part in the acetone as suggested. BTW, it prints at 220-225C for white ABS and heatbed at just 90-95C. Trick is blue elmer's glue stick, they work like magic, no more messing with hairspray and super high temperatures...
Here're pics of the brass fittings, and also enclosure box that I printed last night. Only issue I'm still having is with overhangs, but I need to mount cooling fan to fix it...
Edited 1 time(s). Last edit at 12/29/2014 09:53AM by Bratan.
|
Re: My Replikeo Prusa i3 Rework Build December 29, 2014 10:38AM |
Registered: 9 years ago Posts: 518 |
Quote
Blue Ice
Quote
TheZippyMan
Hey guys,
I have constructed a holder for a 17mm outer diameter inductive/capazitive probe. It fits in the standard Prusa i3 eMotiontec extruder.
You can find it here:
[www.thingiverse.com]
I would be happy, if you guys can give me some feedback!
Greetings
It seems in the pictures on Thingiverse that you have a metal bed with no glass on top. I have a bed with glass on top of the heating circuit board. Will your setup work for me?
Thanks.
You will need a capacitive probe, simply take the one I mentioned above. If you have a metal bed you can use an inductive probe. A capacitive probe senses all materials (even water!), an inductive one can only sense metal (steel, aluminium...)
I hope I cleared your questions!
Greetings,
Justin
|
Re: My Replikeo Prusa i3 Rework Build December 29, 2014 12:55PM |
Registered: 9 years ago Posts: 103 |
Quote
Blue Ice
Quote
LittleMike
Hey all,
Sorry, I have been totally out of the loops with real life and had to put my printer build on hold. Would someone be so kind as to refresh my memory, please? I've almost completed the build using the wiki instructions and I'm stuck on the last part - wiring the extruder fan. I thought I recall some people saying not to solder it to D2 like in the instructions. Where have you all connected it to and what are the pros and cons to each set up? I really want to get this thing up and running so I can calibrate and start printing!
Sure!
I connected the fan by doing a quick and dirty solder job on the ends of the fan connector to a strip of male 0.1 in header. It does the job, and I didn't really want to wait for a crimping tool to ship to me just to connect the part with a proper connector. I just used what I had on hand. When I do the next big round of upgrades on my Pi3R I'll probably fix that too. I'm not really worried about the wires crossing as of now- it's set up pretty well.
Here is a picture that I just took:
Pros:
- Quick
- Cheap
- Sturdy if you use heat shrink (too late for me now)
Cons:
- Risky if you do it wrong
- You need to be handy with a soldering iron
EDIT: Yep, D2 is the right connector, by the way. I think the Replikeo kit has a male header preinstalled on the board, but it's a little strange that they don't have the matching connector for the fan.
Thanks! My RAMPS board has no header pins on D2. It's just holes there, so I was concerned. I don't mind soldering if I have to, but I was trying to avoid a "permanent" solution if I could, considering the fact that there are no pins and no pin connector on the fan wires. Also, like I said, I was reading elsewhere that using D2 was a bad idea because then the extruder fan would turn on and off, though I'm not sure why that's bad.

|
Re: My Replikeo Prusa i3 Rework Build December 30, 2014 12:41AM |
Registered: 9 years ago Posts: 30 |
|
Re: My Replikeo Prusa i3 Rework Build January 02, 2015 09:58AM |
Registered: 10 years ago Posts: 14 |
Same problem with the clone j-head from replikeo ! I spent hours and hours to review all the printer, I think I would be mad !Quote
Bratan
Thanks man! How do you clean it after it's disasambled? I removed mine and it has a lot of ABS in it. If I just hit it up and invert would it pour out?
So I decide to disasemble the jhead and heat it with a blowtorch, then put in acetone ! When I put the j-head back, I broke the peek.
For my christmas, I bought a new e3d hotend and now, everything is back to normal !
|
Re: My Replikeo Prusa i3 Rework Build January 02, 2015 04:49PM |
Registered: 9 years ago Posts: 120 |
Quote
Jonny Five
How did you guys mount your y-axis motor? The wiki instructions state to mount it such that the plug faces downwards. I've found that the power plug won't fit well though and the frame doesn't sit completely flat, and it kinks the wires as well.
Downwards originally, but now I have it mounted sideways. Here is an image:

The white clips on there are something I've been working on recently. I designed them and have been printing them out- they are quite strong and won't come unlatched. Here's another closeup:

I'll post on my blog about them with the design files soon- they are meant to go on the threaded rods of the printer. I'll also try to let you all know as well.
Blue Ice
blog at [contemporarymaker.com]
|
Re: My Replikeo Prusa i3 Rework Build January 05, 2015 02:49AM |
Registered: 9 years ago Posts: 103 |
Okay guys, so I finally got everything assembled and wired up. I loaded the marlin firmware from Replikeo's website, fired up Pronterface and I'm stuck. I tried hitting the X, Y, Z buttons and it keeps telling me echo:endstop hits: and then coordinates. I hit the Home button and all it wants to do is move the Z axis up. I can't get it to move anywhere else.
As an aside, I'm not sure if something burnt out (aside from an endstop). I manually hit the switch on each one just to test them and the LED lit up on each except for one, I heard a pop and smelled smoke afterwards. Luckily I bought a bunch of spares, so I swapped that one out and the LED works when I hit the switch, but I still have the same issue where none of the axes want to move.
I even tried unplugging the Z motor and then plugging one of the other motors into the Z spot on the RAMPS and the motor worked, but it still was just moving "Z" and none of the other axes. Any ideas? Is there maybe something wrong in the firmware configuration? I'm stumped.
|
Re: My Replikeo Prusa i3 Rework Build January 05, 2015 01:15PM |
Registered: 9 years ago Posts: 18 |


Sorry, only registered users may post in this forum.