Folger Prusa i3 Kit from ebay
Posted by Waltermixx
|
Re: Folger Prusa i3 Kit from ebay September 15, 2014 10:54PM |
Registered: 9 years ago Posts: 208 |
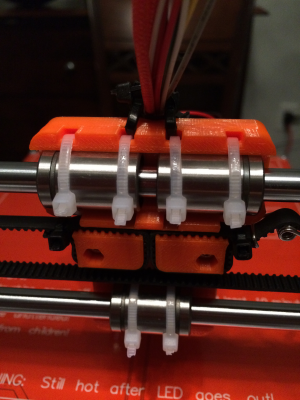
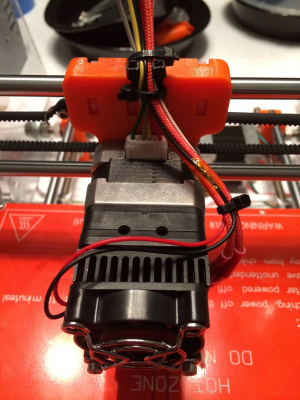
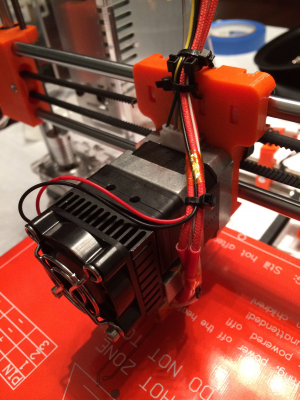
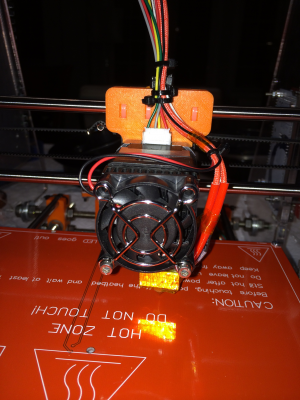
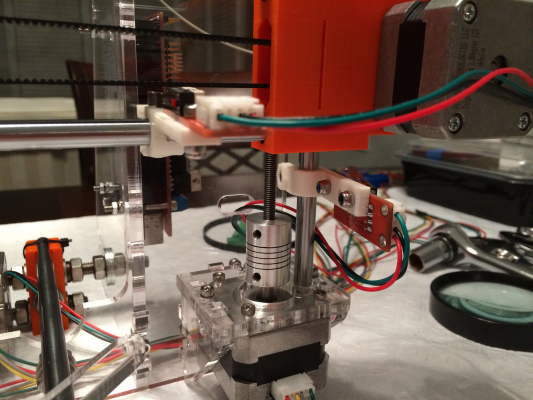
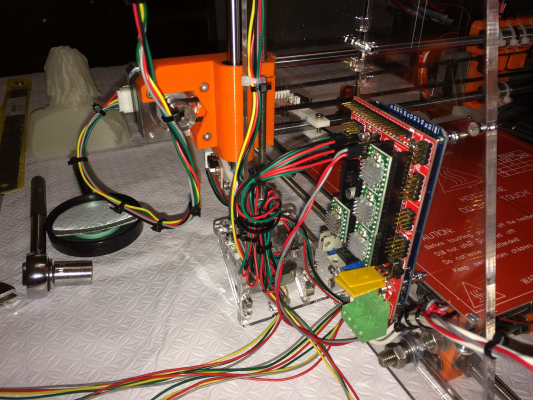
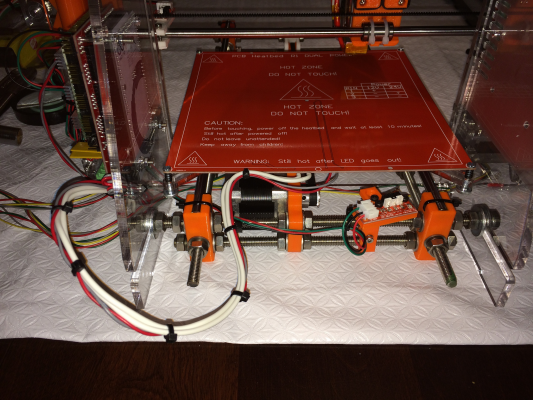
Okie doke I have mounted my Extruder and started to do some cable managment. Can I please have your opinions on the way I did my extruder cables and if you see any issues? I mounted them using the two middle holes provided for the zip ties that hold the bearing in place... I slide two another zip ties facing towards the extruder simply to provide two loops so I can then zip tie around the cables providing a secure anchoring that does not cause any movement near the thermister or heat cartridge for the hot end. I think i may keep the cables running in front of the x carriage instead of it leaning towards the back of the carriage... either way have a look, i will update with another picture. Ok 4th picture is with cables going straight up, i moved the second zip tie around the front of the loop...
Please let me know what you think:
Edited 1 time(s). Last edit at 09/15/2014 11:02PM by Waltermixx.
Please let me know what you think:
Edited 1 time(s). Last edit at 09/15/2014 11:02PM by Waltermixx.
|
Re: Folger Prusa i3 Kit from ebay September 15, 2014 11:49PM |
Registered: 9 years ago Posts: 208 |
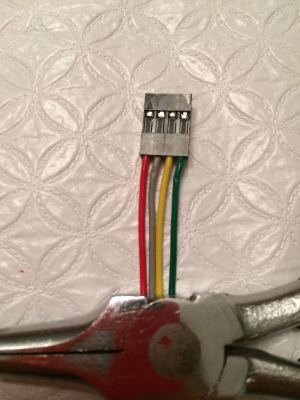
Next question, the order of the wires from the motor are: Green Grey Yellow Red (or Red, Yellow, Grey, Green) . The other end of the cables were loose and were not installed in the plastic 4 pin shell. My question is, in what order to I wire the pins into the plastic shell?
According the RAMPS 1.4 document on the Folger Google Drive, it indicates: Red, Grey, Yellow, Green, as pictured below... is this correct? HELP? Can you guys please let me know? Thank you
here is the link to their drive: [drive.google.com]
Cheers.
Edited 2 time(s). Last edit at 09/16/2014 12:39AM by Waltermixx.
According the RAMPS 1.4 document on the Folger Google Drive, it indicates: Red, Grey, Yellow, Green, as pictured below... is this correct? HELP? Can you guys please let me know? Thank you

here is the link to their drive: [drive.google.com]
Cheers.

Edited 2 time(s). Last edit at 09/16/2014 12:39AM by Waltermixx.
|
Re: Folger Prusa i3 Kit from ebay September 16, 2014 12:52AM |
Registered: 10 years ago Posts: 477 |
If you aren't sure you can use a multimeter to find the pairs. Low or no resistance indicate a pair, open circuit indicates its not a pair. Pairs go next to each other in the 4 pin connector.
Steve
My updated Instructable on our Prusa i3 Build
[www.instructables.com]
Steve
My updated Instructable on our Prusa i3 Build
[www.instructables.com]
|
Re: Folger Prusa i3 Kit from ebay September 16, 2014 01:11AM |
Registered: 9 years ago Posts: 208 |
Yup double checked with a multi-meter and i do have the pairs next to each other, and consistent across all 5 stepper motors. So that should help when connecting everything together... Thanks for the hint very much appreciated. Cheers. 
(very cool instructables article, i will check it out when it comes time to calibrate...)
Just wondering if others have wired their connectors the same way?
Edited 1 time(s). Last edit at 09/16/2014 01:18AM by Waltermixx.

(very cool instructables article, i will check it out when it comes time to calibrate...)
Just wondering if others have wired their connectors the same way?
Edited 1 time(s). Last edit at 09/16/2014 01:18AM by Waltermixx.
|
Re: Folger Prusa i3 Kit from ebay September 17, 2014 01:11AM |
Registered: 9 years ago Posts: 208 |
Made some more progress...
|
Re: Folger Prusa i3 Kit from ebay September 17, 2014 07:58AM |
Registered: 9 years ago Posts: 54 |
Looks like it's coming along really well! You must be pretty close to powering it up by now?
I've been building an enclosure using Elmers foam board that you can get at Walmart for $2 for a 20in x 30in sheet. It's surprisingly sturdy and very easy to work with while also looking nice. I'll post pictures when I'm done.
I've been building an enclosure using Elmers foam board that you can get at Walmart for $2 for a 20in x 30in sheet. It's surprisingly sturdy and very easy to work with while also looking nice. I'll post pictures when I'm done.
|
Re: Folger Prusa i3 Kit from ebay September 17, 2014 09:13AM |
Registered: 9 years ago Posts: 208 |
Yup i have the x,y,z axis steppers to do, then the extruder wires... but before i connect power I will measure the outgoing voltage of the power supply to make sure I'm only getting 12 volts...
The calibration part might be a bit of a nail biter, or a hair "puller outer" but I'm sure i will get through it.
Curious did your kit come with 2 white thicker gage wires, and 2 pairs of red and black? I used the white for the heated build plate, and will use the red and black for the two power runs.
I used the red and grey to extend the fan on the extruder, as well as the termister on the build plate. I also had to purchase a few more longer M3 bolts. I also have a question regarding
the heated build plate PCboard: mine is warped a bit, seems to bow in the middle... just wondering when you clamp the glass on it, does it straighten out at all, for good contact with the glass?
Cheers.
The calibration part might be a bit of a nail biter, or a hair "puller outer"
 but I'm sure i will get through it.
Curious did your kit come with 2 white thicker gage wires, and 2 pairs of red and black? I used the white for the heated build plate, and will use the red and black for the two power runs.
I used the red and grey to extend the fan on the extruder, as well as the termister on the build plate. I also had to purchase a few more longer M3 bolts. I also have a question regarding
the heated build plate PCboard: mine is warped a bit, seems to bow in the middle... just wondering when you clamp the glass on it, does it straighten out at all, for good contact with the glass?
Cheers.

|
Re: Folger Prusa i3 Kit from ebay September 17, 2014 09:44AM |
Registered: 9 years ago Posts: 54 |
There is a trim pot on the power supply that you should use to tune it to 12v.
I used my wires the exact same way you're describing, so you should be good there. I also had to buy several M3 screws, not sure how they were expecting it to go together without them.
My heated build plate was fairly straight but I know a lot of them are warped. The glass plate might even it out a bit, I wouldn't worry too much about it though.
|
Re: Folger Prusa i3 Kit from ebay September 17, 2014 10:35AM |
Registered: 9 years ago Posts: 58 |
|
Re: Folger Prusa i3 Kit from ebay September 18, 2014 09:01AM |
Registered: 9 years ago Posts: 208 |
I ended up moving my Y-Endstop to the Front of the printer like Dooms101. I did some reading and decided i wanted the rear right corner to be the 0,0,0 or Home. In order to make the Front Left corner the 0,0,0 Home, there would have been more work involved.... Plus i wanted to be consistant with the design. In order to use the end stop that i printed, i have to create a shim for the acrylic Y plate to hit the endstop mounted on the threaded rods, head on.
pictures to come, but if you check my flickr feed, you can see where I moved the Y-endstop to. My Flickr Feed
pictures to come, but if you check my flickr feed, you can see where I moved the Y-endstop to. My Flickr Feed
|
Re: Folger Prusa i3 Kit from ebay September 18, 2014 11:12AM |
Registered: 9 years ago Posts: 54 |
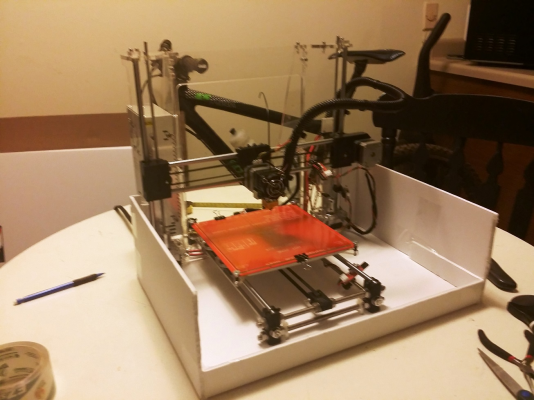
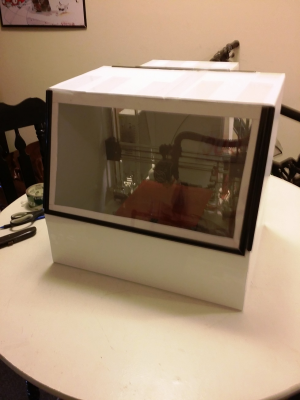
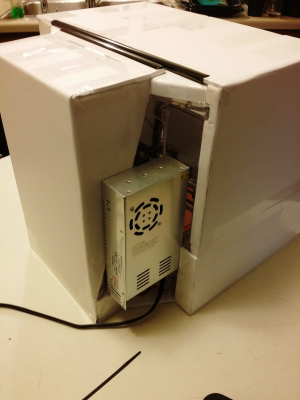
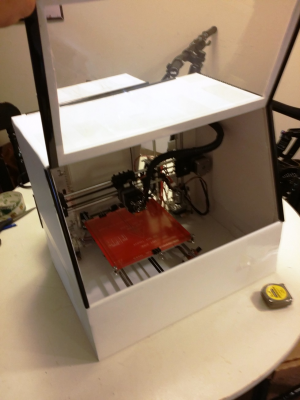
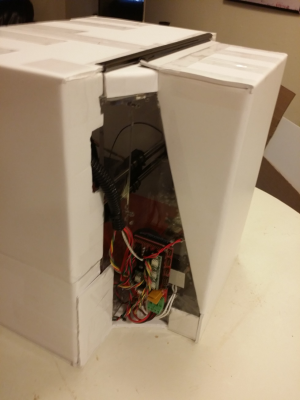
My enclosure is now complete (for the most part). Like I said in an earlier post, I made it from a poster frame and several large sheets of 3/8in Elmer's foam board, and a roll of clear packing tape that I got from Walmart for about $15. It turns out this foam board stuff is insanely easy to work with, insulates pretty well, looks good, and is a lot stronger than you'd think when it's folded.
I used two layers of the foam to build the bottom tray, which actually just the first layer was stiff enough to pick up the whole printer with. Now that there's two layers down there I can safely move the printer around without worrying about it.
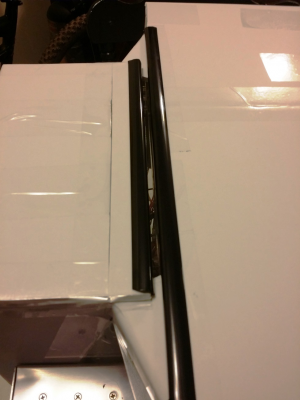
The front window was made using the poster frame. It's actually a double-pane window for better insulation. I was pretty surprised at how well this whole thing went together. Up at the top is a long slit with the poster frame side pieces used as guides on both sides for the filament feed. Eventually, I'll put a filament spool holder on the back or side.
Right now there isn't a means to monitor or control the internal temp. Right now I'm warming just the heated bed to see how hot it gets inside and it feels to be around 50C, so heating the extruder would probably get it even hotter. I might need to install a vent with a fan and a temperature probe so I can actively cool it using some custom code in Marlin.
|
Re: Folger Prusa i3 Kit from ebay September 18, 2014 11:56AM |
Registered: 9 years ago Posts: 208 |
Wow that's a great looking enclosure. I bet it's very effective.  I suspect it will be pretty warm in there... I was wondering if you had a chance to finalize your settings (configuration file) in Marlin? I would be curious to see how you have it all configured... and to be totally truthful it would help me a great deal with mine when I do get brave enough to power it on. I decided to put my prusa on a 1/2" piece of plywood, (18" X 20" a bit wider than neccessary so I have room for the lcd display that will be mounted on the plywood as well...) The cost for the plywood at home depot was $7.39 for a 24" x 24" piece which they cut down for me for free... i printed these clips at work to hold the printer in place without bending the rods:
[www.thingiverse.com]
[www.thingiverse.com]
along with this case and stand00 for the graphics LCD:
[www.thingiverse.com]
[www.thingiverse.com]
Edited 1 time(s). Last edit at 09/18/2014 11:58AM by Waltermixx.
 I suspect it will be pretty warm in there... I was wondering if you had a chance to finalize your settings (configuration file) in Marlin? I would be curious to see how you have it all configured... and to be totally truthful it would help me a great deal with mine when I do get brave enough to power it on. I decided to put my prusa on a 1/2" piece of plywood, (18" X 20" a bit wider than neccessary so I have room for the lcd display that will be mounted on the plywood as well...) The cost for the plywood at home depot was $7.39 for a 24" x 24" piece which they cut down for me for free... i printed these clips at work to hold the printer in place without bending the rods:
 [www.thingiverse.com]
[www.thingiverse.com]
along with this case and stand00 for the graphics LCD:
[www.thingiverse.com]
[www.thingiverse.com]
Edited 1 time(s). Last edit at 09/18/2014 11:58AM by Waltermixx.
|
Re: Folger Prusa i3 Kit from ebay September 18, 2014 12:37PM |
Registered: 9 years ago Posts: 54 |
Quote
Waltermixx
Wow that's a great looking enclosure. I bet it's very effective.I suspect it will be pretty warm in there... I was wondering if you had a chance to finalize your settings (configuration file) in Marlin? I would be curious to see how you have it all configured... and to be totally truthful it would help me a great deal with mine when I do get brave enough to power it on. I decided to put my prusa on a 1/2" piece of plywood, (18" X 20" a bit wider than neccessary so I have room for the lcd display that will be mounted on the plywood as well...) The cost for the plywood at home depot was $7.39 for a 24" x 24" piece which they cut down for me for free...
Looks nice and sturdy! Make sure you let us know how you like that LCD controller, I'm considering getting one for myself. The case for it looks really nice, too.
My Marlin settings aren't very stable at the moment, I'm still trying to figure out why I keep getting bad prints. I tried a small print this morning with the new enclosure and the enclosure helped with warping a lot but the print is till messy. I am going to try flashing the newest version of Marlin instead of the outdated one on Fogler's drive. I am also pretty sure Slic3r is at fault, it chooses some really strange tool paths and is horribly inconsistent. I'm going to try a different Slic3r program and see how that goes.
|
Re: Folger Prusa i3 Kit from ebay September 18, 2014 05:01PM |
Registered: 9 years ago Posts: 58 |
@Dooms101, Great idea for the enclosure. Do you have any pictures of your "messy" prints? It would be interesting to take a look at them.
Are you guys all considering (or using) Repetier Host as your host software? I am planning on trying that first when I get everything setup with this printer. My current printer uses custom software which is easy to use (so nice for my wife who doesn't care for the details) but lacks advanced settings for challenging prints.
If I determine I like the Folger printer I am highly considering buying a program called Simplify 3D which so far looks like it has some very impressive features and reviews. The ability to have different zones within a single print which can use different print settings looks very interesting.
|
Re: Folger Prusa i3 Kit from ebay September 18, 2014 10:56PM |
Registered: 9 years ago Posts: 54 |
Quote
czmorris
@Dooms101, Great idea for the enclosure. Do you have any pictures of your "messy" prints? It would be interesting to take a look at them.
Are you guys all considering (or using) Repetier Host as your host software? I am planning on trying that first when I get everything setup with this printer. My current printer uses custom software which is easy to use (so nice for my wife who doesn't care for the details) but lacks advanced settings for challenging prints.
If I determine I like the Folger printer I am highly considering buying a program called Simplify 3D which so far looks like it has some very impressive features and reviews. The ability to have different zones within a single print which can use different print settings looks very interesting.
Before you go spending money on a program, I'd try out RepetierHost using the CuraSlicer, I'm really really impressed with it so far. I've also heard good things about the MakerWare software.
Although I wouldn't really call RepetierHost the most user friendly, there's an overwhelming amount of options and settings. Once you get things setup it's fairly easy to use and the controls are laid out really nicely.
|
Re: Folger Prusa i3 Kit from ebay September 18, 2014 10:59PM |
Registered: 9 years ago Posts: 54 |
Okay, so I finally figured out what was wrong with my prints, I was simply using too high of a layer height at 0.4mm, going to 0.2mm gave me nice prints again. The enclosure helps a lot with keeping temps stable and makes warming up quicker but I don't think its really that necessary.
Anyways, I've attached my configuration file for the LATEST version of Marlin - not the one on the Folger drive folder. You can download the latest version of Marlin here.
Anyways, I've attached my configuration file for the LATEST version of Marlin - not the one on the Folger drive folder. You can download the latest version of Marlin here.
|
Re: Folger Prusa i3 Kit from ebay September 18, 2014 11:24PM |
Registered: 9 years ago Posts: 208 |
Thanks for the files, and the link  . So I'm almost done with my build. I've drilled some holes in the acrylic to guide wires, add zip ties, and to keep things neat. I wanted to wait and get some nice mesh wire wrap like Dooms101 has, but i was getting impatient... so I used zip ties to keep things together and tight... when I can, I will wrap the cables so it looks better, although it does not look too bad now.
I'm hoping this weekend to plug it in and program the arduino mega
here is my Prusa i3 pictures folder: [www.flickr.com]
Edited 2 time(s). Last edit at 09/18/2014 11:30PM by Waltermixx.
 . So I'm almost done with my build. I've drilled some holes in the acrylic to guide wires, add zip ties, and to keep things neat. I wanted to wait and get some nice mesh wire wrap like Dooms101 has, but i was getting impatient... so I used zip ties to keep things together and tight... when I can, I will wrap the cables so it looks better, although it does not look too bad now.
I'm hoping this weekend to plug it in and program the arduino mega

here is my Prusa i3 pictures folder: [www.flickr.com]
Edited 2 time(s). Last edit at 09/18/2014 11:30PM by Waltermixx.
|
Re: Folger Prusa i3 Kit from ebay September 19, 2014 09:29AM |
Registered: 9 years ago Posts: 208 |
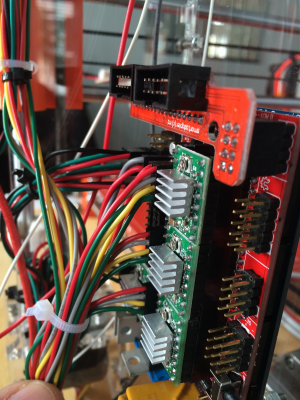
Dooms101, i was wondering if you could provide a close up shot of your ramps board. I am wondering where you connected the Fan from the extruder... the image on Folgers's google drive seems to indicate it's connected to the empty pololu socket? Also not sure if you saw my post a few days ago about the wiring of the Stepper motors:
how are yours done?
also when you plug it into the ramps board, which wire colour do you have closest to the top of the board, mine are red based on the order shown above. Red, Grey, Yellow, Green...
how are yours done?
also when you plug it into the ramps board, which wire colour do you have closest to the top of the board, mine are red based on the order shown above. Red, Grey, Yellow, Green...
|
Re: Folger Prusa i3 Kit from ebay September 19, 2014 09:39AM |
Registered: 9 years ago Posts: 54 |
The green and yellow wires need to be next to each other and the red and grey wires need to be next to each other. I put my green+yellow group on top of the RAMPS board which gave me correct orientation for the Marlin config file I posted earlier. However, your ordering will still work, you just need to reverse the direction in your Marlin config. Of course, just flipping the plug around works too.
It's hard to tell from the picture but the fan wires go into the bottom blue connections next to the bed heater connections. Make sure you get the polarity right.
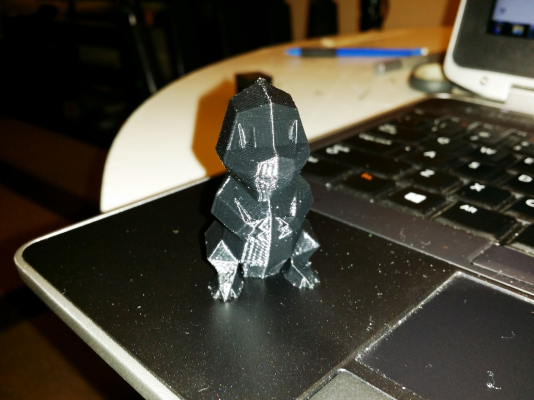
Also, here's my print from last night:
Using RepetierHost + CuraSlicer + Marlin made a really really nice print. It was also significantly faster than it was before I switched software. I compared it to some prints from a Markerbot and its right on par.
|
Re: Folger Prusa i3 Kit from ebay September 19, 2014 10:29AM |
Registered: 9 years ago Posts: 208 |
Your print looks great! very sharp. 
I think I will flip my plugs. within each pair, does it matter if it's Red, Grey or Grey Red? from the top, yours are Green, Yellow, Red Grey, when I flip my plug, mine will be Green, Yellow,Grey, Red, will that matter?
Hope I'm not being a pain...
Also I can see the polarity of the fan connector, looks like (+) Red is closer to the back of the unit (heat bed connection)
Edited 1 time(s). Last edit at 09/19/2014 10:30AM by Waltermixx.

I think I will flip my plugs. within each pair, does it matter if it's Red, Grey or Grey Red? from the top, yours are Green, Yellow, Red Grey, when I flip my plug, mine will be Green, Yellow,Grey, Red, will that matter?
Hope I'm not being a pain...

Also I can see the polarity of the fan connector, looks like (+) Red is closer to the back of the unit (heat bed connection)

Edited 1 time(s). Last edit at 09/19/2014 10:30AM by Waltermixx.
|
Re: Folger Prusa i3 Kit from ebay September 19, 2014 10:48AM |
Registered: 9 years ago Posts: 54 |
Quote
Waltermixx
Your print looks great! very sharp.
I think I will flip my plugs. within each pair, does it matter if it's Red, Grey or Grey Red? from the top, yours are Green, Yellow, Red Grey, when I flip my plug, mine will be Green, Yellow,Grey, Red, will that matter?
Hope I'm not being a pain...
Also I can see the polarity of the fan connector, looks like (+) Red is closer to the back of the unit (heat bed connection)
Thanks! I'm very relieved that I can finally get good prints. I was worried that I wouldn't find a solution to my crappy prints before.
The polarity of each wire within the group doesn't matter for the stepper motors. So red then grey is the same as grey then red.
For the fan wiring, positive is towards the right of the board and negative towards the left.
|
Re: Folger Prusa i3 Kit from ebay September 19, 2014 10:50AM |
Registered: 10 years ago Posts: 477 |
Quote
Waltermixx
Thanks for the files, and the link. So I'm almost done with my build. I've drilled some holes in the acrylic to guide wires, add zip ties, and to keep things neat. I wanted to wait and get some nice mesh wire wrap like Dooms101 has, but i was getting impatient... so I used zip ties to keep things together and tight... when I can, I will wrap the cables so it looks better, although it does not look too bad now.
I'm hoping this weekend to plug it in and program the arduino mega
here is my Prusa i3 pictures folder: [www.flickr.com]
Looks great, especially the very neat wiring looms.
Steve
|
Re: Folger Prusa i3 Kit from ebay September 19, 2014 03:46PM |
Registered: 9 years ago Posts: 208 |
Thanks Steve. And thank you Dooms101...  Everything is assembled and wired. I decided i would not reverse the stepper plugs at this point, as it will be a good for me to study the Configuration.h file so I can reverse it from there... plus it's all zip tied nice and neat. I will post a few more pictures, and then the real fun begins... I have my digital multimeter so I can adjust the ref voltage for the stepper drivers.
I hope I don't release the elusive magic blue smoke... I was pretty careful with the wiring...
A link to my Prusa i3 Flickr album. [www.flickr.com]
Cheers.
 Everything is assembled and wired. I decided i would not reverse the stepper plugs at this point, as it will be a good for me to study the Configuration.h file so I can reverse it from there... plus it's all zip tied nice and neat. I will post a few more pictures, and then the real fun begins... I have my digital multimeter so I can adjust the ref voltage for the stepper drivers.
 I hope I don't release the elusive magic blue smoke... I was pretty careful with the wiring...

A link to my Prusa i3 Flickr album. [www.flickr.com]
Cheers.

|
Re: Folger Prusa i3 Kit from ebay September 20, 2014 12:44AM |
Registered: 9 years ago Posts: 208 |
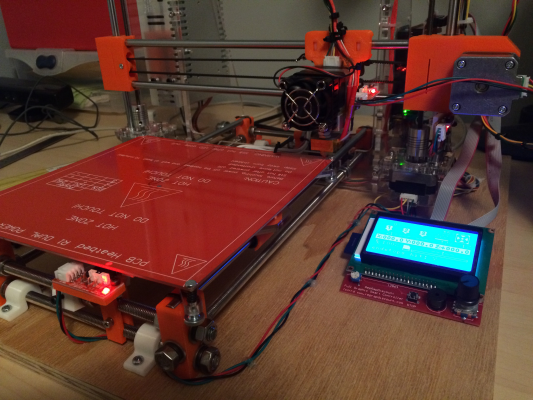
Ok plugged in and preliminary tests seem to be fine... i think i have an issue with my z axis... when i say go 100mm it goes more than that... the x and y seem to be perfect, but the z seems to go further than it's supposed to...  either way here is a picture of it up and running.
 either way here is a picture of it up and running.
|
Re: Folger Prusa i3 Kit from ebay September 20, 2014 12:57AM |
Registered: 9 years ago Posts: 54 |
|
Re: Folger Prusa i3 Kit from ebay September 20, 2014 01:07AM |
Registered: 9 years ago Posts: 208 |
|
Re: Folger Prusa i3 Kit from ebay September 20, 2014 01:21AM |
Registered: 9 years ago Posts: 208 |
|
Re: Folger Prusa i3 Kit from ebay September 20, 2014 12:18PM |
Registered: 9 years ago Posts: 208 |
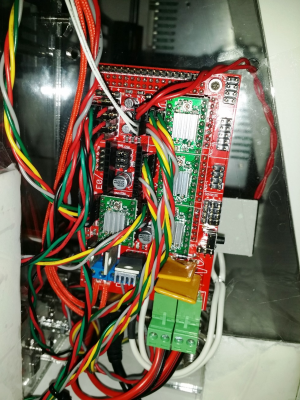
@ Dooms101 i noticed you put what looks like a stepper heat sink on your mos fet, very clever, are you blowing any air on them as well?
unfortunately my Folger kit was missing a heat sync from one of my stepper boards, so I dont have a spare to put on there...
but i should be going out today to look for something.
i will also be googling prusa i3 mosfet coolers to see what others have done... but i definately want to put some kind of heat sync on it,
I did putchase a 12 volt fan, so just have to get a mount for it...
unfortunately my Folger kit was missing a heat sync from one of my stepper boards, so I dont have a spare to put on there...
but i should be going out today to look for something.

i will also be googling prusa i3 mosfet coolers to see what others have done... but i definately want to put some kind of heat sync on it,
I did putchase a 12 volt fan, so just have to get a mount for it...
|
Re: Folger Prusa i3 Kit from ebay September 20, 2014 12:38PM |
Registered: 9 years ago Posts: 54 |
|
Re: Folger Prusa i3 Kit from ebay September 20, 2014 03:09PM |
Registered: 9 years ago Posts: 208 |
Thinking of using this between the heating plate and the acrylic Y-bed...
it's made of silicon, and I know there are silicon oven mitts, so I'm thinking this should
repel heat very well from the acrylic y-bed:
[www.walmart.com]
it's made of silicon, and I know there are silicon oven mitts, so I'm thinking this should
repel heat very well from the acrylic y-bed:
[www.walmart.com]
Sorry, only registered users may post in this forum.
