new to 3d printin looking to dive in
Posted by lokiwizz
|
Re: new to 3d printin looking to dive in April 25, 2015 08:12AM |
Registered: 9 years ago Posts: 48 |
|
Re: new to 3d printin looking to dive in April 27, 2015 03:32PM |
Registered: 9 years ago Posts: 48 |
All right, all parts came in all looks well. Started asm. Sunday so far all looks good. Only thing I have problems with so far is the linear(spelling) bearings some feel like crap. so will probably pick up some more also going to check smooth rod actual diameter. Other than that look forward to continuing the build progress.
|
Re: new to 3d printin looking to dive in April 28, 2015 01:39PM |
Registered: 9 years ago Posts: 131 |
|
Re: new to 3d printin looking to dive in April 28, 2015 03:06PM |
Registered: 9 years ago Posts: 48 |
|
Re: new to 3d printin looking to dive in April 29, 2015 09:13AM |
Registered: 9 years ago Posts: 48 |
|
Re: new to 3d printin looking to dive in April 29, 2015 10:04AM |
Registered: 9 years ago Posts: 131 |
Simplest solution would be similar to what I am doing. Ordered a chromed custom cut 8mm rod (or will tomorrow) from an eBay supplier from Canada. Should take about 6 days to come in. Total cost to me is around $40 US with shipping and two 8MM X 370MM rods. This should solve the problem. Also I understand the chromed rods are a bit more likely to last than the standard rods.
Other than that you could try finding the high end of the rods (a good caliper can help) and sand it down with 800 grit but that would be tedious to me. I'd much rather have my teeth pulled without Novocain than to spend time doing that.
Other than that you could try finding the high end of the rods (a good caliper can help) and sand it down with 800 grit but that would be tedious to me. I'd much rather have my teeth pulled without Novocain than to spend time doing that.
|
Re: new to 3d printin looking to dive in April 30, 2015 11:17AM |
Registered: 9 years ago Posts: 48 |
|
Re: new to 3d printin looking to dive in May 01, 2015 11:44AM |
Registered: 9 years ago Posts: 48 |
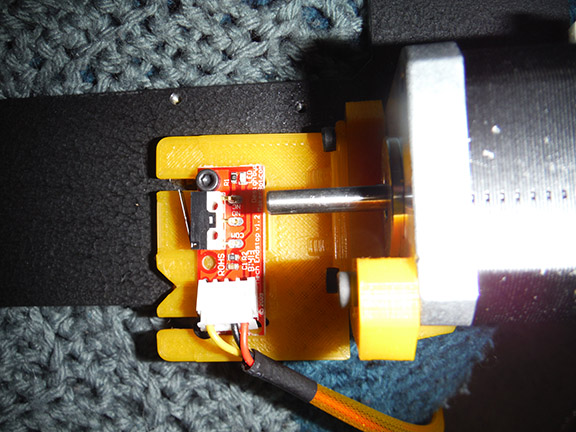
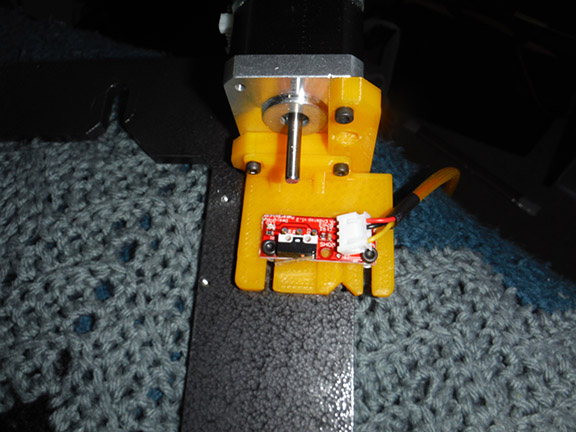
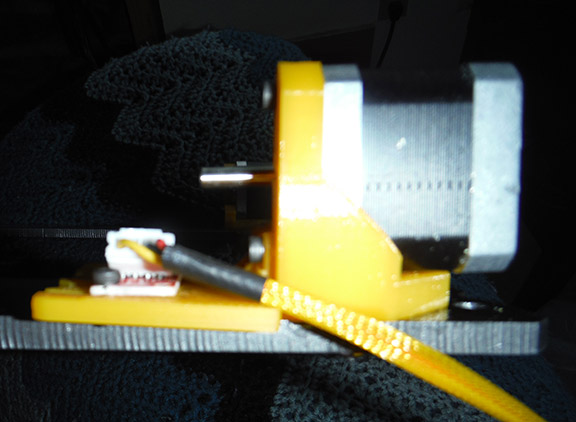
all right ran into another little snag last night, mounting the end stops. mine the connector is covering the mounting holes. im going to de-solder them and straiten the pins and re-solder them (basically rotate the connector 90 on the board).
the other problem is with this mount not clearing the x axis this one here haven't figured a workaround for this as my extruder is shorter than the average and needs to move down farther to be close to the bed. any ideas?
I will try some pics this weekend
the other problem is with this mount not clearing the x axis this one here haven't figured a workaround for this as my extruder is shorter than the average and needs to move down farther to be close to the bed. any ideas?
I will try some pics this weekend
|
Re: new to 3d printin looking to dive in May 01, 2015 11:59AM |
Registered: 9 years ago Posts: 131 |
I had the same problem with the end stops, I just slowly bent them up to 90 degrees. Seemed to work.
As far as a work around goes, my order of the plastic parts came with that connector as well as the rod connector for the end stops. Picture a plastic wire clamp that you screw into a frame to manage wiring. I'll be using that for the X axis as it seems to be the solution. That other piece is worthless to me as I had the same problem.
As far as a work around goes, my order of the plastic parts came with that connector as well as the rod connector for the end stops. Picture a plastic wire clamp that you screw into a frame to manage wiring. I'll be using that for the X axis as it seems to be the solution. That other piece is worthless to me as I had the same problem.
|
Re: new to 3d printin looking to dive in May 01, 2015 12:09PM |
Registered: 9 years ago Posts: 48 |
|
Re: new to 3d printin looking to dive in May 01, 2015 02:08PM |
Registered: 9 years ago Posts: 131 |
I tore my machine down... changed out some pieces and I'm putting it back together this week. I'll see if I can get it together and grab a shot.
I know this had me scratching my head for a bit. I'm assuming it's the Z axis that has you flustered?
Edited 2 time(s). Last edit at 05/01/2015 04:51PM by Viper97.
I know this had me scratching my head for a bit. I'm assuming it's the Z axis that has you flustered?
Edited 2 time(s). Last edit at 05/01/2015 04:51PM by Viper97.
|
Re: new to 3d printin looking to dive in May 01, 2015 05:43PM |
Registered: 9 years ago Posts: 48 |
|
Re: new to 3d printin looking to dive in May 03, 2015 08:44AM |
Registered: 9 years ago Posts: 48 |
Lititle update (sorry no pics yet) made up a harness for a stepper motor, connected heat bed and thermistor, hotend and thermistor, end stops, lcd screen, wired up the psu and tested everything. Psu working ramps/arduino look good also. Loaded the ramps test firmware to light the lights jog the steppers. Firth test of the stepper harness was a fail, the pin out I found for my motors was incorrect some quick mesurments with the dmm solved that. Moved on to test the other motors all of them jog.
Things left to do
Still need to mount end stops
Still Need to mount ramps/arduino
need to work on making more stepper harness
need to wire the fan
and lots more as I progress on
Things I'm un clear on
The lcd seems to be giving me some trouble as others have stated. Back light comes on but that's about it.
I have checked marlin firmware the lcd is un commented, don't remember the exact name but it's the discount smart lcd line. Have checked the ribbons from board to board, to voltage mesurment for contrast it was around 4v. I added the u8lib or something like that can't remember the exact name but it's the one reprap.org
tells you to add to your library folder. This is where I'm un clear, I don't see any mention of it in the firmware (the vanilla marlin or the one folger tech supplied me with in the kit). Is there not a line of code to include the usage of said library?
Other things left to test
Temp sensors
end stops (once mounted)
and probably more.
OK my little update turned into a long post
thanks for all help and advice
as always have fun and stay safe
Chris
|
Re: new to 3d printin looking to dive in May 03, 2015 12:33PM |
Registered: 9 years ago Posts: 131 |
Okay I figured out the Z stop holder (plate style), I changed the bolts to M3X8mm and I've got clearance from the frame. I then used M3X16mm screws to fasten it to the motor.
|
Re: new to 3d printin looking to dive in May 03, 2015 07:18PM |
Registered: 9 years ago Posts: 48 |
Ok thanks looks like i will be heading to the hardware store for some m3x8mm
On a side note i have confirmed my lcd working with the examples in the u8glib by adding this line of code ( U8GLIB_ST7920_128X64_1X u8g(23, 17, 16); // SPI Com: SCK = en = 23, MOSI = rw = 17, CS = di = 16 ) as seen here youtube video on this set up. I also have it working in vanilla marlin 1.0.2 by setting the board to the correct ramps board (33) or ( #define MOTHERBOARD BOARD_RAMPS_13_EFB )
then un-commenting ( #define SDSUPPORT // Enable SD Card Support in Hardware Console ) and ( #define REPRAP_DISCOUNT_FULL_GRAPHIC_SMART_CONTROLLER )
the sd support is in my folger tech firmware but the reprap discount full graphic smart controller is missing along with other .h files that may or may not be necessary for operation
I am trying to decide if i modify the folger tech firmware to support the lcd or modify the vanilla marlin firmware to support my hardware. the folger tech firmware is all ready set up for a I3 model
im asumming the vanilla marlin is just ganeric and would need all that set up.
here is a link to the folger tech files and set up folger tech
what to do what to do!
what are you guys thoughts on this
|
Re: new to 3d printin looking to dive in May 04, 2015 10:59AM |
Registered: 9 years ago Posts: 131 |
|
Re: new to 3d printin looking to dive in May 04, 2015 07:57PM |
Registered: 9 years ago Posts: 48 |
Yes that's what my thought process was as well.
This is beginning to be two steps forward one step back
got marlin all set up hooked all the electronics up to test again. Found that my motors are not moving as should.
think my harness my be wrong after all. When I comm and any motor to move it just jitters back and forth never moves in one direction. The pin out for my motors is not listed as 1a, 2a, 1b, 2b but rather a, then a, with a line under it and so on for b. My thought was that a1, is a, a2 is a, with the line under it. Could I be wrong here or do you guys think it my be something else? could i have 4 bad stepper drivers or blown by me? how would one test for a blown driver?
Edited 1 time(s). Last edit at 05/04/2015 08:29PM by lokiwizz.
|
Re: new to 3d printin looking to dive in May 04, 2015 09:17PM |
Registered: 9 years ago Posts: 131 |
I wouldn't think they were blown. The odds are against it. There are two coils and you can test them by measuring the ohms. If it's 0 or there about then you have a match, if it's infinite then try another wire. Once you have a pair, then you need to figure out which is + and which is - then you can connect them to the ramp and see if it moves the axis. If it's opposite of what you expected reverse the leads and try again, that should solve it. Then do the same for the next two pairs. Once you figure out one, you pretty much nailed the rest.
|
Re: new to 3d printin looking to dive in May 04, 2015 09:33PM |
Registered: 11 years ago Posts: 469 |
Easiest way to test is to use the test Marlin firmware to see if your motors work.
Remember before loading to put your X& Y carriages in the middle of their travel and the Z at least 20 mm off the bed. The test software doesnt look at endstops or anything else just runs the motors backwards and forwards.
test code
Its unlikely ( but not impossible) you have blown all 4 drivers. It sounds more like the drivers are set too low.
with the test software running try and adjust the potentiometer on the driver clockwise to increase the motor current so it runs.
Each stepper motor contains 2 coils and in your case a & a are the same as 1a & 2a . Same for b
good luck
|
Re: new to 3d printin looking to dive in May 04, 2015 09:49PM |
Registered: 9 years ago Posts: 48 |
Quote
bigfilsing
Easiest way to test is to use the test Marlin firmware to see if your motors work.
Remember before loading to put your X& Y carriages in the middle of their travel and the Z at least 20 mm off the bed. The test software doesnt look at endstops or anything else just runs the motors backwards and forwards.
test code
Its unlikely ( but not impossible) you have blown all 4 drivers. It sounds more like the drivers are set too low.
with the test software running try and adjust the potentiometer on the driver clockwise to increase the motor current so it runs.
Each stepper motor contains 2 coils and in your case a & a are the same as 1a & 2a . Same for b
good luck
thanks for the reply so quick i have the test firmware and was using it. i have used a digital multi meter to test the wires all that checks out.
i did try increasing the voltage/amps to the motors while checking it with the meter they were reading 520mv and i stepped up slowly to 1.2v no change in motor behavior.
it would be nice if i had a o scope to see what im getting from them( should be a square wave i think) as im starting to think there bad or i killed them.
side note no other way to test for bad stepper drivers is there
quick question could not having anything connected to the ramps connector for each driver and powering it on damage the drivers or plugging and un plugging them while powered on.
|
Re: new to 3d printin looking to dive in May 04, 2015 10:20PM |
Registered: 11 years ago Posts: 469 |
Ive never had a problem with not having a stepper motor actually connected.
Pluggin in or out while powered is a definite NO NO !! As the drivers are current regulators the spikes caused when pluggin in/out while powered can cause fatal damage.
I would order a new set if i were you. Even if you resolve your issue, a set of spares isnt a bad thing
There's no real way of testing the drivers functionality without a scope im afraid.
In most cases ive seen ( or heard of) when theyre blown they do nothing at all. So considering your motors jitter still has me thinking theres a small chance that something else is going on here.
If you have a bread board you can wire them to a stepper and test that way with the arduino stepper library and anyone of the many stepper sketches.
|
Re: new to 3d printin looking to dive in May 05, 2015 03:18AM |
Registered: 8 years ago Posts: 5,232 |
Hi all,
I´m new to the prusa world but have played around with steppers before.
@Chris
Are you sure, you have the PSU and ramps/megaboard connected the right way? You mentioned some voltage readouts, while turning up the current potmeter. They seemed pretty low.
Of course youre getting a PWM sort of signal which lowers the readout on a DMM, but I think it is worth checking the power-wiring again. Does the jitter feel strong or is it more like a weak humming?
The other thing about finding the good 4 wires is, you have to read the ohms after the current has settled. Two of the three "A" wires should read a high value, while the obsolete wire reads only half the resistance. Same for "B" ofcourse...
If you feel the steppers move strong, but only jitters back and forth, you should switch only A or B wires, not both pairs at the same time.
Sorry, if I bothered you with too many stupid details, but better write too much than not enough
Greetings from Germany
Olaf
|
Re: new to 3d printin looking to dive in May 05, 2015 07:54AM |
Registered: 9 years ago Posts: 48 |
Thanks guys all of these questions/suggestions are welcome. I will ohm the motor again tonight and post back the findings, I do have them wired a to a1, a- to a2,
b to b1, b- to b2. The other two wires are labeled com and took them to be the center tap on my unipoler steppers. I don't believe the power wireing to be the problem as it is wired just like the ramps scimatics show
with the two 12v rails. I will be picking up some new drivers as I feel that I may have dameged them. If I have not then spare parts is never a bad idea. will wait till after I post the findings of ohm n the motors to test them on a bread board in fear of further damage. I would like to hammer out the motor wireing first As the problem.
If there is any other ideas or suggestions pls feel free to post.
again thanks for the help
|
Re: new to 3d printin looking to dive in May 05, 2015 07:56AM |
Registered: 9 years ago Posts: 48 |
|
Re: new to 3d printin looking to dive in May 05, 2015 08:43AM |
Registered: 8 years ago Posts: 5,232 |
|
Re: new to 3d printin looking to dive in May 05, 2015 12:44PM |
Registered: 9 years ago Posts: 48 |
the voltages on the steppers I thought were correct, that's why i did not think the the psu wiring was at falt.
Little update on the motor wiring (A1 is to A) (A2 is to A) and so on for the B side.
Now i ohm'd them on my lunch break (I love living close to work) (A1 to A2) = 12ohm's and (A1 or A2 to com = 6ohm's), and is identical for the other coil (B side)
here is a link to the data sheet on my motors.
and the specs as listed on the sellers description from ebay
Parameters:
Current up to 1.2A
Voltage will work with power supply up to 36VDC
1.8 deg / step
6 wire connection uni-polar or 4 wire connection bi-polar
width 42mm x 42mm
total length of 44 mm with damper 50
5 mm diameter shafts
shafts length 20mm
Weight 12 oz.
Connection wires provided from 2” to 6”
PIN1= B-
COMMON
PIN3= B
PIN4= A
COMMON
PIN6= A-
What are you guys thoughts given this info?
im thinking i killed my drivers ( I dont think i will ever graduate from the school of hard knocks)
|
Re: new to 3d printin looking to dive in May 05, 2015 02:16PM |
Registered: 9 years ago Posts: 48 |

|
Re: new to 3d printin looking to dive in May 05, 2015 09:42PM |
Registered: 11 years ago Posts: 469 |
The stepper motor info seems to be pretty straight forward and as expected
do all the stepper motors jitter the same way when you try to move them ? Im just thinking its unlikely that all the drivers are "blown" in the same way.
In my experience they just dont work at all when blown.
Are you absolutely sure your 12 V power supply is good and doesn't collapse under load or something.
|
Re: new to 3d printin looking to dive in May 06, 2015 02:59AM |
Registered: 8 years ago Posts: 5,232 |
How are the odds for buying steppers nowadays, that are NOT able to do 1/16 microsteps?
Background: I sourced my steppers I used to play with from old copymachines. They hardly do 1/2 steps, better use fullsteps only....
Just thinking out of the box
Olaf
PS: Did you try to reduce speed and acceleration settings?
Edited 1 time(s). Last edit at 05/06/2015 03:00AM by o_lampe.
Background: I sourced my steppers I used to play with from old copymachines. They hardly do 1/2 steps, better use fullsteps only....
Just thinking out of the box
Olaf
PS: Did you try to reduce speed and acceleration settings?
Edited 1 time(s). Last edit at 05/06/2015 03:00AM by o_lampe.
|
Re: new to 3d printin looking to dive in May 06, 2015 07:15AM |
Registered: 9 years ago Posts: 48 |
Allright guys all these are valid points.
at this point I have not tested every motor.
but two motors act the same when plugged in to any of the drivers. As for steps or speed I have not changed them. the power supply I'm un certain on an explication on how to test for that would be greatly appreciated.
The replacement parts should be in today along with the osiliscope so I will check the drivers before trying a new one.
Buying 4 bad drivers is unlikely but damaging 4 drivers from hot swapping the motor harness I think is in the realm
of possibilities


Sorry, only registered users may post in this forum.