Migbot Prusa i3 Unofficial Support Thread
Posted by jcabrer
|
Re: Migbot Prusa i3 Unofficial Support Thread January 18, 2016 11:32AM |
Registered: 8 years ago Posts: 38 |
Quote
Wes78
well what you do is..... watch this. it helped me ALOT!
[www.youtube.com]
if you have auto-lvl watch this one too
[www.youtube.com]
Tom has good videos... watch them ....ALL...
Thanks, Wes78, I will try this out tonight! I got a little closer with my own methods last night but hopefully this video will help me finalize it.
The auto-leveler video is interesting, I need to get one of those sometime soon! I will likely check out Tom's videos as I get more acclimated to the machine and to printing in general.
Edited 1 time(s). Last edit at 01/18/2016 11:38AM by AccidentalWisdom.
|
Re: Migbot Prusa i3 Unofficial Support Thread January 18, 2016 12:12PM |
Registered: 8 years ago Posts: 103 |
Quote
AccidentalWisdom
Quote
Wes78
well what you do is..... watch this. it helped me ALOT!
[www.youtube.com]
if you have auto-lvl watch this one too
[www.youtube.com]
Tom has good videos... watch them ....ALL...
Thanks, Wes78, I will try this out tonight! I got a little closer with my own methods last night but hopefully this video will help me finalize it.
The auto-leveler video is interesting, I need to get one of those sometime soon! I will likely check out Tom's videos as I get more acclimated to the machine and to printing in general.
No problem at all!
Auto leveling is the only way to go makes life so much easier,
I would defiantly try to make time to see some of his videos this play list here has a lot of good info for someone starting out and setting up a 3D printer
[www.youtube.com]
|
Re: Migbot Prusa i3 Unofficial Support Thread January 18, 2016 01:23PM |
Registered: 8 years ago Posts: 38 |
Quote
Wes78
Quote
AccidentalWisdom
Quote
Wes78
well what you do is..... watch this. it helped me ALOT!
[www.youtube.com]
if you have auto-lvl watch this one too
[www.youtube.com]
Tom has good videos... watch them ....ALL...
Thanks, Wes78, I will try this out tonight! I got a little closer with my own methods last night but hopefully this video will help me finalize it.
The auto-leveler video is interesting, I need to get one of those sometime soon! I will likely check out Tom's videos as I get more acclimated to the machine and to printing in general.
No problem at all!
Auto leveling is the only way to go makes life so much easier,
I would defiantly try to make time to see some of his videos this play list here has a lot of good info for someone starting out and setting up a 3D printer
[www.youtube.com]
Any idea where I can get the auto-leveler for the Migbot? I got the kit through a friend of mine that is a skilled tinkerer, not directly. No idea where he got it from. Do you have links to a place that I can purchase the little green auto-leveler I see in posts and other parts for the Migbot?
|
Re: Migbot Prusa i3 Unofficial Support Thread January 18, 2016 01:26PM |
Registered: 8 years ago Posts: 103 |
get you something like this [www.ebay.com]
and print you off a holder, something like this [www.thingiverse.com]
not sure where to get the green one from, ill have to look at the numbers on it and see if i can find one
Edited 1 time(s). Last edit at 01/18/2016 01:29PM by Wes78.
and print you off a holder, something like this [www.thingiverse.com]
not sure where to get the green one from, ill have to look at the numbers on it and see if i can find one
Edited 1 time(s). Last edit at 01/18/2016 01:29PM by Wes78.
|
Re: Migbot Prusa i3 Unofficial Support Thread January 18, 2016 05:09PM |
Registered: 8 years ago Posts: 111 |
|
Re: Migbot Prusa i3 Unofficial Support Thread January 18, 2016 05:13PM |
Registered: 8 years ago Posts: 103 |
Quote
Wes78
Quote
spinracing
Heya all,
Have a few pics of the larger bed I made up, with the much stiffer carriage.
Also a quick end stop for the y axis, as the switch being on the carriage, it never seemed to have the right distance. SO I measured, and whipped up a quick block with a hole and zip tied it to my Y axis Motor.
Y Axis End stop. Dropbox
Original Table, "Large size" of the electron Migbot.
The number one problem... when the auto leveler tries to run it goes off the back of the table. SO you cant use it all. Dropbox
This is the size difference between tables. The new table is around .5 inches longer on the near end. And as you can see a few inches longer on the far end. Allowing the autolevel sensor to function, AND to be able to use all of the available table. (250mm by 200mm usable print area now) Dropbox
End view of the table and carriage. The table was 5/8 T-6 6061. Milled out to the channel to keep rigidity lengthwise. Carriage was 1/2 inch, but I machined it down a decent amount. It is also 6061. Dropbox
Two pics of the carriage.
I left the thicker edges not only for rigidity, but if I decided to go with larger rails, and or a second bearing on the right side, I wanted to have material to mount wherever needed.
Also the original plan was to add a ballscrew, but I think I will go to a much larger y axis travel so may so something different (but still ballscrew)
Dropbox
Dropbox
I made an Y Axis End stop bracket as well, It fits on the back side of the printer over the top of the y axis smooth rod hole.
when its homed its hit the switch on the edge of the black carriage (or alum if you have it)
Anyway it might work better for you as Its bolted to the printer, when i get home ill post pic.
If you or anyone else interested in it ill post the stl file on thingiverse
Here are those pictures
[www.dropbox.com]
|
Re: Migbot Prusa i3 Unofficial Support Thread January 18, 2016 10:25PM |
Registered: 8 years ago Posts: 38 |
Quote
Wes78
get you something like this [www.ebay.com]
and print you off a holder, something like this [www.thingiverse.com]
not sure where to get the green one from, ill have to look at the numbers on it and see if i can find one
Yeah, I definitely want an auto leveler. However, I think I have solved the issue manually, for now, just to find new problems.
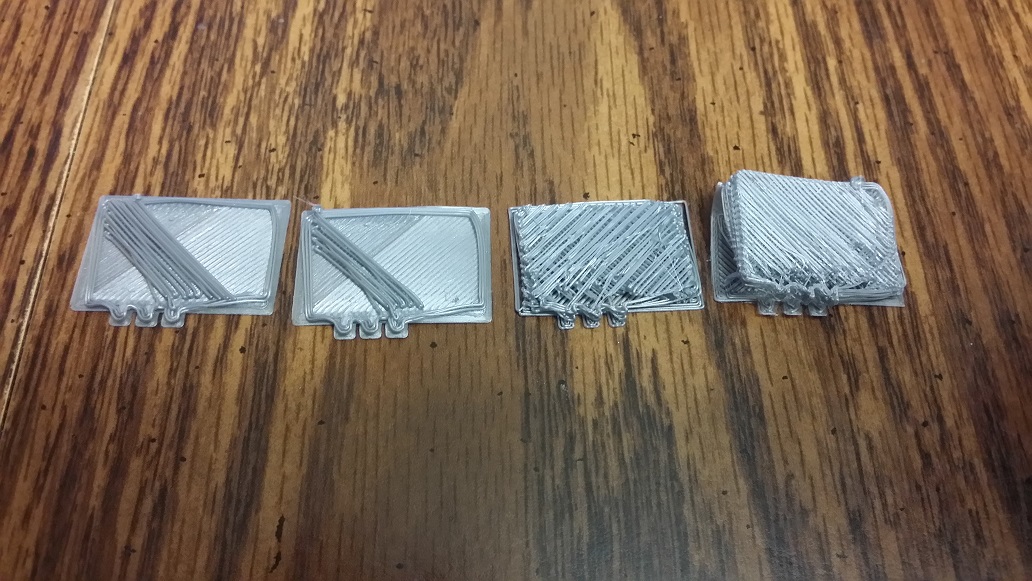
So the bottom layer is adhering very well to the bed. Right now I am printing the bottom later at 10 mm/s, and subsequent layers at 30 mm/s. However, after the intial layer is complete, I think there are multiple problems.
The initial layer finishes (quite well, very close to perfect), but then the subsequent layers look awful and don't really attach to the initial layer or each other. They are very sloppy and there seems to also be too much space between each line as well. Based on a little bit of research on Simplify3D's Print Quality page, it sounds to me like a combination of Layer Separation and Under-Extrusion. Picture attached.
I have tried Layer Heights of .1, .2, and .3, and several different speeds. My nozzle temperature has always been set at the recommended 210C for PLA. Should I increase this, perhaps? Any other ideas?
|
Re: Migbot Prusa i3 Unofficial Support Thread January 19, 2016 12:01AM |
Registered: 8 years ago Posts: 16 |
AccidentalWisdom,
Looks like
1. Your Z-Gap is way too high. The reason your first layer seems to coming out fine is probably due to the "First Layer Height" is "squishing" the print a lot. However, on the second and subsequent layers, it goes back to 100%... and there is too much separation between your layers.
2. You are printing relatively slow. Which, in general would not be a terrible thing. Unless your cooling fan is set at a high speed (like 80% to 100%"). This would "over-cool" your filament and not allow it to "stick".
Try adjusting your Gap a bit tighter... but set the "First Layer Height" at somewhere between 80% and 90%.
We tend to print at around 4,800 mm/min (80 mm/sec)... with the first layer height at 80% and first layer speed of 40%.
Good luck!
Jacob
3DSysTech / 3DMAGINE
|
Re: Migbot Prusa i3 Unofficial Support Thread January 19, 2016 08:32AM |
Registered: 8 years ago Posts: 111 |
I have my machine slowed WAY down in the firmware and print speed set to 60 mm/sec, to the point it takes almost 30 hrs to do a 23 hr print (per Cura). However, quality is high for the machine that it is. The Migbot is a good machine, but it does take a lot of work to get all the bugs out, and it can be quite finicky.

|
Re: Migbot Prusa i3 Unofficial Support Thread January 19, 2016 09:51AM |
Registered: 8 years ago Posts: 11 |
Thanks Wes78, nice idea on dropping it outside the frame.
The only issue I might have with that is enlarging the frame may require something different.
In relation to the proximity/auto leveler... I have the one that they sold at the 3dprintersonlinestorethingplace. Its green and electronic. I love it.... works fantastic.
BUT. The one issue I think that we (collectively) should consider.
The further from the print head, the less accuracy if the table is not perfectly level.
The offset sensor can limit available bed size, and measurement.
If you consider the factory leveler that I got... when I went to use it after putting in my table size properly.. it drove the Y axis right up to its proper distance.. then the Z axis went right down against the table and bound up. Because the sensor was off the table. (As you see as a recurring theme all over the forum, and everywhere else) There are many solutions, from small printed parts with metal tape, to tinfoil, the works.
Which all defeat the accuracy of the sensor measuring to the TABLE... not a part hanging off it.
A larger table, or glass print surface with some foil on it, is a perfectly fine solution. BUT.... keeping that sensor close to the nozzle is always something to think of.
In a perfect universe.. I would want a larger X axis, and a dual extruder with sensor between them, for the best average height measurements.
|
Re: Migbot Prusa i3 Unofficial Support Thread January 20, 2016 07:52PM |
Registered: 8 years ago Posts: 38 |
Quote
3DST
AccidentalWisdom,
Looks like
1. Your Z-Gap is way too high. The reason your first layer seems to coming out fine is probably due to the "First Layer Height" is "squishing" the print a lot. However, on the second and subsequent layers, it goes back to 100%... and there is too much separation between your layers.
2. You are printing relatively slow. Which, in general would not be a terrible thing. Unless your cooling fan is set at a high speed (like 80% to 100%"). This would "over-cool" your filament and not allow it to "stick".
Try adjusting your Gap a bit tighter... but set the "First Layer Height" at somewhere between 80% and 90%.
We tend to print at around 4,800 mm/min (80 mm/sec)... with the first layer height at 80% and first layer speed of 40%.
Good luck!
Jacob
3DSysTech / 3DMAGINE
Hi Jacob and all,
Thanks for the suggestions, they make sense. In #1, I think you are saying that my Z "Home" is off, right? Even if that wasn't what you were saying, it was true, haha. I fixed the Z Limit Switch on the machine so that the initial layer is no longer squished. To do this, I used Cura to send the Z Axis to "Home" position and noticed it jammed into the bed by .1 or .2 mm. So I kept raising it, playing with the position of the Z Limit Switch, then sending it "Home" again until I got it to a point where it was just ever so slightly pressing against a single sheet of standard printer paper. Good? If this isn't what you meant, can you let me know what you mean by Z-Gap?
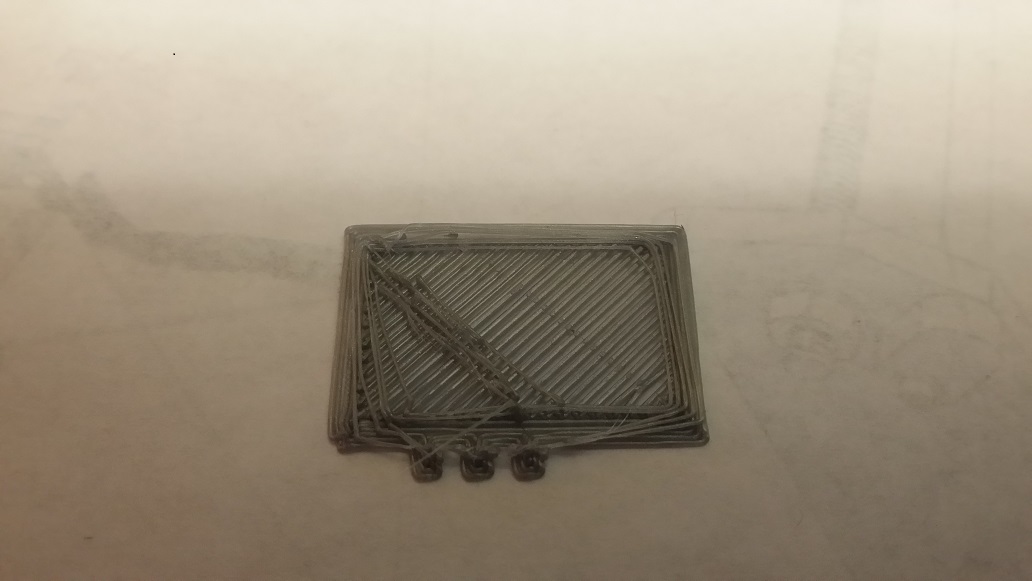
I also reduced my fan speed from 100% to 60%. Now, the initial layer prints ok, but for each line of filament there is an equal width of empty space between (see picture attached). In addition, the subsequent layers still don't adhere well to the initial layers.
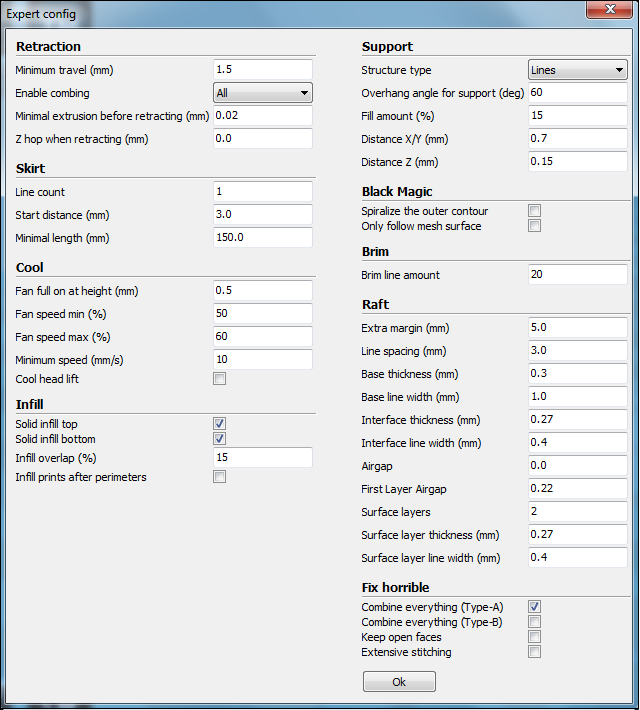
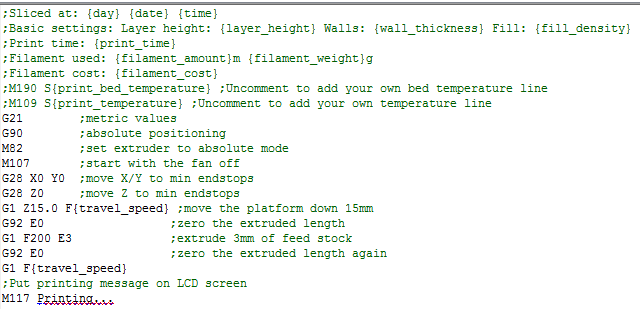
Attached is a picture of the most recent print result, along with my Cura settings for the Basic, Advanced, Fan, G-Code and Expert sections. Any suggestions on these settings? Do I have something set way off or is it possible there is an issue with the printer itself, its firmware or some defect in my assembly attempt?
Other relevant bits of info:
This is what I am trying to print, as a test piece: [fatdragongames.proboards.com]
I have the printer inside a box made of insulation foam, open at the front (for now), to keep breezes at a minimum.
I prime the printer bed with hairspray (smells pretty fantastic), my friend said that helps the filament to adhere much better than without.
The temp of my house is around 68F.
I have the filament spool on a dowel, suspended above the printer, with almost no tension so it spins very easy.
Edited 2 time(s). Last edit at 01/20/2016 07:57PM by AccidentalWisdom.
|
Re: Migbot Prusa i3 Unofficial Support Thread January 20, 2016 09:51PM |
Registered: 8 years ago Posts: 269 |
Couple of quick updates for you.. I've got the 3rd Migbot semi-running, it's had a couple of test cubes off it, so many niggles but I'll be running a #3DBenchy tomorrow. However, things I've discovered about my E3D mount and extended sensor are that they were weak and can snap if they crash into the bed and you don't get to the reset quick enough. So I've strengthened the mounts up and now they're rock solid. My second Migbot has developed a habit of pinging the Y axis belt, I re-printed the clip, but it was far too tight and stuffing the belt in, it doesn't go all the way in, so I've modified the clip to become a clamp. It's now in 2 pieces and is secured with an M3 bolt in the centre. No more slipping belts..
Both are up on Thingiverse:
Y Axis Clamp
E3D Mount
Both are up on Thingiverse:
Y Axis Clamp
E3D Mount
|
Re: Migbot Prusa i3 Unofficial Support Thread January 21, 2016 12:23AM |
Registered: 9 years ago Posts: 112 |
|
Re: Migbot Prusa i3 Unofficial Support Thread January 21, 2016 03:54AM |
Registered: 8 years ago Posts: 269 |
Quote
evetanlm
any one out there know migbot z axis gear ratio? please kindly let me know, anyone that willing to help? please appreciate anyone that can help!
I think it's a 8mm/revolution 2mm pitch leadscrew, as that gets you very close to the standard steps/mm in the firmware using the Prusa Calculator.
|
Re: Migbot Prusa i3 Unofficial Support Thread January 21, 2016 06:56AM |
Registered: 8 years ago Posts: 111 |
Quote
AccidentalWisdom
Quote
3DST
AccidentalWisdom,
Looks like
1. Your Z-Gap is way too high. The reason your first layer seems to coming out fine is probably due to the "First Layer Height" is "squishing" the print a lot. However, on the second and subsequent layers, it goes back to 100%... and there is too much separation between your layers.
2. You are printing relatively slow. Which, in general would not be a terrible thing. Unless your cooling fan is set at a high speed (like 80% to 100%"). This would "over-cool" your filament and not allow it to "stick".
Try adjusting your Gap a bit tighter... but set the "First Layer Height" at somewhere between 80% and 90%.
We tend to print at around 4,800 mm/min (80 mm/sec)... with the first layer height at 80% and first layer speed of 40%.
Good luck!
Jacob
3DSysTech / 3DMAGINE
Hi Jacob and all,
Thanks for the suggestions, they make sense. In #1, I think you are saying that my Z "Home" is off, right? Even if that wasn't what you were saying, it was true, haha. I fixed the Z Limit Switch on the machine so that the initial layer is no longer squished. To do this, I used Cura to send the Z Axis to "Home" position and noticed it jammed into the bed by .1 or .2 mm. So I kept raising it, playing with the position of the Z Limit Switch, then sending it "Home" again until I got it to a point where it was just ever so slightly pressing against a single sheet of standard printer paper. Good? If this isn't what you meant, can you let me know what you mean by Z-Gap?
I also reduced my fan speed from 100% to 60%. Now, the initial layer prints ok, but for each line of filament there is an equal width of empty space between (see picture attached). In addition, the subsequent layers still don't adhere well to the initial layers.
Attached is a picture of the most recent print result, along with my Cura settings for the Basic, Advanced, Fan, G-Code and Expert sections. Any suggestions on these settings? Do I have something set way off or is it possible there is an issue with the printer itself, its firmware or some defect in my assembly attempt?
Other relevant bits of info:
This is what I am trying to print, as a test piece: [fatdragongames.proboards.com]
I have the printer inside a box made of insulation foam, open at the front (for now), to keep breezes at a minimum.
I prime the printer bed with hairspray (smells pretty fantastic), my friend said that helps the filament to adhere much better than without.
The temp of my house is around 68F.
I have the filament spool on a dowel, suspended above the printer, with almost no tension so it spins very easy.
Attatched is my configuration.h file I use. It slows the printer way down, enables setting adjustments from the LCD, etc. and I have had great success with it. It is setup for Auto Bed Leveling awesomeness, so be aware of that. Back up your old file, and give it a try.
If you are using PLA, you don't need the enclosure or hairspray. I have found regular old blue painter tape works just fine.
All my Cura settings are exactly as Migbot said they should be.
Make sure you have the nozzle height adjusted properly, and bed leveled.
Just trying to help.
EDIT: Something I noticed while looking at your settings. Under Advanced > Speed, I noticed all your speeds are set to 0.0. Mine are: Travel Speed 100.0, bottom Layer 20, Infill 80, Outer Shell 20, Inner shell 40. Put those in and see what happens.
Edited 1 time(s). Last edit at 01/21/2016 07:03AM by veaceonee.
|
Re: Migbot Prusa i3 Unofficial Support Thread January 21, 2016 07:23AM |
Registered: 8 years ago Posts: 103 |
blue painter tape dose work great soas long as you dont heat the bed, in my experience ive found that the tape dont stick well at all when the bed is hot,
this maybe partly due to the filament that im using, that is Makergeeks pla abs and petg, (blue tape with pla only) the pla the extruder temp is higher then most pla's run it around 225-230c so with that i run the bed around 65-70c being that hot blue tape dont stick gets gummy, anyway what i found works best is water down "extra hold" Elmer's glue. i almost cant get the prints off the bed... until the temp is below 50c at 35-40c they will pop right off
makergeeks filament is pretty good stuff, its made in the usa, has free shipping and is very well priced
[www.makergeeks.com]
Edit: I do have Kapton on top the alum bed
[www.amazon.com]
Edited 2 time(s). Last edit at 01/21/2016 07:41AM by Wes78.
|
Re: Migbot Prusa i3 Unofficial Support Thread January 21, 2016 11:09AM |
Registered: 8 years ago Posts: 38 |
Quote
Veaceonee
Attatched is my configuration.h file I use. It slows the printer way down, enables setting adjustments from the LCD, etc. and I have had great success with it. It is setup for Auto Bed Leveling awesomeness, so be aware of that. Back up your old file, and give it a try.
If you are using PLA, you don't need the enclosure or hairspray. I have found regular old blue painter tape works just fine.
All my Cura settings are exactly as Migbot said they should be.
Make sure you have the nozzle height adjusted properly, and bed leveled.
Just trying to help.
EDIT: Something I noticed while looking at your settings. Under Advanced > Speed, I noticed all your speeds are set to 0.0. Mine are: Travel Speed 100.0, bottom Layer 20, Infill 80, Outer Shell 20, Inner shell 40. Put those in and see what happens.
Thank you for the info. I did set those values in your Edit section after my post, but no change to the print quality.
Here's what I think might be the (or at least a) problem. It slipped my mind until last night, but when we were putting this printer together, the right X Axis tensioner was cracked. So on my friend's printer we printed this out: [www.thingiverse.com] as a replacement (we also printed a corresponding tensioner for the left side). This piece uses a different rod - an Acme Threaded rod, so both of the Z Axis rods are Acme. I believe this is the one we bought for each X Axis but I can confirm if needed:
[www.amazon.com]
So, since the threading is different on Acme vs standard, and the Migbot's firmware was programmed for standard threading, my guess is that when the firmware is telling the printer to move Z stepper up/down .10 mm, it is actually moving .? mm, instead. Does this make sense? If so, the fact that this printer part exists means someone has solved the issue with firmware edits, hopefully someone here is one of those people?
Edited 2 time(s). Last edit at 01/21/2016 11:32AM by AccidentalWisdom.
|
Re: Migbot Prusa i3 Unofficial Support Thread January 21, 2016 04:41PM |
Registered: 8 years ago Posts: 269 |
Quote
AccidentalWisdom
Quote
Veaceonee
Attatched is my configuration.h file I use. It slows the printer way down, enables setting adjustments from the LCD, etc. and I have had great success with it. It is setup for Auto Bed Leveling awesomeness, so be aware of that. Back up your old file, and give it a try.
If you are using PLA, you don't need the enclosure or hairspray. I have found regular old blue painter tape works just fine.
All my Cura settings are exactly as Migbot said they should be.
Make sure you have the nozzle height adjusted properly, and bed leveled.
Just trying to help.
EDIT: Something I noticed while looking at your settings. Under Advanced > Speed, I noticed all your speeds are set to 0.0. Mine are: Travel Speed 100.0, bottom Layer 20, Infill 80, Outer Shell 20, Inner shell 40. Put those in and see what happens.
Thank you for the info. I did set those values in your Edit section after my post, but no change to the print quality.
Here's what I think might be the (or at least a) problem. It slipped my mind until last night, but when we were putting this printer together, the right X Axis tensioner was cracked. So on my friend's printer we printed this out: [www.thingiverse.com] as a replacement (we also printed a corresponding tensioner for the left side). This piece uses a different rod - an Acme Threaded rod, so both of the Z Axis rods are Acme. I believe this is the one we bought for each X Axis but I can confirm if needed:
[www.amazon.com]
So, since the threading is different on Acme vs standard, and the Migbot's firmware was programmed for standard threading, my guess is that when the firmware is telling the printer to move Z stepper up/down .10 mm, it is actually moving .? mm, instead. Does this make sense? If so, the fact that this printer part exists means someone has solved the issue with firmware edits, hopefully someone here is one of those people?
My Migbots are Electron3Ds from 3D Printers Online Store. These have acme leadscrews for the Z axis. The firmware for the Electrons can be found here
|
Re: Migbot Prusa i3 Unofficial Support Thread January 21, 2016 09:03PM |
Registered: 9 years ago Posts: 112 |
|
Re: Migbot Prusa i3 Unofficial Support Thread January 21, 2016 09:08PM |
Registered: 9 years ago Posts: 112 |
|
Re: Migbot Prusa i3 Unofficial Support Thread January 22, 2016 02:53PM |
Registered: 8 years ago Posts: 103 |
1/8th step is bigger then 1/32 step, what step you use dont matter to much for the Z axis aslong as you use this to figure what your steps are [prusaprinters.org] and enter that in the FW.
Im pretty sure the FW for this printer is defaulted to 1/16 for all 4 axis, i know 100% for sure x and y are.
From what ive read the MKS base v1.4 with built in drives are limited to 1/16th step , (somone correct me if im wrong)
my next upgrade is going to be a MKS gen v1.3 board so i can run Drv8825 stepper drives with 1/32 step on x and y
Edited 1 time(s). Last edit at 01/22/2016 02:55PM by Wes78.
|
Re: Migbot Prusa i3 Unofficial Support Thread January 22, 2016 03:06PM |
Registered: 8 years ago Posts: 103 |
A heads up to those thinking about running or about to run an alum plate in place to the plastic one,
after doing so i started skipping steps when printing, i thought maybe it would become an issue and it did.
I had to slow the acceleration down a bit (in the FW) and i up'ed the amps via the pot screw going to the motor, im pretty sure im over amping the motor now, witch i think im going to change out to the next size up motor, as i will prob end up burring up the motor or the drive or both at some point if i dont.
|
Re: Migbot Prusa i3 Unofficial Support Thread January 22, 2016 06:29PM |
Registered: 8 years ago Posts: 111 |
Quote
Wes78
A heads up to those thinking about running or about to run an alum plate in place to the plastic one,
after doing so i started skipping steps when printing, i thought maybe it would become an issue and it did.
I had to slow the acceleration down a bit (in the FW) and i up'ed the amps via the pot screw going to the motor, im pretty sure im over amping the motor now, witch i think im going to change out to the next size up motor, as i will prob end up burring up the motor or the drive or both at some point if i dont.
what is the weight difference between the aluminum and the acrylic? just out of curiosity. The aluminum plate might be to heavy for the drive setup.
|
Re: Migbot Prusa i3 Unofficial Support Thread January 22, 2016 06:52PM |
Registered: 8 years ago Posts: 103 |
Quote
veaceonee
Quote
Wes78
A heads up to those thinking about running or about to run an alum plate in place to the plastic one,
after doing so i started skipping steps when printing, i thought maybe it would become an issue and it did.
I had to slow the acceleration down a bit (in the FW) and i up'ed the amps via the pot screw going to the motor, im pretty sure im over amping the motor now, witch i think im going to change out to the next size up motor, as i will prob end up burring up the motor or the drive or both at some point if i dont.
what is the weight difference between the aluminum and the acrylic? just out of curiosity. The aluminum plate might be to heavy for the drive setup.
I really wish i weighted them when i put it together but i forgot to, the alum plate i used was 3mm.
but yes i think it made it right at its limit for the motor. i think the drive will put out 2amps but these motors are rated at 1.3amp.
|
Re: Migbot Prusa i3 Unofficial Support Thread January 22, 2016 07:31PM |
Registered: 8 years ago Posts: 19 |
|
Re: Migbot Prusa i3 Unofficial Support Thread January 22, 2016 11:53PM |
Registered: 8 years ago Posts: 38 |
Thanks, Ax, I will look into this, but I wonder if your Acme rods have the same pitch as mine? Maybe I should calculate mine, just in case. I was able to track down the exact leadscrews I got - T8 L300mm 8mm Lead 4 Start Lead Screw and Nut. Here is the information:
Material: 304 stainless steel
Diameter: 8mm
Length: 300mm
Pitch: 2mm
Lead of thread: 8mm
So I am trying to calculate the value on the Prusa Calculator, but I am not sure what to select on the entries in red. Can someone help with this?
Motor Stepper Angle: ?
Driver Microstepping: ?
Leadscrew Pitch: 2mm
Pitch Preset: (is this just a drop-down I can use instead of manually typing in the Pitch in the Leadscrew Pitch box?)
Gear Ratio: ?
|
Re: Migbot Prusa i3 Unofficial Support Thread January 23, 2016 12:00AM |
Registered: 8 years ago Posts: 38 |
New problem - I was doing a test the other day, and accidentally got one of the Hot End Thermistor wires caught on the Z Axis rod. The printer then ripped one of the wires out of Hot End box, and now the LCD screen perpetually displays "Err: MINTEMP." Cura will no longer connect to the printer - says "Error: Extruder switched off. MINTEMP t..." . I tried putting the wire back in the hole (shown in picture attached), but the error would not go away. Is there any way to fix this, or do I need to order a new Hot End?
Update: FIXED! I got so caught up in the wire that got pulled out I didn't think to look closely at the wire that was still in. If I had, I would have seen the small conductor filament that was inside the clear plastic tube. Something that was missing in the tube of the wire that was accidentally pulled out. Luckily, I found that the conductor was still mixed with the other Hot Bed wires inside the translucent yellow tube. I rectified that blunder, powered the printer up and the Err: MINTEMP was gone! Had a couple weird incidents in the process (including a lying Err: MAXTEMP registering the ambient temp at 320+ degrees, which I think was caused but having the pressure screw in too tight because loosening it a bit fixed that), but now I think I am good.
One note - initially after the fix, if the nozzle touched the bed, the Err: MINTEMP error came back every time. I suspected that it was caused by a small short, indicating that I crisscrossed the wires that connect to the plug that feeds into the A13 slot in the MKS BASE V1.2 board. That suspicion proved correct. I am certainly learning from all these mistakes and mishaps, haha.
Edited 3 time(s). Last edit at 01/24/2016 03:04AM by AccidentalWisdom.
|
Re: Migbot Prusa i3 Unofficial Support Thread January 23, 2016 12:08AM |
Registered: 8 years ago Posts: 103 |
|
Re: Migbot Prusa i3 Unofficial Support Thread January 23, 2016 12:12AM |
Registered: 8 years ago Posts: 38 |
Quote
Wes78
I would try replacing the thermistor first.
In cura. Are you able to connect? If so dose it register a temperature for the hotend? It should be something other then 0. You'll lest see what Ambient temperature is.
Just a thought
Cura won't connect and ambient temp reads at 0 degrees on the LCD. I already ordered a replacement 2 days ago, just in case, but it still hasn't shipped. So I am literally at a standstill, then? That sucks. My own fault for delaying on proper wire management. I would love to print out one of those nice chainlink style wire systems but I sort of need the printer to work, first, haha.
|
Re: Migbot Prusa i3 Unofficial Support Thread January 23, 2016 12:15AM |
Registered: 8 years ago Posts: 103 |
Quote
AccidentalWisdom
Quote
Wes78
I would try replacing the thermistor first.
In cura. Are you able to connect? If so dose it register a temperature for the hotend? It should be something other then 0. You'll lest see what Ambient temperature is.
Just a thought
Cura won't connect and ambient temp reads at 0 degrees on the LCD. I already ordered a replacement 2 days ago, just in case, but it still hasn't shipped. So I am literally at a standstill, then? That sucks. My own fault for delaying on proper wire management. I would love to print out one of those nice chainlink style wire systems but I sort of need the printer to work, first, haha.
I have a hunch that a new thermostat will fix your problem.


Sorry, only registered users may post in this forum.