Folger Tech 2020 i3 Printer Kit (Official Thread)
Posted by Dan_FolgerTech
|
Re: Folger Tech 2020 i3 Printer Kit (Official Thread) July 13, 2015 02:26PM |
Registered: 8 years ago Posts: 367 |
Quote
cvanclev
Decided to reprint some of the included black PLA parts to fix the quality issue, as I have access to a Dimension Elite ABS printer. Upon opening the STL's in Solidworks 2014, I was getting measurements of 50+ *meters* in length on some small parts like the carriage mounts. Anyone else attempt to work with the STLs on the drive and have this issue? Massively scaled up. Could just be Solidworks? I've used Solidworks to generate STLs but rarely open them up with the program.
I printed the Y bed bearing mounts yesterday using Repetier/Slic3r, and the sizes were correct. IIRC, STL's don't specify the system of units.
See my blog at [moosteria.blogspot.com].
|
Re: Folger Tech 2020 i3 Printer Kit (Official Thread) July 13, 2015 02:28PM |
Registered: 8 years ago Posts: 135 |
Does anybody know if this is a 12v or 24v hot end? I assumed 12v so thats what I ordered for my e3d v6 but now I am noticing that the ramps has the 24v connections used on it...
My creations/2020 aluminum parts/FolgerTech i3 upgrades [www.thingiverse.com]
My creations/2020 aluminum parts/FolgerTech i3 upgrades [www.thingiverse.com]
|
Re: Folger Tech 2020 i3 Printer Kit (Official Thread) July 13, 2015 02:51PM |
Registered: 9 years ago Posts: 251 |
|
Re: Folger Tech 2020 i3 Printer Kit (Official Thread) July 13, 2015 03:00PM |
Registered: 8 years ago Posts: 20 |
Thanks animoose! You've been such a great resource on this forum and in your blog. I'll provide whatever tips and assistance I can when I begin the build later this week. I think you are correct regarding the STLs and unit specification. As a corollary, did you have to manually scale in Reptier/Slic3r?
|
Re: Folger Tech 2020 i3 Printer Kit (Official Thread) July 13, 2015 03:39PM |
Registered: 8 years ago Posts: 121 |
Is anyone else having trouble with the build guide link? The delta style guide opens fine but the 2020 guide just keeps having me sign into google over and over. I was using the link from ebay. The one on the first page of this forum worked fine. It gave me buld guide Rev. A 31 pages and on the last page it has you hooking up the heated bed then at step 23 mount & wire the end stops it just says coming 5/26/2015?
Edited 2 time(s). Last edit at 07/13/2015 04:38PM by jasonsaffle13@gmail.com.
Edited 2 time(s). Last edit at 07/13/2015 04:38PM by jasonsaffle13@gmail.com.
|
Re: Folger Tech 2020 i3 Printer Kit (Official Thread) July 13, 2015 04:07PM |
Registered: 8 years ago Posts: 367 |
Quote
cvanclev
Thanks animoose! You've been such a great resource on this forum and in your blog. I'll provide whatever tips and assistance I can when I begin the build later this week. I think you are correct regarding the STLs and unit specification. As a corollary, did you have to manually scale in Reptier/Slic3r?
I did no manual scaling, but I did need to tune the parameters a bit. I could not fit a LM8UU into the initial print. After some advice from another thread, I tried changing the extrusion multiplier to 0.85 and setting external perimeters first, and it was much better. I haven't used the mounts for real yet, just checked whether I can get a LM8UU to fit in them.
See my blog at [moosteria.blogspot.com].
|
Re: Folger Tech 2020 i3 Printer Kit (Official Thread) July 13, 2015 06:56PM |
Registered: 8 years ago Posts: 135 |
Quote
animoose
Quote
cvanclev
Thanks animoose! You've been such a great resource on this forum and in your blog. I'll provide whatever tips and assistance I can when I begin the build later this week. I think you are correct regarding the STLs and unit specification. As a corollary, did you have to manually scale in Reptier/Slic3r?
I did no manual scaling, but I did need to tune the parameters a bit. I could not fit a LM8UU into the initial print. After some advice from another thread, I tried changing the extrusion multiplier to 0.85 and setting external perimeters first, and it was much better. I haven't used the mounts for real yet, just checked whether I can get a LM8UU to fit in them.
HMMM that's interesting. Everything I have printed so far has been dimensionaly good enough. Most things come out a tiny bit too tight, but that's good because some parts need to be tight (such as ball joint mounts like on my RPI camera) and anything else can be filed out (I found a small set of hand files to be really invaluable for 3D Printing). I just finished printing a replacement x motor mount. The old one cracked, but looking at the design theres no strength where it cracked so maybe it was supposed to. If you look on the right side, you will see that it cracked on that side as well, so it's cracked on both sides of the bearing holder. I think this may have to do with misalignment of the z rods. I also think that the cracks are allowing it to absorb a lot of the vibrations from the motor so its actually a lot quieter. You can see where the bearing is out of alignment with the mount. It is printing really well as you can see in the replacement part (the ripples on the edge are from the brim). I tested an LM8UU bearing in it and it fits nice and snug. I was using 100% flow, 100% feed, with fine tuned extruder e-steps.
Pics:
[imgur.com]
Edited 1 time(s). Last edit at 07/13/2015 06:58PM by mel0n.
My creations/2020 aluminum parts/FolgerTech i3 upgrades [www.thingiverse.com]
|
Re: Folger Tech 2020 i3 Printer Kit (Official Thread) July 13, 2015 08:28PM |
Registered: 8 years ago Posts: 367 |
Here's the thread where the reduced extrusion was recommended: [forums.reprap.org]. The parts I've printed with it look good apart from a tiny amount of separation on the first layer.
See my blog at [moosteria.blogspot.com].
See my blog at [moosteria.blogspot.com].
|
Re: Folger Tech 2020 i3 Printer Kit (Official Thread) July 13, 2015 09:57PM |
Registered: 8 years ago Posts: 81 |
Quote
mel0n
Quote
animoose
Quote
cvanclev
Thanks animoose! You've been such a great resource on this forum and in your blog. I'll provide whatever tips and assistance I can when I begin the build later this week. I think you are correct regarding the STLs and unit specification. As a corollary, did you have to manually scale in Reptier/Slic3r?
I did no manual scaling, but I did need to tune the parameters a bit. I could not fit a LM8UU into the initial print. After some advice from another thread, I tried changing the extrusion multiplier to 0.85 and setting external perimeters first, and it was much better. I haven't used the mounts for real yet, just checked whether I can get a LM8UU to fit in them.
HMMM that's interesting. Everything I have printed so far has been dimensionaly good enough. Most things come out a tiny bit too tight, but that's good because some parts need to be tight (such as ball joint mounts like on my RPI camera) and anything else can be filed out (I found a small set of hand files to be really invaluable for 3D Printing). I just finished printing a replacement x motor mount. The old one cracked, but looking at the design theres no strength where it cracked so maybe it was supposed to. If you look on the right side, you will see that it cracked on that side as well, so it's cracked on both sides of the bearing holder. I think this may have to do with misalignment of the z rods. I also think that the cracks are allowing it to absorb a lot of the vibrations from the motor so its actually a lot quieter. You can see where the bearing is out of alignment with the mount. It is printing really well as you can see in the replacement part (the ripples on the edge are from the brim). I tested an LM8UU bearing in it and it fits nice and snug. I was using 100% flow, 100% feed, with fine tuned extruder e-steps.
Pics:
[imgur.com]
Im having problems with the x-ends too. On my printer im seeing a very big play between the bearing and its holder (both on the motor and idler side).
Im considering to modify the original stl to place some reinforcements where its needed. Also, im looking to add screw stubs on it so i could secure the bearings in place.
I also see noticeable play on the holes for the x rods. This could probably only get worse overtime so gonna have to find way to tighten them, perhaps using screws too.
So many things to do, so little time.
For those who are interested, Autodesk offers free license for students/educators (good for 3 years i think). I use Inventor for modifying/creating mechanical stuffs for my printer.
You just need to install an add-on (mesh enabler) which allows you to convert an stl file to a solid/surface feature which you can then modify to your hearts content.
Export the modified part to STL again to print it.
-Wilbert
|
Re: Folger Tech 2020 i3 Printer Kit (Official Thread) July 13, 2015 10:10PM |
Registered: 8 years ago Posts: 135 |
Ahh that sounds cool I will have to check it out. So far I have only been working in Open SCAD because I am a programmer and its easy for me. I need to dive into a 3D modeling application eventually.
My creations/2020 aluminum parts/FolgerTech i3 upgrades [www.thingiverse.com]
My creations/2020 aluminum parts/FolgerTech i3 upgrades [www.thingiverse.com]
|
Re: Folger Tech 2020 i3 Printer Kit (Official Thread) July 13, 2015 10:50PM |
Registered: 11 years ago Posts: 335 |

|
Re: Folger Tech 2020 i3 Printer Kit (Official Thread) July 13, 2015 11:07PM |
Registered: 8 years ago Posts: 81 |
|
Re: Folger Tech 2020 i3 Printer Kit (Official Thread) July 13, 2015 11:31PM |
Registered: 11 years ago Posts: 335 |
Quote
wderoxas
Darn. An enclosure was on my to-do list. How bad was the meltdown and which part of the x axis were affected?
It was affected around the extruder and x stepper. Seemed to be okay at 40-50c but the additional heat, weight, and tension around the stepper motors was too much. I was able to bend everything back into place while it was still warm and the printer is otherwise unharmed but I don't think you could print long term without making some substantial changes.
Edited 1 time(s). Last edit at 07/13/2015 11:31PM by 691175002.
|
Re: Folger Tech 2020 i3 Printer Kit (Official Thread) July 14, 2015 02:33AM |
Registered: 8 years ago Posts: 20 |
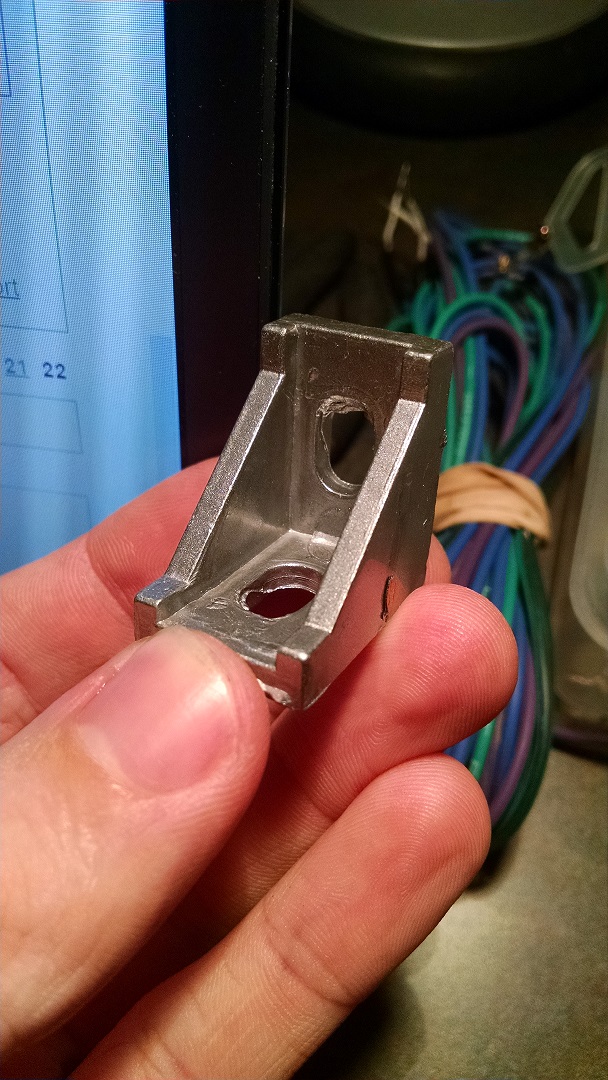
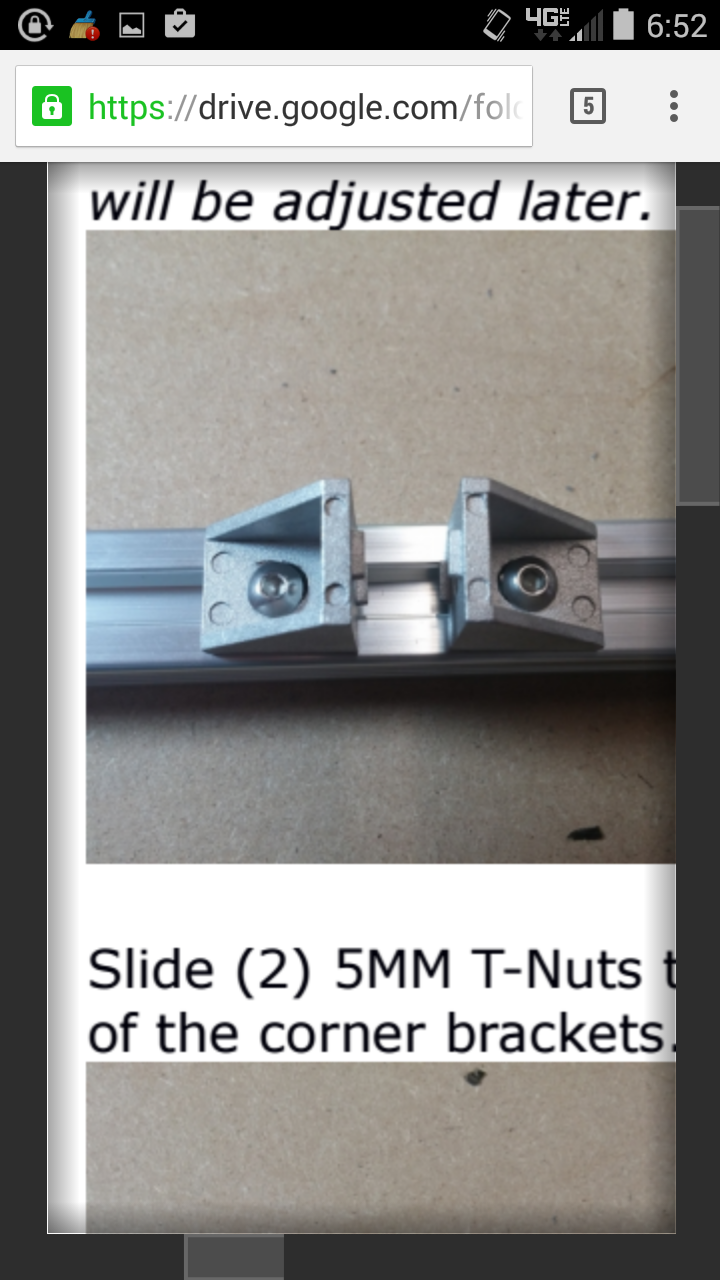
Well, got my kit! Literally stalled out on the FIRST step of the build. The corner brackets that they shipped me look nothing like the build guide photo, and nothing like the one on 691175002's model. Anyone else get these? They definitely don't work with the M4x8mm panheads.
Edited 1 time(s). Last edit at 07/14/2015 02:38AM by cvanclev.
Edited 1 time(s). Last edit at 07/14/2015 02:38AM by cvanclev.
|
Re: Folger Tech 2020 i3 Printer Kit (Official Thread) July 14, 2015 03:18AM |
Registered: 8 years ago Posts: 81 |
Those brackets are only needed for the Y- idler. You should only get two of those. You got a bunch of them?
Standard corner brackets are L-shaped with set screw inside.
If they have switched their corner brackets, then you should have a lot of T- nuts too.
If this is the case, and you didn't get at least two of those L-shaped corner brackets, then you'll have a problem installing the Z rods.
Standard corner brackets are L-shaped with set screw inside.
If they have switched their corner brackets, then you should have a lot of T- nuts too.
If this is the case, and you didn't get at least two of those L-shaped corner brackets, then you'll have a problem installing the Z rods.
|
Re: Folger Tech 2020 i3 Printer Kit (Official Thread) July 14, 2015 08:14AM |
Registered: 8 years ago Posts: 135 |
Quote
wderoxas
Those brackets are only needed for the Y- idler. You should only get two of those. You got a bunch of them?
Standard corner brackets are L-shaped with set screw inside.
If they have switched their corner brackets, then you should have a lot of T- nuts too.
If this is the case, and you didn't get at least two of those L-shaped corner brackets, then you'll have a problem installing the Z rods.
Basically what he said. However those would work fine in corners, and I think you get 4. 2 large ones for the y-idler pully, and 2 small for mounting the power supply.
My creations/2020 aluminum parts/FolgerTech i3 upgrades [www.thingiverse.com]
|
Re: Folger Tech 2020 i3 Printer Kit (Official Thread) July 14, 2015 09:55AM |
Registered: 8 years ago Posts: 20 |
I was provided with five of the brackets in my first photo, and zero of the ones pictured here. The M4 bolt head falls right through the brackets I have now. Could use a washer and make it work, but wondering if I would run into height problems on the Y axis idler. Can't tell yet as I'm not far enough into the build to know how much clearance I need for the bed.
|
Re: Folger Tech 2020 i3 Printer Kit (Official Thread) July 14, 2015 11:50AM |
Registered: 8 years ago Posts: 2 |
Quote
cvanclev
I was provided with five of the brackets in my first photo, and zero of the ones pictured here. The M4 bolt head falls right through the brackets I have now. Could use a washer and make it work, but wondering if I would run into height problems on the Y axis idler. Can't tell yet as I'm not far enough into the build to know how much clearance I need for the bed.
I got my kit on Saturday and also received different brackets as cvanclev mentions. The M4 bolts barely hang on to the brackets and I was considering using a washer. I hadn't thought about the height difference for the Y axis, I guess I'll see soon enough.
I did get the correct T Nuts however, so I was happy to see that.
ed
|
Re: Folger Tech 2020 i3 Printer Kit (Official Thread) July 14, 2015 02:05PM |
Registered: 11 years ago Posts: 335 |
I was actually wondering why they were using the internal corner brackets. They are generally only used for cosmetic purposes since they are less rigid and less square than the proper brackets. Assuming that everything still fits together, the change should be beneficial. I suspect that you are now supposed to use only one corner bracket for the upright extrusions.
I'm surprised they are sticking with the m4 hardware though, corner brackets are designed for m5. Definitely use a washer if they provide enough of them.
Edited 1 time(s). Last edit at 07/14/2015 02:05PM by 691175002.
I'm surprised they are sticking with the m4 hardware though, corner brackets are designed for m5. Definitely use a washer if they provide enough of them.
Edited 1 time(s). Last edit at 07/14/2015 02:05PM by 691175002.
|
Re: Folger Tech 2020 i3 Printer Kit (Official Thread) July 14, 2015 08:39PM |
Registered: 8 years ago Posts: 7 |
Update on this:
I heated up the nozzle to ~120 degrees, and unscrewed it along with the barrel. Cleaned out all the goop, let it cool, and reassembled it. That solved 95% of the ooze from the bottom, still a fair amount of ooze out the top, but at least that taks far longer to drip into my prints!
Next course of action is to buy a metric nut that will thread onto the barrel, and screw it tight against the heating block to try and seal the gap that way. If that doesn't work, I'll get some teflon tape and see if that has any effect.
Quote
nonfish
Is anyone else having problems with the extruder oozing where it shouldn't - out the top and around the nozzle? Pictures Here. This is after only a few minutes running; every 15 minutes of printing or so I need to manually clean the nozzle to not get massive deposits in my print.
I heated up the nozzle to ~120 degrees, and unscrewed it along with the barrel. Cleaned out all the goop, let it cool, and reassembled it. That solved 95% of the ooze from the bottom, still a fair amount of ooze out the top, but at least that taks far longer to drip into my prints!
Next course of action is to buy a metric nut that will thread onto the barrel, and screw it tight against the heating block to try and seal the gap that way. If that doesn't work, I'll get some teflon tape and see if that has any effect.
|
Re: Folger Tech 2020 i3 Printer Kit (Official Thread) July 14, 2015 09:39PM |
Registered: 8 years ago Posts: 21 |
are you guys getting good (or any...) customer service? I messaged folgertech with some inquiries on the lcd screen and my extruder skipping when using pla, and their answer was "the files are not gcode. check out reprap"
That is litterally all he wrote. I'm sorry, but that's just sh*tty customer service, especially for a company that boasts having their parts made in the USA...
That is litterally all he wrote. I'm sorry, but that's just sh*tty customer service, especially for a company that boasts having their parts made in the USA...
|
Re: Folger Tech 2020 i3 Printer Kit (Official Thread) July 14, 2015 09:53PM |
Registered: 8 years ago Posts: 1 |
Yes, I got the same brackets in my kit yesterday. They work with an oversized M4 washer but it isn't ideal.
My first showstopper was the very next step where you mount the smooth rod blocks to the M5 T nuts using the M5x8 bolts. The blocks I got are 6mm thick at the base, there's roughly a 1mm gap below the base to the top of the T nut even when you hold the dang thing upside down. So doing the math I can fit roughly one thread of the bolt into the T nut. Not nearly enough. Ordered some M5x10 bolts from McMaster Carr since the local hardware stores have extremely crappy metric hardware selections. Part of the fun of assembling a kit, I guess.
My RAMPS board also looks exactly like the first one posted, down to the bent-to-crap pins and solder blobs, bridges, and cold joints all over the back. I'm not very impressed that they admitted they had a vendor quality issue, claim to have fixed it, yet are still shipping shoddy parts. I'll clean up the obviously bad solder and hope that everything is in working order.
Edited 2 time(s). Last edit at 07/14/2015 09:55PM by tmiller74.
|
Re: Folger Tech 2020 i3 Printer Kit (Official Thread) July 14, 2015 10:11PM |
Registered: 11 years ago Posts: 335 |
Alright, finally got some reasonable prints. I am using the enclosure again, but with some tweaks to avoid melting the printer components. My heated bed is now set to 70c for all layers (previously 105c). I I have also turned the X and E steppers down to 0.15V (previously 0.35V) and will probably go even lower. I also leave the door ajar and periodically check the temperature to avoid going higher than 40c.
ABS at 0.2mm
There is still a bit more tweaking I can do in the slicer but I think I've basically hit the mechanical repeatability limit of the printer. There is quite a bit of slop in the bearings and compliance in general, but for a $270 printer I can't really complain.
ABS at 0.2mm

There is still a bit more tweaking I can do in the slicer but I think I've basically hit the mechanical repeatability limit of the printer. There is quite a bit of slop in the bearings and compliance in general, but for a $270 printer I can't really complain.
|
Re: Folger Tech 2020 i3 Printer Kit (Official Thread) July 14, 2015 10:26PM |
Registered: 8 years ago Posts: 171 |
That looks awesome!
For those with missing or bad parts, I think the only way FT will pay attention is you contact them and "give them the opportunity to fix it." They have admitted to bad RAMPS boards, so make them send you a new, defect-free one.
I didn't have a single part missing and any difficulty putting it together was in my own understanding. Now there are some things I'd like to upgrade but mine basically worked out of the box with no extra trips to the hardware store. I think that's reasonable.
|
Re: Folger Tech 2020 i3 Printer Kit (Official Thread) July 15, 2015 12:44AM |
Registered: 8 years ago Posts: 20 |
Quote
tmiller74
Yes, I got the same brackets in my kit yesterday. They work with an oversized M4 washer but it isn't ideal.
My first showstopper was the very next step where you mount the smooth rod blocks to the M5 T nuts using the M5x8 bolts. The blocks I got are 6mm thick at the base, there's roughly a 1mm gap below the base to the top of the T nut even when you hold the dang thing upside down. So doing the math I can fit roughly one thread of the bolt into the T nut. Not nearly enough. Ordered some M5x10 bolts from McMaster Carr since the local hardware stores have extremely crappy metric hardware selections. Part of the fun of assembling a kit, I guess.
My RAMPS board also looks exactly like the first one posted, down to the bent-to-crap pins and solder blobs, bridges, and cold joints all over the back. I'm not very impressed that they admitted they had a vendor quality issue, claim to have fixed it, yet are still shipping shoddy parts. I'll clean up the obviously bad solder and hope that everything is in working order.
Right there with you on the "holding the dang thing upside down" part. Literally just fixed this SAME problem as well. I was beginning to wonder if I was just doing things flat-out wrong, as there were two major showstoppers in the first two steps. I've heard it mentioned in this thread that a few people had trouble getting the blocks to grab the smooth rods firmly.. here's to hoping these new ones at least fix that problem. I have the luxury of being employed in a TechShop style lab on our campus, and grabbed some M5x10s from a big bin we had sitting around, worked perfectly. My original plan (before remembering the bin) was to use a drill press and counter sink the area where the M5 makes contact for a quick fix. Might be an option that works for you if you don't want to wait on shipping and have access to a press. Also, mine came with enough extra M5 T nuts (2) that I was able to use 2 extra M5x8 bolts, a couple spare washers I had sitting around, and the aforementioned nuts to mount the Y idler pulley on those corner brackets. Feels wayyyy better than M4s with a washer.
Edited 1 time(s). Last edit at 07/15/2015 12:47AM by cvanclev.
|
Re: Folger Tech 2020 i3 Printer Kit (Official Thread) July 15, 2015 01:19AM |
Registered: 8 years ago Posts: 135 |
Quote
691175002
Alright, finally got some reasonable prints. I am using the enclosure again, but with some tweaks to avoid melting the printer components. My heated bed is now set to 70c for all layers (previously 105c). I I have also turned the X and E steppers down to 0.15V (previously 0.35V) and will probably go even lower. I also leave the door ajar and periodically check the temperature to avoid going higher than 40c.
ABS at 0.2mm
There is still a bit more tweaking I can do in the slicer but I think I've basically hit the mechanical repeatability limit of the printer. There is quite a bit of slop in the bearings and compliance in general, but for a $270 printer I can't really complain.
That looks great, but I found you only see artifacts on mostly flat vertical sections, so I think thats why I am not seeing any artifacting in that print. Very well done none the less. Enjoy the print quality while you can, your hot end nossel is going to need frequent cleanings to keep that kind of repeatability. Unless you got super lucky and the tolerances between the heat break and nossel are good. However with the amount of oozing every1 has been seeing and that space between the heatbreak and nossel that collects and burns plastic, its not very likely

I would say the only necessary non-3d printed upgrade to this printer is the hot end. But thats true for the large majority of printer kits on the market and most of them are $500+ kits so we really cant complain. It works, just not the best, or for very long.
My creations/2020 aluminum parts/FolgerTech i3 upgrades [www.thingiverse.com]
|
Re: Folger Tech 2020 i3 Printer Kit (Official Thread) July 15, 2015 01:26AM |
Registered: 8 years ago Posts: 18 |
|
Re: Folger Tech 2020 i3 Printer Kit (Official Thread) July 15, 2015 08:16AM |
Registered: 8 years ago Posts: 95 |
|
Re: Folger Tech 2020 i3 Printer Kit (Official Thread) July 15, 2015 08:40AM |
Registered: 8 years ago Posts: 121 |
|
Re: Folger Tech 2020 i3 Printer Kit (Official Thread) July 15, 2015 09:00AM |
Registered: 8 years ago Posts: 430 |


Sorry, only registered users may post in this forum.