Folger Tech 2020 i3 Printer Kit (Official Thread)
Posted by Dan_FolgerTech
|
Re: Folger Tech 2020 i3 Printer Kit (Official Thread) August 10, 2015 10:49AM |
Registered: 9 years ago Posts: 44 |
Quote
mel0n
Quote
zarnold16
Quote
zarnold16
So here is my first problem that I have received in a while except for some user error with printing. I went to click start on my print via the SD card and my screen blacked out then came back on like this. Now everytime I turn off my printer and turn it back on it comes back when I turn the dial. [imgur.com]
Okay I still have not figured this out.I just broke a blade on my extruder fan, Am I able to run the printer without this while I wait for replacement?
It will probably be out of balance and noisy, but if it still pushes air and you have a replacement coming, I don't see why not.
Okay, Do you know why my screen does that?
|
Re: Folger Tech 2020 i3 Printer Kit (Official Thread) August 10, 2015 10:52AM |
Registered: 8 years ago Posts: 135 |
Quote
zarnold16
Quote
mel0n
Quote
zarnold16
Quote
zarnold16
So here is my first problem that I have received in a while except for some user error with printing. I went to click start on my print via the SD card and my screen blacked out then came back on like this. Now everytime I turn off my printer and turn it back on it comes back when I turn the dial. [imgur.com]
Okay I still have not figured this out.I just broke a blade on my extruder fan, Am I able to run the printer without this while I wait for replacement?
It will probably be out of balance and noisy, but if it still pushes air and you have a replacement coming, I don't see why not.
Okay, Do you know why my screen does that?
Nope I wouldn't rule out ESD damage though. Could be software, but it sounds more hardware to me since it happens when you turn the dial. I read through all the LCD code on marlin at one point, but I don't remember enough to say whats going on there.
My creations/2020 aluminum parts/FolgerTech i3 upgrades [www.thingiverse.com]
|
Re: Folger Tech 2020 i3 Printer Kit (Official Thread) August 10, 2015 12:11PM |
Registered: 9 years ago Posts: 45 |
Oh trust me, I realized many of them would turn with force, but some refused. I think this is another tolerance issue honestly. There are extra tnuts, but not enough to cover the bad ones we had! My only trick was once I realized I had a bad one, I would use tweezers, a small Allen wrench, a small screw or just insert it like a preinstall t nut. Once rotated I'd grab the biggest Allen wrench I could fit in the slot and use it as an anti-rotation device. Sometimes just removing the Allen wrench to reposition and turn was enough to get the things to start to turn. If it was in a vertical slot, that's all it would take. So yes, I would generally orient the slot flat then start to turn.
Also note, just because it "bit" doesn't mean it fully rotated. In many cases I checked it to see it only rotated about 1/8 a turn and was hanging by the corners of the nuts. The roughening of the surface seems to indicate this may be ok, but I don't trust that. Biting alone wasn't enough for me. Had to have them 90.
Another trick was to kinda vibrate the screw as you screwed it in. That got some of the "less bad" ones to rotate again leading me to believe this was a tolerance issue. My guess is there are kits full of t nuts that work every time and kits like mine with some that plain won't go. Again, knowing cost is a factor, tolerance isn't going to be controlled. In this case I think it's best to just avoid the issue all together, and just use preinstall t nuts which won't have the issue, or use something like what I saw in misumi's site with one side of the t but ground down so it will just pop in the slot post install...and not be easy to get out. I've actually got to order some of these for my delta at some point, so I'll come back and comment on them when I do as to whether they're easier to use than these rotate into place t nuts. I always prefer preinstall but you can't plan for everything! . Got some additions to make!
Also note, just because it "bit" doesn't mean it fully rotated. In many cases I checked it to see it only rotated about 1/8 a turn and was hanging by the corners of the nuts. The roughening of the surface seems to indicate this may be ok, but I don't trust that. Biting alone wasn't enough for me. Had to have them 90.
Another trick was to kinda vibrate the screw as you screwed it in. That got some of the "less bad" ones to rotate again leading me to believe this was a tolerance issue. My guess is there are kits full of t nuts that work every time and kits like mine with some that plain won't go. Again, knowing cost is a factor, tolerance isn't going to be controlled. In this case I think it's best to just avoid the issue all together, and just use preinstall t nuts which won't have the issue, or use something like what I saw in misumi's site with one side of the t but ground down so it will just pop in the slot post install...and not be easy to get out. I've actually got to order some of these for my delta at some point, so I'll come back and comment on them when I do as to whether they're easier to use than these rotate into place t nuts. I always prefer preinstall but you can't plan for everything!
 . Got some additions to make!
|
Re: Folger Tech 2020 i3 Printer Kit (Official Thread) August 10, 2015 12:19PM |
Registered: 9 years ago Posts: 45 |
I had something similar happen on my delta trying to get my 12864 kit working. I didn't have all the firmware one set up right (still don't actually...just removed the lcd for now...and I just realized that could be what led to the death of my electronics board! Thanks! Couldn't figure out what weakened it...why it suddenly turned into an arduino due killer and why it's down until I get a new board from Deutschland (Germany)!
I don't think this is your problem though, and I didn't go back too far in the thread to see if anyone already talked about wiring, but double check you have exp1 running to exp1 on the ramps adapter board, and that all the pins are making proper contact. I suspect incorrect wiring would damage things if that's what happened (much like my ill fated radds board!). Just double check. It's hard to read the ramps adapter board to be sure you've matched up the exp numbers!
I don't think this is your problem though, and I didn't go back too far in the thread to see if anyone already talked about wiring, but double check you have exp1 running to exp1 on the ramps adapter board, and that all the pins are making proper contact. I suspect incorrect wiring would damage things if that's what happened (much like my ill fated radds board!). Just double check. It's hard to read the ramps adapter board to be sure you've matched up the exp numbers!
|
Re: Folger Tech 2020 i3 Printer Kit (Official Thread) August 10, 2015 01:05PM |
Registered: 8 years ago Posts: 30 |
So I finally finished my build the other day. I have loaded the arduino and downloaded the repetier software and done the first 13 pages of the config guide. The last thing I need to do before starting to home and what not is to tune the stepper drivers. This seems to be the part that I find the fuzziest in the instructions. I have read of people just adjusting until the noise goes away, others saying a meter is the best way. Maybe I am missing something, but I have not seen anyone say anywhere about where to connect the meter? I see mention of adjusting parameters in what looks like the config.h file? Can some one shed a little light on this for me? I downloaded the file on the google drive on tuning, but this seems a little vague. I understand what vref is, but am I just supposed to plug it in and adjust the pot? Which pin do I measure the vref on? Thanks for your help!
|
Re: Folger Tech 2020 i3 Printer Kit (Official Thread) August 10, 2015 02:26PM |
Registered: 8 years ago Posts: 171 |
Quote
Morrobotz
Update: My printer is working like a champ and I am very happy. I did a lot of test prints of cilinders to dial in the settings but this was my first true test print, please help me diagnose any issues you see. The print is roughly 5" tall.
I have made some adjustments and am currently printing a 0.08 layer hight print and will be done in 3 more hours though it looks really good so far.
I am currently using standard 3/32" glass that I slightly toothed with sand paper and applyed pruple vanishing gluestick to. (I find it better at adheasion than Acitone and ABS slury).
1.75mm ABS plastic @0.2 Layer height
Admin edit: fixed mis-typed img tags
I meant to reply to this - it gives me something to aspire to! This looks fantastic.
Did you replace/upgrade parts? Or just tweak the stock equipment?
|
Re: Folger Tech 2020 i3 Printer Kit (Official Thread) August 10, 2015 02:26PM |
Registered: 8 years ago Posts: 6 |
Quote
Blackbird
Are you sure the bearing with teeth on the motor isn't puched too close to the motor body? If it sits right against the motor housing and you have the set screws tightened, it won't spin properly. Easy thing to overlook while putting everything together.Quote
blank64
So I have now finished the build, but am now having some problems trying it out with repetier: (I tried both the marlin included in the drive folder, and the one posted a few pages back)
My y-axis motor doesn't seem to be able to turn the belt (it either barely turns, or skips the belt entirely while turning), I used one of the included belt tensioners so it's pretty tight.
My x-axis motor doesn't seem to be working at all (Although it gets a bit warm after a couple of minutes)
Only one of my z-axis motors is actually turning (the one which I can turn by hand while off), I tried switching where the 2 motors are plugged in, but in each case the same one turns.
Has anyone experienced any of these problems?
I had a couple of the bearings right against the motors, but have now moved them and am getting the same results. I took the belt off of the y axis, and it just vibrates the bearing when I tell it to move. The x axis makes no movement whatsoever, but I can hear different high pitched tones for each of the steps (like my one working motor), so I don't quite know what to make of that.
Edited 1 time(s). Last edit at 08/10/2015 02:34PM by blank64.
|
Re: Folger Tech 2020 i3 Printer Kit (Official Thread) August 10, 2015 02:46PM |
Registered: 8 years ago Posts: 95 |
After a couple weeks emailing back and forth with Folger Tech .. I received my replacement Ramps board today .. looking forward to getting my printer working again.. was working great with no problems from the get go (from the very first print).. by following the instructions about bed being level and the spacing of the hot end and bed,, and downloading and installing the firmware and settings.exactly as instructed. but my hotend stopped heating and lost control of bed heating..will up date after replacing...
Edited 1 time(s). Last edit at 08/10/2015 02:47PM by mike3.
Edited 1 time(s). Last edit at 08/10/2015 02:47PM by mike3.
|
Re: Folger Tech 2020 i3 Printer Kit (Official Thread) August 10, 2015 03:37PM |
Registered: 8 years ago Posts: 135 |
Quote
mike3
but my hotend stopped heating and lost control of bed heating..will up date after replacing...
Sounds like a bad FET :[ it was probably correct for them to send you a new Ramps. Hopefully your arduino is ok.
My creations/2020 aluminum parts/FolgerTech i3 upgrades [www.thingiverse.com]
|
Re: Folger Tech 2020 i3 Printer Kit (Official Thread) August 10, 2015 03:53PM |
Registered: 8 years ago Posts: 35 |
Quote
mel0n
Quote
691175002
Quote
corry
Biggest issue: to those who say they got the kit assembled in 4 hours are you *SURE* you have those t nuts rotated in the slots 90 degrees? All of them? They're awful. I know misumi's preinstall t nuts cost a bit, but those (m4) post install t nuts are absolute garbage. Spent hours on single bolts sometimes. Was ready to go to the garage make some thermite just to burn those witchlike t nuts. They've gotta go. Pissed me off something fierce!
They are pretty awful (frankly I would have preferred regular pre-assembly nuts and some planning) but there is kind of a trick. If you have tweezers you can rotate them into place and as long as you don't try to back out the screw during assembly they should stay in place.
Also the earlier kits used internal corner brackets (with set-screws) so you only needed like 6 or 8 of the m4 nuts.
The instructions could use work, and I'm pretty sure with proper design they could have really cut down on the number of different fastener types used.
Actually, the T-nuts aren't that bad once you figure out the technique. I figured it out about half way through my printer. APPLY FORCE. Basically, just pop the nut in, orientation doesn't matter, line up your screw, and push down on the screw with a good amount of force as you tighten it. I can't really explain how it works, but at least 9/10 times it pulls the t-nut up and rotates itself into place with a good amount of bite.
So next time you use a T-nut, push on it really hard as you screw into it and I promise you will be amazed how well/easily it works.
I didn't really have any issues with the t-nuts. I just dropped them in and tightened the bolts. If any didn't twist into place I'd just nugde them with an allen key or something. They will only rotate 90 deg and then stop so you can't turn them too far. I consider them a complete non-issue.
|
Re: Folger Tech 2020 i3 Printer Kit (Official Thread) August 10, 2015 04:28PM |
Registered: 8 years ago Posts: 135 |
Quote
RedneckGeek
Quote
mel0n
Quote
691175002
Quote
corry
Biggest issue: to those who say they got the kit assembled in 4 hours are you *SURE* you have those t nuts rotated in the slots 90 degrees? All of them? They're awful. I know misumi's preinstall t nuts cost a bit, but those (m4) post install t nuts are absolute garbage. Spent hours on single bolts sometimes. Was ready to go to the garage make some thermite just to burn those witchlike t nuts. They've gotta go. Pissed me off something fierce!
They are pretty awful (frankly I would have preferred regular pre-assembly nuts and some planning) but there is kind of a trick. If you have tweezers you can rotate them into place and as long as you don't try to back out the screw during assembly they should stay in place.
Also the earlier kits used internal corner brackets (with set-screws) so you only needed like 6 or 8 of the m4 nuts.
The instructions could use work, and I'm pretty sure with proper design they could have really cut down on the number of different fastener types used.
Actually, the T-nuts aren't that bad once you figure out the technique. I figured it out about half way through my printer. APPLY FORCE. Basically, just pop the nut in, orientation doesn't matter, line up your screw, and push down on the screw with a good amount of force as you tighten it. I can't really explain how it works, but at least 9/10 times it pulls the t-nut up and rotates itself into place with a good amount of bite.
So next time you use a T-nut, push on it really hard as you screw into it and I promise you will be amazed how well/easily it works.
I didn't really have any issues with the t-nuts. I just dropped them in and tightened the bolts. If any didn't twist into place I'd just nugde them with an allen key or something. They will only rotate 90 deg and then stop so you can't turn them too far. I consider them a complete non-issue.
Yup thats why they are round on the right side of the tips. I found they wouldn't have enough bite on the screw to rotate, so by adding pressure/force as I tightened the screw it would gain enough bite on the threads to turn the t-nut in place as I described in my post.
I suppose at this point I might as well explain my technique, and why it works for every1.
By applying force, obviously you will prevent the nut from turning as your forcing it against the bottom, but as you turn farther, it will start to lift from the bottom and reduce the amount of pressure you have on it by itself. Thus, it reaches the perfect pressure point where it will bite on the threads and turn itself into place.
Edited 1 time(s). Last edit at 08/10/2015 04:31PM by mel0n.
My creations/2020 aluminum parts/FolgerTech i3 upgrades [www.thingiverse.com]
|
Re: Folger Tech 2020 i3 Printer Kit (Official Thread) August 10, 2015 04:49PM |
Registered: 8 years ago Posts: 95 |
Quote
mel0n
Quote
mike3
but my hotend stopped heating and lost control of bed heating..will up date after replacing...
Sounds like a bad FET :[ it was probably correct for them to send you a new Ramps. Hopefully your arduino is ok.
Eureka !!! its alive.... just printed a part for the Smart Core .. came out perfect... using the Smart LCD .. havn't tested it with the USB yet.. but I can now print again...

|
Re: Folger Tech 2020 i3 Printer Kit (Official Thread) August 10, 2015 08:46PM |
Registered: 8 years ago Posts: 285 |
Quote
Neverdone
So I finally finished my build the other day. I have loaded the arduino and downloaded the repetier software and done the first 13 pages of the config guide. The last thing I need to do before starting to home and what not is to tune the stepper drivers. This seems to be the part that I find the fuzziest in the instructions. I have read of people just adjusting until the noise goes away, others saying a meter is the best way. Maybe I am missing something, but I have not seen anyone say anywhere about where to connect the meter? I see mention of adjusting parameters in what looks like the config.h file? Can some one shed a little light on this for me? I downloaded the file on the google drive on tuning, but this seems a little vague. I understand what vref is, but am I just supposed to plug it in and adjust the pot? Which pin do I measure the vref on? Thanks for your help!
Take you measurements by putting one of your multimeter's leads onto the pot on the stepper driver, and the other lead onto the ground terminal that goes from the ramps to the power supply.
|
Re: Folger Tech 2020 i3 Printer Kit (Official Thread) August 11, 2015 09:04AM |
Registered: 8 years ago Posts: 135 |
Quote
Mach
Quote
Neverdone
So I finally finished my build the other day. I have loaded the arduino and downloaded the repetier software and done the first 13 pages of the config guide. The last thing I need to do before starting to home and what not is to tune the stepper drivers. This seems to be the part that I find the fuzziest in the instructions. I have read of people just adjusting until the noise goes away, others saying a meter is the best way. Maybe I am missing something, but I have not seen anyone say anywhere about where to connect the meter? I see mention of adjusting parameters in what looks like the config.h file? Can some one shed a little light on this for me? I downloaded the file on the google drive on tuning, but this seems a little vague. I understand what vref is, but am I just supposed to plug it in and adjust the pot? Which pin do I measure the vref on? Thanks for your help!
Take you measurements by putting one of your multimeter's leads onto the pot on the stepper driver, and the other lead onto the ground terminal that goes from the ramps to the power supply.
Be very careful! If you are plugged into mains don't use a metal screwdriver (your going to make a current path). Also, be sure your multimeter probe doesnt slip off the screw, a bunch of people here blew their drivers doing that!
My creations/2020 aluminum parts/FolgerTech i3 upgrades [www.thingiverse.com]
|
Re: Folger Tech 2020 i3 Printer Kit (Official Thread) August 11, 2015 04:28PM |
Registered: 8 years ago Posts: 16 |
I ordered the Folger Tech 2020 i3 Friday, and it is scheduled for delivery tomorrow. After reading through the thread, I didn't expect to see any tracking movement until the end of the week, but USPS has the package. Hopefully they didn't ship the extra nozzle I ordered separate from the printer 

|
Re: Folger Tech 2020 i3 Printer Kit (Official Thread) August 11, 2015 05:10PM |
Registered: 8 years ago Posts: 25 |
|
Re: Folger Tech 2020 i3 Printer Kit (Official Thread) August 11, 2015 05:48PM |
Registered: 8 years ago Posts: 6 |
Quote
blank64
Quote
Blackbird
Are you sure the bearing with teeth on the motor isn't puched too close to the motor body? If it sits right against the motor housing and you have the set screws tightened, it won't spin properly. Easy thing to overlook while putting everything together.Quote
blank64
So I have now finished the build, but am now having some problems trying it out with repetier: (I tried both the marlin included in the drive folder, and the one posted a few pages back)
My y-axis motor doesn't seem to be able to turn the belt (it either barely turns, or skips the belt entirely while turning), I used one of the included belt tensioners so it's pretty tight.
My x-axis motor doesn't seem to be working at all (Although it gets a bit warm after a couple of minutes)
Only one of my z-axis motors is actually turning (the one which I can turn by hand while off), I tried switching where the 2 motors are plugged in, but in each case the same one turns.
Has anyone experienced any of these problems?
I had a couple of the bearings right against the motors, but have now moved them and am getting the same results. I took the belt off of the y axis, and it just vibrates the bearing when I tell it to move. The x axis makes no movement whatsoever, but I can hear different high pitched tones for each of the steps (like my one working motor), so I don't quite know what to make of that.
So right now I'm thinking that 3 of my stepper motors may be broken. I am not able to turn any of them by hand (at all) , and switching their connections to my working one has proved that their drivers are working. My y-axis shudders the shaft when I try to make it move, and the other two make no movement at all but emit a high pitched whine after attempting a step.
Has anyone else encountered a problem like this?
|
Re: Folger Tech 2020 i3 Printer Kit (Official Thread) August 11, 2015 07:46PM |
Registered: 8 years ago Posts: 135 |
Quote
blank64
Quote
blank64
Quote
Blackbird
Are you sure the bearing with teeth on the motor isn't puched too close to the motor body? If it sits right against the motor housing and you have the set screws tightened, it won't spin properly. Easy thing to overlook while putting everything together.Quote
blank64
So I have now finished the build, but am now having some problems trying it out with repetier: (I tried both the marlin included in the drive folder, and the one posted a few pages back)
My y-axis motor doesn't seem to be able to turn the belt (it either barely turns, or skips the belt entirely while turning), I used one of the included belt tensioners so it's pretty tight.
My x-axis motor doesn't seem to be working at all (Although it gets a bit warm after a couple of minutes)
Only one of my z-axis motors is actually turning (the one which I can turn by hand while off), I tried switching where the 2 motors are plugged in, but in each case the same one turns.
Has anyone experienced any of these problems?
I had a couple of the bearings right against the motors, but have now moved them and am getting the same results. I took the belt off of the y axis, and it just vibrates the bearing when I tell it to move. The x axis makes no movement whatsoever, but I can hear different high pitched tones for each of the steps (like my one working motor), so I don't quite know what to make of that.
So right now I'm thinking that 3 of my stepper motors may be broken. I am not able to turn any of them by hand (at all) , and switching their connections to my working one has proved that their drivers are working. My y-axis shudders the shaft when I try to make it move, and the other two make no movement at all but emit a high pitched whine after attempting a step.
Has anyone else encountered a problem like this?
Don't really feel like explaining it, so I will just paste a response from another thread about motor whine here:
Quote
Mel0n
When motors make high pitch noise but do not move, its because the printer thinks your trying to move it in an INCREASING direction, so they turn on and hold their position but wont move further because it doesn't want to crash before it homes. Look at your printer shape settings in repetier, this is really important. If you change your endstop/firmware settings, repetier is still going to tell it to go the wrong way.
Theoretical home is front left of the print bed. So look where you have your endstops and adjust accordingly. An example, your x end stop is on the right, which is max (200). But the software doesn't know this, it thinks min(0) is the endstop. So by telling repetier in printer settings, X-home : max, your letting it know that it should be trying to go to the max value. If this is the case, you also need to switch the position of the endstop plug on your RAMPS from x-min to x-max (reference the schematic, or look at any of my posts on this in the main thread).
Also a link to his thread since you are having (basically) the same problem he was, which has been explained, solved, solved again, and explained in this thread multiple times [forums.reprap.org]
Edited 2 time(s). Last edit at 08/11/2015 07:49PM by mel0n.
My creations/2020 aluminum parts/FolgerTech i3 upgrades [www.thingiverse.com]
|
Re: Folger Tech 2020 i3 Printer Kit (Official Thread) August 11, 2015 07:53PM |
Registered: 8 years ago Posts: 3 |
Quote
corry
Biggest issue: to those who say they got the kit assembled in 4 hours are you *SURE* you have those t nuts rotated in the slots 90 degrees? All of them? They're awful. I know misumi's preinstall t nuts cost a bit, but those (m4) post install t nuts are absolute garbage. Spent hours on single bolts sometimes. Was ready to go to the garage make some thermite just to burn those witchlike t nuts. They've gotta go. Pissed me off something fierce!
I used blue loctite (actually another brand, but same stuff) after trying for quite a bit to get one in. That made the job so simple. Still, took me far longer than 4 hours to assemble.
FolgerTech 2020 i3
Home designed and built CNC router
800x600 80watt laser engraver
|
Re: Folger Tech 2020 i3 Printer Kit (Official Thread) August 11, 2015 08:16PM |
Registered: 8 years ago Posts: 135 |
Quote
therippa
Pics...
STL's...
Extruder - [www.thingiverse.com]
Hotend holder - [www.thingiverse.com]
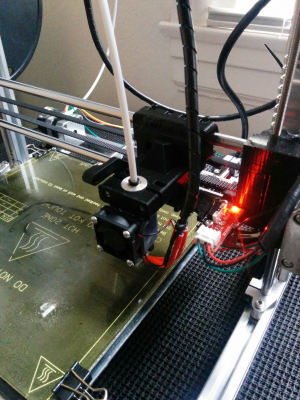
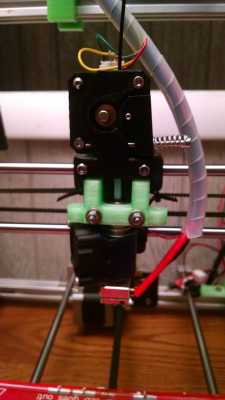
The hotend holder's mounting holes didn't line up with the hole on the Folgertech X-carriage, so I just brought out the drill. This weekend's project will be hooking up the fan (easy) and the capacitive sensor (not as easy) to it.
I know I said I would post, but at the time you posted, My E3D had a catastrophic failure. The guys at filastruder were great, and they comped me a new nossle and heat block. I got my parts in last week and my printer has been running happily since. So I am finally getting around to uploading pics and all and making this post.
Here is an album of pics prior to the failure: [imgur.com]
The failure itself was basically a HORRIBLE clog. I can't advise against Hatchbox ABS enough. Their ABS is complete crap, is full of impurities, and as has been proven multiple times in the community, ISN'T REAL ABS (it doesnt dissolve in acetone). The tolerances of the filament were terrible, I had all kinds of weird things show up in my prints that were exclusively filament related, and from the time I installed my E3D I never removed the filament/changed filament/etc until the clog event. I threw away the roll after I saw how badly it clogged. I also followed instructions I found online for taking apart the E3D and heated the hotend before loostening the nossel, yet it still broke clean off with little force. I could not clear the clog in the heatbreak and had to order a new one with the new parts that filastruder comped for me. ABS should not clog your heatbreak/ptfe, this is further testament to how poor the hatchbox abs is.
Anyways pics of the failure : [imgur.com]
Since it has been fixed, I replaced a bunch of parts on my extruder with the correct/better ones. This is the current state of my printer: [imgur.com]
Also here is a link to the Extruder: [www.thingiverse.com]
P.s. don't worry about my cable management, I have been taking the thing apart every few days and I will put everything in a more permanent spot when I am happy with everything.
Edited 2 time(s). Last edit at 08/11/2015 08:20PM by mel0n.
My creations/2020 aluminum parts/FolgerTech i3 upgrades [www.thingiverse.com]
|
Re: Folger Tech 2020 i3 Printer Kit (Official Thread) August 11, 2015 08:24PM |
Registered: 8 years ago Posts: 276 |
|
Re: Folger Tech 2020 i3 Printer Kit (Official Thread) August 11, 2015 08:31PM |
Registered: 8 years ago Posts: 367 |
Nice work, mel0n. I think replacing the hot end is the next project for me. I've been trying a few different filaments the past few days and will write up a blog post when I've got through the remaining ones. One clog, with PETG, which I was able to clear out.
See my blog at [moosteria.blogspot.com].
See my blog at [moosteria.blogspot.com].
|
Re: Folger Tech 2020 i3 Printer Kit (Official Thread) August 11, 2015 08:36PM |
Registered: 8 years ago Posts: 66 |
I've not tried Hatchbox but I've been using stuff from Seacans (Canada) and a couple rolls from FolgerTech. The FolgerTech black has clogged the stock hot end 2x in a whole roll but I'm thinking it's just a bad nozzle. I changed it to the low profile nozzle from an E3D and it hasn't had any issues yet.
Sigil Pickups || Stunt Monkey Pedals
Sigil Pickups || Stunt Monkey Pedals
|
Re: Folger Tech 2020 i3 Printer Kit (Official Thread) August 11, 2015 10:53PM |
Registered: 8 years ago Posts: 135 |
I had cleared a few pfte/heatbreak clogs that were caused by PLA in the stock hotend, but those actually make sense given the thermal expansion properties of PLA and crappy design of the stock hotend. I also experienced a few clogs as a result of switching between ABS/PLA. However I never saw a clog from ABS, and theoretically you shouldnt unless its at the nossle, or there is some sort of jam up in an area for it to melt and pool up, which there pretty much is none in the E3D V6 because the PTFE goes all the way to the nossle.
Anyways, I have had great luck with sainsmart, and what is what I ordered more of. I prefer ABS now because of better bridging, easier print removal/adhesion, much lower instance of clogs, the ability to dissolve/polish with acetone, better resistance to humidity, and overall better strength since I try to print useful things. I know sainsmart is Chinese, but I have gone through 3 rolls of their ABS and I am really happy with the consistency and quality of the filament. The only complain I have is their cardboard spools, and I have experienced 1 of the crossovers that are described in the amazon reviews. But I really could care less because my printer is happy with it, I am happy with it, and I have seen good consistency ad a great price.
I was going to include some pictures of print quality I am getting, though all of my best prints are on my desk at work with the exception of the nasa wrench. So I will take good pics in good lighting tomorrow and upload some print quality pics with the E3D. (one example you can already see is the green piece on the extruder. I printed that with the E3D as well as the fan ducts that go on it. rough edges on the bottom are from a brim and I never cleaned it up. I prefer printing with a brim with ABS regardless of part size.)
Edited 3 time(s). Last edit at 08/11/2015 11:10PM by mel0n.
My creations/2020 aluminum parts/FolgerTech i3 upgrades [www.thingiverse.com]
|
Re: Folger Tech 2020 i3 Printer Kit (Official Thread) August 12, 2015 12:13AM |
Registered: 8 years ago Posts: 25 |
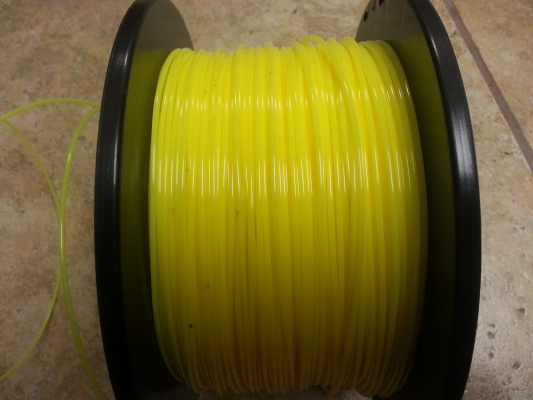
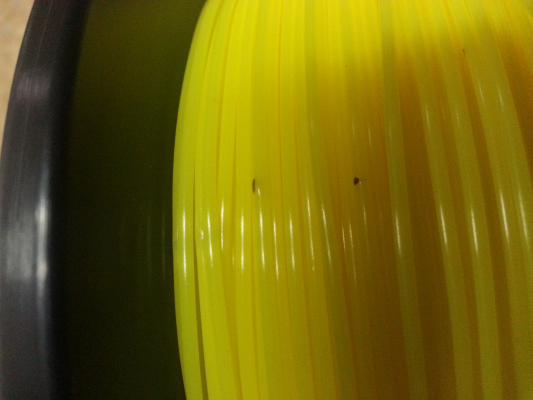
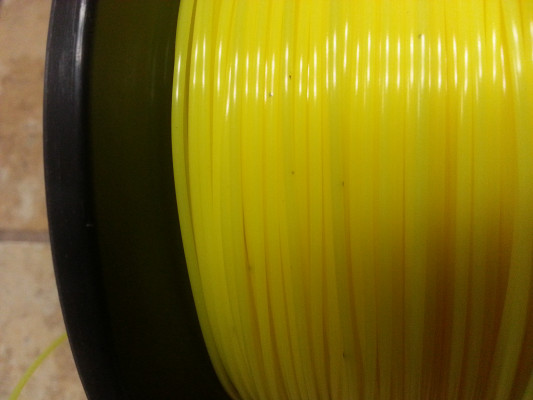
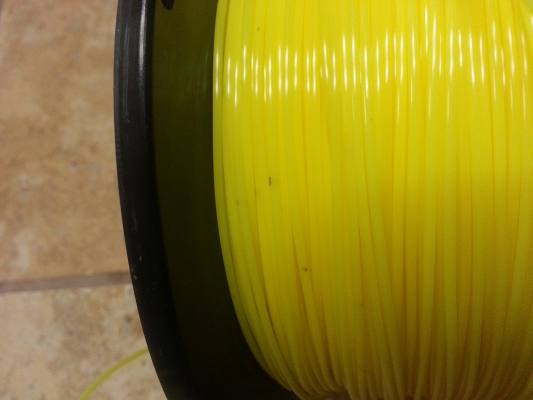
When ordered my printer, I ordered a spool of yellow PLA and a spool of black ABS from Folger Tech. I used the PLA since I got the printer. I went through about half the spool with only 1 PTFE tube jam I was able to basically force through. A few weeks ago I decided to play with with ABS in preparation to printing upgraded parts for the printer. Over the weekend, I got my 1st bad nozzle clog with the Folger Tech ABS. Didn't know what was going on at 1st, but I figured it out and got it cleared. I went to put the PLA back in to print a part, and it got loose and unspooled on me. I unrolled about 30 feet off the spool to re-spool it tight, and this is what I saw 
Good thing this is yellow and I could see the junk in the filament. Now I'm wondering if my black ABS has the same thing in it, and that's what caused my clog!!!
One thing to note... I ordered some JustPLA from Amazon that I have not tried yet. But, the spools from Folger Tech and JustPLA are the same. They even have the same sticker shape, size, font, and color. Even the model/part on the sticker looks to be along the same numbering scheme! So you may want to check your spools if you got it from Folger Tech or JustPLA/JustABS!!!
|
Re: Folger Tech 2020 i3 Printer Kit (Official Thread) August 12, 2015 12:26AM |
Registered: 8 years ago Posts: 367 |
Interesting info. I also have some yellow JustPLA waiting to go. It was super cheap on Amazon. Maybe I'll think twice before using it.
See my blog at [moosteria.blogspot.com].
See my blog at [moosteria.blogspot.com].
|
Re: Folger Tech 2020 i3 Printer Kit (Official Thread) August 12, 2015 12:35AM |
Registered: 8 years ago Posts: 25 |
|
Re: Folger Tech 2020 i3 Printer Kit (Official Thread) August 12, 2015 09:12AM |
Registered: 8 years ago Posts: 121 |
So I went ahead and ordered the 8mm threaded rod. Does anyone know how to modify the firmware to switch from 5mm rods to 400mm Lead Screw 3D Printer Z Axis Lead Screw ACME Lead Screw 8mm Screw Pitch. I plan on printing out the z motor stand offs. Not home to double check if I needed the 300 or 400mm length rods will cut down the 400 if need be.
|
Re: Folger Tech 2020 i3 Printer Kit (Official Thread) August 12, 2015 09:31AM |
Registered: 8 years ago Posts: 135 |
Quote
[email protected]
So I went ahead and ordered the 8mm threaded rod. Does anyone know how to modify the firmware to switch from 5mm rods to 400mm Lead Screw 3D Printer Z Axis Lead Screw ACME Lead Screw 8mm Screw Pitch. I plan on printing out the z motor stand offs. Not home to double check if I needed the 300 or 400mm length rods will cut down the 400 if need be.
[prusaprinters.org] your welcome!

My creations/2020 aluminum parts/FolgerTech i3 upgrades [www.thingiverse.com]
|
Re: Folger Tech 2020 i3 Printer Kit (Official Thread) August 12, 2015 10:37AM |
Registered: 8 years ago Posts: 367 |
Quote
[email protected]
So I went ahead and ordered the 8mm threaded rod. Does anyone know how to modify the firmware to switch from 5mm rods to 400mm Lead Screw 3D Printer Z Axis Lead Screw ACME Lead Screw 8mm Screw Pitch. I plan on printing out the z motor stand offs. Not home to double check if I needed the 300 or 400mm length rods will cut down the 400 if need be.
300mm worked fine for me. The bottom of the screw is about level with the aluminium plate under the bed. I changed z steps to 400. This isn't what the prusa calculator says, and it comes from them being 4-start lead screws. Details at [moosteria.blogspot.com].
See my blog at [moosteria.blogspot.com].
Sorry, only registered users may post in this forum.
