Folger Tech 2020 i3 Printer Kit (Official Thread)
Posted by Dan_FolgerTech
|
Re: Folger Tech 2020 i3 Printer Kit (Official Thread) September 24, 2015 10:52PM |
Registered: 8 years ago Posts: 367 |
Quote
LancelotL
Everything is looking really good on my calibration cube after the belt tensioner and extruder calibration. Having a tough time getting the top layer smooth though. It's kind of saggy in places. Is that a temperature issue?
A picture would help. It could be that you have the temperature too high. The PLA sample I got from Folger said 219C on it, and this is way too hot. Around 190 works better.
See my blog at [moosteria.blogspot.com].
|
Re: Folger Tech 2020 i3 Printer Kit (Official Thread) September 24, 2015 11:17PM |
Registered: 8 years ago Posts: 430 |
Quote
LancelotL
Everything is looking really good on my calibration cube after the belt tensioner and extruder calibration. Having a tough time getting the top layer smooth though. It's kind of saggy in places. Is that a temperature issue?
Could be the temp or an under extrusion. What's the material and temp you are using?
Newbie with Folgertech 2020 i3.
|
Re: Folger Tech 2020 i3 Printer Kit (Official Thread) September 25, 2015 12:03AM |
Registered: 8 years ago Posts: 367 |
My hot tip of the week: if your heat bed takes a long time to come up to temperature, try placing a paperback book on it. My second hot tip: remove the book before the printing starts.
See my blog at [moosteria.blogspot.com].
See my blog at [moosteria.blogspot.com].
|
Re: Folger Tech 2020 i3 Printer Kit (Official Thread) September 25, 2015 01:21AM |
Registered: 8 years ago Posts: 59 |
|
Re: Folger Tech 2020 i3 Printer Kit (Official Thread) September 25, 2015 09:33AM |
Registered: 8 years ago Posts: 541 |
|
Re: Folger Tech 2020 i3 Printer Kit (Official Thread) September 25, 2015 12:02PM |
Registered: 8 years ago Posts: 99 |
|
Re: Folger Tech 2020 i3 Printer Kit (Official Thread) September 25, 2015 12:49PM |
Registered: 8 years ago Posts: 57 |
Quote
woodknack
Quote
animoose
My hot tip of the week: if your heat bed takes a long time to come up to temperature, try placing a paperback book on it. My second hot tip: remove the book before the printing starts.
LMAO
Tip 2 YES very important......
I cracked up too

I put some Reflectix between the heated bed and bottom carriage plate.. and I'll leave a piece on top of the bed while heating, heats much faster. No problems holding temp
|
Re: Folger Tech 2020 i3 Printer Kit (Official Thread) September 25, 2015 12:58PM |
Registered: 9 years ago Posts: 251 |
|
Re: Folger Tech 2020 i3 Printer Kit (Official Thread) September 25, 2015 01:50PM |
Registered: 8 years ago Posts: 59 |
|
Re: Folger Tech 2020 i3 Printer Kit (Official Thread) September 25, 2015 06:42PM |
Registered: 8 years ago Posts: 59 |
|
Re: Folger Tech 2020 i3 Printer Kit (Official Thread) September 25, 2015 11:50PM |
Registered: 8 years ago Posts: 541 |
|
Re: Folger Tech 2020 i3 Printer Kit (Official Thread) September 26, 2015 06:14AM |
Registered: 8 years ago Posts: 30 |
I updated my slic3r to the latest version they have on their website, 1.2.9 Stable, and have been able to print again. But still some things are not printing the software will slice then immediately say stopped working, and if I try to put multiple items on the bed to print, it will freeze and crash the software. Is anyone else experiencing this?
I also ran in to another issue. I started the printer watched the first few layers then walked away from the printer. I came back and found that the print looked like crap and that towards the end of the print you can see that the x-axis started to shift to the left. I releveled the bed, made sure the belts were still tight, made sure the grub screws on the pulley were tight and started the print over. It did the same thing, but in a different spot. I think that it looks like there is too much plastic extruding out, this is causing the rough looking layer on the top of the print, then I noticed that as the printer is traveling it catches on these rough spots and I think that is what is causing it to shift the print. Has anyone seen this before? I am running the same settings that I had on black ABS, just swapped to green, but I would think the settings would stay the same. Can anyone help with this?
I also ran in to another issue. I started the printer watched the first few layers then walked away from the printer. I came back and found that the print looked like crap and that towards the end of the print you can see that the x-axis started to shift to the left. I releveled the bed, made sure the belts were still tight, made sure the grub screws on the pulley were tight and started the print over. It did the same thing, but in a different spot. I think that it looks like there is too much plastic extruding out, this is causing the rough looking layer on the top of the print, then I noticed that as the printer is traveling it catches on these rough spots and I think that is what is causing it to shift the print. Has anyone seen this before? I am running the same settings that I had on black ABS, just swapped to green, but I would think the settings would stay the same. Can anyone help with this?
|
Re: Folger Tech 2020 i3 Printer Kit (Official Thread) September 26, 2015 08:15AM |
Registered: 8 years ago Posts: 59 |
Quote
Neverdone
I updated my slic3r to the latest version they have on their website, 1.2.9 Stable, and have been able to print again. But still some things are not printing the software will slice then immediately say stopped working, and if I try to put multiple items on the bed to print, it will freeze and crash the software. Is anyone else experiencing this?
I also ran in to another issue. I started the printer watched the first few layers then walked away from the printer. I came back and found that the print looked like crap and that towards the end of the print you can see that the x-axis started to shift to the left. I releveled the bed, made sure the belts were still tight, made sure the grub screws on the pulley were tight and started the print over. It did the same thing, but in a different spot. I think that it looks like there is too much plastic extruding out, this is causing the rough looking layer on the top of the print, then I noticed that as the printer is traveling it catches on these rough spots and I think that is what is causing it to shift the print. Has anyone seen this before? I am running the same settings that I had on black ABS, just swapped to green, but I would think the settings would stay the same. Can anyone help with this?
I found that you need to do several things to get a nice smooth top layer. First, go into the slic3r settings and adjust the speed for the top layers. I used 20%. Then, make sure your temperature is not to high. Finally, make sure the infill is more than just a few lines (I used the honeycomb at 40% infill). Oh and one more thing, make sure the settings you are modifiying are actually being used by Slicer. The first couple times I ran it I couldn't figure out why my changes wouldn't take. The I realize slic3r wasn't using the printer settings file I was adjusting. Bed leveling will also be a huge help. I found that i first had to level my x rails because one end was higher than the other. I eyeballed that first and then made minor adjustments using the grub screws.
Oh and make sure you calibrate the feed rate. Read back a few posts to figure that out.
Edited 1 time(s). Last edit at 09/26/2015 08:23AM by LancelotL.
|
Re: Folger Tech 2020 i3 Printer Kit (Official Thread) September 26, 2015 08:16AM |
Registered: 8 years ago Posts: 59 |
|
Re: Folger Tech 2020 i3 Printer Kit (Official Thread) September 26, 2015 08:18AM |
Registered: 8 years ago Posts: 59 |
Quote
tjnamtiw
Quote
LancelotL
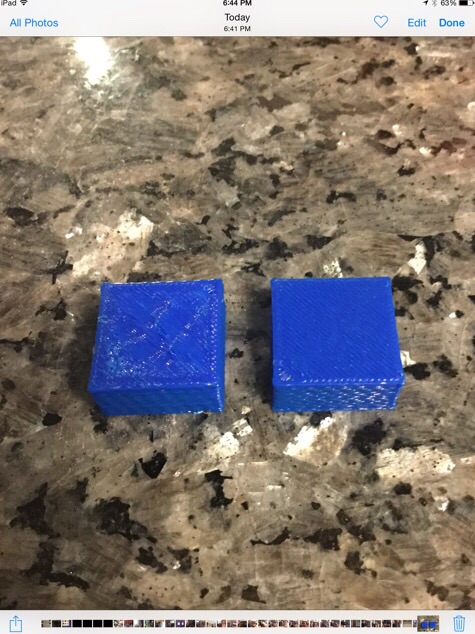
I used the honeycomb infill on the right and made some other refinements - mich nicer finish than the one on the left.
Absolutely! That was the ticket! How did they measure?
The dims are perfect. The iPhone case fit like a glove. I still need to adjust my bed about 1 mm on one corner though.
|
Re: Folger Tech 2020 i3 Printer Kit (Official Thread) September 26, 2015 08:49AM |
Registered: 8 years ago Posts: 30 |
Quote
LancelotL
Quote
Neverdone
I updated my slic3r to the latest version they have on their website, 1.2.9 Stable, and have been able to print again. But still some things are not printing the software will slice then immediately say stopped working, and if I try to put multiple items on the bed to print, it will freeze and crash the software. Is anyone else experiencing this?
I also ran in to another issue. I started the printer watched the first few layers then walked away from the printer. I came back and found that the print looked like crap and that towards the end of the print you can see that the x-axis started to shift to the left. I releveled the bed, made sure the belts were still tight, made sure the grub screws on the pulley were tight and started the print over. It did the same thing, but in a different spot. I think that it looks like there is too much plastic extruding out, this is causing the rough looking layer on the top of the print, then I noticed that as the printer is traveling it catches on these rough spots and I think that is what is causing it to shift the print. Has anyone seen this before? I am running the same settings that I had on black ABS, just swapped to green, but I would think the settings would stay the same. Can anyone help with this?
I found that you need to do several things to get a nice smooth top layer. First, go into the slic3r settings and adjust the speed for the top layers. I used 20%. Then, make sure your temperature is not to high. Finally, make sure the infill is more than just a few lines (I used the honeycomb at 40% infill). Oh and one more thing, make sure the settings you are modifiying are actually being used by Slicer. The first couple times I ran it I couldn't figure out why my changes wouldn't take. The I realize slic3r wasn't using the printer settings file I was adjusting. Bed leveling will also be a huge help. I found that i first had to level my x rails because one end was higher than the other. I eyeballed that first and then made minor adjustments using the grub screws.
Oh and make sure you calibrate the feed rate. Read back a few posts to figure that out.
I think that you misunderstood what I said, by top layer I wasn't actually meaning the top of the piece, more the last row printed. In the picture you can see what happened to the print. Towards the top of the part you can see how it shifted over during the print. Notice how the sides are rough, and the top layer in the print ended up kind of bubbly. This is what happened when I tried to rerun the print. When I noticed that I killed the print until I can figure out what is causing it.
|
Re: Folger Tech 2020 i3 Printer Kit (Official Thread) September 26, 2015 10:57AM |
Registered: 8 years ago Posts: 285 |
Quote
Neverdone
Quote
LancelotL
Quote
Neverdone
I updated my slic3r to the latest version they have on their website, 1.2.9 Stable, and have been able to print again. But still some things are not printing the software will slice then immediately say stopped working, and if I try to put multiple items on the bed to print, it will freeze and crash the software. Is anyone else experiencing this?
I also ran in to another issue. I started the printer watched the first few layers then walked away from the printer. I came back and found that the print looked like crap and that towards the end of the print you can see that the x-axis started to shift to the left. I releveled the bed, made sure the belts were still tight, made sure the grub screws on the pulley were tight and started the print over. It did the same thing, but in a different spot. I think that it looks like there is too much plastic extruding out, this is causing the rough looking layer on the top of the print, then I noticed that as the printer is traveling it catches on these rough spots and I think that is what is causing it to shift the print. Has anyone seen this before? I am running the same settings that I had on black ABS, just swapped to green, but I would think the settings would stay the same. Can anyone help with this?
I found that you need to do several things to get a nice smooth top layer. First, go into the slic3r settings and adjust the speed for the top layers. I used 20%. Then, make sure your temperature is not to high. Finally, make sure the infill is more than just a few lines (I used the honeycomb at 40% infill). Oh and one more thing, make sure the settings you are modifiying are actually being used by Slicer. The first couple times I ran it I couldn't figure out why my changes wouldn't take. The I realize slic3r wasn't using the printer settings file I was adjusting. Bed leveling will also be a huge help. I found that i first had to level my x rails because one end was higher than the other. I eyeballed that first and then made minor adjustments using the grub screws.
Oh and make sure you calibrate the feed rate. Read back a few posts to figure that out.
I think that you misunderstood what I said, by top layer I wasn't actually meaning the top of the piece, more the last row printed. In the picture you can see what happened to the print. Towards the top of the part you can see how it shifted over during the print. Notice how the sides are rough, and the top layer in the print ended up kind of bubbly. This is what happened when I tried to rerun the print. When I noticed that I killed the print until I can figure out what is causing it.
Remember when you change to a different filament, things like the quality and the temperatures that you use will be different. Even though the filament may be from the same manufacturer, the temperature requirements and the filament/print quality change from color to color. Also, you may want to check to see if your X axis rods are sliding back and forth in their holders. I know on my printer, the rods are not cut long enough to bottom out in their sockets allowing them to slide, so that may be causing precision problems during the print.You also may want to enable supports for the overhangs. The knobs may not fit into the other holes when you assemble the chain, due to the extra plastic and the deformation of the holes.
Edited 1 time(s). Last edit at 09/26/2015 11:07AM by Mach.
|
Re: Folger Tech 2020 i3 Printer Kit (Official Thread) September 26, 2015 11:20AM |
Registered: 8 years ago Posts: 30 |
I did not realize that it would be different from color to color. Does anyone have base numbers to use to start on these for different colors? I think that my flow rate might be too high and that might be causing my biggest issue. I would think that temps would pretty well stay the same no?
How do you enable supports? I have been wondering about that. I didn't know if I would have to draw them in or not......
How do you enable supports? I have been wondering about that. I didn't know if I would have to draw them in or not......
|
Re: Folger Tech 2020 i3 Printer Kit (Official Thread) September 26, 2015 12:15PM |
Registered: 8 years ago Posts: 285 |
Quote
Neverdone
I did not realize that it would be different from color to color. Does anyone have base numbers to use to start on these for different colors? I think that my flow rate might be too high and that might be causing my biggest issue. I would think that temps would pretty well stay the same no?
How do you enable supports? I have been wondering about that. I didn't know if I would have to draw them in or not......
The temperatures for each color differ from manufacturer to manufacturer, so you will have to check the specs for your particular brand and colors. I would say the temperatures probably stay within +-/3-5 degrees C, but even a 1 degree change in temp can cause for noticeable quality differences. The setting to enable supports for Slic3r in rep-host is under the "slicer" tab about half way down, and the config for those are under "slicer" tab > configuration > printer settings > support material. I use cura, so I am not quite sure which support pattern works best in slic3r, but I would probably avoid honeycomb since a honeycomb structure is pretty strong, so it may be a royal pain to remove


|
Re: Folger Tech 2020 i3 Printer Kit (Official Thread) September 26, 2015 06:54PM |
Registered: 8 years ago Posts: 367 |
I tried printing with Ninjaflex this weekend. No go! I still use the original direct drive extruder and it just won't grab the filament tightly enough to drive it through. Probably one of the modified extruders with a spring grip would work better.
See my blog at [moosteria.blogspot.com].
See my blog at [moosteria.blogspot.com].
|
Re: Folger Tech 2020 i3 Printer Kit (Official Thread) September 26, 2015 07:32PM |
Registered: 8 years ago Posts: 59 |
Quote
tjnamtiw
Quote
Tenny
Ok I got it fixed.
So if you keep the cables wired as they are in the manual this will fix it:
Change the following in configuration.h
- #define INVERT_X_DIR true to #define INVERT_X_DIR false
- #define X_HOME_DIR -1 to #define X_HOME_DIR 1
- With the printer off PHYSICALLY move the x-axis stopper to the left one set of pins (this makes it so it's the x max instead of x-min)
Now if you are using rep host, you need to go to printer settings > printer shape and change home X: from min to Max.
In Octoprint it looks like nothing is needed.
Now there are ways of changing pins.h so you don't have to do #3 but I prefer to do it this way.
EDIT: Ok, yes this fixed the problem. The error i was having after this was another change I set that I forgot about.
Thanks go out to Tenny for this one! This set up completely solved my X axis problems! So darn simple too. One key was to move the X end stop plug from the right most set of pins to the set just to the left of that one. Those are for X axis MAX. Also in Repetier, by choosing home X to Max, it eliminates the red numbers over 200 that I was seeing.
Got my bed leveled and, since I'm using those black clips to hold down my glass, I squeezed in my max dimensions to 180 by 180 and moved my end stops to clear the clips. Now all I need is a thermistor for my hotend and I can set up the extruder. I moved the bed thermistor lead over to the hotend plug so I could work the motions.
Can't wait! Thank heavens that you all are here!
[www.google.com]
I implemented the changes above and operationally they were fine. However my first asymmetrical prints were mirrored. I believe I read about this issue in some earlier posts so I will attempt to correct.
|
Re: Folger Tech 2020 i3 Printer Kit (Official Thread) September 26, 2015 08:18PM |
Registered: 8 years ago Posts: 33 |
[imgur.com]
Guys I am trying to figure out on this print of tracks for the grand kids tank out of 12 tracks it appears that 2 of the tracks got some light bridging on the drive opening. I did this print using sd card and s3d. I am printed 12 more but from the computer and got none of the bridging on the tracks. the Bridging was easily removed but I can't figure out why it happened. I am going to print 12 more tomorrow using the sd card and see if it happens again. All of the tracks measure within .02mm of each other. I just can't figure this out.
Guys I am trying to figure out on this print of tracks for the grand kids tank out of 12 tracks it appears that 2 of the tracks got some light bridging on the drive opening. I did this print using sd card and s3d. I am printed 12 more but from the computer and got none of the bridging on the tracks. the Bridging was easily removed but I can't figure out why it happened. I am going to print 12 more tomorrow using the sd card and see if it happens again. All of the tracks measure within .02mm of each other. I just can't figure this out.
|
Re: Folger Tech 2020 i3 Printer Kit (Official Thread) September 27, 2015 08:30AM |
Registered: 8 years ago Posts: 59 |
|
Re: Folger Tech 2020 i3 Printer Kit (Official Thread) September 27, 2015 09:05AM |
Registered: 8 years ago Posts: 59 |
|
Re: Folger Tech 2020 i3 Printer Kit (Official Thread) September 27, 2015 01:16PM |
Registered: 8 years ago Posts: 541 |
I got tired of wrestling with the filament roll on the side of my FT 2020 and wondering how it was affecting the extruder drive and making it slip sometimes. I made a PVC stand for the time being but I didn't like the filament dragging over my LCD panel that I have mounted on the top. I used Sketchup to design this simple standoff. >> [www.thingiverse.com]
I have Rhino, Alibre, Blender and OpenSCAD but not enough time to master any of them. I've used 2D AutoCad ever since it first came out in the DOS version but never got my head around 3D. Rhino is pretty cool but OpenSCAD defies my imagination. It's like programming all over again rather than a pure CAD program.
Anyway, maybe this standoff will help someone. I'm still madly printing away trying to keep up with the wife's honey--do list of goodies. I do hear one Y axis bearing starting to get 'ballsy'. grrrrrrrrrrrr. I probably already have 100 hours on it.
Edited 1 time(s). Last edit at 09/27/2015 03:57PM by tjnamtiw.
|
Re: Folger Tech 2020 i3 Printer Kit (Official Thread) September 27, 2015 08:17PM |
Registered: 8 years ago Posts: 99 |
Quote
tjnamtiw
[attachment 63052 filament_spacer1.jpg][attachment 63051 filament_spacer.jpg]I got tired of wrestling with the filament roll on the side of my FT 2020 and wondering how it was affecting the extruder drive and making it slip sometimes. I made a PVC stand for the time being but I didn't like the filament dragging over my LCD panel that I have mounted on the top. I used Sketchup to design this simple standoff. >> [www.thingiverse.com]
I have Rhino, Alibre, Blender and OpenSCAD but not enough time to master any of them. I've used 2D AutoCad ever since it first came out in the DOS version but never got my head around 3D. Rhino is pretty cool but OpenSCAD defies my imagination. It's like programming all over again rather than a pure CAD program.
Anyway, maybe this standoff will help someone. I'm still madly printing away trying to keep up with the wife's honey--do list of goodies. I do hear one Y axis bearing starting to get 'ballsy'. grrrrrrrrrrrr. I probably already have 100 hours on it.
Nice!
I was in the same boat as you. Then I discovered TinkerCad. Its free and web based and VERY easy. A kid can make stuff with it. There are lesson right on there page too. Im having as much fun designing things as I am printing them. And really if you have your own printer there are going to be things you want to print but cannot find without drawing them up yourself. Also you can take stuff from thingiverse, like say a 2020 extrusion clip .stl and drop it into tinkercad and then take another object from thingiverse, say a led light switch box.stl and drop that into tinker cad too. Then you can merge the two drawings together the way you want to work for the app you want it for without spending hours trying to draw every part.
|
Re: Folger Tech 2020 i3 Printer Kit (Official Thread) September 27, 2015 08:37PM |
Registered: 8 years ago Posts: 541 |
|
Re: Folger Tech 2020 i3 Printer Kit (Official Thread) September 27, 2015 09:37PM |
Registered: 8 years ago Posts: 57 |
Quote
therippa
I would really recommend moving your x-axis to where it should be, on the left side, while you're doing this upgrade. It will solve a bunch of problems, some of which are being able to run G28 (it homes differently after autolevel is configured) and G29 successfully. If you need any pointers you can view the diffs on the branch I actually use for my setup (I use inductive autolevel, but the settings are similar) - [github.com]
Also, as soon as Marlin 1.1 is officially released, I'll put out a new release with the folgertech settings
OK - hit my first problem.
Got the servo, Z end stop microswitch all set up.
Here's what happens.
I can home X and Y on their own - both go to 0.
If I try to home Z, it says Z Probe Out - bed -- I expect that, because safe homing is on.
I move X to 100, Y to 100. Home Z -- no problem. It drops the servo arm, probes the bed, and is now zero. Z on my LCD shows my offset (9.89).
Issue G29 and it tries to probe waaaay off the bed to the left - like it is not honoring the offsets. Config.h attached
I compared a lot of configs.. can't figure it out. Unless I'm just doing something. Whats your pre print custom G code look like in slic3r?
Edit: figured it out. Needed this in my config.h
#define DISABLE_MAX_ENDSTOPS
answer was in: [forums.reprap.org]
Edited 4 time(s). Last edit at 09/28/2015 12:03AM by srcga.
|
Re: Folger Tech 2020 i3 Printer Kit (Official Thread) September 28, 2015 02:09PM |
Registered: 8 years ago Posts: 285 |
|
Re: Folger Tech 2020 i3 Printer Kit (Official Thread) September 28, 2015 04:30PM |
Registered: 8 years ago Posts: 541 |
Quote
Mach
Hey tjnamtiw, have you tried the full graphics controller? If you did, could you get it to work properly?
No, I haven't tried it ............yet.
All of these 'goodies' are very tempting but I ask myself "Self, do you really need that right now when you're having enough fun making STUFF and designing new STUFF? AND it's all working, so don't screw with it!"I haven't really even looked at the advantages of the new display vs the one I have, to be honest. To be equally honest, at this point, I can see why everyone is making such a big deal out of this self-leveling BS when I've run about 100 hours and my bed still has a .1 mm gap in all four corners. (checked it yesterday). That goes for the threaded rod vs lead screws for the Z axis. I know the advantages of lead screws but for the Z axis that gets used so very little, it makes little sense. There's no backlash because you have the entire X axis assembly hanging on it taking up the backlash. I can see real advantages for the X and Y axes, but not the Z. If any emphasis should be brought to bear, it should be on eliminating these horrible 8 mm linear bearings and the alignment issues of the twin rods, which causes most of the problems IMHO. Most people don't have a clue that they are the weak link in the whole reprap design.
Wow, you wanted a simple yes or no, didn't you? hahaha


Sorry, only registered users may post in this forum.