Folger Tech 2020 i3 Printer Kit (Official Thread)
Posted by Dan_FolgerTech
|
Re: Folger Tech 2020 i3 Printer Kit (Official Thread) October 19, 2015 10:23PM |
Registered: 8 years ago Posts: 62 |
Quote
sonnylowe
Quote
Mrfus
So sad... while doing all the wiring i found that the thermistor on the hot end it's dead... i just ordered two for replace the broken one and have a spare, looks like when they crimp the shield one if the legs on the thermistor got broken.
I broke the one in my new hot end, I bought THIS ONE as a replacement, it's very easy to setup :-)
I just checked my MK8 Extruder Heat Block, you could remove the 3mm set screw that holds the old thermistor in place and replace it with this screw-in thermistor...
I was thinking about searching online for something like that... as soon as i get home tonight i will give the thermistor one last try with the soldering station!
Tomorrow morning i will install the endstops and clean up some the wiring in order to prepare for the adjusting of the steeper drivers... i procrastinate on printing the X endstop and finishing the design of a simple bracket for the LCD so im just going to use the ones from the kit to start testing motors and any workout mechanical problems, i hope that by the time i have all running as should be the thermistor, borosilicate glass and braided sleeve wrap that ordered be home.
|
Re: Folger Tech 2020 i3 Printer Kit (Official Thread) October 19, 2015 10:37PM |
Registered: 8 years ago Posts: 16 |
I got the missing parts and finished my assembly! I'm currently working on calibrating and fine tuning. However, whenever I move my Z axis it starts to make a high pitched whine until I disconnect the power or turn off the motors. I saw a few other people with the same issue, I just didn't find the fix.

|
Re: Folger Tech 2020 i3 Printer Kit (Official Thread) October 19, 2015 10:41PM |
Registered: 8 years ago Posts: 16 |
Quote
therippa
Quote
Spam
Woo Hoo! It's alive!
Anyway, lots of success after some trial, error, and some changes to the Configuration file... The instructions are a little light, but every problem I had was, for the most part, documented somewhere in this thread...
Here's what I discovered: For those about to build, we salute you!
Oh, these are in no particular order...
1. Read everything, read ahead, then build.
2. Spend a lot of time aligning your chrome rods, you'll be thankful you did later.
3. YOU HAVE TO ADJUST YOUR STEPPER CONTROLLERS. The default setting worked, but my X and Z motors got hot, and the damn thing was LOUD. By adjusting the motors you can cut the heat, and the noise. There are a ton of youtube videos with different methods... One guy said crank it to the max, and go, another shows measuring voltages (on a board so small you have no choice but to short stuff out). but the last (by an Indian gentleman) said to turn them way down, then turn them up to the point you get reliable movement. Works like a charm! X and Z temps dropped, and the noise went down significantly.
4. The linear bearings make a lot of noise... so I thought... Once assembled, if you have reasonably straight chrome rods, and you spent some time running the hot-plate back and forth with one set of rods not completely tightened down, you can get real smooth action. The bearings, at the speeds the machine runs, don't make as much noise as the steppers...
5. Don't be afraid to muck with the configuration.h file. I had to change #define X_HOME_DIR -1 to 1, otherwise home went the wrong way. YES, I flipped the stepper controller around, but then the stop switch was wrong, Hey it worked for me. I also had to comment out: #define ENDSTOPPULLUP_XMAX otherwise the board would think I had a left side X stop switch, and would not move left...
6. best I can tell, but I could be wrong, the stop switch jumpers don't always go where the instructions say to. Again, worked for me. . .
7. The extruder: before you mount it, the head should be tight, and not twist around. I had a problem at one point when I had my Z axis too low that PLA was leaking around the threads. Loosen up the extruder nozzle, screw in the threaded feeder tube a bit, and tighten the extruder nozzle down against it. None of it should move. At one point, I could not get anything to feed, so I took the whole extruder head apart. Do this before you put filament in... you'll need to know how to do this later anyway... I found the small piece of teflon tubing was kinked inside the threaded extruder extension piece... probably from me trying to force the filament through and it caught on the edge.
8. Before you print: Turn on the heater bed, and the extruder... Home the machine, THEN go get your files ready. That will save you about 10 minutes of waiting. . .
9. A couple of the printed parts had some shrinkage. Don't be wussy about pulling out a saw or a heat gun to warp them back into shape. The belt holder on the bed was warped and it was impossible to get the belt in. A little heat from a heat gun, and it was a piece of cake. The X carriage was similarly warped, and was too small for both the bearings and the extruder asstembly. I used a dremel to expand the single bearing, and to remove the spacer in between the two... I enlarged the holes for the stepper bolts to get them wide enough to fit. - Despite the lack of perfection, they work great. Also, the Z parts: the hole that the threaded rod passed through was too tight... I found a drill just slightly bigger than the rod and cleaned it out...
10. I, in my noobish ignorance, in an earlier post complained about the bearing noise... I'll say it again: I was wrong... yes, fancy delrin bushings might be a little quieter, but they're not nearly as noisy as I thought they would be while operating the printer.
11. A heated bed eliminates the need for all that fancy carp on the bed: hairspray, glue sticks, painters tape, whatever. I thought I needed that stuff... until I tried without it... My last print finished a few minutes ago, and I could hear a popping and cracking sound as the plastic and glass shrunk differently as they cooled. The result? Darn parts fell off with no need for a razor blade or anything. All those silly tricks that OTHER people use are just to get the first layer to stick. Heated beds rock, and my sub $300 printer has one, so there...
12. Lubrication is necessary. A good synthetic grease, in very small quantities on every bearing surface and the threaded Z rods is absolutely necessary... Be sure to wipe the rods down from time to time and add new grease. It is a machine, no different than your car.
Ok, I'm getting punchy, it's late, and the kids have about 50 things they want to print tomorrow. That is all I can remember... Print on and thanks for all the help!
Regarding item #11 - you will soon find yourself loving your gluestick if you're printing ABS

well thanks this should solve my loud and warm z axis!
|
Re: Folger Tech 2020 i3 Printer Kit (Official Thread) October 20, 2015 12:14AM |
Registered: 8 years ago Posts: 62 |
Quote
IWantToBeAPrincess
I got the missing parts and finished my assembly! I'm currently working on calibrating and fine tuning. However, whenever I move my Z axis it starts to make a high pitched whine until I disconnect the power or turn off the motors. I saw a few other people with the same issue, I just didn't find the fix.
Really nice and clean work!! My printer is a mess... I was going to finish the wiring today but the thermistor got busted and I end up fixing a TV wall support in the house instead

|
Re: Folger Tech 2020 i3 Printer Kit (Official Thread) October 20, 2015 12:50AM |
Registered: 8 years ago Posts: 48 |
|
Re: Folger Tech 2020 i3 Printer Kit (Official Thread) October 20, 2015 11:33AM |
Registered: 8 years ago Posts: 84 |
Quote
IWantToBeAPrincess
I got the missing parts and finished my assembly! I'm currently working on calibrating and fine tuning. However, whenever I move my Z axis it starts to make a high pitched whine until I disconnect the power or turn off the motors. I saw a few other people with the same issue, I just didn't find the fix.
Check your stepper voltages, if they are too high or low it will do that.
|
Re: Folger Tech 2020 i3 Printer Kit (Official Thread) October 20, 2015 08:15PM |
Registered: 8 years ago Posts: 16 |
they were way to high I used a multi meter and brought them down to .430 voltsQuote
built350camaro
Quote
IWantToBeAPrincess
I got the missing parts and finished my assembly! I'm currently working on calibrating and fine tuning. However, whenever I move my Z axis it starts to make a high pitched whine until I disconnect the power or turn off the motors. I saw a few other people with the same issue, I just didn't find the fix.
Check your stepper voltages, if they are too high or low it will do that.
Hopefully that helps!
Thanks! cable wrap is my friend and a dozen zip ties.Quote
Mrfus
Really nice and clean work!! My printer is a mess... I was going to finish the wiring today but the thermistor got busted and I end up fixing a TV wall support in the house instead
it's also a great cpu cooler!Quote
Flyer
That's quite the cooling unit you have on your printer.....
|
Re: Folger Tech 2020 i3 Printer Kit (Official Thread) October 20, 2015 09:26PM |
Registered: 8 years ago Posts: 16 |
alright, day two of troubleshooting and my hot end is getting...too hot. Is this a common problem or have I missed another glaring obvious step? If not, I have an old heat sink I can wrap around the stepper motor to cool it.
here's my on the fly fix for a test print that's at 90%

here's my on the fly fix for a test print that's at 90%
|
Re: Folger Tech 2020 i3 Printer Kit (Official Thread) October 20, 2015 10:58PM |
Registered: 8 years ago Posts: 13 |
|
Re: Folger Tech 2020 i3 Printer Kit (Official Thread) October 21, 2015 12:14AM |
Registered: 8 years ago Posts: 84 |
|
Re: Folger Tech 2020 i3 Printer Kit (Official Thread) October 21, 2015 12:38AM |
Registered: 8 years ago Posts: 62 |
Quote
IWantToBeAPrincess
alright, day two of troubleshooting and my hot end is getting...too hot. Is this a common problem or have I missed another glaring obvious step? If not, I have an old heat sink I can wrap around the stepper motor to cool it.
here's my on the fly fix for a test print that's at 90%
I was able to resolder my thermistor and with a little bit of kapton tape it's fixed (I order one replacement from FolgerTech and one set like the one that Sonnylowe mentioned, let's see which one get here first), I just put today the endstop brackets (the original ones) and I think I got all the wiring right, tomorrow I will get the firmware loaded on the arduino, adjust the voltage on the Drivers, and install Repetier on my laptop so I can do a quick hardware check (not printing, still waiting for the borosilicate glass)...
What host are you using?
Mr.Fus
<------------------------------------------------->
Green M3D (Running v.1.3.6.3Beta)
FolgerTech Prusa i3 (2020 Frame)
<------------------------------------------------>
|
Re: Folger Tech 2020 i3 Printer Kit (Official Thread) October 21, 2015 04:39AM |
Registered: 8 years ago Posts: 276 |
Quote
Mrfus
Quote
IWantToBeAPrincess
alright, day two of troubleshooting and my hot end is getting...too hot. Is this a common problem or have I missed another glaring obvious step? If not, I have an old heat sink I can wrap around the stepper motor to cool it.
here's my on the fly fix for a test print that's at 90%
I was able to resolder my thermistor and with a little bit of kapton tape it's fixed (I order one replacement from FolgerTech and one set like the one that Sonnylowe mentioned, let's see which one get here first), I just put today the endstop brackets (the original ones) and I think I got all the wiring right, tomorrow I will get the firmware loaded on the arduino, adjust the voltage on the Drivers, and install Repetier on my laptop so I can do a quick hardware check (not printing, still waiting for the borosilicate glass)...
What host are you using?
Not to be a downer, and I'm aware that there is failsafe code in Marlin, but make sure you don't leave the area while you're printing until you get your replacements. No one wants to see your place go up in flames because of a failed thermistor

Need help? Visit the Folgertech Wikia Page
The latest Marlin firmware with Folgertech Prusa i3 settings merged in, get it here
And check out my designs on Thingiverse, and follow me if you like what you see!
|
Re: Folger Tech 2020 i3 Printer Kit (Official Thread) October 21, 2015 10:12AM |
Registered: 8 years ago Posts: 62 |
Quote
therippa
Quote
Mrfus
Quote
IWantToBeAPrincess
alright, day two of troubleshooting and my hot end is getting...too hot. Is this a common problem or have I missed another glaring obvious step? If not, I have an old heat sink I can wrap around the stepper motor to cool it.
here's my on the fly fix for a test print that's at 90%
I was able to resolder my thermistor and with a little bit of kapton tape it's fixed (I order one replacement from FolgerTech and one set like the one that Sonnylowe mentioned, let's see which one get here first), I just put today the endstop brackets (the original ones) and I think I got all the wiring right, tomorrow I will get the firmware loaded on the arduino, adjust the voltage on the Drivers, and install Repetier on my laptop so I can do a quick hardware check (not printing, still waiting for the borosilicate glass)...
What host are you using?
Not to be a downer, and I'm aware that there is failsafe code in Marlin, but make sure you don't leave the area while you're printing until you get your replacements. No one wants to see your place go up in flames because of a failed thermistor
I'm only using the fixed one to get the software running and poke around to get familiar with it and testing that the extruder heating element is running... I'm so limited on free time that if i can print something it's going to be until next week and according to the traking numbers the two new thermistors are supposed to arrive Saturday so i will have the extruder fully functional to print the test cube next sunday (?)
I have a question, when connecting the endstops i notice that there are more headers label endstop on the board. I followed the instructions and connected my on the 3rd, fifth and last connector (positive on top signal on the bottom).... what is the function of the other ports?
Edited 1 time(s). Last edit at 10/21/2015 10:44AM by Mrfus.
Mr.Fus
<------------------------------------------------->
Green M3D (Running v.1.3.6.3Beta)
FolgerTech Prusa i3 (2020 Frame)
<------------------------------------------------>
|
Re: Folger Tech 2020 i3 Printer Kit (Official Thread) October 21, 2015 01:30PM |
Registered: 8 years ago Posts: 16 |
Quote
Mrfus
Quote
therippa
Quote
Mrfus
Quote
IWantToBeAPrincess
alright, day two of troubleshooting and my hot end is getting...too hot. Is this a common problem or have I missed another glaring obvious step? If not, I have an old heat sink I can wrap around the stepper motor to cool it.
here's my on the fly fix for a test print that's at 90%
I was able to resolder my thermistor and with a little bit of kapton tape it's fixed (I order one replacement from FolgerTech and one set like the one that Sonnylowe mentioned, let's see which one get here first), I just put today the endstop brackets (the original ones) and I think I got all the wiring right, tomorrow I will get the firmware loaded on the arduino, adjust the voltage on the Drivers, and install Repetier on my laptop so I can do a quick hardware check (not printing, still waiting for the borosilicate glass)...
What host are you using?
Not to be a downer, and I'm aware that there is failsafe code in Marlin, but make sure you don't leave the area while you're printing until you get your replacements. No one wants to see your place go up in flames because of a failed thermistor
I'm only using the fixed one to get the software running and poke around to get familiar with it and testing that the extruder heating element is running... I'm so limited on free time that if i can print something it's going to be until next week and according to the traking numbers the two new thermistors are supposed to arrive Saturday so i will have the extruder fully functional to print the test cube next sunday (?)
I have a question, when connecting the endstops i notice that there are more headers label endstop on the board. I followed the instructions and connected my on the 3rd, fifth and last connector (positive on top signal on the bottom).... what is the function of the other ports?
I'm hosting the pictures on imgur? The other end stop connectors are for the max distance of the x y and z because the firmware has the max distance they don't seem nessasary.
I still however have no idea what I'm doing.
|
Re: Folger Tech 2020 i3 Printer Kit (Official Thread) October 21, 2015 01:43PM |
Registered: 8 years ago Posts: 276 |
Quote
Mrfus
Quote
therippa
Quote
Mrfus
Quote
IWantToBeAPrincess
alright, day two of troubleshooting and my hot end is getting...too hot. Is this a common problem or have I missed another glaring obvious step? If not, I have an old heat sink I can wrap around the stepper motor to cool it.
here's my on the fly fix for a test print that's at 90%
I was able to resolder my thermistor and with a little bit of kapton tape it's fixed (I order one replacement from FolgerTech and one set like the one that Sonnylowe mentioned, let's see which one get here first), I just put today the endstop brackets (the original ones) and I think I got all the wiring right, tomorrow I will get the firmware loaded on the arduino, adjust the voltage on the Drivers, and install Repetier on my laptop so I can do a quick hardware check (not printing, still waiting for the borosilicate glass)...
What host are you using?
Not to be a downer, and I'm aware that there is failsafe code in Marlin, but make sure you don't leave the area while you're printing until you get your replacements. No one wants to see your place go up in flames because of a failed thermistor
I'm only using the fixed one to get the software running and poke around to get familiar with it and testing that the extruder heating element is running... I'm so limited on free time that if i can print something it's going to be until next week and according to the traking numbers the two new thermistors are supposed to arrive Saturday so i will have the extruder fully functional to print the test cube next sunday (?)
I have a question, when connecting the endstops i notice that there are more headers label endstop on the board. I followed the instructions and connected my on the 3rd, fifth and last connector (positive on top signal on the bottom).... what is the function of the other ports?
There is a min and max endstop for each axis. If you load my updated firmware, you're going to want to move the x-endstop one set of pins over to max (this is the correct marlin behavior, folgertech has it wrong in the guide)
Need help? Visit the Folgertech Wikia Page
The latest Marlin firmware with Folgertech Prusa i3 settings merged in, get it here
And check out my designs on Thingiverse, and follow me if you like what you see!
|
Re: Folger Tech 2020 i3 Printer Kit (Official Thread) October 21, 2015 02:20PM |
Registered: 8 years ago Posts: 62 |
Quote
therippa
Quote
Mrfus
Quote
therippa
Quote
Mrfus
Quote
IWantToBeAPrincess
alright, day two of troubleshooting and my hot end is getting...too hot. Is this a common problem or have I missed another glaring obvious step? If not, I have an old heat sink I can wrap around the stepper motor to cool it.
here's my on the fly fix for a test print that's at 90%
I was able to resolder my thermistor and with a little bit of kapton tape it's fixed (I order one replacement from FolgerTech and one set like the one that Sonnylowe mentioned, let's see which one get here first), I just put today the endstop brackets (the original ones) and I think I got all the wiring right, tomorrow I will get the firmware loaded on the arduino, adjust the voltage on the Drivers, and install Repetier on my laptop so I can do a quick hardware check (not printing, still waiting for the borosilicate glass)...
What host are you using?
Not to be a downer, and I'm aware that there is failsafe code in Marlin, but make sure you don't leave the area while you're printing until you get your replacements. No one wants to see your place go up in flames because of a failed thermistor
I'm only using the fixed one to get the software running and poke around to get familiar with it and testing that the extruder heating element is running... I'm so limited on free time that if i can print something it's going to be until next week and according to the traking numbers the two new thermistors are supposed to arrive Saturday so i will have the extruder fully functional to print the test cube next sunday (?)
I have a question, when connecting the endstops i notice that there are more headers label endstop on the board. I followed the instructions and connected my on the 3rd, fifth and last connector (positive on top signal on the bottom).... what is the function of the other ports?
There is a min and max endstop for each axis. If you load my updated firmware, you're going to want to move the x-endstop one set of pins over to max (this is the correct marlin behavior, folgertech has it wrong in the guide)
Ok... so there are two sets of connectors per axis and we can have a max and min endstop, it make sense, avoid damaging the machine when the values input are out of the physical limits of movement for the printer. I have my end stop for X on the right side and I'm ready to upload your firmware, did I need to change the endstop to the left side and move the connector to the 5fth position or it's ok if i keep it physically on the right side and only change the position of the Dupont connector from row 6 to 5?

by the way I have the 2004 LCD and want to install it now, I found on the RepRap wiki that I need to change the follow lines on Marlin to get it working:
"In "Configuration.h”
Change line 46 to #define MOTHERBOARD 33
Change line 306 to #define REPRAP_DISCOUNT_SMART_CONTROLLER (just remove the // at the beginning)
Change line 326 to #define NEWPANEL //enable this if you have a click-encoder panel (just remove the // at the beginning)
Switch over to "Pins.h" and change line 318 to #define RAMPS_V_1_3 (just remove the // at the beginning)
Upload the firmware, power off the Arduino, connect the panel, reapply power, and everything should work."
This changes are mention for V1 of Marlin, did the same changes need to be made on your updated firmware?
Edited 1 time(s). Last edit at 10/21/2015 02:25PM by Mrfus.
Mr.Fus
<------------------------------------------------->
Green M3D (Running v.1.3.6.3Beta)
FolgerTech Prusa i3 (2020 Frame)
<------------------------------------------------>
|
Re: Folger Tech 2020 i3 Printer Kit (Official Thread) October 21, 2015 02:39PM |
Registered: 8 years ago Posts: 276 |
Quote
Mrfus
Quote
therippa
Quote
Mrfus
Quote
therippa
Quote
Mrfus
Quote
IWantToBeAPrincess
alright, day two of troubleshooting and my hot end is getting...too hot. Is this a common problem or have I missed another glaring obvious step? If not, I have an old heat sink I can wrap around the stepper motor to cool it.
here's my on the fly fix for a test print that's at 90%
I was able to resolder my thermistor and with a little bit of kapton tape it's fixed (I order one replacement from FolgerTech and one set like the one that Sonnylowe mentioned, let's see which one get here first), I just put today the endstop brackets (the original ones) and I think I got all the wiring right, tomorrow I will get the firmware loaded on the arduino, adjust the voltage on the Drivers, and install Repetier on my laptop so I can do a quick hardware check (not printing, still waiting for the borosilicate glass)...
What host are you using?
Not to be a downer, and I'm aware that there is failsafe code in Marlin, but make sure you don't leave the area while you're printing until you get your replacements. No one wants to see your place go up in flames because of a failed thermistor
I'm only using the fixed one to get the software running and poke around to get familiar with it and testing that the extruder heating element is running... I'm so limited on free time that if i can print something it's going to be until next week and according to the traking numbers the two new thermistors are supposed to arrive Saturday so i will have the extruder fully functional to print the test cube next sunday (?)
I have a question, when connecting the endstops i notice that there are more headers label endstop on the board. I followed the instructions and connected my on the 3rd, fifth and last connector (positive on top signal on the bottom).... what is the function of the other ports?
There is a min and max endstop for each axis. If you load my updated firmware, you're going to want to move the x-endstop one set of pins over to max (this is the correct marlin behavior, folgertech has it wrong in the guide)
Ok... so there are two sets of connectors per axis and we can have a max and min endstop, it make sense, avoid damaging the machine when the values input are out of the physical limits of movement for the printer. I have my end stop for X on the right side and I'm ready to upload your firmware, did I need to change the endstop to the left side and move the connector to the 5fth position or it's ok if i keep it physically on the right side and only change the position of the Dupont connector from row 6 to 5?
by the way I have the 2004 LCD and want to install it now, I found on the RepRap wiki that I need to change the follow lines on Marlin to get it working:
"In "Configuration.h”
Change line 46 to #define MOTHERBOARD 33
Change line 306 to #define REPRAP_DISCOUNT_SMART_CONTROLLER (just remove the // at the beginning)
Change line 326 to #define NEWPANEL //enable this if you have a click-encoder panel (just remove the // at the beginning)
Switch over to "Pins.h" and change line 318 to #define RAMPS_V_1_3 (just remove the // at the beginning)
Upload the firmware, power off the Arduino, connect the panel, reapply power, and everything should work."
This changes are mention for V1 of Marlin, did the same changes need to be made on your updated firmware?
You keep the physical location of the endstop on the right side, and move the dupont connector. You'll also need to change X-endstop to MAX in your host.
As for the LCD stuff, I already have the 2004 LCD enabled in the build, so it should work without having to change anything.
Need help? Visit the Folgertech Wikia Page
The latest Marlin firmware with Folgertech Prusa i3 settings merged in, get it here
And check out my designs on Thingiverse, and follow me if you like what you see!
|
Re: Folger Tech 2020 i3 Printer Kit (Official Thread) October 21, 2015 02:50PM |
Registered: 8 years ago Posts: 33 |
I finally got everything set up!
I am using a glass print bed with a sheet of PEI on top of it.
I leveled the bed and also calibrated the extruder.
I am running The Rippas configuration.h file and I have made some small changes to account for calibrating the extruder,
Overall I am pleased with this kit but i have some more questions over calibration.
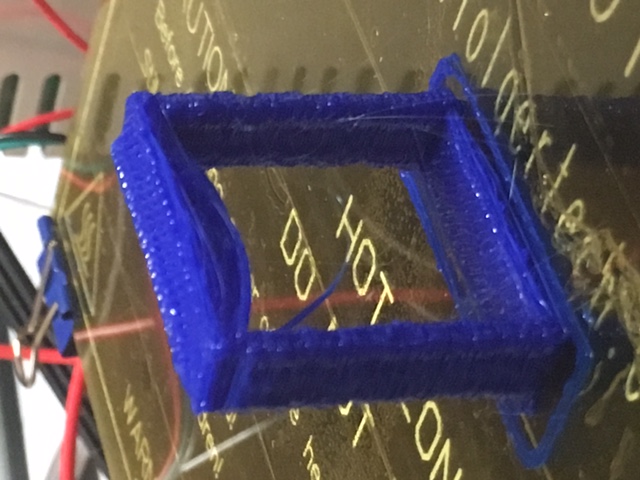
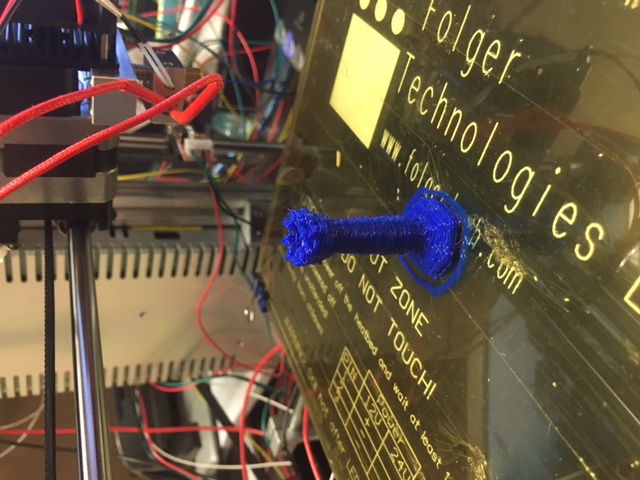
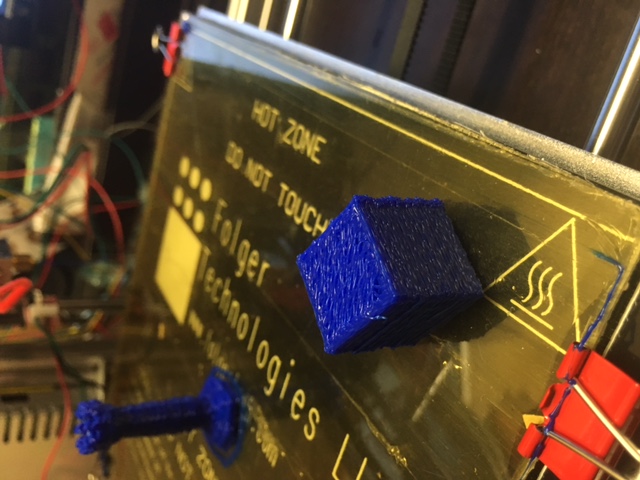
I am printing hatchbox PLA at 185 degrees with a bed temperature of 70 degrees.
I extrude the first layer at 0.4 mm and a 0.3 mm layer setting after that.
My prints seemed warped and not as precice as i would like.
Attached you will see the prints i am currently getting.
Any input is appreciated, thanks everyone!
I am using a glass print bed with a sheet of PEI on top of it.
I leveled the bed and also calibrated the extruder.
I am running The Rippas configuration.h file and I have made some small changes to account for calibrating the extruder,
Overall I am pleased with this kit but i have some more questions over calibration.
I am printing hatchbox PLA at 185 degrees with a bed temperature of 70 degrees.
I extrude the first layer at 0.4 mm and a 0.3 mm layer setting after that.
My prints seemed warped and not as precice as i would like.
Attached you will see the prints i am currently getting.
Any input is appreciated, thanks everyone!
|
Re: Folger Tech 2020 i3 Printer Kit (Official Thread) October 21, 2015 02:59PM |
Registered: 9 years ago Posts: 251 |
|
Re: Folger Tech 2020 i3 Printer Kit (Official Thread) October 21, 2015 03:05PM |
Registered: 9 years ago Posts: 251 |
Quote
Keary123
I am printing hatchbox PLA at 185 degrees with a bed temperature of 70 degrees.
I extrude the first layer at 0.4 mm and a 0.3 mm layer setting after that.
My prints seemed warped and not as precice as i would like.
I print Hatchbox PLA at 200C with great results. You could try uping your temp by 5C each time and reprint a simple cube.
|
Re: Folger Tech 2020 i3 Printer Kit (Official Thread) October 21, 2015 04:04PM |
Registered: 8 years ago Posts: 541 |
Why are you printing the first layer so high? You want that first layer to be pushed down tightly for good adhesion. Make it 0.3 with 150% extrusion rate so it adheres and stops your warping. I use the same temperatures as you and never have had warping.
Edited 1 time(s). Last edit at 10/21/2015 04:06PM by tjnamtiw.
Edited 1 time(s). Last edit at 10/21/2015 04:06PM by tjnamtiw.
|
Re: Folger Tech 2020 i3 Printer Kit (Official Thread) October 21, 2015 05:17PM |
Registered: 8 years ago Posts: 276 |
Quote
Keary123
I finally got everything set up!
I am using a glass print bed with a sheet of PEI on top of it.
I leveled the bed and also calibrated the extruder.
I am running The Rippas configuration.h file and I have made some small changes to account for calibrating the extruder,
Overall I am pleased with this kit but i have some more questions over calibration.
I am printing hatchbox PLA at 185 degrees with a bed temperature of 70 degrees.
I extrude the first layer at 0.4 mm and a 0.3 mm layer setting after that.
My prints seemed warped and not as precice as i would like.
Attached you will see the prints i am currently getting.
Any input is appreciated, thanks everyone!
I think you need to get your extrusion and temperature settings dialed in first. The photos are a little small and grainy so it's hard to tell what's wrong, but I think you're overextruding and you temperature seems too cool.
Need help? Visit the Folgertech Wikia Page
The latest Marlin firmware with Folgertech Prusa i3 settings merged in, get it here
And check out my designs on Thingiverse, and follow me if you like what you see!
|
Re: Folger Tech 2020 i3 Printer Kit (Official Thread) October 21, 2015 05:39PM |
Registered: 8 years ago Posts: 1 |
Hi reprap people!
So, I got my kit assembled last night, and this morning I figured out why I couldn't get the X and Y motors to move (the pulleys were too tight against the back of the axle, causing lots of friction).
However! I still have a problem. My Y and Z axes will only move in the negative direction, and when I tell them to go back the other way repetier reports that they have collided with the endstops. All three axes, including X, try to plow right through the endstops when they do run into them. When I tell them to go to home, they continue trying to go in the negative direction until long after they collide with the endstops.
The endstops themselves appear to work (tested them all with the multimeter), and I am pretty sure i have them plugged in correctly. They do get clicked when the carriages collide with them. I can think of more probably-relevant things (repetier seems to think that the Y motors are wayyyy off in a negative position when it reports an endstop collision and it seems to think Z is at zero) but I don't really trust my memory on those, and I'll have to wait until I get back from school later to test anything else.
Googling has thus far failed to yield a solution, so um, does anyone know what my problem might be?
|
Re: Folger Tech 2020 i3 Printer Kit (Official Thread) October 21, 2015 06:37PM |
Registered: 8 years ago Posts: 33 |
|
Re: Folger Tech 2020 i3 Printer Kit (Official Thread) October 21, 2015 07:35PM |
Registered: 8 years ago Posts: 430 |
Quote
kn4ud
Here are some pictures of my ft2020 at the present. I had to do a reprint of the youngest grand childs Shark_bot's tail after he had an accident with it. Pardon the clairty of some of the prints guys. I am new to all the steps I am going through to post them because of size.
[imgur.com]
That's a good shark tail
We are getting the first set of legos for the now 4 year old so I have been looking for a lego to duplo adapter piece.You did much better than me on adding 4 bearings to the build plate. It too me a couple tries to get the holes right so I have lots of extra holes.
Can you share the ends your used on the X axis and those pieces at the bottom of the Z ? I have lead screws coming.
Newbie with Folgertech 2020 i3.
|
Re: Folger Tech 2020 i3 Printer Kit (Official Thread) October 21, 2015 07:48PM |
Registered: 8 years ago Posts: 19 |
I recently built the folger tech prusa i3 2020 but i'm having some trouble with the z axis not moving correctly. In repetier host, if i press the +/- .01 for the z axis it moves accordingly, but if i press .1,1, or 10 it barely turns and makes sort of a higher pitched woo-wee-woo sound (like a lower pitched to higher pitched to lower pitched sound). I've did some minor adjustments of the stepper driver voltage but it doesn't seem to helped so i put it back to where it was. All other axis are working correctly.
[www.youtube.com]
I disconnected both the Z axis from the threaded rods and they are just spinning freely or atleast should be.
The short quick low pitched sounds is me pressing the +/- .01 which turns the motor shaft correctly. The 2 high pitched sounds is from me pressing the ,1 and 1 increment in either direction where the 1 is the longer sound.
Fixed!
Edited 3 time(s). Last edit at 10/22/2015 10:03AM by Slaghton.
|
Re: Folger Tech 2020 i3 Printer Kit (Official Thread) October 21, 2015 07:59PM |
Registered: 8 years ago Posts: 33 |
Quote
msaeger
Quote
kn4ud
Here are some pictures of my ft2020 at the present. I had to do a reprint of the youngest grand childs Shark_bot's tail after he had an accident with it. Pardon the clairty of some of the prints guys. I am new to all the steps I am going through to post them because of size.
[imgur.com]
That's a good shark tail
You did much better than me on adding 4 bearings to the build plate. It too me a couple tries to get the holes right so I have lots of extra holes.
Can you share the ends your used on the X axis and those pieces at the bottom of the Z ? I have lead screws coming.
The X axis assembly is the one that was done by therippa. The lower support in the picture has a bearing in it for 5mm. I turned the end of the 8mm screw down to 5mm.
|
Re: Folger Tech 2020 i3 Printer Kit (Official Thread) October 21, 2015 08:08PM |
Registered: 8 years ago Posts: 16 |
Thanks for the help sofar! I have one more question. I noticed my X axes is mirrored I went into the firmware and changed #define invert_x_dir ture but now it's going to the wrong side and not hitting the endstop so should I flip power to the motor again or change the #define ENDSTOPPULLUP_XMIN to max?
|
Re: Folger Tech 2020 i3 Printer Kit (Official Thread) October 21, 2015 08:57PM |
Registered: 8 years ago Posts: 285 |
|
Re: Folger Tech 2020 i3 Printer Kit (Official Thread) October 21, 2015 10:35PM |
Registered: 8 years ago Posts: 541 |
Quote
Keary123
I finally got everything set up!
I am using a glass print bed with a sheet of PEI on top of it.
I leveled the bed and also calibrated the extruder.
I am running The Rippas configuration.h file and I have made some small changes to account for calibrating the extruder,
Overall I am pleased with this kit but i have some more questions over calibration.
I am printing hatchbox PLA at 185 degrees with a bed temperature of 70 degrees.
I extrude the first layer at 0.4 mm and a 0.3 mm layer setting after that.
My prints seemed warped and not as precice as i would like.
Attached you will see the prints i am currently getting.
Any input is appreciated, thanks everyone!
You definitely need to calibrate your extruder! With all the open areas between 'strings', it looks like there's not enough plastic. Calibrate the extruder. There are plenty of YouTube videos showing how to do it.
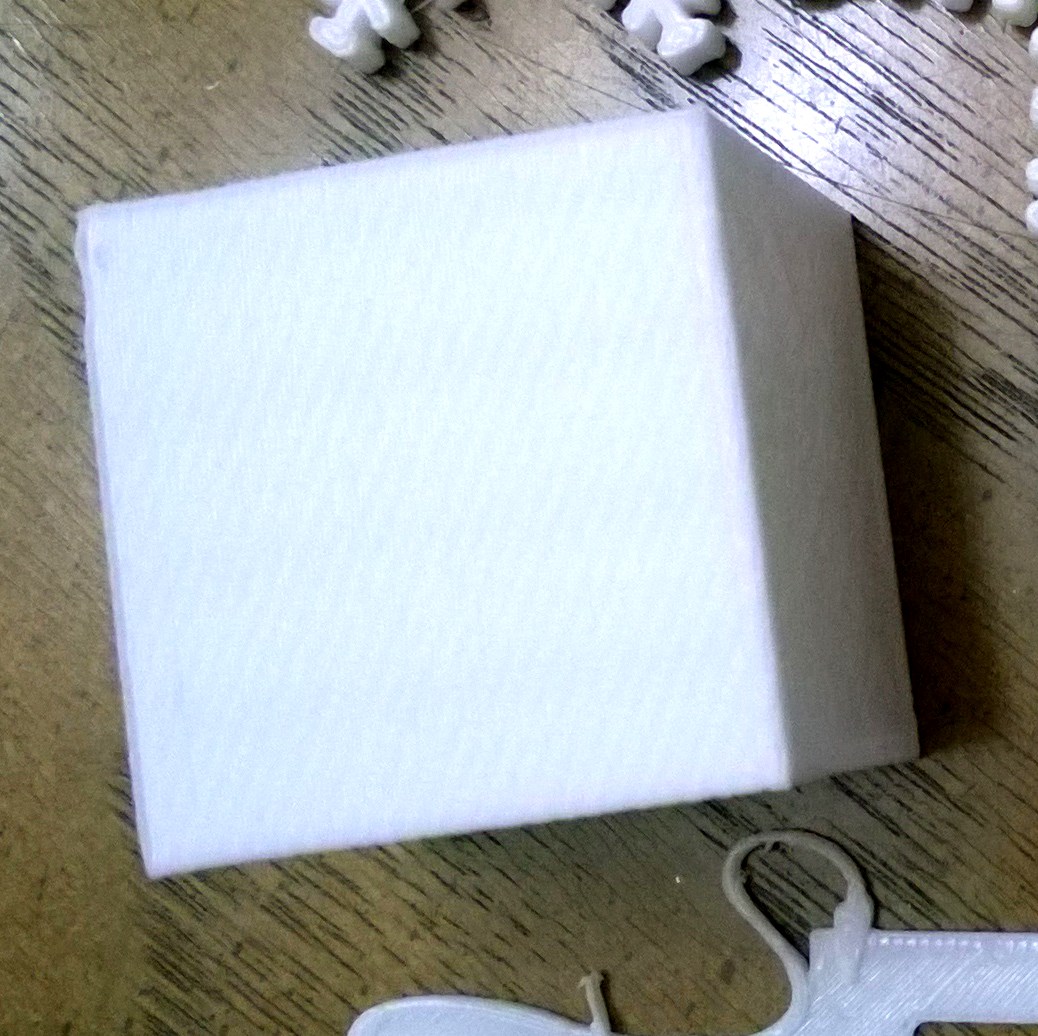
Then that box should be laid on its side, not standing up. Your cube should look like this
.
Edited 2 time(s). Last edit at 10/21/2015 10:49PM by tjnamtiw.


Sorry, only registered users may post in this forum.