Folger Tech 2020 i3 Printer Kit (Official Thread)
Posted by Dan_FolgerTech
|
Re: Folger Tech 2020 i3 Printer Kit (Official Thread) November 22, 2015 09:57AM |
Registered: 8 years ago Posts: 268 |
Quote
therippa
Quote
sonnylowe
Quote
msaeger
Should be much smoother than the rods and bearings. Are you planning on doing the X axis too? I have seen V-slot X axis on thingiverse.
Yes, that is the plan. I picked out most of the hardware for the X-Axis today and just need to decide on a mounting options. It should be another $50.00 or so with shipping. I think that's going to be the average cost to setup any of these rail systems!?!? Not too bad considering the cost of good quality linear bearings, and you're still stuff with those flimsy rods...
I'll most likely use my current Z setup (I have lead screws installed already) but need to keep the possibility of upgrading it in mind. It would be nice for this to be straight bolt in like the Y-Carriage with only a few new printed parts required...I think that's doable. I just need to give it some further thought.
I also scoured thingi today looking at all sorts of V-Slot and Openbuilds stuff...so many great ideas!!! I'll be sticking to the aluminum gantry plates though, I think you need them for a really good bearing mount!?!? I'll design and print whatever adapter I need for the Cyclops
This is EXCELLENT work, I look forward to seeing what your final results are, and if you want someone who is willing to also order the parts you are using and help you debug any problems, I'm more than down

I like your style therippa...just like me, always willing to upgrade :-) When my wife asked me what my plans were for this printer I simply told her "to build the best printer I can", now I realize how true that statement was. I've printed more upgrade parts than anything else LOL
I'll try to get everything updated and a detailed parts list up today or tomorrow, that way you can order parts and play if you like

I just updated the model and added the 210x320 bed that msaeger found for me...although it obviously lengthens the printer by quite a bit, it will work. The only additional cost would be the larger heater and bed of your choice. I currently have it mounted to the 210 x 210 arms, but they would of course be updated if I pursue this extra long Y-Carriage...
I added a couple photos to the Y-Carriage Album showing the larger bed extended and retracted on the printer. Please keep in mind, I have the bare bones structure of the printer modeled (I might model it all at some point!?!?) just to get by. And yes, my Cyclops Hotend is floating in space ;-) I'll add the V-Slot X-Carriage once it's designed.
Here is a 3D PDF of the CAD Model. You should be able to click it, then rotate, scale, move, etc., pretty cool feature (when it works).
|
Re: Folger Tech 2020 i3 Printer Kit (Official Thread) November 22, 2015 10:04AM |
Registered: 8 years ago Posts: 268 |
Quote
therippa
Also, I rescind my rescission of the Igus Drylin bushings.
After installing them on the Y and X axis, I reported I had some nasty vibration on Y. I replaced them with some Amazon 5-star rated LM8UU's (that were crap), and while there was noise, there was no vibration that affected prints and I was able to print some new Y-axis holders with no problems. Actually, even with the bearing noise, these were some of the best prints to ever come out of my printer, and it bothered me a bit to take the Y-carriage apart, again (for the fifth time?) tonight to install them.
Instead of printing the Folgertech Y-axis holders, I went with these (but don't use them, use my remix below) - [www.thingiverse.com] . What I like about them is they don't use zip ties so you don't have to remove them to swap out bearings/bushings. Just be careful not to tighten them too much or they will crack.
They printed very well, but after installing them I learned that they are too short (bed hits the motor before homing all the way), so I offset their height with M3 nuts as a quick fix, shortened my Y print space to 130mm (to compensate for them hitting the motor and the Y belt holder on the other side of the printer), added some height to them in Sketchup, and the new set are printing right now. I decided to try the Igus bushings again, and they are working wonderfully now, so I'll chalk this one up to the crappy print quality of the Y holders Folgertech provides.
So... those new expensive LM8UU equivalents I ordered will go into the box of ordered-but-forgotten components until a problem with the Igus potentially comes up and I have to readdress the situation.
Here is the STL for anyone who might want to use it - [www.thingiverse.com]
And of course, this is all moot once I get my SonnYcarriage up and running
Again, nice work. I have my Igus bearings mounted in aluminum pillow blocks. The bearings were a bit loose and I think they are sliding inside the pillow blocks making that annoying clicking sound I'm getting. I thought about shimming them, but once I decided to go with the new Y-Carriage, I like you, kicked yet another upgrade to the curb...I think I'll have enough spare parts soon to build another printer ;-)
Edit: Here is a quick VIDEO of the noise I'm getting, I'm pretty sure it's the Y-Carriage bearings, but I'll know for sure once my new carriage is installed...
Edited 1 time(s). Last edit at 11/22/2015 11:03AM by sonnylowe.
|
Re: Folger Tech 2020 i3 Printer Kit (Official Thread) November 22, 2015 12:01PM |
Registered: 8 years ago Posts: 367 |
@therippa, what did you print the bearing holders with? I would guess ABS or PETG work better than PLA because they have a little more flexibility.
See my blog at [moosteria.blogspot.com].
See my blog at [moosteria.blogspot.com].
|
Re: Folger Tech 2020 i3 Printer Kit (Official Thread) November 22, 2015 04:29PM |
Registered: 8 years ago Posts: 276 |
Quote
animoose
@therippa, what did you print the bearing holders with? I would guess ABS or PETG work better than PLA because they have a little more flexibility.
ABS. The outer shell layers delaminated a little bit, but it's still sturdy.
Edited 1 time(s). Last edit at 11/22/2015 04:35PM by therippa.
Need help? Visit the Folgertech Wikia Page
The latest Marlin firmware with Folgertech Prusa i3 settings merged in, get it here
And check out my designs on Thingiverse, and follow me if you like what you see!
|
Re: Folger Tech 2020 i3 Printer Kit (Official Thread) November 22, 2015 06:15PM |
Registered: 8 years ago Posts: 38 |
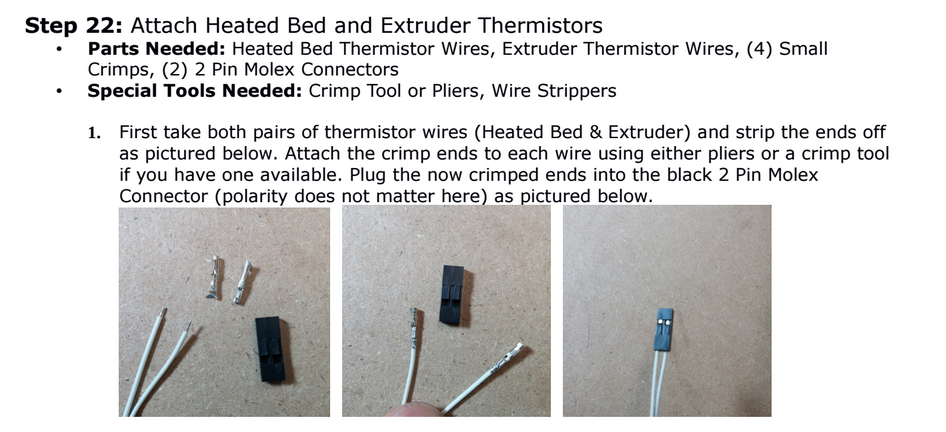
Hey guys, When assembling the extruder's thermistors, did the Molex connector and crimp ends come with the package? Where were they included?
My headed bed Thermistor is already preassembled with the molex connector on top of it.
I'm trying to follow the step attached but can't seem to find the connector/crimps for the extruder's white wires.
My headed bed Thermistor is already preassembled with the molex connector on top of it.
I'm trying to follow the step attached but can't seem to find the connector/crimps for the extruder's white wires.
|
Re: Folger Tech 2020 i3 Printer Kit (Official Thread) November 22, 2015 06:19PM |
Registered: 8 years ago Posts: 4 |
I just finished my build and the Bed thermistor did come with a molex connector, the hotend connector did not; and needs to be soldered to the Black/Red wire with the 2pin molex that should have been in the bag with the hotend assembly.Quote
watlooazn
Hey guys, When assembling the extruder's thermistors, did the Molex connector and crimp ends come with the package? Where were they included?
My headed bed Thermistor is already preassembled with the molex connector on top of it.
I had to call to get a replacement black/red+molex as mine didnt come with one and there's no way to connect the hotend thermister to the RAMPS without the molex (or some gater clips and ingenuity that is not nearly as nice).
|
Re: Folger Tech 2020 i3 Printer Kit (Official Thread) November 22, 2015 08:05PM |
Registered: 8 years ago Posts: 276 |
sonny - have you considered using lead screws instead of belts in your new designs?
Need help? Visit the Folgertech Wikia Page
The latest Marlin firmware with Folgertech Prusa i3 settings merged in, get it here
And check out my designs on Thingiverse, and follow me if you like what you see!
Need help? Visit the Folgertech Wikia Page
The latest Marlin firmware with Folgertech Prusa i3 settings merged in, get it here
And check out my designs on Thingiverse, and follow me if you like what you see!
|
Re: Folger Tech 2020 i3 Printer Kit (Official Thread) November 22, 2015 10:20PM |
Registered: 8 years ago Posts: 430 |
Quote
watlooazn
Hey guys, When assembling the extruder's thermistors, did the Molex connector and crimp ends come with the package? Where were they included?
My headed bed Thermistor is already preassembled with the molex connector on top of it.
I'm trying to follow the step attached but can't seem to find the connector/crimps for the extruder's white wires.
No on thermistor had a connector and one didn't I chopped one off an old PC case and soldered / heat shrunk the wires.
Newbie with Folgertech 2020 i3.
|
Re: Folger Tech 2020 i3 Printer Kit (Official Thread) November 23, 2015 02:54PM |
Registered: 8 years ago Posts: 268 |
Quote
therippa
sonny - have you considered using lead screws instead of belts in your new designs?
therippa,
Yes, but only briefly. I figured I do the belt first, it was the easiest (and cheapest) to setup and configure (at least in Y). I think the lead screws could work great though, it's definitely something I'll look into, as the X-Carriage has proven to be much more difficult to configure with the belt. The only real problem I can think of is the lead screw setups are pretty bulky in comparison to belt drives. I'll take a look at openbuilds, see if there are any smaller iterations of the lead screw actuators, then I'll sketch something up tonight using them...see what it looks like, and what it cost!?!?
For me the cost is no big deal, but I try to keep in it mind when the design, as not everybody is willing or able to invest a lot of money in these printers, so the more reasonable the cost of the upgrade, the more people might be able to benefit from the design. It' one of the reasons I opted to print everything I could vs simply buying it.
BTW: I have all my hardware now to install the Y-Carriage. I'm printing new corner braces as I type. I plan to do a couple calibration blocks with the current setup then switch everything over, then do the same blocks again. I'd like to know if there is any improvement in actual print quality as well as noise reduction...
Sonny
|
Re: Folger Tech 2020 i3 Printer Kit (Official Thread) November 23, 2015 09:49PM |
Registered: 8 years ago Posts: 268 |
Y-Carriage installed and running
This VIDEO shows significant noise reduction of the previous SETUP. Now all I can hear are the stepper motors and some noise from the X-Carriage (I'm working that redesign now).
I printer a couple cal blocks prior to the change and the same block afterwards. I added more photos to the FOLDER, some of the cal blocks, and the y-carriage installed. The blocks on the right were prior to the upgrade and left were after. I cannot see a significant change in quality one way or the other. However, this upgrade was not about print quality as much as it was about building a better, quieter, and more easily aligned Y-Carriage (no bearing alignment needed only making sure the rail was aligned wit hthe frame), all of which I feel was achieved.
As usual things never go as planned...the endstop mount cause a foul between the endstop and the bed mount bracket prior to initiating. I had to improvise and move the endstop while still using the mount. I was able to do this by added the longer screws and a few nuts. Luckily I had tapped threads into the mount which made this last miunte change pretty easy. I'll design and print a new mount tonight.
I am so pleased with this setup I just order everything I need to the X-Carriage...I have designed and redesign X several times...it is proving to be a bit more difficult. I have a plan just need to get everything aligned prior to printing parts. therippa had asked about lead screws, but after seeing the cost more than double and the bulkiness of the setup would increase I'm going to try to make the belt drive work...at least for now ;-)
I'd be happy to generate a BOM and upload all the STL (and step) files if anyone that is interested...
Sonny
|
Re: Folger Tech 2020 i3 Printer Kit (Official Thread) November 23, 2015 10:46PM |
Registered: 8 years ago Posts: 430 |
Quote
sonnylowe
Y-Carriage installed and running
This VIDEO shows significant noise reduction of the previous SETUP. Now all I can hear are the stepper motors and some noise from the X-Carriage (I'm working that redesign now).
I printer a couple cal blocks prior to the change and the same block afterwards. I added more photos to the FOLDER, some of the cal blocks, and the y-carriage installed. The blocks on the right were prior to the upgrade and left were after. I cannot see a significant change in quality one way or the other. However, this upgrade was not about print quality as much as it was about building a better, quieter, and more easily aligned Y-Carriage (no bearing alignment needed only making sure the rail was aligned wit hthe frame), all of which I feel was achieved.
As usual things never go as planned...the endstop mount cause a foul between the endstop and the bed mount bracket prior to initiating. I had to improvise and move the endstop while still using the mount. I was able to do this by added the longer screws and a few nuts. Luckily I had tapped threads into the mount which made this last miunte change pretty easy. I'll design and print a new mount tonight.
I am so pleased with this setup I just order everything I need to the X-Carriage...I have designed and redesign X several times...it is proving to be a bit more difficult. I have a plan just need to get everything aligned prior to printing parts. therippa had asked about lead screws, but after seeing the cost more than double and the bulkiness of the setup would increase I'm going to try to make the belt drive work...at least for now ;-)
I'd be happy to generate a BOM and upload all the STL (and step) files if anyone that is interested...
Sonny
It's hard to tell the difference in noise from the video but I can't see how it wouldn't be quieter. I defiantly would like to see the BOM and STL's. Did you see any of the X axis's using vslot on thingiverse? [www.thingiverse.com]
Newbie with Folgertech 2020 i3.
|
Re: Folger Tech 2020 i3 Printer Kit (Official Thread) November 24, 2015 04:41AM |
Registered: 8 years ago Posts: 268 |
Quote
msaeger
Quote
sonnylowe
Y-Carriage installed and running
This VIDEO shows significant noise reduction of the previous SETUP. Now all I can hear are the stepper motors and some noise from the X-Carriage (I'm working that redesign now).
I printer a couple cal blocks prior to the change and the same block afterwards. I added more photos to the FOLDER, some of the cal blocks, and the y-carriage installed. The blocks on the right were prior to the upgrade and left were after. I cannot see a significant change in quality one way or the other. However, this upgrade was not about print quality as much as it was about building a better, quieter, and more easily aligned Y-Carriage (no bearing alignment needed only making sure the rail was aligned wit hthe frame), all of which I feel was achieved.
As usual things never go as planned...the endstop mount cause a foul between the endstop and the bed mount bracket prior to initiating. I had to improvise and move the endstop while still using the mount. I was able to do this by added the longer screws and a few nuts. Luckily I had tapped threads into the mount which made this last miunte change pretty easy. I'll design and print a new mount tonight.
I am so pleased with this setup I just order everything I need to the X-Carriage...I have designed and redesign X several times...it is proving to be a bit more difficult. I have a plan just need to get everything aligned prior to printing parts. therippa had asked about lead screws, but after seeing the cost more than double and the bulkiness of the setup would increase I'm going to try to make the belt drive work...at least for now ;-)
I'd be happy to generate a BOM and upload all the STL (and step) files if anyone that is interested...
Sonny
It's hard to tell the difference in noise from the video but I can't see how it wouldn't be quieter. I defiantly would like to see the BOM and STL's. Did you see any of the X axis's using vslot on thingiverse? [www.thingiverse.com]
If you listen to the "previous SETUP" video you can hear clicking/grinding sounds...they were the most annoying and completely eliminated :-)
I'll work on uploading the BOM and STL's this week...
I'll take another look at thingi, hopefully it will inspire me ;-)
|
Re: Folger Tech 2020 i3 Printer Kit (Official Thread) November 24, 2015 07:43AM |
Registered: 8 years ago Posts: 430 |
Quote
sonnylowe
Quote
msaeger
Quote
sonnylowe
Y-Carriage installed and running
This VIDEO shows significant noise reduction of the previous SETUP. Now all I can hear are the stepper motors and some noise from the X-Carriage (I'm working that redesign now).
I printer a couple cal blocks prior to the change and the same block afterwards. I added more photos to the FOLDER, some of the cal blocks, and the y-carriage installed. The blocks on the right were prior to the upgrade and left were after. I cannot see a significant change in quality one way or the other. However, this upgrade was not about print quality as much as it was about building a better, quieter, and more easily aligned Y-Carriage (no bearing alignment needed only making sure the rail was aligned wit hthe frame), all of which I feel was achieved.
As usual things never go as planned...the endstop mount cause a foul between the endstop and the bed mount bracket prior to initiating. I had to improvise and move the endstop while still using the mount. I was able to do this by added the longer screws and a few nuts. Luckily I had tapped threads into the mount which made this last miunte change pretty easy. I'll design and print a new mount tonight.
I am so pleased with this setup I just order everything I need to the X-Carriage...I have designed and redesign X several times...it is proving to be a bit more difficult. I have a plan just need to get everything aligned prior to printing parts. therippa had asked about lead screws, but after seeing the cost more than double and the bulkiness of the setup would increase I'm going to try to make the belt drive work...at least for now ;-)
I'd be happy to generate a BOM and upload all the STL (and step) files if anyone that is interested...
Sonny
It's hard to tell the difference in noise from the video but I can't see how it wouldn't be quieter. I defiantly would like to see the BOM and STL's. Did you see any of the X axis's using vslot on thingiverse? [www.thingiverse.com]
If you listen to the "previous SETUP" video you can hear clicking/grinding sounds...they were the most annoying and completely eliminated :-)
I'll work on uploading the BOM and STL's this week...
I'll take another look at thingi, hopefully it will inspire me ;-)
Definitely could hear the clicking I just don't get the clicking on my stock setup so I am thinking that could have been eliminated. What I have heard on mine and others is a vibration kind of sound.
Newbie with Folgertech 2020 i3.
|
Re: Folger Tech 2020 i3 Printer Kit (Official Thread) November 24, 2015 03:43PM |
Registered: 8 years ago Posts: 59 |
I seem to be having problems getting anything that doesn't have straight lines to hold dimensions in the first 1/4" off the build plate. I'm using ABS. Radiused corners tend to peel up in this 1/4" zone too. This is somewhat mitigated if I make the first 10 layers solid, but then the first 1/4" of the base winds up being a bit mis-shaped. I'm thinking it has to do with the bed temperature which I have set at 100. I'm printing straight to glass so the parts usually stick really well. Maybe when the plastic sticks to the glass it tends to shrink less than the layers on top that are cooler? I can't figure out why I see this on curved parts and not parts with straight edges. Anyone else having this issue? It's hard to send a picture of this issue, but I will try later if it might help.
|
Re: Folger Tech 2020 i3 Printer Kit (Official Thread) November 24, 2015 04:20PM |
Registered: 8 years ago Posts: 367 |
Quote
LancelotL
I seem to be having problems getting anything that doesn't have straight lines to hold dimensions in the first 1/4" off the build plate. I'm using ABS. Radiused corners tend to peel up in this 1/4" zone too. This is somewhat mitigated if I make the first 10 layers solid, but then the first 1/4" of the base winds up being a bit mis-shaped. I'm thinking it has to do with the bed temperature which I have set at 100. I'm printing straight to glass so the parts usually stick really well. Maybe when the plastic sticks to the glass it tends to shrink less than the layers on top that are cooler? I can't figure out why I see this on curved parts and not parts with straight edges. Anyone else having this issue? It's hard to send a picture of this issue, but I will try later if it might help.
Have you tried printing the first layer much slower than the others? In Slic3r you can specify a percentage speed for the first layer, and I've sometimes taken this down as low as 30% of the regular speed to help get a good first layer.
Edited 1 time(s). Last edit at 11/24/2015 04:20PM by animoose.
See my blog at [moosteria.blogspot.com].
|
Re: Folger Tech 2020 i3 Printer Kit (Official Thread) November 24, 2015 04:36PM |
Registered: 8 years ago Posts: 59 |
I can try slowing it down some more, but typically work at 50% on the first layer. Seems to be a problem that occurs on the first 10 to 15 layers though. Then, everything goes back to spec. I will also try ramping the build plate temp down too.Quote
animoose
Quote
LancelotL
I seem to be having problems getting anything that doesn't have straight lines to hold dimensions in the first 1/4" off the build plate. I'm using ABS. Radiused corners tend to peel up in this 1/4" zone too. This is somewhat mitigated if I make the first 10 layers solid, but then the first 1/4" of the base winds up being a bit mis-shaped. I'm thinking it has to do with the bed temperature which I have set at 100. I'm printing straight to glass so the parts usually stick really well. Maybe when the plastic sticks to the glass it tends to shrink less than the layers on top that are cooler? I can't figure out why I see this on curved parts and not parts with straight edges. Anyone else having this issue? It's hard to send a picture of this issue, but I will try later if it might help.
Have you tried printing the first layer much slower than the others? In Slic3r you can specify a percentage speed for the first layer, and I've sometimes taken this down as low as 30% of the regular speed to help get a good first layer.
|
Re: Folger Tech 2020 i3 Printer Kit (Official Thread) November 24, 2015 06:31PM |
Registered: 8 years ago Posts: 541 |

So far so good. PLA at 185, 0.2 layer, 65 speed. This thing is WAY too much fun! Stock extruder, stock carriages (although new ones are on my to-do list).
This one was awesome. So says my grand daughter, who confiscated it! Still hadn't trimmed him from all the support material. Also, my new roll of brown tangled up and starved the extruder, which is why the legs look sick! I'm glad I caught it before it was a total loss.

And it's finally done!!! Smooth as baby's behind!

Edited 2 time(s). Last edit at 11/24/2015 10:11PM by tjnamtiw.
|
Re: Folger Tech 2020 i3 Printer Kit (Official Thread) November 24, 2015 07:48PM |
Registered: 8 years ago Posts: 16 |
Hi, I've been trying to set up auto bed leveling with a servo motor. I followed this guide. Whenever I home my z axis or start a print, the nozzle does not go back down towards the bed. This causes the prints to start way too high. Here are my settings: [pastebin.com]
Thanks
Thanks
|
Re: Folger Tech 2020 i3 Printer Kit (Official Thread) November 24, 2015 08:02PM |
Registered: 8 years ago Posts: 59 |
Turns out reducing the bed temp fixes the curve warp issue. I also had an issue with my extrude coefficient so bumped it back up. Right now I'm printing first layer at 70 and remaining layers at 80. Took the hot end temp down to 220 also. Will keep pushing the bed and extrusion temp until I get it perfect.Quote
LancelotL
I can try slowing it down some more, but typically work at 50% on the first layer. Seems to be a problem that occurs on the first 10 to 15 layers though. Then, everything goes back to spec. I will also try ramping the build plate temp down too.Quote
animoose
Quote
LancelotL
I seem to be having problems getting anything that doesn't have straight lines to hold dimensions in the first 1/4" off the build plate. I'm using ABS. Radiused corners tend to peel up in this 1/4" zone too. This is somewhat mitigated if I make the first 10 layers solid, but then the first 1/4" of the base winds up being a bit mis-shaped. I'm thinking it has to do with the bed temperature which I have set at 100. I'm printing straight to glass so the parts usually stick really well. Maybe when the plastic sticks to the glass it tends to shrink less than the layers on top that are cooler? I can't figure out why I see this on curved parts and not parts with straight edges. Anyone else having this issue? It's hard to send a picture of this issue, but I will try later if it might help.
Have you tried printing the first layer much slower than the others? In Slic3r you can specify a percentage speed for the first layer, and I've sometimes taken this down as low as 30% of the regular speed to help get a good first layer.
|
Re: Folger Tech 2020 i3 Printer Kit (Official Thread) November 24, 2015 10:16PM |
Registered: 8 years ago Posts: 38 |
|
Re: Folger Tech 2020 i3 Printer Kit (Official Thread) November 25, 2015 09:23AM |
Registered: 8 years ago Posts: 80 |
Quote
tjnamtiw
[attachment 66503 tn_WP_20151124_006.jpg]
So far so good. PLA at 185, 0.2 layer, 65 speed. This thing is WAY too much fun! Stock extruder, stock carriages (although new ones are on my to-do list).
This one was awesome. So says my grand daughter, who confiscated it! Still hadn't trimmed him from all the support material. Also, my new roll of brown tangled up and starved the extruder, which is why the legs look sick! I'm glad I caught it before it was a total loss.
[attachment 66504 tn_WP_20151122_006.jpg]
And it's finally done!!! Smooth as baby's behind!
[attachment 66509 tn_WP_20151124_008.jpg]
Beautiful! And nice that you can get that detail at 65 speed. With rounded overhang edges like hat moon, I find I need to slow the speed to about half that.
|
Re: Folger Tech 2020 i3 Printer Kit (Official Thread) November 25, 2015 02:00PM |
Registered: 8 years ago Posts: 38 |
|
Re: Folger Tech 2020 i3 Printer Kit (Official Thread) November 25, 2015 02:29PM |
Registered: 8 years ago Posts: 8 |
|
Re: Folger Tech 2020 i3 Printer Kit (Official Thread) November 25, 2015 02:36PM |
Registered: 8 years ago Posts: 541 |
Quote
watlooazn
I heard we have to buy our own glass for the heated bed. Anyone know what type of glass and where we can get it from? Should it be exactly the same size as the heated bed?
This is the one I've been using since I started. It works great. Just a light coat of hair spray and you're good to go for PLA. It fits just inside of the adjusting screw heads.
[smile.amazon.com]
|
Re: Folger Tech 2020 i3 Printer Kit (Official Thread) November 25, 2015 11:00PM |
Registered: 8 years ago Posts: 276 |
sonny - would you mind sharing the STL's? I think I'm going to get started on the y-axis thing soon.
Need help? Visit the Folgertech Wikia Page
The latest Marlin firmware with Folgertech Prusa i3 settings merged in, get it here
And check out my designs on Thingiverse, and follow me if you like what you see!
Need help? Visit the Folgertech Wikia Page
The latest Marlin firmware with Folgertech Prusa i3 settings merged in, get it here
And check out my designs on Thingiverse, and follow me if you like what you see!
|
Re: Folger Tech 2020 i3 Printer Kit (Official Thread) November 26, 2015 02:44AM |
Registered: 8 years ago Posts: 1 |
Greetings! I received my 2020 last week. It's my first printer and I stayed up all night building it. Unfortunately, I wasn't able to get any decent and my hot end got terribly clogged. It turns out the PTFE tube was damaged. I ordered a few replacement throats with the PTFE but I figured I check out the electronic surplus store over the hill. I was amazed that they had the exact PTFE tube that I needed! For $0.44/foot!!!
I just got back and decided enough with the test cubes; let's just try print something semi-useful using the stock PLA .ini config. And here it is! My first not completely failed print, a fan shroud (still need to clean it up though)! I'm super excited and wish that my Thanksgiving break from school was longer so I could get this printer calibrated and dialed in!
Cheers all!
I just got back and decided enough with the test cubes; let's just try print something semi-useful using the stock PLA .ini config. And here it is! My first not completely failed print, a fan shroud (still need to clean it up though)! I'm super excited and wish that my Thanksgiving break from school was longer so I could get this printer calibrated and dialed in!


Cheers all!
|
Re: Folger Tech 2020 i3 Printer Kit (Official Thread) November 26, 2015 08:06AM |
Registered: 8 years ago Posts: 541 |
Wow, I just had my first bitch-slap from J-MAX >> [forums.reprap.org]
This guy hates FT and apparently is God, at least in his own mind. In his words, anyone who's only been around for 3 months has NOTHING to contribute to the forum. They should just sit quietly and learn even though I spent my entire working career of 50 years in electrical and electronic engineering.
Sad, really.
|
Re: Folger Tech 2020 i3 Printer Kit (Official Thread) November 26, 2015 08:10AM |
Registered: 8 years ago Posts: 541 |
Quote
catbagan
Greetings! I received my 2020 last week. It's my first printer and I stayed up all night building it. Unfortunately, I wasn't able to get any decent and my hot end got terribly clogged. It turns out the PTFE tube was damaged. I ordered a few replacement throats with the PTFE but I figured I check out the electronic surplus store over the hill. I was amazed that they had the exact PTFE tube that I needed! For $0.44/foot!!!
I just got back and decided enough with the test cubes; let's just try print something semi-useful using the stock PLA .ini config. And here it is! My first not completely failed print, a fan shroud (still need to clean it up though)! I'm super excited and wish that my Thanksgiving break from school was longer so I could get this printer calibrated and dialed in!
Cheers all!
Congrats!!! I have that fan shroud on my SD card but haven't gotten around to making it. INSTEAD I continue to stick my finger in that fan! It was a good first choice.
Yea, calibrate the extruder especially and you'll be surprised how well it prints.
|
Re: Folger Tech 2020 i3 Printer Kit (Official Thread) November 26, 2015 08:45AM |
Registered: 8 years ago Posts: 80 |
Quote
tjnamtiw
Wow, I just had my first bitch-slap from J-MAX >> [forums.reprap.org]
This guy hates FT and apparently is God, at least in his own mind. In his words, anyone who's only been around for 3 months has NOTHING to contribute to the forum. They should just sit quietly and learn even though I spent my entire working career of 50 years in electrical and electronic engineering.
Sad, really.
That guy is an arrogant jerk, and really has it in for FT. I've read a number of his posts, and he repetitively posts about how much he hates FT. It seems to be personal for him.
My experience is similar to yours. I have nothing but good things to say about the kit I received. Well, perhaps a few things could get cleaned up in the build manual. Before this printer, my experience is with the ones we have at the office, an Ultimaker 2 and a Taz 5. Most of my printing there is on the Ultimaker 2, which is a $2500 printer. I can honestly say that it's prints are no better than my FT 2020. Not just my opinion. I've brought some examples of my prints into work, and my coworkers have been equally impressed. The only upgrades I made to the FT2020 are a new E3D lite hot end, and an LCD screen. Other than that, strictly stock.
When I went shopping for a printer, I wanted to go the DIY route. I initially compiled the list of parts for a RepRap Prusa and priced them out on eBay and Amazon. Then I discovered the FT2020, which had all the same parts, but at $50 cheaper than I could do by myself. I can't say that any of the parts in the kit are different than ones I would have picked out myself. The way I look at it, I can take that $50 savings and apply it to upgrade any parts that fall short. So far, it's just been the hot end and I'm still ahead. I see that a number of other people on this thread have upgraded bearings, threaded rods, etc, but I suspect a lot of that is just for the fun of tinkering rather than getting noticeable improvement in print quality,
Anyway, it must really irk J-MAX that this thread is one of the most popular on this forum, filled with people who love the FT2020. So there!


Sorry, only registered users may post in this forum.