Folger Tech 2020 i3 Printer Kit (Official Thread)
Posted by Dan_FolgerTech
|
Re: Folger Tech 2020 i3 Printer Kit (Official Thread) January 06, 2016 07:39AM |
Registered: 8 years ago Posts: 268 |
Quote
GrouchoDuke
Quote
sonnylowe
As soon as I have time (and they are finalized them) I'll be posting the X-Y upgrades on Thingi, along with a few other designs.
I think adding current mods-configurations to our signature is a great idea, and it would help people find there way much easier.
As far as S3D profiles, I change mine on the fly depending on what I'm printing...I don't save different profiles, I only have two...one for single extruder and one for duel extruders. I'd be happy to share those base profiles though.
Awesome, that sounds great. I'll watch for your stuff on Thingiverse.
Since I don't have a printer yet, I'm going to start with just getting the stock printer going. Hopefully mod-time will come quickly.
Thanks!
Enjoy building and using your printer, mine actually worked pretty damn good bone stock. Give it some time and keep a close eye on this thread. As far as upgrades, you'll quickly figure out what you like and what you don't

|
Re: Folger Tech 2020 i3 Printer Kit (Official Thread) January 06, 2016 08:40AM |
Registered: 8 years ago Posts: 32 |
Did my first print last night!
Did E-steps calibration first and I had to flip the connector for the extruder as it was running backwards.
Printed this distance and square test piece on thingiverse: Square, Known Distance Calibration Tool
Very happy with the results!
Edit: Some of the images wouldn't load so here's the Imgur link
PLA (FolgerTech sample, think it's Atomic) on glass @185/60, 0.3mm layer height.
Going to try the 20mm cube tonight to check Z distance.
Edited 1 time(s). Last edit at 01/06/2016 11:33AM by Boffster.
|
Re: Folger Tech 2020 i3 Printer Kit (Official Thread) January 06, 2016 09:28AM |
Registered: 8 years ago Posts: 26 |
Quote
Boffster
Quote
Jim72
OK, I read the entire thread, for other noobs it starts getting more informative (ie. less complaining about quality and shipping) in the page 30's and beyond. However, there is good information in the first 30 pages as well. There is one thing I do not recall seeing mentioned. If one plans to use the LCD, is it better for any reason to consider power up and downloading the programs in the configuration section before attaching the LCD? As opposed to connecting the LCD and then doing the SD card to get started? I have the build completed and have x end stop on the left, so left front corner is home. The build was very fun. Still need to get glass plate and sd card then on to configuration and power up.
Thanks
Jim
Hi Jim, I have the LCD and connected it to the printer first, then I connected to the printer/Arduino via USB (with the printer powered off) and flashed the firmware. Then I powered up the printer after the firmware had finished uploading and connected with Repetier to test the axes. I haven't tried to print from the SD Card yet, but the menus work fine and the main LCD info screen is updating and displaying the same info as Repetier.
Hope this helps.
Hi Boffster, thank you for the reply. I appreciate the info, this is all new to me (software stuff) but eventually it will make sense, I am determined to do this. I could build the machines all day long, the software is what I am not familiar with. The info you gave helps a lot, I will attach the LCD and proceed as you indicated.
Thanks, Jim
|
Re: Folger Tech 2020 i3 Printer Kit (Official Thread) January 06, 2016 10:17AM |
Registered: 8 years ago Posts: 11 |
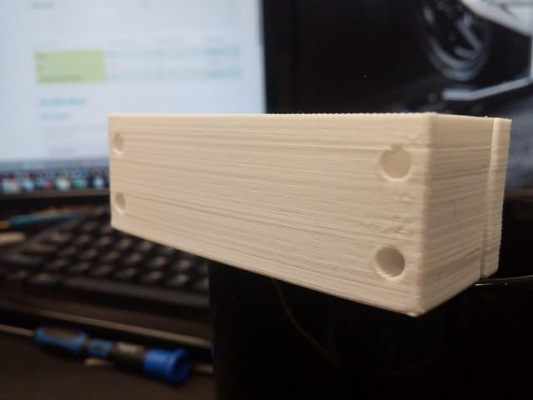
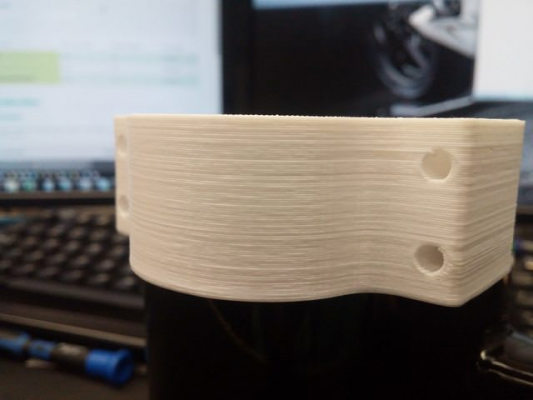
I got my printer up and running and right away with the only change necessary being moving the end stop to the left side. My first cube with PLA printed out well so I went right to the 3dBenchy with ABS(because why not). Both look good, but have very wavy sides. The closest I can describe them is almost like the side of a woven basket. Any ideas how to fix this? Is my temperature to hot or to cold or something else?
Also I am noticing that my x axis when power is off slides smoothly, but when it is printing is vibrating/rattling a lot what could be the cause of this?
Finally, people mention tweaking to improve printing. Does this mean Slic3r tweaking or what? I believe my stepper controls are tuned so other than the x axis I believe hardware is tweaked beyond dialing in the temperature for different filaments I am not sure what to tweak.
Thanks and sorry for three questions in one post.
|
Re: Folger Tech 2020 i3 Printer Kit (Official Thread) January 06, 2016 10:44AM |
Registered: 8 years ago Posts: 268 |
With my printer down awaiting hardware to arrive (to complete yet another verison of my X Carriage upgrade) I've moved my thoughts elsewhere...wire management is one. I've relocated the Arduino/Ramps Board (enclosure is in mind) and started looming and rerouting all the wiring. I hope to have that done tonight. I have also moved to the hotter side of things, yup, the Hotend.
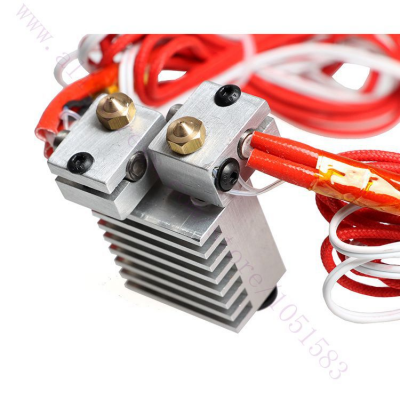
I am currently running the E3D Legends Pack. I like both the Chimera and Cyclops Heater Blocks for different reasons.
The Cyclops with it's one nozzle and heater block is really easy to setup, but limits you to using the same type filament while dual extruding. You could (in theory) run PLA and ABS at the same time, but they require different heat ranges to work properly and the current single heater block does not accommodate that. So you are stuck with ABS or PLA, or whatever.
The Chimera is quite a bit more difficult to setup as you have two independent heater blocks that both have the be set to the correct Z height. E3D did a great job providing a means to do this, but it's pretty time consuming and requires a lot of trial and error (and is quite unattractive in general). I can't ever seem to got it perfect!!! The great thing about the Chimera is you can run PLA and ABS at the same time with two different heat profiles, and extruder multipliers. You can even combined a flexible filament & Nylon for example, hell you can pretty much combined whatever you want.
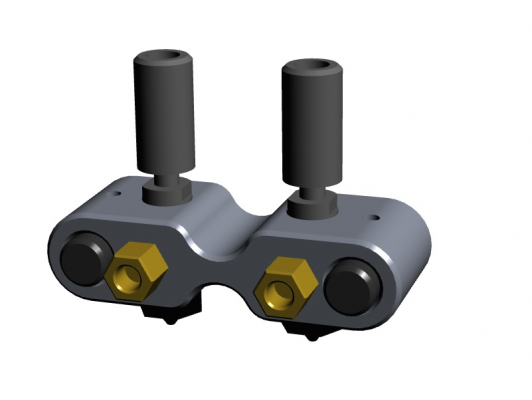
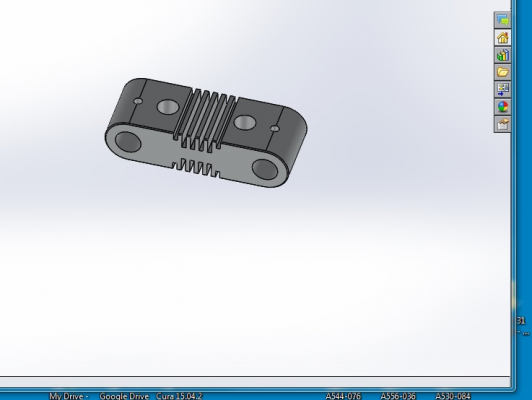
With that said...I decided to take a shot at combining the one piece ease of the Cyclops with the independent flexibility of the Chimera. I came up with the Chimera 1 Piece Heater Block.
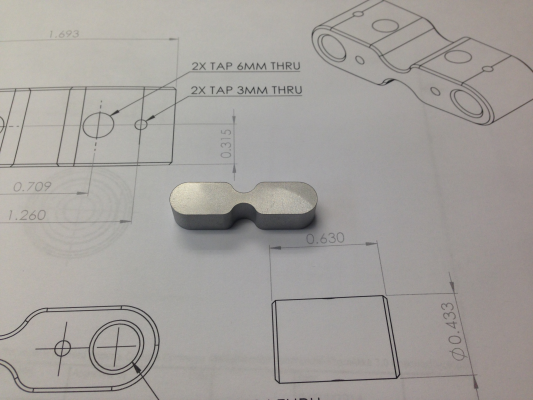
This will make setup as easy as the Cyclops, yet the undercut midsection should allow both sides of the heater block to reach independent temperatures (within reason). I know there will be heat soak between the two main sections, how much I don't know!?!? That will come to light as soon as testing starts. The main section should be out of the Wire EDM today (see sample cut below). If so I'll get the final machining done this week, and if my other parts come in Friday it will get installed this weekend
The heater block also takes advantage of the far less expensive V6 Nozzles (a third the cost of Cyclops Nozzles)...dirt cheap if you went with a Chinese knockoff (I wouldn't suggest it, I've gone that route, it's not worth it). The heat breaks are standard Chimera or Cyclops...either should work. I'll use the screw in Thermistors for ease of installation, and the fact I simply like them
I attached a 3D PDF of the assembly, you can zoom in, spin it around, and check it out...I love these 3D DPF's!!!
I am currently running the E3D Legends Pack. I like both the Chimera and Cyclops Heater Blocks for different reasons.
The Cyclops with it's one nozzle and heater block is really easy to setup, but limits you to using the same type filament while dual extruding. You could (in theory) run PLA and ABS at the same time, but they require different heat ranges to work properly and the current single heater block does not accommodate that. So you are stuck with ABS or PLA, or whatever.
The Chimera is quite a bit more difficult to setup as you have two independent heater blocks that both have the be set to the correct Z height. E3D did a great job providing a means to do this, but it's pretty time consuming and requires a lot of trial and error (and is quite unattractive in general). I can't ever seem to got it perfect!!! The great thing about the Chimera is you can run PLA and ABS at the same time with two different heat profiles, and extruder multipliers. You can even combined a flexible filament & Nylon for example, hell you can pretty much combined whatever you want.
With that said...I decided to take a shot at combining the one piece ease of the Cyclops with the independent flexibility of the Chimera. I came up with the Chimera 1 Piece Heater Block.
This will make setup as easy as the Cyclops, yet the undercut midsection should allow both sides of the heater block to reach independent temperatures (within reason). I know there will be heat soak between the two main sections, how much I don't know!?!? That will come to light as soon as testing starts. The main section should be out of the Wire EDM today (see sample cut below). If so I'll get the final machining done this week, and if my other parts come in Friday it will get installed this weekend

The heater block also takes advantage of the far less expensive V6 Nozzles (a third the cost of Cyclops Nozzles)...dirt cheap if you went with a Chinese knockoff (I wouldn't suggest it, I've gone that route, it's not worth it). The heat breaks are standard Chimera or Cyclops...either should work. I'll use the screw in Thermistors for ease of installation, and the fact I simply like them

I attached a 3D PDF of the assembly, you can zoom in, spin it around, and check it out...I love these 3D DPF's!!!
|
Re: Folger Tech 2020 i3 Printer Kit (Official Thread) January 06, 2016 11:44AM |
Registered: 8 years ago Posts: 32 |
Just checked out the chimera hotend, from the pics it looks like the nozzles are at the same height so why would you need different Z heights?
I really like the look of your design, can't wait to see how it performs! Hopefully there won't be too much heat seeping between the main blocks - if it does turn out to be a problem maybe a fin or two on the neck might help? I was going to suggest a heatsink between the two main blocks, but then you'd end up with 3 separate pieces and after I've looked at the chimera I'm sure you're trying to keep it as one piece.
Edited 1 time(s). Last edit at 01/06/2016 11:44AM by Boffster.
|
Re: Folger Tech 2020 i3 Printer Kit (Official Thread) January 06, 2016 12:55PM |
Registered: 8 years ago Posts: 93 |
Quote
sonnylowe
With my printer down awaiting hardware to arrive (to complete yet another verison of my X Carriage upgrade) I've moved my thoughts elsewhere...wire management is one. I've relocated the Arduino/Ramps Board (enclosure is in mind) and started looming and rerouting all the wiring. I hope to have that done tonight. I have also moved to the hotter side of things, yup, the Hotend.
I am currently running the E3D Legends Pack. I like both the Chimera and Cyclops Heater Blocks for different reasons.
The Cyclops with it's one nozzle and heater block is really easy to setup, but limits you to using the same type filament while dual extruding. You could (in theory) run PLA and ABS at the same time, but they require different heat ranges to work properly and the current single heater block does not accommodate that. So you are stuck with ABS or PLA, or whatever.
The Chimera is quite a bit more difficult to setup as you have two independent heater blocks that both have the be set to the correct Z height. E3D did a great job providing a means to do this, but it's pretty time consuming and requires a lot of trial and error (and is quite unattractive in general). I can't ever seem to got it perfect!!! The great thing about the Chimera is you can run PLA and ABS at the same time with two different heat profiles, and extruder multipliers. You can even combined a flexible filament & Nylon for example, hell you can pretty much combined whatever you want.
With that said...I decided to take a shot at combining the one piece ease of the Cyclops with the independent flexibility of the Chimera. I came up with the Chimera 1 Piece Heater Block.
This will make setup as easy as the Cyclops, yet the undercut midsection should allow both sides of the heater block to reach independent temperatures (within reason). I know there will be heat soak between the two main sections, how much I don't know!?!? That will come to light as soon as testing starts. The main section should be out of the Wire EDM today (see sample cut below). If so I'll get the final machining done this week, and if my other parts come in Friday it will get installed this weekend
The heater block also takes advantage of the far less expensive V6 Nozzles (a third the cost of Cyclops Nozzles)...dirt cheap if you went with a Chinese knockoff (I wouldn't suggest it, I've gone that route, it's not worth it). The heat breaks are standard Chimera or Cyclops...either should work. I'll use the screw in Thermistors for ease of installation, and the fact I simply like them
I attached a 3D PDF of the assembly, you can zoom in, spin it around, and check it out...I love these 3D DPF's!!!
I'm curious, would you still be able to use different materials at different temperatures with this? Also both nozzles would have to be exactly identical.
Folger Tech 2020 i3 Wiki
Custom google search for the Folger Tech 2020 i3 forum topic by Animoose
My Thingiverse Designs
|
Re: Folger Tech 2020 i3 Printer Kit (Official Thread) January 06, 2016 01:12PM |
Registered: 8 years ago Posts: 84 |
Quote
sonnylowe
Quote
built350camaro
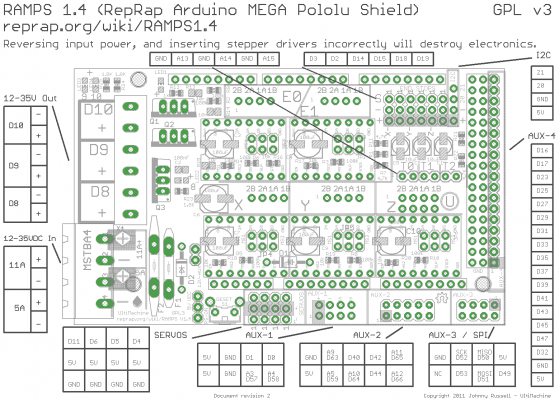
Ok I think I am ready to add auto bed leveling to my rig. I printed the new carriage with the servo at the bottom and have a servo to go there, where do I plug the servo on the Ramps board? I moved the endstop to the left side and got all the running the correct direction.
The servo plugs into the ramps board at the top (as installed-bottom in photo), just to the left of the reset button and power strips.
Make sure you add the jumper required to power the servo pins...
Where do I need to add this jumper? Any good write ups on how to do this?
|
Re: Folger Tech 2020 i3 Printer Kit (Official Thread) January 06, 2016 01:18PM |
Registered: 8 years ago Posts: 84 |
Quote
srcga
Quote
sonnylowe
Quote
built350camaro
Ok I think I am ready to add auto bed leveling to my rig. I printed the new carriage with the servo at the bottom and have a servo to go there, where do I plug the servo on the Ramps board? I moved the endstop to the left side and got all the running the correct direction.
The servo plugs into the ramps board at the top (as installed-bottom in photo), just to the left of the reset button and power strips.
Make sure you add the jumper required to power the servo pins...
What he said! Are you using the carriage that I put on thingiverse?
I had a 5v regulator around - I powered the '5V' pin pictured with its output, it's the 5v pin next to the PS_ON pin, that powers the servos. The 5v bus as-is won't be able to handle the Servo if you try to power it without help.
Yes I am using your carriage.
|
Re: Folger Tech 2020 i3 Printer Kit (Official Thread) January 06, 2016 01:47PM |
Registered: 8 years ago Posts: 268 |
Quote
Boffster
Just checked out the chimera hotend, from the pics it looks like the nozzles are at the same height so why would you need different Z heights?
I really like the look of your design, can't wait to see how it performs! Hopefully there won't be too much heat seeping between the main blocks - if it does turn out to be a problem maybe a fin or two on the neck might help? I was going to suggest a heatsink between the two main blocks, but then you'd end up with 3 separate pieces and after I've looked at the chimera I'm sure you're trying to keep it as one piece.
Yes, you guys are correct, both Z heights are set the same on the Chimera, but they a set "Independently" as I indicated. That is what makes it more time consuming than setting up the Cyclops with it's single nozzle.
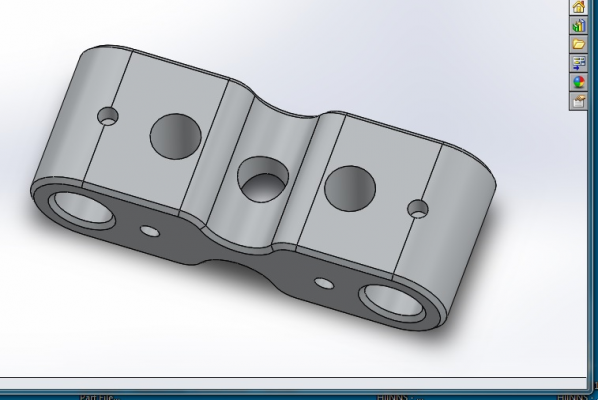
I have already added another hole to the design that is centered in between the two main sections, it should help with the heat soak...I hope ;-)
Actually, since this is being wire cut adding fins is pretty damn easy, and I can still keep it one piece. The additional surface area would really help with stopping heat transfer between the main lugs...I'll be modeling it very soon...thanks for the idea!!!
Okay, while I was waiting for our slow ass internet connection to catch up I whipped this out...
|
Re: Folger Tech 2020 i3 Printer Kit (Official Thread) January 06, 2016 01:51PM |
Registered: 8 years ago Posts: 268 |
Quote
built350camaro
Quote
sonnylowe
Quote
built350camaro
Ok I think I am ready to add auto bed leveling to my rig. I printed the new carriage with the servo at the bottom and have a servo to go there, where do I plug the servo on the Ramps board? I moved the endstop to the left side and got all the running the correct direction.
The servo plugs into the ramps board at the top (as installed-bottom in photo), just to the left of the reset button and power strips.
Make sure you add the jumper required to power the servo pins...
Where do I need to add this jumper? Any good write ups on how to do this?
THIS guy has a nice series of videos explaining the whole process, he'll show you where to put the jumper

|
Re: Folger Tech 2020 i3 Printer Kit (Official Thread) January 06, 2016 02:01PM |
Registered: 8 years ago Posts: 268 |
Quote
Bert3D
Quote
sonnylowe
With my printer down awaiting hardware to arrive (to complete yet another verison of my X Carriage upgrade) I've moved my thoughts elsewhere...wire management is one. I've relocated the Arduino/Ramps Board (enclosure is in mind) and started looming and rerouting all the wiring. I hope to have that done tonight. I have also moved to the hotter side of things, yup, the Hotend.
I am currently running the E3D Legends Pack. I like both the Chimera and Cyclops Heater Blocks for different reasons.
The Cyclops with it's one nozzle and heater block is really easy to setup, but limits you to using the same type filament while dual extruding. You could (in theory) run PLA and ABS at the same time, but they require different heat ranges to work properly and the current single heater block does not accommodate that. So you are stuck with ABS or PLA, or whatever.
The Chimera is quite a bit more difficult to setup as you have two independent heater blocks that both have the be set to the correct Z height. E3D did a great job providing a means to do this, but it's pretty time consuming and requires a lot of trial and error (and is quite unattractive in general). I can't ever seem to got it perfect!!! The great thing about the Chimera is you can run PLA and ABS at the same time with two different heat profiles, and extruder multipliers. You can even combined a flexible filament & Nylon for example, hell you can pretty much combined whatever you want.
With that said...I decided to take a shot at combining the one piece ease of the Cyclops with the independent flexibility of the Chimera. I came up with the Chimera 1 Piece Heater Block.
This will make setup as easy as the Cyclops, yet the undercut midsection should allow both sides of the heater block to reach independent temperatures (within reason). I know there will be heat soak between the two main sections, how much I don't know!?!? That will come to light as soon as testing starts. The main section should be out of the Wire EDM today (see sample cut below). If so I'll get the final machining done this week, and if my other parts come in Friday it will get installed this weekend
The heater block also takes advantage of the far less expensive V6 Nozzles (a third the cost of Cyclops Nozzles)...dirt cheap if you went with a Chinese knockoff (I wouldn't suggest it, I've gone that route, it's not worth it). The heat breaks are standard Chimera or Cyclops...either should work. I'll use the screw in Thermistors for ease of installation, and the fact I simply like them
I attached a 3D PDF of the assembly, you can zoom in, spin it around, and check it out...I love these 3D DPF's!!!
I'm curious, would you still be able to use different materials at different temperatures with this? Also both nozzles would have to be exactly identical.
That's the hope and plan...time will tell.
Yes, the nozzles themselves would need to be pretty much identical. That's a good reason to use the E3D Nozzles, if you look at their tolerances I think it will work. You could still adjust nozzle height by just not seating the flange of the nozzle to the heater block (it usually isn't). However my plan is to seat them in hope that the nozzle tips line up. I could design and make some sort of setup tool that would do the job, but that would most likely make this more complicated than the original design!?!? The only advantage then would be not having to look at this...
Edited 1 time(s). Last edit at 01/06/2016 02:03PM by sonnylowe.
|
Re: Folger Tech 2020 i3 Printer Kit (Official Thread) January 06, 2016 02:17PM |
Registered: 8 years ago Posts: 32 |
Damn you're quick! Will you be trying all 3 block designs? Would be interesting to see the difference with heat dissipation.
Good luck anyway!
|
Re: Folger Tech 2020 i3 Printer Kit (Official Thread) January 06, 2016 02:28PM |
Registered: 8 years ago Posts: 3 |
For giggles, I guessed at a few dimensions on your part from the drawing you posted earlier, and for the solid portions of the finned area estimated it to be about 16mm wide and 3.6mm tall (1/3 overall height) and 9mm long. A quick back of the envelope calc of the heat conduction shows that with a 45 deg C difference (180 vs 225) you could move about 55-60 watts between the two sides, assuming no convective losses. You may have a hard time maintaining a large difference between the two sides. Of course, I hope I am wrong.Quote
sonnylowe
Okay, while I was waiting for our slow ass internet connection to catch up I whipped this out...
|
Re: Folger Tech 2020 i3 Printer Kit (Official Thread) January 06, 2016 03:14PM |
Registered: 8 years ago Posts: 268 |
Quote
kebauc
For giggles, I guessed at a few dimensions on your part from the drawing you posted earlier, and for the solid portions of the finned area estimated it to be about 16mm wide and 3.6mm tall (1/3 overall height) and 9mm long. A quick back of the envelope calc of the heat conduction shows that with a 45 deg C difference (180 vs 225) you could move about 55-60 watts between the two sides, assuming no convective losses. You may have a hard time maintaining a large difference between the two sides. Of course, I hope I am wrong.Quote
sonnylowe
Okay, while I was waiting for our slow ass internet connection to catch up I whipped this out...
Haha, you're most likely right (the math usually doesn't lie), and if so this could be a futile effort...but I have the machines and the time so I'll give it a whirl

Thank's for doing the math...it's way beyond me!!!
|
Re: Folger Tech 2020 i3 Printer Kit (Official Thread) January 06, 2016 03:45PM |
Registered: 8 years ago Posts: 5 |
A few few people have commented on issues with the LCD from Folger.
I've found that mine can be flaky, but so far it has worked consistently fine if, in addition to plugging in the printer, I also plug use a USB cord to plug the Arduino Mega into a wall adapter.
I've also read that shielding the cable can help.
I've found that mine can be flaky, but so far it has worked consistently fine if, in addition to plugging in the printer, I also plug use a USB cord to plug the Arduino Mega into a wall adapter.
I've also read that shielding the cable can help.
|
Re: Folger Tech 2020 i3 Printer Kit (Official Thread) January 06, 2016 05:57PM |
Registered: 8 years ago Posts: 51 |
got my bits for my Y axis upgrade.
Need to order some extra hardware before installation.
Sonny and theRipper. Can you show me how you spaced your wheels out from the plate? Currently I can't get the tensioner not a belt to fit as its a tight fit. I got the wheel kit. so bearings, spacers and nuts + bolts.
Pics of what I am upto currently are: [imgur.com]
|
Re: Folger Tech 2020 i3 Printer Kit (Official Thread) January 06, 2016 11:45PM |
Registered: 8 years ago Posts: 70 |
Quote
peeejayz
got my bits for my Y axis upgrade.
Need to order some extra hardware before installation.
Sonny and theRipper. Can you show me how you spaced your wheels out from the plate? Currently I can't get the tensioner not a belt to fit as its a tight fit. I got the wheel kit. so bearings, spacers and nuts + bolts.
Pics of what I am upto currently are: [imgur.com]
your screws should be inserted from the other side.
see drawing from open build
|
Re: Folger Tech 2020 i3 Printer Kit (Official Thread) January 07, 2016 03:24AM |
Registered: 8 years ago Posts: 51 |
Quote
Mopar99
Quote
peeejayz
got my bits for my Y axis upgrade.
Need to order some extra hardware before installation.
Sonny and theRipper. Can you show me how you spaced your wheels out from the plate? Currently I can't get the tensioner not a belt to fit as its a tight fit. I got the wheel kit. so bearings, spacers and nuts + bolts.
Pics of what I am upto currently are: [imgur.com]
your screws should be inserted from the other side.
see drawing from open build
I did see that, and have swapped mine over, but that still doesn't raise the platform any higher, so I'm wondering if they had to add extra spacers?
|
Re: Folger Tech 2020 i3 Printer Kit (Official Thread) January 07, 2016 04:36AM |
Registered: 8 years ago Posts: 93 |
Ok, I give up. Tonight I installed an autolevel Z probe and when I issue a G29 it just goes the the front left and probes the same spot several times. Never moves. Also does not go to center to z probe on a G28. Further it doesn't raise the head by the amount I set in the config between probes.
And yes, I did move my X endstop to the left and set it to min in both firmware and where it plugs in. X and Y home are working just fine.
Hooking up the servo and switch was the easy part. Getting it to work is not going so well, even though I followed the videos.
Any suggestions on what I'm missing?
Folger Tech 2020 i3 Wiki
Custom google search for the Folger Tech 2020 i3 forum topic by Animoose
My Thingiverse Designs
|
Re: Folger Tech 2020 i3 Printer Kit (Official Thread) January 07, 2016 07:29AM |
Registered: 8 years ago Posts: 268 |
|
Re: Folger Tech 2020 i3 Printer Kit (Official Thread) January 07, 2016 07:30AM |
Registered: 8 years ago Posts: 268 |
Quote
peeejayz
got my bits for my Y axis upgrade.
Need to order some extra hardware before installation.
Sonny and theRipper. Can you show me how you spaced your wheels out from the plate? Currently I can't get the tensioner not a belt to fit as its a tight fit. I got the wheel kit. so bearings, spacers and nuts + bolts.
Pics of what I am up to currently are: [imgur.com]
Other than the direction of the screws I'm pretty sure you got it right. I only ordered 6mm and 1mm spacers, so I know I used the 6mm, maybe I added one or two 1mm spacers as well, sorry I can't recall!?!? I'll check tonight when I get home, if there is extra hardware I'll let you know and I'll add it to the BOM. Either way everything is a pretty tight fit ;-)
BTW: Feel free to PM me anytime!!!
|
Re: Folger Tech 2020 i3 Printer Kit (Official Thread) January 07, 2016 07:59AM |
Registered: 8 years ago Posts: 51 |
Quote
sonnylowe
Quote
peeejayz
got my bits for my Y axis upgrade.
Need to order some extra hardware before installation.
Sonny and theRipper. Can you show me how you spaced your wheels out from the plate? Currently I can't get the tensioner not a belt to fit as its a tight fit. I got the wheel kit. so bearings, spacers and nuts + bolts.
Pics of what I am up to currently are: [imgur.com]
Other than the direction of the screws I'm pretty sure you got it right. I only ordered 6mm and 1mm spacers, so I know I used the 6mm, maybe I added one or two 1mm spacers as well, sorry I can't recall!?!? I'll check tonight when I get home, if there is extra hardware I'll let you know and I'll add it to the BOM. Either way everything is a pretty tight fit ;-)
BTW: Feel free to PM me anytime!!!
Awesome, if you could check that would be great. I'm think I've got all of the bolts ect ordered I'll need now. Probably not tho....
|
Re: Folger Tech 2020 i3 Printer Kit (Official Thread) January 07, 2016 09:21AM |
Registered: 9 years ago Posts: 40 |
I am trying to improve my print quality and am not sure where to start. I have calibrated my e-steps for my filament(Inland White PETG). I have printed a .4mm single wall calibration print and it is close to .4mm. I have messed with my stepper driver pots and I think they are turned up high enough, I do not get missed steps and they do not overheat.
My setup is below:
-Stock M5 threaded rod with dual nut anti-backlash trap
-Extended Z motor mounts
-Genuine E3DV6 w/.4mm nozzle with TheRippas mount
-X-Axis tensioner
Slic3r
-.3mm layers
-1.72mm filament
-98% flow
-2 Perimeters
-25% Infill
-235C hot end / 100C bed
The print is pretty smooth to the touch, but has some visible "edges"
Any suggestions?
|
Re: Folger Tech 2020 i3 Printer Kit (Official Thread) January 07, 2016 10:09AM |
Registered: 8 years ago Posts: 70 |
Quote
peeejayz
Quote
Mopar99
Quote
peeejayz
got my bits for my Y axis upgrade.
Need to order some extra hardware before installation.
Sonny and theRipper. Can you show me how you spaced your wheels out from the plate? Currently I can't get the tensioner not a belt to fit as its a tight fit. I got the wheel kit. so bearings, spacers and nuts + bolts.
Pics of what I am upto currently are: [imgur.com]
your screws should be inserted from the other side.
see drawing from open build
I did see that, and have swapped mine over, but that still doesn't raise the platform any higher, so I'm wondering if they had to add extra spacers?
ok, after seeing there is more than one photo, one thing i see is the washer should be the wheel and spacer. if you made changes you might want to post new photos of your changes. i would make sure you assemble it as per the drawing posted above. i had problems with the wheels not spinning freely until i figure out the washer was needed between the wheel and spacer.
|
Re: Folger Tech 2020 i3 Printer Kit (Official Thread) January 07, 2016 10:21AM |
Registered: 8 years ago Posts: 51 |
Quote
Mopar99
Quote
peeejayz
Quote
Mopar99
Quote
peeejayz
got my bits for my Y axis upgrade.
Need to order some extra hardware before installation.
Sonny and theRipper. Can you show me how you spaced your wheels out from the plate? Currently I can't get the tensioner not a belt to fit as its a tight fit. I got the wheel kit. so bearings, spacers and nuts + bolts.
Pics of what I am upto currently are: [imgur.com]
your screws should be inserted from the other side.
see drawing from open build
I did see that, and have swapped mine over, but that still doesn't raise the platform any higher, so I'm wondering if they had to add extra spacers?
ok, after seeing there is more than one photo, one thing i see is the washer should be the wheel and spacer. if you made changes you might want to post new photos of your changes. i would make sure you assemble it as per the drawing posted above. i had problems with the wheels not spinning freely until i figure out the washer was needed between the wheel and spacer.
First of all I didn't put the one between the bearings but I'll put one between teh bearing and spacer too, shouldn't make much differance to how it spins but mihgt give me that extra 1mm gap.
|
Re: Folger Tech 2020 i3 Printer Kit (Official Thread) January 07, 2016 10:48AM |
Registered: 8 years ago Posts: 268 |
Quote
peeejayz
Quote
Mopar99
Quote
peeejayz
Quote
Mopar99
Quote
peeejayz
got my bits for my Y axis upgrade.
Need to order some extra hardware before installation.
Sonny and theRipper. Can you show me how you spaced your wheels out from the plate? Currently I can't get the tensioner not a belt to fit as its a tight fit. I got the wheel kit. so bearings, spacers and nuts + bolts.
Pics of what I am upto currently are: [imgur.com]
your screws should be inserted from the other side.
see drawing from open build
I did see that, and have swapped mine over, but that still doesn't raise the platform any higher, so I'm wondering if they had to add extra spacers?
ok, after seeing there is more than one photo, one thing i see is the washer should be the wheel and spacer. if you made changes you might want to post new photos of your changes. i would make sure you assemble it as per the drawing posted above. i had problems with the wheels not spinning freely until i figure out the washer was needed between the wheel and spacer.
First of all I didn't put the one between the bearings but I'll put one between teh bearing and spacer too, shouldn't make much differance to how it spins but mihgt give me that extra 1mm gap.
The two wheels with the eccentric spacers will need the 1mm spacers between the bearings as they need to be really tight to keep tension on the V-Slot. The two with standard spacers would be fine without the bearing spacer as long as you didn't tighten them too tight, but you really want all the bearings tight as that will keep the slop out of the system...so it's better to put them in there ;-)
|
Re: Folger Tech 2020 i3 Printer Kit (Official Thread) January 07, 2016 02:36PM |
Registered: 8 years ago Posts: 268 |
Quote
sethmo
I am trying to improve my print quality and am not sure where to start. I have calibrated my e-steps for my filament(Inland White PETG). I have printed a .4mm single wall calibration print and it is close to .4mm. I have messed with my stepper driver pots and I think they are turned up high enough, I do not get missed steps and they do not overheat.
My setup is below:
-Stock M5 threaded rod with dual nut anti-backlash trap
-Extended Z motor mounts
-Genuine E3DV6 w/.4mm nozzle with TheRippas mount
-X-Axis tensioner
Slic3r
-.3mm layers
-1.72mm filament
-98% flow
-2 Perimeters
-25% Infill
-235C hot end / 100C bed
The print is pretty smooth to the touch, but has some visible "edges"
Any suggestions?
That's not a bad looking print at all...but I understand, we all want perfection. Try this guide from our friends over at S3D...Print Quality Troubleshooting Guide
|
Re: Folger Tech 2020 i3 Printer Kit (Official Thread) January 07, 2016 04:06PM |
Registered: 8 years ago Posts: 131 |
Quote
sonnylowe
Quote
sethmo
I am trying to improve my print quality and am not sure where to start. I have calibrated my e-steps for my filament(Inland White PETG). I have printed a .4mm single wall calibration print and it is close to .4mm. I have messed with my stepper driver pots and I think they are turned up high enough, I do not get missed steps and they do not overheat.
My setup is below:
-Stock M5 threaded rod with dual nut anti-backlash trap
-Extended Z motor mounts
-Genuine E3DV6 w/.4mm nozzle with TheRippas mount
-X-Axis tensioner
Slic3r
-.3mm layers
-1.72mm filament
-98% flow
-2 Perimeters
-25% Infill
-235C hot end / 100C bed
The print is pretty smooth to the touch, but has some visible "edges"
Any suggestions?
That's not a bad looking print at all...but I understand, we all want perfection. Try this guide from our friends over at S3D...Print Quality Troubleshooting Guide
Take some fine sand paper to it and clean it up. Let's see what it looks like after some finishing.
|
Re: Folger Tech 2020 i3 Printer Kit (Official Thread) January 07, 2016 04:36PM |
Registered: 8 years ago Posts: 276 |
Quote
sethmo
I am trying to improve my print quality and am not sure where to start. I have calibrated my e-steps for my filament(Inland White PETG). I have printed a .4mm single wall calibration print and it is close to .4mm. I have messed with my stepper driver pots and I think they are turned up high enough, I do not get missed steps and they do not overheat.
My setup is below:
-Stock M5 threaded rod with dual nut anti-backlash trap
-Extended Z motor mounts
-Genuine E3DV6 w/.4mm nozzle with TheRippas mount
-X-Axis tensioner
Slic3r
-.3mm layers
-1.72mm filament
-98% flow
-2 Perimeters
-25% Infill
-235C hot end / 100C bed
The print is pretty smooth to the touch, but has some visible "edges"
Any suggestions?
0.3mm layers are pretty big (at least in my humble opinion) and might be contributing to the problem you're having. 0.2mm is usually the highest I go. Also, what speed are you printing at?
Need help? Visit the Folgertech Wikia Page
The latest Marlin firmware with Folgertech Prusa i3 settings merged in, get it here
And check out my designs on Thingiverse, and follow me if you like what you see!
Sorry, only registered users may post in this forum.
