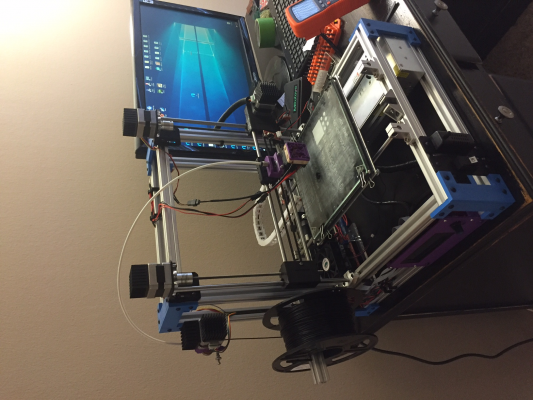
Folger Tech 2020 i3 Printer Kit (Official Thread)
Posted by Dan_FolgerTech
|
Re: Folger Tech 2020 i3 Printer Kit (Official Thread) January 09, 2016 09:32AM |
Registered: 8 years ago Posts: 70 |
Quote
sonnylowe
Quote
Mopar99
nice, so i have to ask about your source on lead screw. I have one picked out on ebay but they don't have the extra brass nut to order. I was going to source it from open build but i didn't see the brass nut on their site.
i did get the igus ordered, should have them sometime this month, currently out of stock but they are being shipped in from Germany.
I got my LS from EBAY and then pickup the replacement nuts from Banggood The key is to watch the thread pitch...these are 2mm. I ordered replacement nuts from FT and they were NOT 2mm pitch
Nice, that's cheaper & longer than the one I had picked out.
|
Re: Folger Tech 2020 i3 Printer Kit (Official Thread) January 09, 2016 01:00PM |
Registered: 8 years ago Posts: 6 |
Quote
Mach
Quote
nontech_3der
Quote
Mach
Quote
nontech_3der
Need help
Just Built my Printer finished setting the voltage on the motors now my issue is when move the z axis is see the log says "endstops hit: Z:0.00"
Not sure where I need to edit the config file to fix this.. any help and or guidance will be greatly appreciated
I am guessing that you are trying to move the Z axis up? Is the axis triggering the endstop? Could you paste your config to pastebin and give a link, I could not open your config file.
Yes I am trying to move the Z axis up. axis is not triggering the endstop, I only have an end stop at the bottom. Question should the kit have two endstops for the Z axis? here is the link [pastebin.com]
I did not see anything anything wrong with the Z axis configs, so the only thing I can think of is that the Z axis was not homed before trying to move it.
I do apologize on my delay had to do some traveling for work and for my ignorance I am finally working on the printer again. I read the manual again not much in there about homing the axis but I do have .believe have them all homed but I am still running in to the issue. when I try to manual move the z axis up I get echo:endstops hit: Z:-28.11 in the logs.. my other axis are moving correct. I did reach out to tech support but all they have told me is my wiring is correct.. Thank you again for all your help with this
|
Re: Folger Tech 2020 i3 Printer Kit (Official Thread) January 09, 2016 01:18PM |
Registered: 8 years ago Posts: 6 |
Quote
nontech_3der
Quote
Mach
Quote
nontech_3der
Quote
Mach
Quote
nontech_3der
Need help
Just Built my Printer finished setting the voltage on the motors now my issue is when move the z axis is see the log says "endstops hit: Z:0.00"
Not sure where I need to edit the config file to fix this.. any help and or guidance will be greatly appreciated
I am guessing that you are trying to move the Z axis up? Is the axis triggering the endstop? Could you paste your config to pastebin and give a link, I could not open your config file.
Yes I am trying to move the Z axis up. axis is not triggering the endstop, I only have an end stop at the bottom. Question should the kit have two endstops for the Z axis? here is the link [pastebin.com]
I did not see anything anything wrong with the Z axis configs, so the only thing I can think of is that the Z axis was not homed before trying to move it.
I do apologize on my delay had to do some traveling for work and for my ignorance I am finally working on the printer again. I read the manual again not much in there about homing the axis but I do have .believe have them all homed but I am still running in to the issue. when I try to manual move the z axis up I get echo:endstops hit: Z:-28.11 in the logs.. my other axis are moving correct. I did reach out to tech support but all they have told me is my wiring is correct.. Thank you again for all your help with this
not sure if this helps but when I click on the z axis home but I get N17 G28 Z0 *79 and the motors will not move.
|
Re: Folger Tech 2020 i3 Printer Kit (Official Thread) January 09, 2016 03:55PM |
Registered: 8 years ago Posts: 1 |
Hey everyone, I am considering getting this kit but I have a question about one of the parts. I am wanting to avoid acrylic on any parts on the printer and thats why I was going with the 2020 printer but I noticed in the build there are some acrylic parts, I see the rod holders and the electronics holders, is this the case? My understanding is those are just basically guides right? My concern with the acrylic parts is cracking while assembling and flexing while printing, if these are just guides or spacers it shouldn't be a problem. I am just wanting to confirm that I am reading the directions properly from people that have assembled the kit. Thanks for your help.
|
Re: Folger Tech 2020 i3 Printer Kit (Official Thread) January 09, 2016 04:11PM |
Registered: 8 years ago Posts: 51 |
Quote
fluffybunny
Hey everyone, I am considering getting this kit but I have a question about one of the parts. I am wanting to avoid acrylic on any parts on the printer and thats why I was going with the 2020 printer but I noticed in the build there are some acrylic parts, I see the rod holders and the electronics holders, is this the case? My understanding is those are just basically guides right? My concern with the acrylic parts is cracking while assembling and flexing while printing, if these are just guides or spacers it shouldn't be a problem. I am just wanting to confirm that I am reading the directions properly from people that have assembled the kit. Thanks for your help.
They are the only bits the rod holder just holds nothing more. This is my reasons for getting this kit too.
|
Re: Folger Tech 2020 i3 Printer Kit (Official Thread) January 09, 2016 04:15PM |
Registered: 8 years ago Posts: 51 |
Quote
sonnylowe
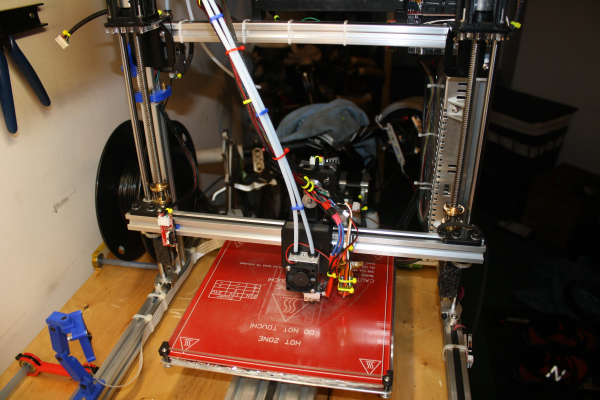
Well I finally got all my hardware and had a chance to put the printer back together. So far the new X (V-2) setup is a winner!! I like it much better than V-1, much more compact, and it will allow a smaller enclosure if I decide to go that direction...and no more X-motor hanging off the side!!!
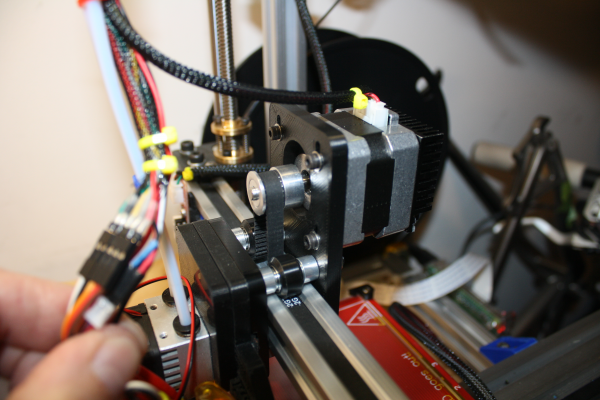
My main objective with this verison was to make the setup more compact which resulted in moving the X stepper motor to the Hotend Gantry. Since I run Bowden Extruders I had some room to add weight back onto the X gantry, and with the V-Slot I think you could run both a Carriage and Extruder stepper on the Gantry with no problem.
The overall setup
New stepper location setup:
This runs smoother and even quieter than the V-1. I think the idler pulley and the longer belt had some resonance to it, and now with the belt half the length and only on one side it's gone
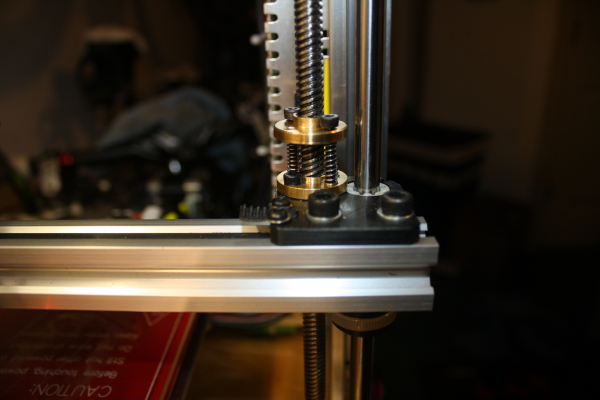
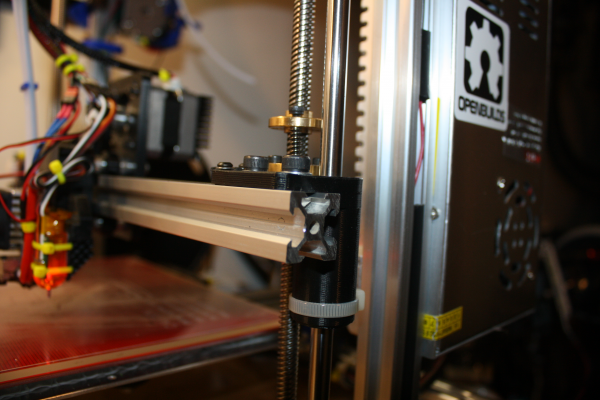
I also added a Z Anti-backlash tension system using an old set of Lead Screw nuts, some springs and a few SHCS. I have eliminated all the little popping sounds I got when changing Z direction. I got those pops a lot because I run a Z retract along with the filament retract. As far as upgrading Z I think this is really all you need to do. Even as much as I like to tinker, when I consider it's slow movement I honestly don't think it would benefit from the V-Slot ball bearing guides...
I didn't want to add any type of structure to the X mount to secure the bearings, so I just used a ty-rap...works great (I'll already add a ty-rap grove to the release version to tidy it up a bit). Like the V-1 X mount this is a single part which is mirrored for side two...BTW: I would have used black ty-raps if I had any ;-)
While the printer was down I took the time to tidy up my wiring a bit. I laid the Ramps board on it's side then mounted it to the upper rail, I used the space created underneath to hide the extra wire...I still need to deal with the Hotend wiring, but util I settle on that configuration I'll leave it as is...
Here's an ALBUM with a few more photos...if you kids want to see any detailed photos let me know, I'll be happy to snap a few more pix...
WOW. I love it!
Awesome design. Can't wait to see some results and video of it printing.
Just in the middle of my Y one now. All the old parts are off just about to drill the bed to fit it on the carriage.
Do you know what you changed your Y esteps to with a 16t pully?
|
Re: Folger Tech 2020 i3 Printer Kit (Official Thread) January 09, 2016 08:32PM |
Registered: 8 years ago Posts: 541 |
Quote
sonnylowe
Well I finally got all my hardware and had a chance to put the printer back together. So far the new X (V-2) setup is a winner!! I like it much better than V-1, much more compact, and it will allow a smaller enclosure if I decide to go that direction...and no more X-motor hanging off the side!!!
My main objective with this verison was to make the setup more compact which resulted in moving the X stepper motor to the Hotend Gantry. Since I run Bowden Extruders I had some room to add weight back onto the X gantry, and with the V-Slot I think you could run both a Carriage and Extruder stepper on the Gantry with no problem.
The overall setup
New stepper location setup:
This runs smoother and even quieter than the V-1. I think the idler pulley and the longer belt had some resonance to it, and now with the belt half the length and only on one side it's gone
..
I LOVE the setup of using the stepper motor on the X carriage! Sweet design to use the top rollers for a double purpose! Good thinking.
I also see you solved the paper clips problem of holding the glass plate down! My BLTouch just arrived today! The new version only draws at max 300 ma rather than the 1 amp of the first version. Did you give it a separate supply or just go with what the servo connector supplies?
|
Re: Folger Tech 2020 i3 Printer Kit (Official Thread) January 09, 2016 11:25PM |
Registered: 8 years ago Posts: 268 |
Quote
peeejayz
Quote
sonnylowe
Well I finally got all my hardware and had a chance to put the printer back together. So far the new X (V-2) setup is a winner!! I like it much better than V-1, much more compact, and it will allow a smaller enclosure if I decide to go that direction...and no more X-motor hanging off the side!!!
My main objective with this verison was to make the setup more compact which resulted in moving the X stepper motor to the Hotend Gantry. Since I run Bowden Extruders I had some room to add weight back onto the X gantry, and with the V-Slot I think you could run both a Carriage and Extruder stepper on the Gantry with no problem.
The overall setup
New stepper location setup:
This runs smoother and even quieter than the V-1. I think the idler pulley and the longer belt had some resonance to it, and now with the belt half the length and only on one side it's gone
I also added a Z Anti-backlash tension system using an old set of Lead Screw nuts, some springs and a few SHCS. I have eliminated all the little popping sounds I got when changing Z direction. I got those pops a lot because I run a Z retract along with the filament retract. As far as upgrading Z I think this is really all you need to do. Even as much as I like to tinker, when I consider it's slow movement I honestly don't think it would benefit from the V-Slot ball bearing guides...
I didn't want to add any type of structure to the X mount to secure the bearings, so I just used a ty-rap...works great (I'll already add a ty-rap grove to the release version to tidy it up a bit). Like the V-1 X mount this is a single part which is mirrored for side two...BTW: I would have used black ty-raps if I had any ;-)
While the printer was down I took the time to tidy up my wiring a bit. I laid the Ramps board on it's side then mounted it to the upper rail, I used the space created underneath to hide the extra wire...I still need to deal with the Hotend wiring, but util I settle on that configuration I'll leave it as is...
Here's an ALBUM with a few more photos...if you kids want to see any detailed photos let me know, I'll be happy to snap a few more pix...
WOW. I love it!
Awesome design. Can't wait to see some results and video of it printing.
Just in the middle of my Y one now. All the old parts are off just about to drill the bed to fit it on the carriage.
Do you know what you changed your Y esteps to with a 16t pully?
Hmmm, that's weird, I'm not using a 16 tooth pulley, I'm running the stock 20 tooth pulley as indicated HERE I did adjust my e-steps but it was a really small amount like 80.21!?!?
|
Re: Folger Tech 2020 i3 Printer Kit (Official Thread) January 09, 2016 11:39PM |
Registered: 8 years ago Posts: 268 |
Quote
tjnamtiw
Quote
sonnylowe
Well I finally got all my hardware and had a chance to put the printer back together. So far the new X (V-2) setup is a winner!! I like it much better than V-1, much more compact, and it will allow a smaller enclosure if I decide to go that direction...and no more X-motor hanging off the side!!!
My main objective with this verison was to make the setup more compact which resulted in moving the X stepper motor to the Hotend Gantry. Since I run Bowden Extruders I had some room to add weight back onto the X gantry, and with the V-Slot I think you could run both a Carriage and Extruder stepper on the Gantry with no problem.
The overall setup
New stepper location setup:
This runs smoother and even quieter than the V-1. I think the idler pulley and the longer belt had some resonance to it, and now with the belt half the length and only on one side it's gone
..
I LOVE the setup of using the stepper motor on the X carriage! Sweet design to use the top rollers for a double purpose! Good thinking.
I also see you solved the paper clips problem of holding the glass plate down! My BLTouch just arrived today! The new version only draws at max 300 ma rather than the 1 amp of the first version. Did you give it a separate supply or just go with what the servo connector supplies?
Thanks!!!
The system works really well and I love the stepper on the Gantry, such a compact setup now...although I can't take credit for idea of using the bearings as belt rollers. It's done in the OB CNC machine builds all the time...just not as common in 3D Printer...although I'm not sure why!?!?
Yeah, those clips for the glass (V-3) are working okay, but I'm still not completely happy with them...I still have other ideas floating around in my head ;-)
I'm running power to the orange version directly off the servo connections on the Ramps board...no separate power supply. It will go into "alarm" mode sometimes when I first turn on the printer (I think the printer draws power away from the BLt), but once the printer is running I just reset it and it's fine!! My guess is you won't have that problem with the White version

|
Re: Folger Tech 2020 i3 Printer Kit (Official Thread) January 10, 2016 01:32AM |
Registered: 8 years ago Posts: 276 |
Quote
peeejayz
WOW. I love it!
Awesome design. Can't wait to see some results and video of it printing.
Just in the middle of my Y one now. All the old parts are off just about to drill the bed to fit it on the carriage.
Do you know what you changed your Y esteps to with a 16t pully?
There's a handy calculator for that - [prusaprinters.org]
Need help? Visit the Folgertech Wikia Page
The latest Marlin firmware with Folgertech Prusa i3 settings merged in, get it here
And check out my designs on Thingiverse, and follow me if you like what you see!
|
Re: Folger Tech 2020 i3 Printer Kit (Official Thread) January 10, 2016 02:14PM |
Registered: 8 years ago Posts: 59 |
Hello all! I have been MIA for awhile but am back in business now. Thought you might like to see what I've been up to. I just printed and installed the z motor mount standoffs and already printing bigger stuff. On another note I have come to the realization that gap between the nozzle and the build surface is the most important thing to get right. If it doesn't "bite" on a piece of paper, adhesion will be terrible and the exposed print face will look terrible. FYI the attached Eifel tower was a four part print I got off of thingiverse. The detail is excellent and the only trouble I have is with the big arches on the bottom. I may need to make supports for those or increase the part size.
|
Re: Folger Tech 2020 i3 Printer Kit (Official Thread) January 10, 2016 03:26PM |
Registered: 8 years ago Posts: 268 |
Here are a couple quick videos of the X-Axis V-2 running...
Video-1
Video-2
Here's a print I did this morning...I just changed my Hotend thermistor, and started a new roll of filament, but I've not had a chance to dial in either, so this is not one of my best prints. I do however think it shows that the X upgrade is running pretty smooth and working well...
Video-1
Video-2
Here's a print I did this morning...I just changed my Hotend thermistor, and started a new roll of filament, but I've not had a chance to dial in either, so this is not one of my best prints. I do however think it shows that the X upgrade is running pretty smooth and working well...
|
Re: Folger Tech 2020 i3 Printer Kit (Official Thread) January 10, 2016 04:30PM |
Registered: 8 years ago Posts: 51 |
Quote
sonnylowe
Quote
peeejayz
Quote
sonnylowe
SNIP
WOW. I love it!
Awesome design. Can't wait to see some results and video of it printing.
Just in the middle of my Y one now. All the old parts are off just about to drill the bed to fit it on the carriage.
Do you know what you changed your Y esteps to with a 16t pully?
Hmmm, that's weird, I'm not using a 16 tooth pulley, I'm running the stock 20 tooth pulley as indicated HERE I did adjust my e-steps but it was a really small amount like 80.21!?!?
Dam I missed that. I got a 16 on it working fine, might go back to the 20 the 16 is a little tight.
Its working and printing now tho
 Mega happy with the difference. Cheers for all of your hard work.
|
Wire leads BURNING plastic? January 10, 2016 04:30PM |
Registered: 8 years ago Posts: 2 |
Hello All,
Hopefully someone here has the knowledge to help me with my issue
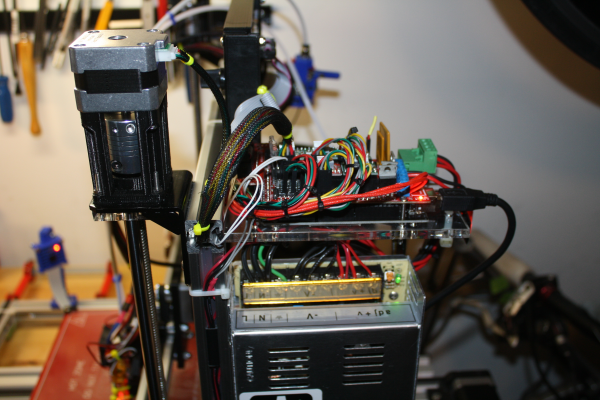
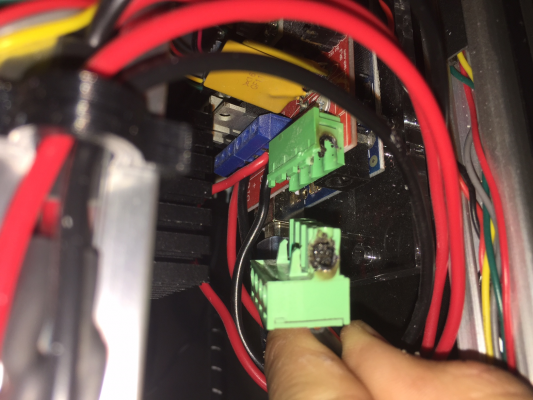
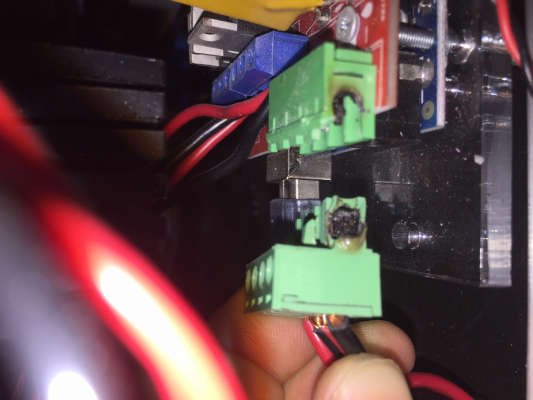
I have had great success and high quality results with this printer until this morning. Mid-print the printer stopped as if a driver was over heating, all motors stopped. This was not the case as I immediately checked each drivers temp, each reading was around 80F. Within seconds my whole room started to smell of burning plastic....not filament lol. After investigating i found the following results. Is this due to a failure within the power supplies or the Mega/Ramps itself? Any help would be greatly appreciated!!!
I also attached a picture of my setup, maybe someone can see something I do not
Edited 1 time(s). Last edit at 01/10/2016 04:31PM by Apettenon.
Hopefully someone here has the knowledge to help me with my issue

I have had great success and high quality results with this printer until this morning. Mid-print the printer stopped as if a driver was over heating, all motors stopped. This was not the case as I immediately checked each drivers temp, each reading was around 80F. Within seconds my whole room started to smell of burning plastic....not filament lol. After investigating i found the following results. Is this due to a failure within the power supplies or the Mega/Ramps itself? Any help would be greatly appreciated!!!
I also attached a picture of my setup, maybe someone can see something I do not

Edited 1 time(s). Last edit at 01/10/2016 04:31PM by Apettenon.
|
Re: Wire leads BURNING plastic? January 10, 2016 04:42PM |
Registered: 8 years ago Posts: 367 |
Quote
Apettenon
Hello All,
Hopefully someone here has the knowledge to help me with my issue
I have had great success and high quality results with this printer until this morning. Mid-print the printer stopped as if a driver was over heating, all motors stopped. This was not the case as I immediately checked each drivers temp, each reading was around 80F. Within seconds my whole room started to smell of burning plastic....not filament lol. After investigating i found the following results. Is this due to a failure within the power supplies or the Mega/Ramps itself? Any help would be greatly appreciated!!!
I also attached a picture of my setup, maybe someone can see something I do not
I think I remember reading on another thread that some RAMPS boards have low quality connectors which can do this. I assume they don't make contact over a big enough area, so then you put all the current through a small area, it gets hot, and bad things happen. My original RAMPS board was clearly a poor quality one (terrible soldering etc) and I ended up not using it at all. I replaced it with this one: [www.amazon.com]
See my blog at [moosteria.blogspot.com].
|
Re: Folger Tech 2020 i3 Printer Kit (Official Thread) January 10, 2016 09:28PM |
Registered: 8 years ago Posts: 6 |
I just finished putting my kit together, and I am now tuning the stepper drivers. What is the current rating for the extruder motor? It looks the same size as the motors for the X and Z axes (I believe these are 0.4A motors), but I wanted to confirm if that was really the case.
Also, when tuning the stepper driver for the Z axis, should I double the Vref since it runs 2 motors?
Also, when tuning the stepper driver for the Z axis, should I double the Vref since it runs 2 motors?
|
Re: Wire leads BURNING plastic? January 10, 2016 09:28PM |
Registered: 8 years ago Posts: 26 |
Quote
Apettenon
Hello All,
Hopefully someone here has the knowledge to help me with my issue
I have had great success and high quality results with this printer until this morning. Mid-print the printer stopped as if a driver was over heating, all motors stopped. This was not the case as I immediately checked each drivers temp, each reading was around 80F. Within seconds my whole room started to smell of burning plastic....not filament lol. After investigating i found the following results. Is this due to a failure within the power supplies or the Mega/Ramps itself? Any help would be greatly appreciated!!!
I also attached a picture of my setup, maybe someone can see something I do not
[attachment 69428 IMG_8869.JPG]
[attachment 69429 IMG_8870.JPG]
[attachment 69430 IMG_8868.JPG]
Hi Apettenon, check out Tom's reviews. He reviewed the RAMPS board and mentioned the polyfuses and that particular connector as not being sized correctly for the electrical loads. He also gives a solution. Here is the link
[www.youtube.com]
Hope this helps.
Jim
|
Re: Folger Tech 2020 i3 Printer Kit (Official Thread) January 10, 2016 09:28PM |
Registered: 8 years ago Posts: 6 |
|
Re: Folger Tech 2020 i3 Printer Kit (Official Thread) January 11, 2016 04:26AM |
Registered: 8 years ago Posts: 268 |
Quote
peeejayz
Quote
sonnylowe
Quote
peeejayz
Quote
sonnylowe
SNIP
WOW. I love it!
Awesome design. Can't wait to see some results and video of it printing.
Just in the middle of my Y one now. All the old parts are off just about to drill the bed to fit it on the carriage.
Do you know what you changed your Y esteps to with a 16t pully?
Hmmm, that's weird, I'm not using a 16 tooth pulley, I'm running the stock 20 tooth pulley as indicated HERE I did adjust my e-steps but it was a really small amount like 80.21!?!?
Dam I missed that. I got a 16 on it working fine, might go back to the 20 the 16 is a little tight.
Its working and printing now thoMega happy with the difference. Cheers for all of your hard work.
Haha, yeah we all miss stuff now and then, so glad to hear it's up and running, and even more so that you like the upgrade

|
Re: Wire leads BURNING plastic? January 11, 2016 06:05AM |
Registered: 8 years ago Posts: 268 |
Quote
Apettenon
Hello All,
Hopefully someone here has the knowledge to help me with my issue
I have had great success and high quality results with this printer until this morning. Mid-print the printer stopped as if a driver was over heating, all motors stopped. This was not the case as I immediately checked each drivers temp, each reading was around 80F. Within seconds my whole room started to smell of burning plastic....not filament lol. After investigating i found the following results. Is this due to a failure within the power supplies or the Mega/Ramps itself? Any help would be greatly appreciated!!!
I also attached a picture of my setup, maybe someone can see something I do not
I have nothing to add to resolving your issue, I think animoose and Jim nailed it. I did however want to say how much I liked your setup

|
Re: Wire leads BURNING plastic? January 11, 2016 08:28AM |
Registered: 8 years ago Posts: 2 |
Quote
sonnylowe
Quote
Apettenon
Hello All,
Hopefully someone here has the knowledge to help me with my issue
I have had great success and high quality results with this printer until this morning. Mid-print the printer stopped as if a driver was over heating, all motors stopped. This was not the case as I immediately checked each drivers temp, each reading was around 80F. Within seconds my whole room started to smell of burning plastic....not filament lol. After investigating i found the following results. Is this due to a failure within the power supplies or the Mega/Ramps itself? Any help would be greatly appreciated!!!
I also attached a picture of my setup, maybe someone can see something I do not
I have nothing to add to resolving your issue, I think animoose and Jim nailed it. I did however want to say how much I liked your setup
Thank you Sonny,
Surprising enough, the addition of the extra 2020 beams has made my machine much more ridged and has increased the quality of prints.
|
Re: Wire leads BURNING plastic? January 11, 2016 09:38AM |
Registered: 8 years ago Posts: 268 |
Quote
Apettenon
Quote
sonnylowe
Quote
Apettenon
Hello All,
Hopefully someone here has the knowledge to help me with my issue
I have had great success and high quality results with this printer until this morning. Mid-print the printer stopped as if a driver was over heating, all motors stopped. This was not the case as I immediately checked each drivers temp, each reading was around 80F. Within seconds my whole room started to smell of burning plastic....not filament lol. After investigating i found the following results. Is this due to a failure within the power supplies or the Mega/Ramps itself? Any help would be greatly appreciated!!!
I also attached a picture of my setup, maybe someone can see something I do not
I have nothing to add to resolving your issue, I think animoose and Jim nailed it. I did however want to say how much I liked your setup
Thank you Sonny,
Surprising enough, the addition of the extra 2020 beams has made my machine much more ridged and has increased the quality of prints.
NICE!!! I've thought about moving all the electronics below the printer and the way you've done it is perfect...who knows what will happen when I run out of other stuff to upgrade, and heaven forbid...get board LOL
|
Re: Folger Tech 2020 i3 Printer Kit (Official Thread) January 11, 2016 09:47AM |
Registered: 8 years ago Posts: 6 |
Quote
Mach
Quote
nontech_3der
Quote
Mach
Quote
nontech_3der
Need help
Just Built my Printer finished setting the voltage on the motors now my issue is when move the z axis is see the log says "endstops hit: Z:0.00"
Not sure where I need to edit the config file to fix this.. any help and or guidance will be greatly appreciated
I am guessing that you are trying to move the Z axis up? Is the axis triggering the endstop? Could you paste your config to pastebin and give a link, I could not open your config file.
Yes I am trying to move the Z axis up. axis is not triggering the endstop, I only have an end stop at the bottom. Question should the kit have two endstops for the Z axis? here is the link [pastebin.com]
I did not see anything anything wrong with the Z axis configs, so the only thing I can think of is that the Z axis was not homed before trying to move it.
Ok not sure why my last quote did show up. First I do apologize for my delayed response i had to travel for work.. Next I rehomed the axis's and still when i try to move the z axis up I see in the logs endstop triggered.. what am I missing or doing wrong.
|
Re: Folger Tech 2020 i3 Printer Kit (Official Thread) January 11, 2016 10:43AM |
Registered: 8 years ago Posts: 51 |
Quote
sonnylowe
Quote
peeejayz
Quote
sonnylowe
Quote
peeejayz
Quote
sonnylowe
SNIP
WOW. I love it!
Awesome design. Can't wait to see some results and video of it printing.
Just in the middle of my Y one now. All the old parts are off just about to drill the bed to fit it on the carriage.
Do you know what you changed your Y esteps to with a 16t pully?
Hmmm, that's weird, I'm not using a 16 tooth pulley, I'm running the stock 20 tooth pulley as indicated HERE I did adjust my e-steps but it was a really small amount like 80.21!?!?
Dam I missed that. I got a 16 on it working fine, might go back to the 20 the 16 is a little tight.
Its working and printing now thoMega happy with the difference. Cheers for all of your hard work.
Haha, yeah we all miss stuff now and then, so glad to hear it's up and running, and even more so that you like the upgrade
Yea I found the stock folger alu bed to flexible to level correctly so I have ordered one of the openbuilds ones so I'll put that in to help stiffen it all up. Just awaiting alu bed and sensor for auto leveling too now.
|
Re: Folger Tech 2020 i3 Printer Kit (Official Thread) January 11, 2016 11:12AM |
Registered: 8 years ago Posts: 26 |
Good morning. I finished the build, got the firmware straightened out with your help, all 3 axis home and move properly. I leveled the bed and next tried to get the bed and extruder to heat. The bed heats fine. The extruder never heated, the reading on the LCD without heat was 23, with heat it got to 26 (30 min), I am sure that is radiant heat from the bed which was at 70 deg C. I assumed the thermister may be an issue. I checked the folgertech help site and they recommend checking resistance, which I did and it was showing 114k ohms (they say normal 80k to 120k). So, I assume the thermister is probably not the problem? Next I put the hot end back together and opened repetier and tried again to get the extruder to heat without success. I then turned on the bed heat and again it got to 70 in minutes ( less than 10 min). I decided while I had it all turned on to try and read some voltages. I read 12v at the green plug screws, and at D08 12 v when the led was lit, at D10 voltage was 0 and there I assume was supposed to be an led that comes on with that circuit and I saw no other led except those that are always on when the board is powered. Bad board? Bad heating element? Firmware related? What do you think? Thanks for any input, Jim.
|
Re: Folger Tech 2020 i3 Printer Kit (Official Thread) January 11, 2016 11:43AM |
Registered: 8 years ago Posts: 268 |
Quote
peeejayz
Quote
sonnylowe
Quote
peeejayz
Quote
sonnylowe
Quote
peeejayz
Quote
sonnylowe
SNIP
WOW. I love it!
Awesome design. Can't wait to see some results and video of it printing.
Just in the middle of my Y one now. All the old parts are off just about to drill the bed to fit it on the carriage.
Do you know what you changed your Y esteps to with a 16t pully?
Hmmm, that's weird, I'm not using a 16 tooth pulley, I'm running the stock 20 tooth pulley as indicated HERE I did adjust my e-steps but it was a really small amount like 80.21!?!?
Dam I missed that. I got a 16 on it working fine, might go back to the 20 the 16 is a little tight.
Its working and printing now thoMega happy with the difference. Cheers for all of your hard work.
Haha, yeah we all miss stuff now and then, so glad to hear it's up and running, and even more so that you like the upgrade
Yea I found the stock folger alu bed to flexible to level correctly so I have ordered one of the openbuilds ones so I'll put that in to help stiffen it all up. Just awaiting alu bed and sensor for auto leveling too now.
Sounds good, but please keep in mind that OB bed will lessens the length of the bed travel by quite a bit, make sure you leave the rail long enough to compensate...
|
Re: Folger Tech 2020 i3 Printer Kit (Official Thread) January 11, 2016 11:51AM |
Registered: 8 years ago Posts: 131 |
Not in front of my printer right now but it sounds like the thermistor is working correctly. It sounds like either the heating element isn't working or the board isn't powering itQuote
Jim72
Good morning. I finished the build, got the firmware straightened out with your help, all 3 axis home and move properly. I leveled the bed and next tried to get the bed and extruder to heat. The bed heats fine. The extruder never heated, the reading on the LCD without heat was 23, with heat it got to 26 (30 min), I am sure that is radiant heat from the bed which was at 70 deg C. I assumed the thermister may be an issue. I checked the folgertech help site and they recommend checking resistance, which I did and it was showing 114k ohms (they say normal 80k to 120k). So, I assume the thermister is probably not the problem? Next I put the hot end back together and opened repetier and tried again to get the extruder to heat without success. I then turned on the bed heat and again it got to 70 in minutes ( less than 10 min). I decided while I had it all turned on to try and read some voltages. I read 12v at the green plug screws, and at D08 12 v when the led was lit, at D10 voltage was 0 and there I assume was supposed to be an led that comes on with that circuit and I saw no other led except those that are always on when the board is powered. Bad board? Bad heating element? Firmware related? What do you think? Thanks for any input, Jim.
Did you check the voltage going to the heating element from the board when it's supposed to be on ?
|
Re: Folger Tech 2020 i3 Printer Kit (Official Thread) January 11, 2016 12:22PM |
Registered: 8 years ago Posts: 26 |
Quote
marc2912
Not in front of my printer right now but it sounds like the thermistor is working correctly. It sounds like either the heating element isn't working or the board isn't powering itQuote
Jim72
Good morning. I finished the build, got the firmware straightened out with your help, all 3 axis home and move properly. I leveled the bed and next tried to get the bed and extruder to heat. The bed heats fine. The extruder never heated, the reading on the LCD without heat was 23, with heat it got to 26 (30 min), I am sure that is radiant heat from the bed which was at 70 deg C. I assumed the thermister may be an issue. I checked the folgertech help site and they recommend checking resistance, which I did and it was showing 114k ohms (they say normal 80k to 120k). So, I assume the thermister is probably not the problem? Next I put the hot end back together and opened repetier and tried again to get the extruder to heat without success. I then turned on the bed heat and again it got to 70 in minutes ( less than 10 min). I decided while I had it all turned on to try and read some voltages. I read 12v at the green plug screws, and at D08 12 v when the led was lit, at D10 voltage was 0 and there I assume was supposed to be an led that comes on with that circuit and I saw no other led except those that are always on when the board is powered. Bad board? Bad heating element? Firmware related? What do you think? Thanks for any input, Jim.
Did you check the voltage going to the heating element from the board when it's supposed to be on ?
Yes, I tested where the wires for the extruder heater enter the plugs (D 10) on the board by contacting the screws that tighten the wires in the plug, with the wires plugged in. The board was powered up and hotend was "on" to heat it up. I would think more likely the board, I guess I could move the wires to another plug to test the heater, but I am not sure if I should, unsure of amps required and available at the other positions. I don't want to cause any smoke.

|
Re: Folger Tech 2020 i3 Printer Kit (Official Thread) January 11, 2016 12:35PM |
Registered: 8 years ago Posts: 131 |
Quote
Jim72
Quote
marc2912
Not in front of my printer right now but it sounds like the thermistor is working correctly. It sounds like either the heating element isn't working or the board isn't powering itQuote
Jim72
Good morning. I finished the build, got the firmware straightened out with your help, all 3 axis home and move properly. I leveled the bed and next tried to get the bed and extruder to heat. The bed heats fine. The extruder never heated, the reading on the LCD without heat was 23, with heat it got to 26 (30 min), I am sure that is radiant heat from the bed which was at 70 deg C. I assumed the thermister may be an issue. I checked the folgertech help site and they recommend checking resistance, which I did and it was showing 114k ohms (they say normal 80k to 120k). So, I assume the thermister is probably not the problem? Next I put the hot end back together and opened repetier and tried again to get the extruder to heat without success. I then turned on the bed heat and again it got to 70 in minutes ( less than 10 min). I decided while I had it all turned on to try and read some voltages. I read 12v at the green plug screws, and at D08 12 v when the led was lit, at D10 voltage was 0 and there I assume was supposed to be an led that comes on with that circuit and I saw no other led except those that are always on when the board is powered. Bad board? Bad heating element? Firmware related? What do you think? Thanks for any input, Jim.
Did you check the voltage going to the heating element from the board when it's supposed to be on ?
Yes, I tested where the wires for the extruder heater enter the plugs (D 10) on the board by contacting the screws that tighten the wires in the plug, with the wires plugged in. The board was powered up and hotend was "on" to heat it up. I would think more likely the board, I guess I could move the wires to another plug to test the heater, but I am not sure if I should, unsure of amps required and available at the other positions. I don't want to cause any smoke.
If you're getting no power when it's supposed to be on reach out to folgertech and tell them your board is bad, most likely they'll replace it.
|
Re: Folger Tech 2020 i3 Printer Kit (Official Thread) January 11, 2016 02:03PM |
Registered: 8 years ago Posts: 26 |
Quote
marc2912
Quote
Jim72
Quote
marc2912
Not in front of my printer right now but it sounds like the thermistor is working correctly. It sounds like either the heating element isn't working or the board isn't powering itQuote
Jim72
Good morning. I finished the build, got the firmware straightened out with your help, all 3 axis home and move properly. I leveled the bed and next tried to get the bed and extruder to heat. The bed heats fine. The extruder never heated, the reading on the LCD without heat was 23, with heat it got to 26 (30 min), I am sure that is radiant heat from the bed which was at 70 deg C. I assumed the thermister may be an issue. I checked the folgertech help site and they recommend checking resistance, which I did and it was showing 114k ohms (they say normal 80k to 120k). So, I assume the thermister is probably not the problem? Next I put the hot end back together and opened repetier and tried again to get the extruder to heat without success. I then turned on the bed heat and again it got to 70 in minutes ( less than 10 min). I decided while I had it all turned on to try and read some voltages. I read 12v at the green plug screws, and at D08 12 v when the led was lit, at D10 voltage was 0 and there I assume was supposed to be an led that comes on with that circuit and I saw no other led except those that are always on when the board is powered. Bad board? Bad heating element? Firmware related? What do you think? Thanks for any input, Jim.
Did you check the voltage going to the heating element from the board when it's supposed to be on ?
Yes, I tested where the wires for the extruder heater enter the plugs (D 10) on the board by contacting the screws that tighten the wires in the plug, with the wires plugged in. The board was powered up and hotend was "on" to heat it up. I would think more likely the board, I guess I could move the wires to another plug to test the heater, but I am not sure if I should, unsure of amps required and available at the other positions. I don't want to cause any smoke.
If you're getting no power when it's supposed to be on reach out to folgertech and tell them your board is bad, most likely they'll replace it.
Okay, I will contact them, Thanks for your input marc.
Sorry, only registered users may post in this forum.
