Folger Tech 2020 i3 Printer Kit (Official Thread)
Posted by Dan_FolgerTech
|
Re: Folger Tech 2020 i3 Printer Kit (Official Thread) February 03, 2016 01:32AM |
Registered: 8 years ago Posts: 314 |
Thanks, I copied those into my Cura setting's and will experiment tomorrow.Quote
iamquestar
Quote
UltiFix
How hot can I heat my bed before the pla becomes goey?
I'm not sure what you mean by gooy, but I had a piece that was low profile, and stuck like crazy. I could not get it off the build plate, so I heated the bed to 100c to see if that would help, and well, I got it off the plate but it softened the piece up to the point that it bent out of shape and ruined the print.
As for my cura settings I promised before, see the attached screen shots. If I didn't take a shot, I know that there was nothing on the tab I changed. Also here is the print I did this evening with these settings:
[attachment 71555 part.jpg]
You asked before if it was OK to use them for a starting point, I think yes, you should be able to. That is how I started. I took someones settings, and it worked OK, then started adjusting from there. The more I read, the more I realize that this is a lot of interplay between speed and temperature, that is not always obvious when you start out.
Edited 1 time(s). Last edit at 02/03/2016 01:32AM by UltiFix.
|
Re: Folger Tech 2020 i3 Printer Kit (Official Thread) February 03, 2016 02:05AM |
Registered: 8 years ago Posts: 276 |
sonnylowe - you still thinking of upgrading the controller? I ran out of things to do on the printer and have been looking into the MiniRambo.
Need help? Visit the Folgertech Wikia Page
The latest Marlin firmware with Folgertech Prusa i3 settings merged in, get it here
And check out my designs on Thingiverse, and follow me if you like what you see!
Need help? Visit the Folgertech Wikia Page
The latest Marlin firmware with Folgertech Prusa i3 settings merged in, get it here
And check out my designs on Thingiverse, and follow me if you like what you see!
|
Re: Folger Tech 2020 i3 Printer Kit (Official Thread) February 03, 2016 04:45AM |
Registered: 8 years ago Posts: 268 |
Quote
Mopar99
Quote
sonnylowe
Glad to see you have it up and running, the more I use my printer the happier I am with the upgrades
Nice job on the Z endstop improvise!!! Like I said in our PM exchanges...I never even thought about it LOL
Love the glow filament...I'm in the process of reprinting all my stuff in White
Thank thingi! Pays to browse and save stuff to collections... Didn't want re-invent the wheel so I made use of the second mounting holesaw the ideal in another design and figure it's better than nothing. Just happen to have the right size screw
I know what you mean about the glow filament. It's hard to take photos of it in action. It one of those thing that better to see in person. The y end stop looks like glass on one side from the way it was printed. I really need to switch it out for the other filaments to get those dialed in.
Question on the lead screw nut you're machining, have you thought about putting them on the bottom side of the x carriage and leaving the brass nut on top? Just a thought I had after assembling my setup. Not sure if there's enough room for the both and if that would help with the play in the brass nut any?


I actually have thought about that...it could be done, but getting the tension just right might be tough!?!? I think the anti-backlash setup I'm currently running does a great job...just needs to make it out of Delrin ;-)
My Stuff on Thingi
FolgerTech Wikia Page
Custom Search by Animoose
MakerSL.com
|
Re: Folger Tech 2020 i3 Printer Kit (Official Thread) February 03, 2016 04:56AM |
Registered: 8 years ago Posts: 268 |
Quote
therippa
sonnylowe - you still thinking of upgrading the controller? I ran out of things to do on the printer and have been looking into the MiniRambo.
Haha...yup!!! I've checked out the Rambo, but not MiniRambo, I guess I know what I'll be doing at work today LOL
To be honest, I find myself looking at the Prinrbot board more and more, it seems like a good board at as reasonable price!?!? Check it out and let me know what you think...
I really like THIS as well...simply love machined aluminum!!! If my current Extruder design does work out it might end up and my short list ;-)
Here's my Belt Drive DDE mounted...just need to wire the NEMA 14, hope to run it tonight

My Stuff on Thingi
FolgerTech Wikia Page
Custom Search by Animoose
MakerSL.com
|
Re: Folger Tech 2020 i3 Printer Kit (Official Thread) February 03, 2016 06:47AM |
Registered: 8 years ago Posts: 51 |
Quote
sonnylowe
Quote
therippa
sonnylowe - you still thinking of upgrading the controller? I ran out of things to do on the printer and have been looking into the MiniRambo.
Haha...yup!!! I've checked out the Rambo, but not MiniRambo, I guess I know what I'll be doing at work today LOL
To be honest, I find myself looking at the Prinrbot board more and more, it seems like a good board at as reasonable price!?!? Check it out and let me know what you think...
I really like THIS as well...simply love machined aluminum!!! If my current Extruder design does work out it might end up and my short list ;-)
Here's my Belt Drive DDE mounted...just need to wire the NEMA 14, hope to run it tonight
Extuder looks good! be interested to see how it copes with both motors on the X axis now. Guessing its going to be quite speed limited now.
|
Re: Folger Tech 2020 i3 Printer Kit (Official Thread) February 03, 2016 07:11AM |
Registered: 8 years ago Posts: 131 |
Quote
dlk4602
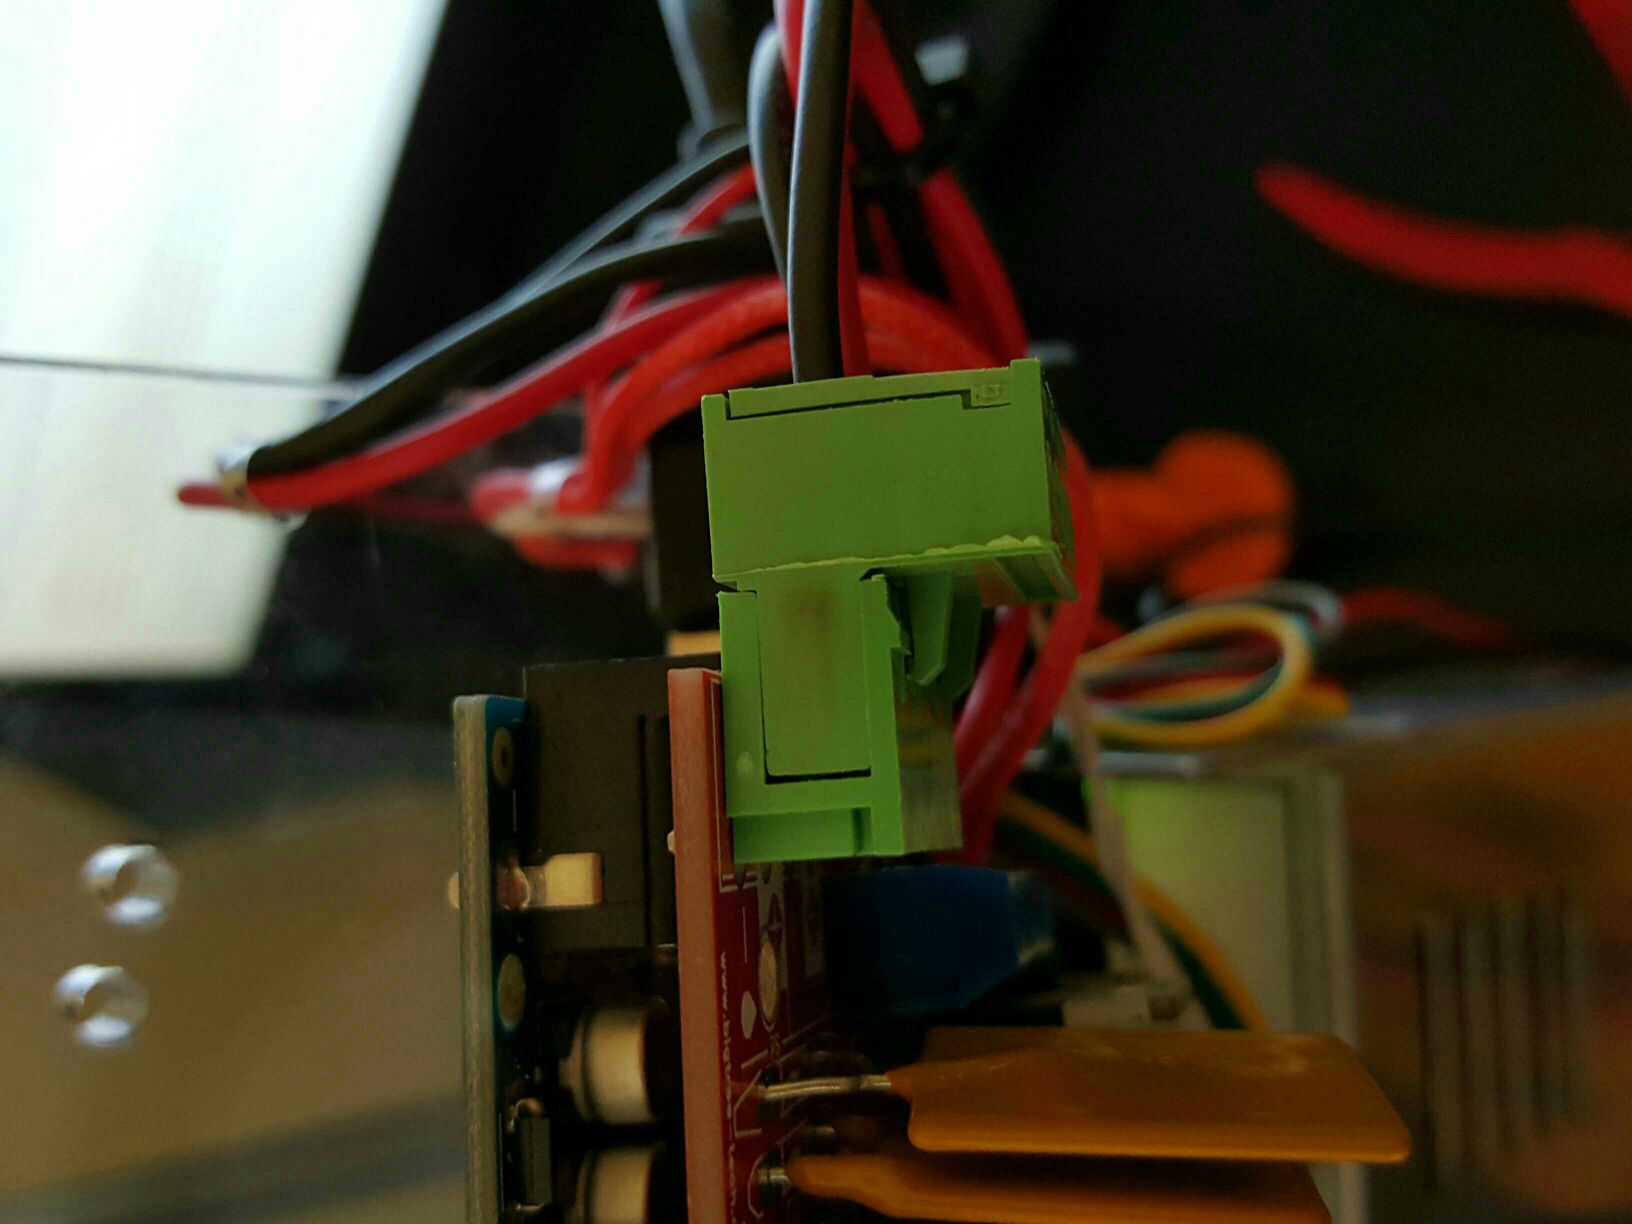
A word of caution for those looking to run unattended. Yesterday mine starting smoking and I found the power connector to the ramps board melted. It looks like the connector was not making good contact and overheated. From looking through other threads, it sounds like this is not uncommon and the connector may not be properly rated for the current it sees. Fortunately it was caught right away and only the connector melted. I now have the power wire soldered directly to the board and it is working OK.
Those ramps board are first class crap. Even though I haven't had a problem with mine I might source a better one for peace of mind.
|
Re: Folger Tech 2020 i3 Printer Kit (Official Thread) February 03, 2016 08:12AM |
Registered: 8 years ago Posts: 32 |
Wow this thread's getting busy!
I'm hoping to change over to lead screws this weekend now all the bits have finally arrived but wanted to check with others regarding backlash. Wouldn't the weight of the X carriage eliminate any backlash as (thanks to gravity) it's always pulling down on the brass nut? When actually printing, the Z axis is only moving in one direction anyway...
Is my understanding correct that backlash is basically 'play' between the nut and bolt?
I printed out the Z anti backlash on Thingiverse (for the M5 rod) but didn't bother installing them for the same reason (also didn't really want to disassemble the printer twice due to lead screws on order).
Would really like to know what those with anti-backlash installed have noticed.
|
Re: Folger Tech 2020 i3 Printer Kit (Official Thread) February 03, 2016 08:19AM |
Registered: 8 years ago Posts: 32 |
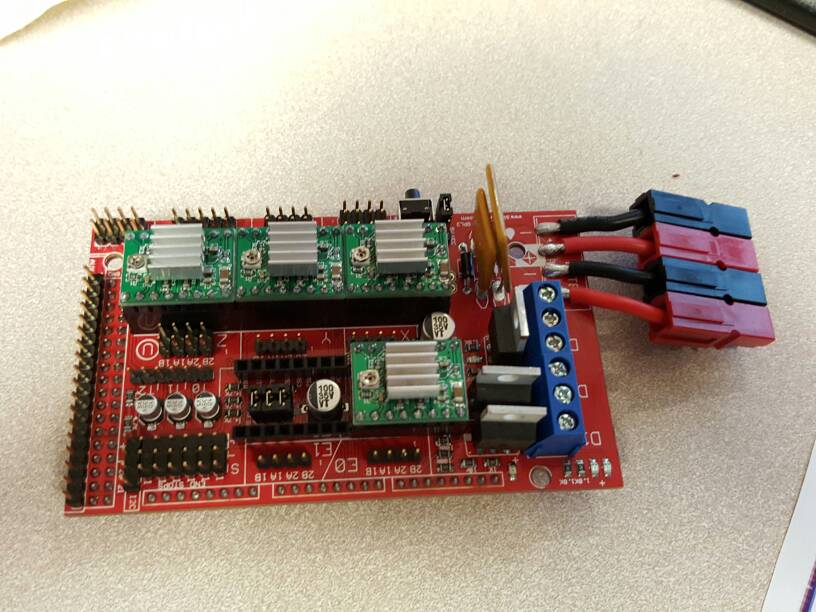
Also, did any of your RAMPS boards come with header pins on the 12v AUX connection? Went to plug a fan in last night and realised there's no pins there! Another job for the weekend...

|
Re: Folger Tech 2020 i3 Printer Kit (Official Thread) February 03, 2016 09:16AM |
Registered: 8 years ago Posts: 25 |
Quote
dlk4602
A word of caution for those looking to run unattended. Yesterday mine starting smoking and I found the power connector to the ramps board melted. It looks like the connector was not making good contact and overheated. From looking through other threads, it sounds like this is not uncommon and the connector may not be properly rated for the current it sees. Fortunately it was caught right away and only the connector melted. I now have the power wire soldered directly to the board and it is working OK.
Had the same problem and fixed mine. Upgraded both the main power connector as well as upgrade the crappy cheap connector for the heater elements.


Edited 1 time(s). Last edit at 02/03/2016 09:17AM by jabu32.
|
Re: Folger Tech 2020 i3 Printer Kit (Official Thread) February 03, 2016 09:29AM |
Registered: 8 years ago Posts: 131 |
Quote
jabu32
Quote
dlk4602
A word of caution for those looking to run unattended. Yesterday mine starting smoking and I found the power connector to the ramps board melted. It looks like the connector was not making good contact and overheated. From looking through other threads, it sounds like this is not uncommon and the connector may not be properly rated for the current it sees. Fortunately it was caught right away and only the connector melted. I now have the power wire soldered directly to the board and it is working OK.
Had the same problem and fixed mine. Upgraded both the main power connector as well as upgrade the crappy cheap connector for the heater elements.
I agree that the parts suck, my only concern with your change is that the connector being unanchored causes constant stress on the solder joints. Over time this could cause one to break and create a short.
It might be worth the work to take the ramps board into eagle are modding it to take heavy duty connections.
|
Re: Folger Tech 2020 i3 Printer Kit (Official Thread) February 03, 2016 09:37AM |
Registered: 8 years ago Posts: 11 |
I printed a 20*20 cube and three of the vertical edges are good, but if you are looking at the printer the back right-hand edge is very rounded, has zits, some stringing, and looks very fuzzy. I noticed that while it was printing this edge was where the printer would move up the nozzle to start the next layer. Could this be the issue? The only thing I can think would be to install the antibacklash mod or possible lower the speed.
I am also noticing a lot of vibration when the x axis moves back and forth which I also suspect might be a result of backlash which is also only noticeable on the right hand side.
Any ideas?
I am also noticing a lot of vibration when the x axis moves back and forth which I also suspect might be a result of backlash which is also only noticeable on the right hand side.
Any ideas?
|
Re: Folger Tech 2020 i3 Printer Kit (Official Thread) February 03, 2016 09:49AM |
Registered: 8 years ago Posts: 25 |
Quote
marc2912
Quote
jabu32
Quote
dlk4602
A word of caution for those looking to run unattended. Yesterday mine starting smoking and I found the power connector to the ramps board melted. It looks like the connector was not making good contact and overheated. From looking through other threads, it sounds like this is not uncommon and the connector may not be properly rated for the current it sees. Fortunately it was caught right away and only the connector melted. I now have the power wire soldered directly to the board and it is working OK.
Had the same problem and fixed mine. Upgraded both the main power connector as well as upgrade the crappy cheap connector for the heater elements.
I agree that the parts suck, my only concern with your change is that the connector being unanchored causes constant stress on the solder joints. Over time this could cause one to break and create a short.
It might be worth the work to take the ramps board into eagle are modding it to take heavy duty connections.
There is no stress on the connector once I have everything hooked back up. (pretty much suspended in air). the connector looks massive but it really is not heavy.
Edited 3 time(s). Last edit at 02/03/2016 09:52AM by jabu32.
|
Re: Folger Tech 2020 i3 Printer Kit (Official Thread) February 03, 2016 11:37AM |
Registered: 8 years ago Posts: 268 |
Quote
peeejayz
Quote
sonnylowe
Quote
therippa
sonnylowe - you still thinking of upgrading the controller? I ran out of things to do on the printer and have been looking into the MiniRambo.
Haha...yup!!! I've checked out the Rambo, but not MiniRambo, I guess I know what I'll be doing at work today LOL
To be honest, I find myself looking at the Prinrbot board more and more, it seems like a good board at as reasonable price!?!? Check it out and let me know what you think...
I really like THIS as well...simply love machined aluminum!!! If my current Extruder design does work out it might end up and my short list ;-)
Here's my Belt Drive DDE mounted...just need to wire the NEMA 14, hope to run it tonight
Extuder looks good! be interested to see how it copes with both motors on the X axis now. Guessing its going to be quite speed limited now.
I have the same concern...however the smaller NEMA 14 motor should help with weight so I'm hopping it can run at the same speeds I'm running now (usually 50mm,s), I worry more about the acceleration and deceleration values...they may need to be adjusted!?!? I think this extruder would be perfect for the Gen-1 X-Axis Upgrade, it doesn't poke out from the gantry near as far as the standard extruders
My Stuff on Thingi
FolgerTech Wikia Page
Custom Search by Animoose
MakerSL.com
|
Re: Folger Tech 2020 i3 Printer Kit (Official Thread) February 03, 2016 12:06PM |
Registered: 8 years ago Posts: 314 |
Wow! Those cura settings are working great so far! It's printing great! Although I need to relevel my bed and crank up the bed heat (After I lowered it), I have been having adhesion issues lately... Can having the bed not level effect that?
Edited 1 time(s). Last edit at 02/03/2016 12:07PM by UltiFix.
Edited 1 time(s). Last edit at 02/03/2016 12:07PM by UltiFix.
|
Re: Folger Tech 2020 i3 Printer Kit (Official Thread) February 03, 2016 12:26PM |
Registered: 8 years ago Posts: 13 |
I almost have everything working but the extruder drive is going backwards. I opened up the extruder and confirmed that instead of pulling the filament down it's pushing it up. I have the extruder motor cable plugged in according to the directions with the red wire on the right. Would flipping around the cable change the direction of the motor? Has anybody run into this before?
|
Re: Folger Tech 2020 i3 Printer Kit (Official Thread) February 03, 2016 12:27PM |
Registered: 8 years ago Posts: 285 |
Quote
UltiFix
Wow! Those cura settings are working great so far! It's printing great! Although I need to relevel my bed and crank up the bed heat (After I lowered it), I have been having adhesion issues lately... Can having the bed not level effect that?
Yes. Not having proper distance between the nozzle and the bed can also cause problems due to the first layer not getting pressed down enough.
Folger Tech I3 2020 Wikia page: [folgertech.wikia.com]
Custom Folger Tech I3 2020 custom search
|
Re: Folger Tech 2020 i3 Printer Kit (Official Thread) February 03, 2016 12:30PM |
Registered: 8 years ago Posts: 285 |
Quote
chking
I almost have everything working but the extruder drive is going backwards. I opened up the extruder and confirmed that instead of pulling the filament down it's pushing it up. I have the extruder motor cable plugged in according to the directions with the red wire on the right. Would flipping around the cable change the direction of the motor? Has anybody run into this before?
I think everyone that followed FT's build guide had that problem, including me. Flipping the cable will work.
Folger Tech I3 2020 Wikia page: [folgertech.wikia.com]
Custom Folger Tech I3 2020 custom search
|
Re: Folger Tech 2020 i3 Printer Kit (Official Thread) February 03, 2016 12:32PM |
Registered: 8 years ago Posts: 314 |
|
Re: Folger Tech 2020 i3 Printer Kit (Official Thread) February 03, 2016 12:56PM |
Registered: 8 years ago Posts: 25 |
Quote
sonnylowe
Quote
Mopar99
Just finish up installing sonny's gen1 upgrades:
full view:
E3D v6 direct drive:
Z- end stop, improvized
Full veiw of the z axis, 400 mm lead screw (that why the 2x4 are under the printer, didn't want to cut them yet).
Still have some thing to clean up and fix. I will say it's a hole lot quieter than it was before with this setup. Used to be i could hear the printer printing downstairs when i was upstairs. This will help with when you have 2 little one running around. In the photos you can see the IKEA lack side table, i have another one to build an enclosure with. should all work when i move to the gen-2 setup. I think i only took off a 1.5 of material for the y rail. Took about 3 inches of the x rail and mounted that piece on the backside of the rail across the top to hole some wires up out of the way. Below is a list of part i used for my build.
- Change out the FT plate for the openbuild plate Build Plate
- Shorten both the x & y rails Rails
- mini v Gantry for X-Axis Mini V Gantry Set
- V-Slot Gantry Set for the Y-AxisV-Slot Gantry Set
- igus bearing instead of LM88UU
- misc hardware & bearings
- Ikea table Lack side table
Glad to see you have it up and running, the more I use my printer the happier I am with the upgrades
Nice job on the Z endstop improvise!!! Like I said in our PM exchanges...I never even thought about it LOL
Love the glow filament...I'm in the process of reprinting all my stuff in White


Sonnylowe, what about moving the extruder to the top of the rail instead of hanging it off the side? That way you don't have all that weight hanging so far out and I don't think you would loose too much height since the hot end would move up as well. If you didn't want to move the X-axis belt, you would need to have something to attach it to on each side of the gantry. Just a thought..
I just need to say, what an awesome job you guys did.. looks great, makes complete sense. FolgerTech should offer that as an upgrade
Edited 2 time(s). Last edit at 02/03/2016 01:00PM by john-i.
New Wikia page: [folgertech.wikia.com]
|
Re: Folger Tech 2020 i3 Printer Kit (Official Thread) February 03, 2016 01:11PM |
Registered: 8 years ago Posts: 276 |
Quote
sonnylowe
Quote
therippa
sonnylowe - you still thinking of upgrading the controller? I ran out of things to do on the printer and have been looking into the MiniRambo.
Haha...yup!!! I've checked out the Rambo, but not MiniRambo, I guess I know what I'll be doing at work today LOL
To be honest, I find myself looking at the Prinrbot board more and more, it seems like a good board at as reasonable price!?!? Check it out and let me know what you think...
I really like THIS as well...simply love machined aluminum!!! If my current Extruder design does work out it might end up and my short list ;-)
Here's my Belt Drive DDE mounted...just need to wire the NEMA 14, hope to run it tonight
I seems like it's a giant pain in the a** to flash that board since you can't just use Arduino Studio - [printrbot.dozuki.com]
Need help? Visit the Folgertech Wikia Page
The latest Marlin firmware with Folgertech Prusa i3 settings merged in, get it here
And check out my designs on Thingiverse, and follow me if you like what you see!
|
Re: Folger Tech 2020 i3 Printer Kit (Official Thread) February 03, 2016 01:22PM |
Registered: 8 years ago Posts: 131 |
Quote
john-i
Quote
sonnylowe
Quote
Mopar99
Just finish up installing sonny's gen1 upgrades:
full view:
E3D v6 direct drive:
Z- end stop, improvized
Full veiw of the z axis, 400 mm lead screw (that why the 2x4 are under the printer, didn't want to cut them yet).
Still have some thing to clean up and fix. I will say it's a hole lot quieter than it was before with this setup. Used to be i could hear the printer printing downstairs when i was upstairs. This will help with when you have 2 little one running around. In the photos you can see the IKEA lack side table, i have another one to build an enclosure with. should all work when i move to the gen-2 setup. I think i only took off a 1.5 of material for the y rail. Took about 3 inches of the x rail and mounted that piece on the backside of the rail across the top to hole some wires up out of the way. Below is a list of part i used for my build.
- Change out the FT plate for the openbuild plate Build Plate
- Shorten both the x & y rails Rails
- mini v Gantry for X-Axis Mini V Gantry Set
- V-Slot Gantry Set for the Y-AxisV-Slot Gantry Set
- igus bearing instead of LM88UU
- misc hardware & bearings
- Ikea table Lack side table
Glad to see you have it up and running, the more I use my printer the happier I am with the upgrades
Nice job on the Z endstop improvise!!! Like I said in our PM exchanges...I never even thought about it LOL
Love the glow filament...I'm in the process of reprinting all my stuff in White
Sonnylowe, what about moving the extruder to the top of the rail instead of hanging it off the side? That way you don't have all that weight hanging so far out and I don't think you would loose too much height since the hot end would move up as well. If you didn't want to move the X-axis belt, you would need to have something to attach it to on each side of the gantry. Just a thought..
I just need to say, what an awesome job you guys did.. looks great, makes complete sense. FolgerTech should offer that as an upgrade
or just charge an extra 20 and only sell it this way.
|
Re: Folger Tech 2020 i3 Printer Kit (Official Thread) February 03, 2016 01:31PM |
Registered: 8 years ago Posts: 85 |
Quote
SteveRoy
Quote
UltiFix
Im wondering how much you guys like autolevel? And whats the easiest way to do it?
With my Prusa i3's I've never needed it. Honestly I think it shouldn't be needed if you have a properly built chassis and a flat heated bed.
Why would you want the z-axis motors moving while printing a layer? Only to compensate for an uneven build.
With a delta style printer I can see the use, but for an i3 style it shouldn't be needed.
I only check the tramming of my printer bed if I have physically moved the printer and I rarely need check the z-height after I change filament.
Steve
Personally I'm loving autolevel. I tossed in the inductive sensor that Folger sells because it was so cheap and figured it would be fun to play with. The first week or two I just did manual bed leveling and it drove me crazy. Chassis is square and tight, all of my axis are parallel and square - I get VERY accurate prints...but my bed level would shift randomly on me all the time. It would be printing great one night, then the next morning suddenly it would be 0.4mm or more out of level because the first layer would go from being nicely squished to dangling in the air.
Part of it may have just been the horrible stock endstop mounts. I suspect the z mount would slowly work it's way down from being hit. But that should have caused the bed height to shift in the other direction so...bah. The one other thing I suspect is vibration causing the thumbscrews to work loose. I've actually had them come off during a print when I had to have one kind of loose to get things aligned.
Decided to try autolevel. Wasn't sure about the inductive sensor since they're usually used with aluminum beds, so started setting up a servo deal first. But that just bugged me, seemed like too many things that could go wrong and too many moving parts that could shift and throw things off. So out of curiosity I hooked up the inductive sensor I got from Folger...and wow, it worked at 5v so I could just plug it in!
Still needed something it could sense though. So I put a sheet of 28g galvanized steel between the heater and my glass. Boom, it sensed and worked! I didn't have much clearance between the sensor and the print bed...but it was enough.
Even with my bed leveled as good as I could get it manually I still see very slight adjustments with autolevel...and they show up in my print results. I'm mainly interested in doing mechanical parts and print in place designs where I need a lot of accuracy. Before auto level doing the negative tolerance test from Make (http://www.thingiverse.com/thing:533472) the best result I was able to get was to easily remove the 0.6 and 0.5 pins and the 0.4 pin with a bit of help from pushing against a table. After adding auto level - I can now remove all of the pins except the 0.2mm one with no help from the table just using my fingers.
I liked the autolevel so much I decided to try and improve it a bit and got a 8mm distance sensor (LJ18A3-8-Z/BX about $5 on ebay) to replace the 4mm distance one from Folger. The new one was larger (18mm) and required me to redesign my mounting bracket: [www.thingiverse.com] but that also let me tweak the bracket a bit to make it stronger and bring the sensor closer to the hot end.
The new sensor also works on 5v...but not reliably
 Sometimes it triggers but not enough for the RAMPS board to detect. I can see the voltage swing on my volt meter, but it's not enough of a swing for the AVR to pick up. So I swapped to 12v (had to solder in a header on the RAMPS and made a resistor ladder to drop the voltage on the output) and that solved the issues of the 8mm distance sensor not working reliably.
The extra sensitivity of the larger sensor is very nice. In fact, when I first put it on I was able to get rid of my sheet of steel under the glass as the sensor was triggering just off the metal in the heated bed! Super easy! Until I did the final adjustment on my bracket...
The for some reason after tweaking my bracket so the sensor was closer to the hot end my first layers were suddenly off acting like the bed was out of level and higher in the back right. Took me a bit to figure out what was going on but then I noticed it. The last bed probe in the back right corner now had the sensor right over one of the screws that mounts the aluminum plate to the bearing blocks. Apparently that extra bit of metal under there from the screw was throwing off the sensor just a bit and making it think that corner of the bed was a little higher than it really was. I put my steel sheet back under the glass and that now triggers the sensor reliably enough that the screws don't throw it off anymore and I get a correct auto level calculation. The sensor now rides with a good 4-5mm of space, though it's a little disconcerting to see the first dozen or so layers print with the Z endstop triggered

I'm still not super happy about having the steel plate in there since it makes it harder to heat my bed enough for ABS, but I haven't added any insulation behind the heater yet and don't run in an enclosed box yet either. I may also try putting aluminum tape on the back of my glass to see if that's enough for the more sensitive sensor to trigger off of.
So yeah...it's a bit of work to get setup but I'm really loving autolevel as it seems to correct beyond what I can and I don't have to worry about mysterious bed height changes anymore or bumping things when removing/replacing my glass.
This was another biggie that helped me get things really aligned: [www.thingiverse.com] I had to use the customizer to print it about 25mm longer than stock to work with our setup but it makes getting the X and Y aligned so much easier. Originally I was just using my calipers to measure from the lower X smooth rod to the table...but then realized it was the Y rails that really mattered so started measuring between them and the X instead of the table. That got me really close but it was fiddly to do with the calipers. With these it's much easier, just lower Z until the lower side touches, then twist the screw on the other to get it to the same point.
Before using the alignment tool to align my X I was able to get about a 0.1mm difference on this test: [www.thingiverse.com]
After using the alignment tool I can no longer detect any difference between the diagonals with my cheap harbor freight calipers.
|
Re: Folger Tech 2020 i3 Printer Kit (Official Thread) February 03, 2016 01:43PM |
Registered: 8 years ago Posts: 314 |
Have you thought about using a capacitive sensor so it will work with glass?Quote
jhitesma
Quote
SteveRoy
Quote
UltiFix
Im wondering how much you guys like autolevel? And whats the easiest way to do it?
With my Prusa i3's I've never needed it. Honestly I think it shouldn't be needed if you have a properly built chassis and a flat heated bed.
Why would you want the z-axis motors moving while printing a layer? Only to compensate for an uneven build.
With a delta style printer I can see the use, but for an i3 style it shouldn't be needed.
I only check the tramming of my printer bed if I have physically moved the printer and I rarely need check the z-height after I change filament.
Steve
Personally I'm loving autolevel. I tossed in the inductive sensor that Folger sells because it was so cheap and figured it would be fun to play with. The first week or two I just did manual bed leveling and it drove me crazy. Chassis is square and tight, all of my axis are parallel and square - I get VERY accurate prints...but my bed level would shift randomly on me all the time. It would be printing great one night, then the next morning suddenly it would be 0.4mm or more out of level because the first layer would go from being nicely squished to dangling in the air.
Part of it may have just been the horrible stock endstop mounts. I suspect the z mount would slowly work it's way down from being hit. But that should have caused the bed height to shift in the other direction so...bah. The one other thing I suspect is vibration causing the thumbscrews to work loose. I've actually had them come off during a print when I had to have one kind of loose to get things aligned.
Decided to try autolevel. Wasn't sure about the inductive sensor since they're usually used with aluminum beds, so started setting up a servo deal first. But that just bugged me, seemed like too many things that could go wrong and too many moving parts that could shift and throw things off. So out of curiosity I hooked up the inductive sensor I got from Folger...and wow, it worked at 5v so I could just plug it in!
Still needed something it could sense though. So I put a sheet of 28g galvanized steel between the heater and my glass. Boom, it sensed and worked! I didn't have much clearance between the sensor and the print bed...but it was enough.
Even with my bed leveled as good as I could get it manually I still see very slight adjustments with autolevel...and they show up in my print results. I'm mainly interested in doing mechanical parts and print in place designs where I need a lot of accuracy. Before auto level doing the negative tolerance test from Make (http://www.thingiverse.com/thing:533472) the best result I was able to get was to easily remove the 0.6 and 0.5 pins and the 0.4 pin with a bit of help from pushing against a table. After adding auto level - I can now remove all of the pins except the 0.2mm one with no help from the table just using my fingers.
I liked the autolevel so much I decided to try and improve it a bit and got a 8mm distance sensor (LJ18A3-8-Z/BX about $5 on ebay) to replace the 4mm distance one from Folger. The new one was larger (18mm) and required me to redesign my mounting bracket: [www.thingiverse.com] but that also let me tweak the bracket a bit to make it stronger and bring the sensor closer to the hot end.
The new sensor also works on 5v...but not reliably
The extra sensitivity of the larger sensor is very nice. In fact, when I first put it on I was able to get rid of my sheet of steel under the glass as the sensor was triggering just off the metal in the heated bed! Super easy! Until I did the final adjustment on my bracket...
The for some reason after tweaking my bracket so the sensor was closer to the hot end my first layers were suddenly off acting like the bed was out of level and higher in the back right. Took me a bit to figure out what was going on but then I noticed it. The last bed probe in the back right corner now had the sensor right over one of the screws that mounts the aluminum plate to the bearing blocks. Apparently that extra bit of metal under there from the screw was throwing off the sensor just a bit and making it think that corner of the bed was a little higher than it really was. I put my steel sheet back under the glass and that now triggers the sensor reliably enough that the screws don't throw it off anymore and I get a correct auto level calculation. The sensor now rides with a good 4-5mm of space, though it's a little disconcerting to see the first dozen or so layers print with the Z endstop triggered
I'm still not super happy about having the steel plate in there since it makes it harder to heat my bed enough for ABS, but I haven't added any insulation behind the heater yet and don't run in an enclosed box yet either. I may also try putting aluminum tape on the back of my glass to see if that's enough for the more sensitive sensor to trigger off of.
So yeah...it's a bit of work to get setup but I'm really loving autolevel as it seems to correct beyond what I can and I don't have to worry about mysterious bed height changes anymore or bumping things when removing/replacing my glass.
This was another biggie that helped me get things really aligned: [www.thingiverse.com] I had to use the customizer to print it about 25mm longer than stock to work with our setup but it makes getting the X and Y aligned so much easier. Originally I was just using my calipers to measure from the lower X smooth rod to the table...but then realized it was the Y rails that really mattered so started measuring between them and the X instead of the table. That got me really close but it was fiddly to do with the calipers. With these it's much easier, just lower Z until the lower side touches, then twist the screw on the other to get it to the same point.
Before using the alignment tool to align my X I was able to get about a 0.1mm difference on this test: [www.thingiverse.com]
After using the alignment tool I can no longer detect any difference between the diagonals with my cheap harbor freight calipers.
|
Re: Folger Tech 2020 i3 Printer Kit (Official Thread) February 03, 2016 03:24PM |
Registered: 8 years ago Posts: 92 |
Quote
UltiFix
The side of my print closest to the spool is better than the side of my print farthest from the spool. Anybody mind linking me to that spool upgrade you were talking about?
Oh im no longer having bed ahesion issues, I added a little bit brim around the small base, and am only printing 1 at a time.
This is the one I'm using:
[www.thingiverse.com]
but I'm thinking about moving to this:
[www.thingiverse.com]
It seems like it will be easier to switch spools.
|
Re: Folger Tech 2020 i3 Printer Kit (Official Thread) February 03, 2016 03:33PM |
Registered: 8 years ago Posts: 92 |
Quote
UltiFix
Can anybody reccomend me a good LCD display?
Or for only a little bit more could I set up a rasberry pi?
I've been using this $10 one from FT (ordered it with the printer)
[folgertech.com]
It's been working fine for me. I really like being able to print without a computer, and having an easy way to speed up or slow down the print (just turn the knob when printing and you can boost or cut the speed by a percentage), but I miss being able to see the path/progress (and completion ETA) on the computer.
Can anyone tell me what benefit the full graphical displays provide?
--Andrew
|
Re: Folger Tech 2020 i3 Printer Kit (Official Thread) February 03, 2016 03:48PM |
Registered: 8 years ago Posts: 85 |
Quote
UltiFix
Have you thought about using a capacitive sensor so it will work with glass?
The same reasons I love capacitive sensors for touch screens...I'm not big on them for this. Too sensitive. I'm sure they're a lot better than the last time I messed with a capacitive sense circuit, but it would be affected by weather and humidity greatly.
I'm liking the inductive. Just was surprised that the new bigger one was sensitive enough for a bolt that far away to throw it off. But it's the only reason I can think of for the reading shifting in that one spot and adding more metal above it solved it.
|
Re: Folger Tech 2020 i3 Printer Kit (Official Thread) February 03, 2016 04:11PM |
Registered: 8 years ago Posts: 268 |
Quote
therippa
Quote
sonnylowe
Quote
therippa
sonnylowe - you still thinking of upgrading the controller? I ran out of things to do on the printer and have been looking into the MiniRambo.
Haha...yup!!! I've checked out the Rambo, but not MiniRambo, I guess I know what I'll be doing at work today LOL
To be honest, I find myself looking at the Prinrbot board more and more, it seems like a good board at as reasonable price!?!? Check it out and let me know what you think...
I really like THIS as well...simply love machined aluminum!!! If my current Extruder design does work out it might end up and my short list ;-)
Here's my Belt Drive DDE mounted...just need to wire the NEMA 14, hope to run it tonight
I seems like it's a giant pain in the a** to flash that board since you can't just use Arduino Studio - [printrbot.dozuki.com]
Good catch, that's just crazy!!! I would really like to upgrade my board, but I just don't know enough about the firmware aspects of it all. I also like the smoothieboard, but damn, that's another firmware to learn. Would i be correct in assuming any board that runs Marlin would be easy to flash!?!?
My Stuff on Thingi
FolgerTech Wikia Page
Custom Search by Animoose
MakerSL.com
|
Re: Folger Tech 2020 i3 Printer Kit (Official Thread) February 03, 2016 04:15PM |
Registered: 8 years ago Posts: 93 |
Quote
jhitesma
Quote
UltiFix
Have you thought about using a capacitive sensor so it will work with glass?
The same reasons I love capacitive sensors for touch screens...I'm not big on them for this. Too sensitive. I'm sure they're a lot better than the last time I messed with a capacitive sense circuit, but it would be affected by weather and humidity greatly.
I'm liking the inductive. Just was surprised that the new bigger one was sensitive enough for a bolt that far away to throw it off. But it's the only reason I can think of for the reading shifting in that one spot and adding more metal above it solved it.
Have you thought about using one of the mk3 aluminum heat beds?
Folger Tech 2020 i3 Wiki
Custom google search for the Folger Tech 2020 i3 forum topic by Animoose
My Thingiverse Designs
|
Re: Folger Tech 2020 i3 Printer Kit (Official Thread) February 03, 2016 04:16PM |
Registered: 8 years ago Posts: 314 |
My build plate is glass and I don't really want to stick some aluminum inbetween... I plan on printing abs in the future, think I could get a capactiive to work alright?Quote
jhitesma
Quote
UltiFix
Have you thought about using a capacitive sensor so it will work with glass?
The same reasons I love capacitive sensors for touch screens...I'm not big on them for this. Too sensitive. I'm sure they're a lot better than the last time I messed with a capacitive sense circuit, but it would be affected by weather and humidity greatly.
I'm liking the inductive. Just was surprised that the new bigger one was sensitive enough for a bolt that far away to throw it off. But it's the only reason I can think of for the reading shifting in that one spot and adding more metal above it solved it.
|
Re: Folger Tech 2020 i3 Printer Kit (Official Thread) February 03, 2016 04:20PM |
Registered: 8 years ago Posts: 14 |
Quote
Mach
Quote
bstern
So I have a weird question. How do I use the springs they provided as belt tensioners? I understand how the cylindrical "bedsprings" work for leveling the bed, I'm more wondering how to tighten the belt with the clip-like springs.
ETA: Do any of you have pictures of how you used them?
Here is a pic. They may be a royal pain in the butt to put on. I remember I spent about forth mins putting one on my Y belt.was easier the second time I putting one on though

Thanks, Mach, for the picture, and thanks, Ultifix, for the suggestion of using pliers.
As soon as I get my cast off (only two more weeks!) I think I can finally finish this off!


Sorry, only registered users may post in this forum.