|
Re: Folger Tech 2020 i3 Printer Kit (Official Thread) August 12, 2015 10:46AM |
Registered: 8 years ago Posts: 135 |
Quote
mel0n
Quote
therippa
Pics...
[i.imgur.com]
[i.imgur.com]
[i.imgur.com]
[i.imgur.com]
STL's...
Extruder - [www.thingiverse.com]
Hotend holder - [www.thingiverse.com]
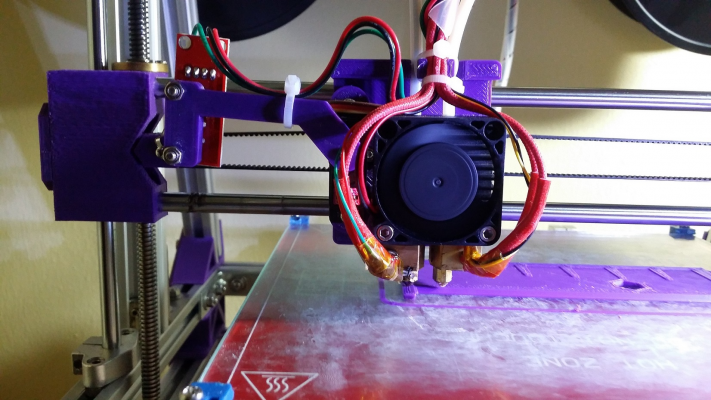
The hotend holder's mounting holes didn't line up with the hole on the Folgertech X-carriage, so I just brought out the drill. This weekend's project will be hooking up the fan (easy) and the capacitive sensor (not as easy) to it.
I know I said I would post, but at the time you posted, My E3D had a catastrophic failure. The guys at filastruder were great, and they comped me a new nossle and heat block. I got my parts in last week and my printer has been running happily since. So I am finally getting around to uploading pics and all and making this post.
Here is an album of pics prior to the failure: [imgur.com]
The failure itself was basically a HORRIBLE clog. I can't advise against Hatchbox ABS enough. Their ABS is complete crap, is full of impurities, and as has been proven multiple times in the community, ISN'T REAL ABS (it doesnt dissolve in acetone). The tolerances of the filament were terrible, I had all kinds of weird things show up in my prints that were exclusively filament related, and from the time I installed my E3D I never removed the filament/changed filament/etc until the clog event. I threw away the roll after I saw how badly it clogged. I also followed instructions I found online for taking apart the E3D and heated the hotend before loostening the nossel, yet it still broke clean off with little force. I could not clear the clog in the heatbreak and had to order a new one with the new parts that filastruder comped for me. ABS should not clog your heatbreak/ptfe, this is further testament to how poor the hatchbox abs is.
Anyways pics of the failure : [imgur.com]
Since it has been fixed, I replaced a bunch of parts on my extruder with the correct/better ones. This is the current state of my printer: [imgur.com]
Also here is a link to the Extruder: [www.thingiverse.com]
P.s. don't worry about my cable management, I have been taking the thing apart every few days and I will put everything in a more permanent spot when I am happy with everything.

So here is my print quality with the E3D and a really well tuned printer. I will start with Vader buddha, which was printed at 0.2mm layer height with the stock hotend.

Next the octopus in green was done with my original e3d install before the failure. The knife and wrench in black was done with my current setup. All at 0.1mm layer height.


The whole album with a total of 10 pics at different lighting/angles can be found here: [imgur.com]
I would recommend an E3D v6 as an upgrade, and Filastruder are a great distributor with good customer service for the USA. All prints were done in ABS by the way, the green was The awful Hatchbox I mentioned, and black was SainSmart. *Any vertical lines, such as under the left eye of the octopus, are a result of slicing with slic3r. I have yet to find a way to get rid of these, and they can even be seen in the preview of the slice. Cura does not produce these lines, but doesnt get holes right. Since I try to mostly print useful tools/parts/items, I use slic3r for hole/size accuracy. Also the knife was printed in 2 halves and glued together.
Also for those who PM'd me about my camera/RasPI setup in the pictures of my printer, here is what my camera view looks like. Thats a wheel for a robot I am working on btw.

Edited 6 time(s). Last edit at 08/12/2015 11:47AM by mel0n.
My creations/2020 aluminum parts/FolgerTech i3 upgrades [www.thingiverse.com]
|
Re: Folger Tech 2020 i3 Printer Kit (Official Thread) August 12, 2015 12:54PM |
Registered: 8 years ago Posts: 10 |
Got my i3 2020 up and printing about 5 days ago. I'm very happy with it so far. I'm still in the tweaking faze and have been doing test prints. I printed the 20x20x20 cube and I'm getting a ripple pattern on all of the sides. There's 5 ripples on each side on a 45 degree angle. I noticed my X stepper was making a lot of noise/buzzing when it moved and that would vibrate the whole machine to some degree. I didn't tune my stepper drivers yet but I realized maybe the x was too high voltage wise. While it was printing I used the ceramic screwdriver that came with my printer and turned the pot on the driver. I got it to be a lot quieter but there's still that ripple patteren. But, the ripple pattern became a lot smaller and there's now maybe 20 ripples but they're less pronounced. The Y stepper is very smooth however. These pots on the drivers... do they spin forever in each direction or do they eventually bottom out? I didn't want to try it as it was running. Has anyone else had this buzzing problem? Maybe I have a bad stepper motor?
Thanks,
Dan
Thanks,
Dan
|
Re: Folger Tech 2020 i3 Printer Kit (Official Thread) August 12, 2015 01:05PM |
Registered: 9 years ago Posts: 251 |
My x motor always ran hot, but usually not long enough to cause problems. Well I was printing emmett's screwless heart gears and my axis shifted, so I finally decided to attach a 40mm fan to the x motor and a 60mm fan to the RAMPS board. Motor runs cool to the touch and reprinted the heart gears without issue. I wired the 12v 60mm fan to the power supply, and since I'm running OctoPrint on a Raspberry Pi, I used a extra 5v 40mm fan wired to the GPIO pins. Only downside is the thing is loud as hell.
|
Re: Folger Tech 2020 i3 Printer Kit (Official Thread) August 12, 2015 01:09PM |
Registered: 8 years ago Posts: 135 |
Mine was very noisy and hot at the beginning, constant lubrication to the X-axis reduced it a lot, and I have turned down the voltage a lot. Tensioning the belt will also help. But you wont get rid of it completely without replacing the bearings with bushings. I also found that after printing A LOT, most of my parts have loosened a bit and worked themselves into a place where they are happy. Theres not much you can do about resonance, so I wouldn't worry about it too much.
Edited 1 time(s). Last edit at 08/12/2015 01:11PM by mel0n.
My creations/2020 aluminum parts/FolgerTech i3 upgrades [www.thingiverse.com]
Edited 1 time(s). Last edit at 08/12/2015 01:11PM by mel0n.
My creations/2020 aluminum parts/FolgerTech i3 upgrades [www.thingiverse.com]
|
Re: Folger Tech 2020 i3 Printer Kit (Official Thread) August 12, 2015 02:44PM |
Registered: 8 years ago Posts: 6 |
Quote
mel0n
Quote
blank64
Quote
blank64
Quote
Blackbird
Are you sure the bearing with teeth on the motor isn't puched too close to the motor body? If it sits right against the motor housing and you have the set screws tightened, it won't spin properly. Easy thing to overlook while putting everything together.Quote
blank64
So I have now finished the build, but am now having some problems trying it out with repetier: (I tried both the marlin included in the drive folder, and the one posted a few pages back)
My y-axis motor doesn't seem to be able to turn the belt (it either barely turns, or skips the belt entirely while turning), I used one of the included belt tensioners so it's pretty tight.
My x-axis motor doesn't seem to be working at all (Although it gets a bit warm after a couple of minutes)
Only one of my z-axis motors is actually turning (the one which I can turn by hand while off), I tried switching where the 2 motors are plugged in, but in each case the same one turns.
Has anyone experienced any of these problems?
I had a couple of the bearings right against the motors, but have now moved them and am getting the same results. I took the belt off of the y axis, and it just vibrates the bearing when I tell it to move. The x axis makes no movement whatsoever, but I can hear different high pitched tones for each of the steps (like my one working motor), so I don't quite know what to make of that.
So right now I'm thinking that 3 of my stepper motors may be broken. I am not able to turn any of them by hand (at all) , and switching their connections to my working one has proved that their drivers are working. My y-axis shudders the shaft when I try to make it move, and the other two make no movement at all but emit a high pitched whine after attempting a step.
Has anyone else encountered a problem like this?
Don't really feel like explaining it, so I will just paste a response from another thread about motor whine here:
Quote
Mel0n
When motors make high pitch noise but do not move, its because the printer thinks your trying to move it in an INCREASING direction, so they turn on and hold their position but wont move further because it doesn't want to crash before it homes. Look at your printer shape settings in repetier, this is really important. If you change your endstop/firmware settings, repetier is still going to tell it to go the wrong way.
Theoretical home is front left of the print bed. So look where you have your endstops and adjust accordingly. An example, your x end stop is on the right, which is max (200). But the software doesn't know this, it thinks min(0) is the endstop. So by telling repetier in printer settings, X-home : max, your letting it know that it should be trying to go to the max value. If this is the case, you also need to switch the position of the endstop plug on your RAMPS from x-min to x-max (reference the schematic, or look at any of my posts on this in the main thread).
Also a link to his thread since you are having (basically) the same problem he was, which has been explained, solved, solved again, and explained in this thread multiple times [forums.reprap.org]
I tried this out with my x-axis, and no luck so far. With the offending motors, I am able to get no movement at all (a bit of shuddering from my y axis, and some non-visible vibrations from one of my z motors), but if I plug their connections into my one working z motor (or the extruder), then it seems to run as expected. This leads me to believe that it's not an endstop problem.
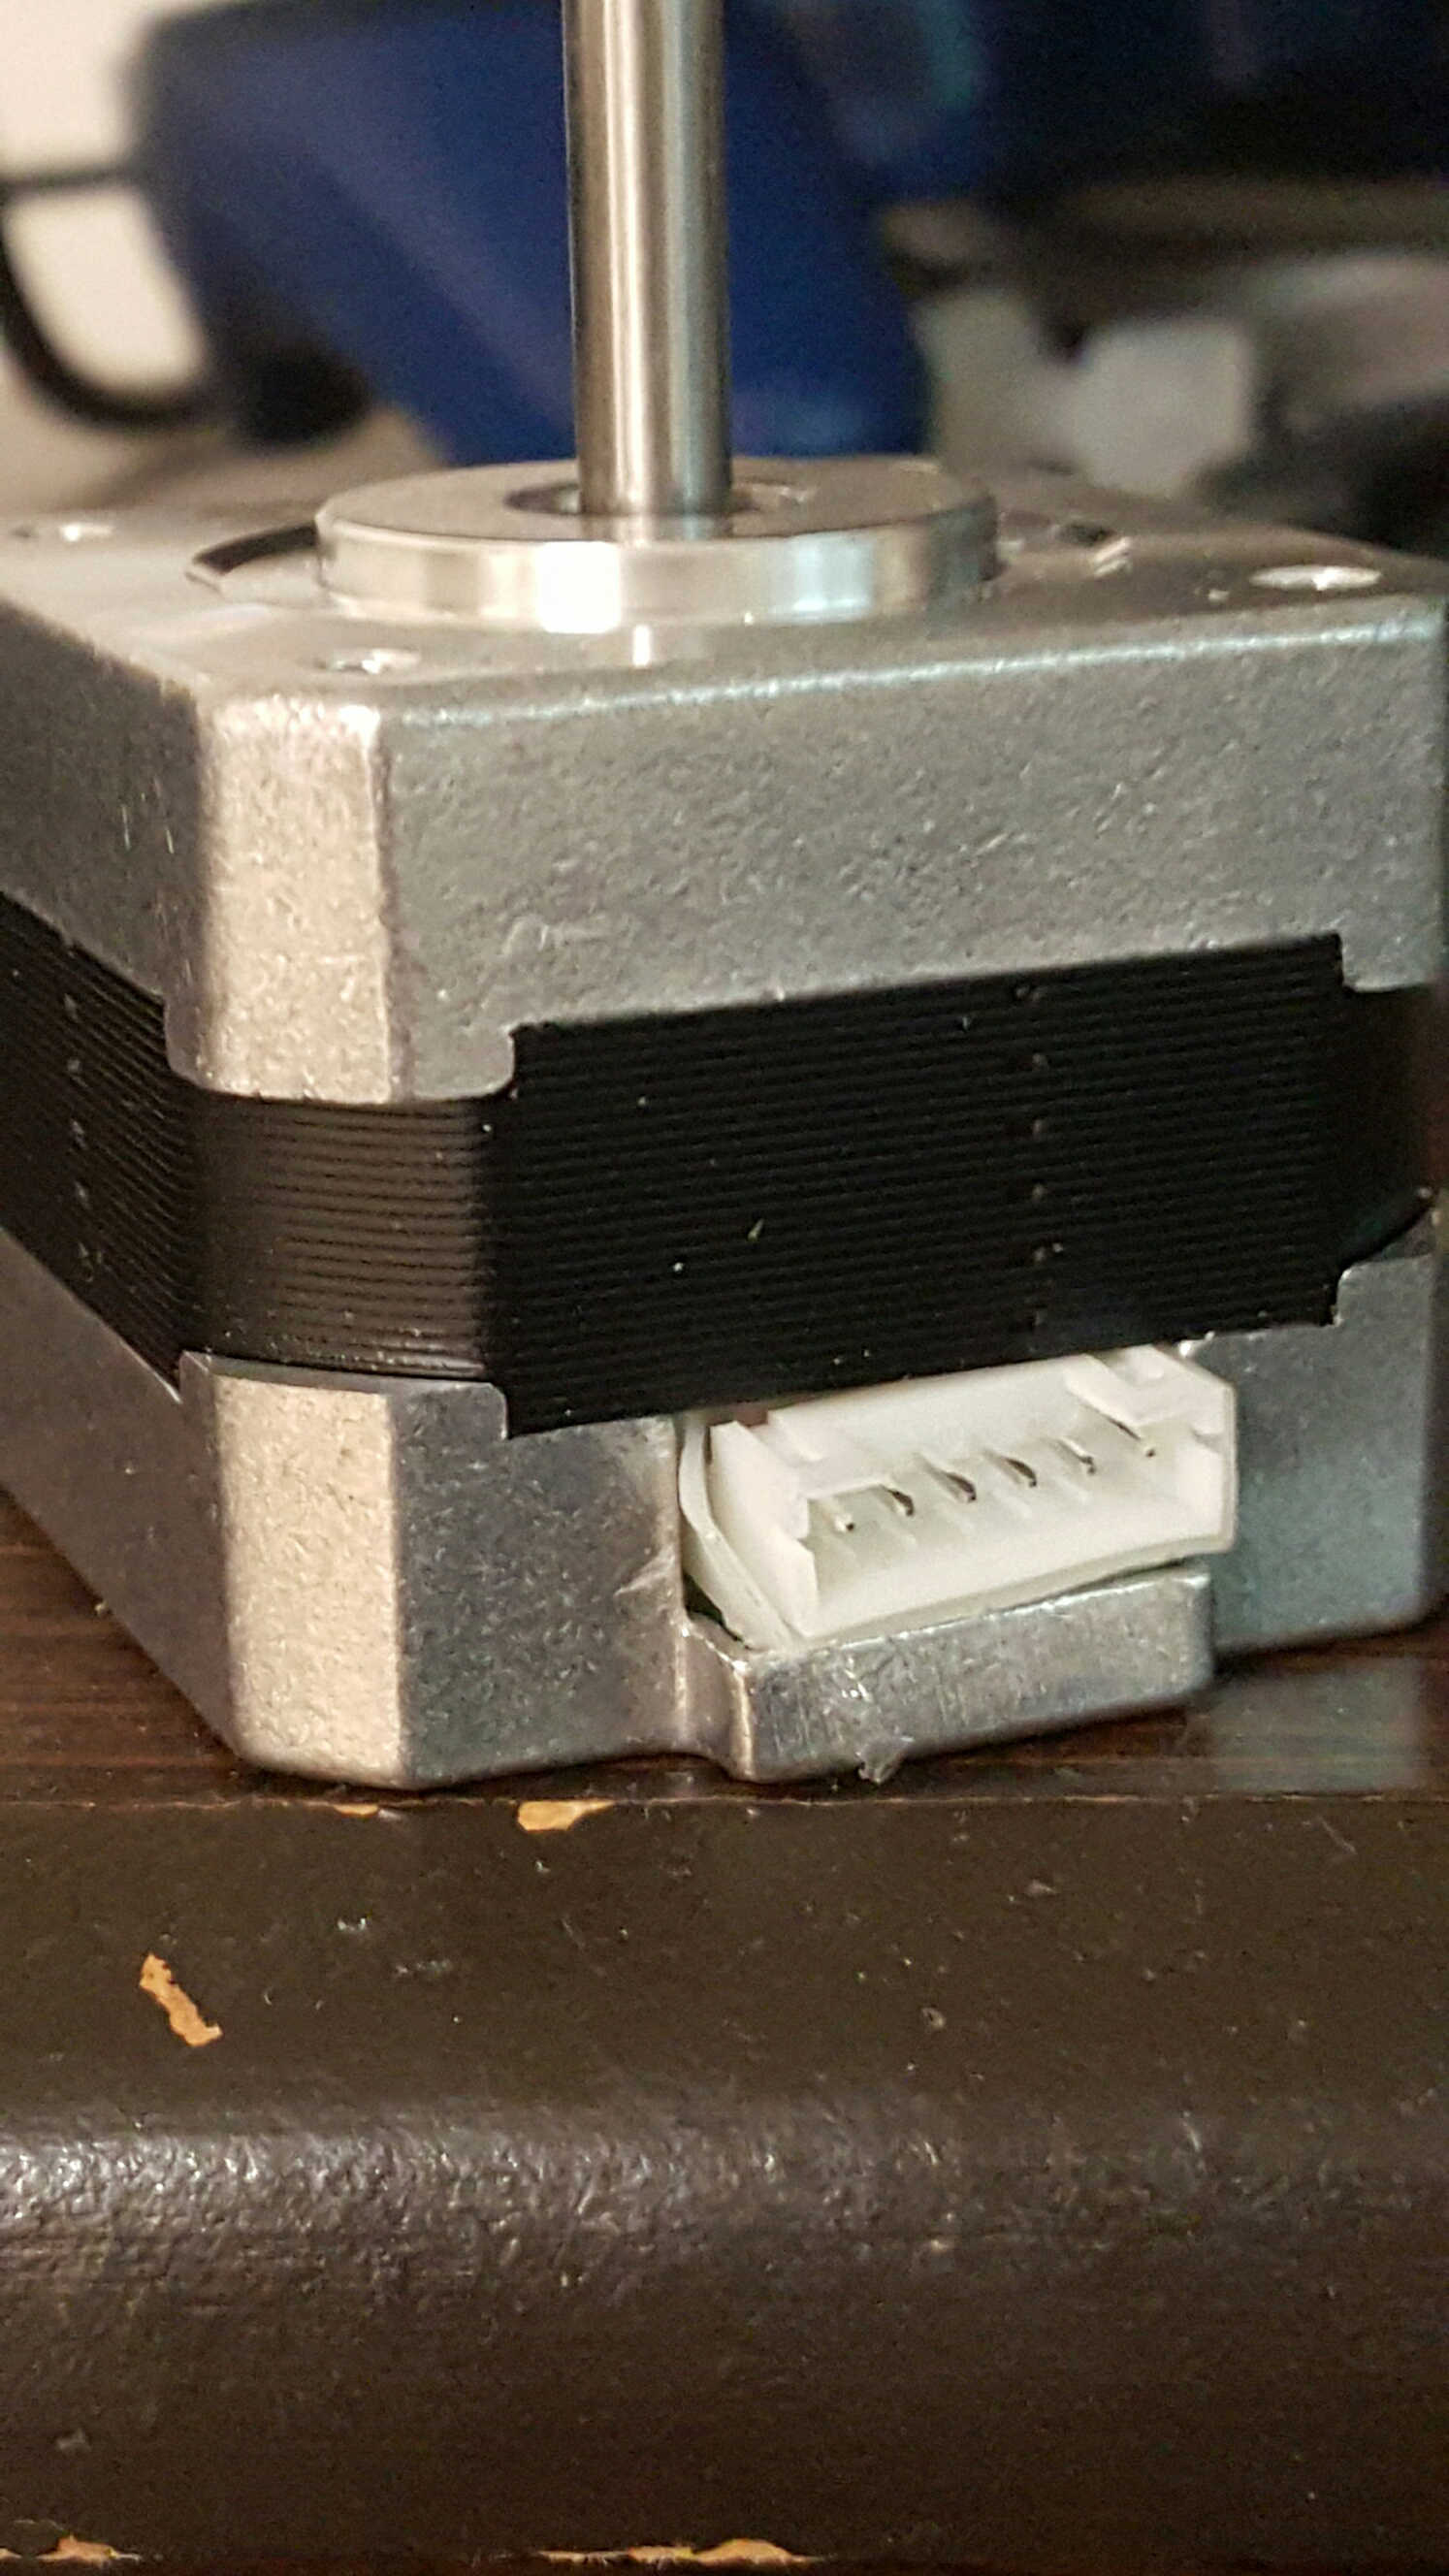
Just in case this is relevant, my motors came a bit bashed up. Attached is a picture taken of the worst offender before I screwed it on to the printer. (this one makes noise, but doesn't even vibrate)
|
Re: Folger Tech 2020 i3 Printer Kit (Official Thread) August 12, 2015 03:23PM |
Registered: 8 years ago Posts: 135 |
WOW the condition of that motor is unacceptable. I would have demanded a replacement before even starting. That connector does not look ok. I am curious what the voltage readings are on your drivers. Also you should check your endstops with Gcode.
I think you should make a new thread, and include all the information here, along with pictures and what you have tried. Also get in contact with folger about those motors, thats not right.
My creations/2020 aluminum parts/FolgerTech i3 upgrades [www.thingiverse.com]
I think you should make a new thread, and include all the information here, along with pictures and what you have tried. Also get in contact with folger about those motors, thats not right.
My creations/2020 aluminum parts/FolgerTech i3 upgrades [www.thingiverse.com]
|
Re: Folger Tech 2020 i3 Printer Kit (Official Thread) August 12, 2015 03:40PM |
Registered: 8 years ago Posts: 16 |
Quote
mel0n
Also for those who PM'd me about my camera/RasPI setup in the pictures of my printer, here is what my camera view looks like. Thats a wheel for a robot I am working on btw.
Is that the Pi NoIR Camera or just low/warm lighting?
I setup OctoPrint on my old RPi Model B, but I will be a USB port short if I use WiFi, USB webcam (carppy VGA currently plugged in), and the printer, which should be on my front porch. My options are to get a RPi 2 with 4 USB ports, or use Pi Camera with the older Model B. Does OctoPrint benefit from the added performance of the RPi 2?
|
Re: Folger Tech 2020 i3 Printer Kit (Official Thread) August 12, 2015 03:41PM |
Registered: 8 years ago Posts: 10 |
Thanks widespread. My X and extruder motors seem to be slightly hot. The X did get cooler when I tweaked the pot to make it quieter. I'm thinking maybe the extruder stepper is also vibrating, could explain the why I'm still getting ripples. I really need to throw a meter on these to check whats up.
I haven't tried any large prints yet. Don't know if I can handel a mistake halfway through lol.
Fans always seem like a good idea. I haven't checked my Ramps board to see how hot it gets. Another thing to check on the list. I'm thinking of getting a fan to blow on the print to cool it.
I haven't tried any large prints yet. Don't know if I can handel a mistake halfway through lol.
Fans always seem like a good idea. I haven't checked my Ramps board to see how hot it gets. Another thing to check on the list. I'm thinking of getting a fan to blow on the print to cool it.
|
Re: Folger Tech 2020 i3 Printer Kit (Official Thread) August 12, 2015 03:46PM |
Registered: 8 years ago Posts: 135 |
Quote
TimJC
I setup OctoPrint on my old RPi Model B, but I will be a USB port short if I use WiFi, USB webcam (carppy VGA currently plugged in), and the printer, which should be on my front porch. My options are to get a RPi 2 with 4 USB ports, or use Pi Camera with the older Model B. Does OctoPrint benefit from the added performance of the RPi 2?
You have to use a powered USB hub anyways because a RPI cannot supply power for the arduino mega. So get a powered USB hub, and plug the pi power usb into it as well to power the PI itself!
I was using my USB webcam but I wanted something smaller that I could mount to the printer, so it is the Pi NOIR camera, because I also have some IR LED's that light it up at night without lighting the room.
Edited 1 time(s). Last edit at 08/12/2015 03:46PM by mel0n.
My creations/2020 aluminum parts/FolgerTech i3 upgrades [www.thingiverse.com]
|
Re: Folger Tech 2020 i3 Printer Kit (Official Thread) August 12, 2015 03:49PM |
Registered: 8 years ago Posts: 10 |
Thanks for the info, Mel0n. I agree about the bushings. I think some of mine have square bearings in them. If I could just get the X to be as smooth as the Y, that'd be great. I put the tensioners on the belts and I though it'd make a big difference but it didn't, for me anyway.
MUST HAVE PERFECTLY SMOOTH PRINTS!!! lol
MUST HAVE PERFECTLY SMOOTH PRINTS!!! lol
|
Re: Folger Tech 2020 i3 Printer Kit (Official Thread) August 12, 2015 03:57PM |
Registered: 8 years ago Posts: 285 |
Quote
Danmst3k
Got my i3 2020 up and printing about 5 days ago. I'm very happy with it so far. I'm still in the tweaking faze and have been doing test prints. I printed the 20x20x20 cube and I'm getting a ripple pattern on all of the sides. There's 5 ripples on each side on a 45 degree angle. I noticed my X stepper was making a lot of noise/buzzing when it moved and that would vibrate the whole machine to some degree. I didn't tune my stepper drivers yet but I realized maybe the x was too high voltage wise. While it was printing I used the ceramic screwdriver that came with my printer and turned the pot on the driver. I got it to be a lot quieter but there's still that ripple patteren. But, the ripple pattern became a lot smaller and there's now maybe 20 ripples but they're less pronounced. The Y stepper is very smooth however. These pots on the drivers... do they spin forever in each direction or do they eventually bottom out? I didn't want to try it as it was running. Has anyone else had this buzzing problem? Maybe I have a bad stepper motor?
Thanks,
Dan
My pots bottom out, at least in the CCW direction. Have not tried seeing if they will when going CW though.
|
Re: Folger Tech 2020 i3 Printer Kit (Official Thread) August 12, 2015 05:33PM |
Registered: 8 years ago Posts: 16 |
The 4-10 (probably 12 for me) hour struggle begins. Here's to hoping there are no missing parts.

|
Re: Folger Tech 2020 i3 Printer Kit (Official Thread) August 12, 2015 06:09PM |
Registered: 8 years ago Posts: 276 |
Quote
TimJC
The 4-10 (probably 12 for me) hour struggle begins. Here's to hoping there are no missing parts.
4-10 (probably 12) hours to build.
20 hours to finish building
40 hours to calibrate and debug

|
Re: Folger Tech 2020 i3 Printer Kit (Official Thread) August 12, 2015 06:37PM |
Registered: 8 years ago Posts: 367 |
Good luck! Don't see it as a struggle, see it as an engineering challenge.
See my blog at [moosteria.blogspot.com].
See my blog at [moosteria.blogspot.com].
|
Re: Folger Tech 2020 i3 Printer Kit (Official Thread) August 12, 2015 07:11PM |
Registered: 8 years ago Posts: 16 |
|
Re: Folger Tech 2020 i3 Printer Kit (Official Thread) August 12, 2015 10:26PM |
Registered: 8 years ago Posts: 16 |
Well I'm 4.5 hours in and through step 9 of the assembly manual. Time to call it a night.
So far I have managed to keep my cool, and there have been no major headaches. There is room for improvement from a screw/bolt standpoint, and there are some steps in the assembly manual that should be done differently.
So far I have managed to keep my cool, and there have been no major headaches. There is room for improvement from a screw/bolt standpoint, and there are some steps in the assembly manual that should be done differently.

|
Re: Folger Tech 2020 i3 Printer Kit (Official Thread) August 12, 2015 10:31PM |
Registered: 8 years ago Posts: 367 |
@TimJC: take a deep breath before step 10. It's the hardest part of the build.
See my blog at [moosteria.blogspot.com].
See my blog at [moosteria.blogspot.com].
|
Re: Folger Tech 2020 i3 Printer Kit (Official Thread) August 12, 2015 11:43PM |
Registered: 8 years ago Posts: 10 |
|
Re: Folger Tech 2020 i3 Printer Kit (Official Thread) August 13, 2015 10:34AM |
Registered: 8 years ago Posts: 95 |
Quote
mike3
Quote
mel0n
Quote
mike3
but my hotend stopped heating and lost control of bed heating..will up date after replacing...
Sounds like a bad FET :[ it was probably correct for them to send you a new Ramps. Hopefully your arduino is ok.
Eureka !!! its alive.... just printed a part for the Smart Core .. came out perfect... using the Smart LCD .. havn't tested it with the USB yet.. but I can now print again...

Ok after several prints over a few days.. I can print perfectly every time using the Smart LCD .. but almost every print I print with Repetier has some kind of minor defect?? any Ideas.. nothing major just annoying
|
Re: Folger Tech 2020 i3 Printer Kit (Official Thread) August 13, 2015 11:42AM |
Registered: 8 years ago Posts: 135 |
What kind of defect? The gcode should be the same assuming ur using repetier to generate gcode loaded onto the sd card?
My creations/2020 aluminum parts/FolgerTech i3 upgrades [www.thingiverse.com]
My creations/2020 aluminum parts/FolgerTech i3 upgrades [www.thingiverse.com]
|
Re: Folger Tech 2020 i3 Printer Kit (Official Thread) August 13, 2015 06:13PM |
Registered: 8 years ago Posts: 30 |
So I finally powered it up last night. Started trying to calibrate it. When I hit the button to home the X-Axis the motor moves maybe 1/2" and then stops. I thought it seemed to me that it was the motor stalling from not enough power. I started trying to turn the stepper driver up but this did not help. when not powered it seems that the axis moves very easily no binding. Does anyone have an suggestions? I lubed the rails with a dry moly lubricant. But still nothing.
|
Re: Folger Tech 2020 i3 Printer Kit (Official Thread) August 13, 2015 06:40PM |
Registered: 8 years ago Posts: 10 |
Bed Temperature goes High out of control:
In manual mode, bed temp control seems to work fine. Heater comes on until almost 60C then shuts off and cycles on and off to maintain temp. Sensed temperature is pretty accurate.
When I print, the bed temp continues to rise even though the correct setting (60C) is indicated. It will rise past 100C even though that is the configured limit
Bed heats up first, then extruder starts heating when bed hits 60C. However bed does not stop heating. Full power is always applied, not PWM as the LED is full on.
the stop button will turn the heater off.
It looks like the logs show setting to the right temperature. I don't notice any other M140 or M190 commands.
I'm using Repetier V1.5.4 with the stock Ftech marlin config files (only change was to the endstop location) and slic3r settings changed to reduce PLA temps to 185/65.
I tried reinstalling Marlin and Repetier with the same results.
Any other ideas??
|
Re: Folger Tech 2020 i3 Printer Kit (Official Thread) August 13, 2015 06:59PM |
Registered: 8 years ago Posts: 10 |
did you check the motor current settings? If too low, they won't move. too high and they get hot. clockwise turn of the pot will increase current
Also when I first got mine going, I had to change the config file to reflect the x axis direction and limit switch.
The correct settings are:
#define INVERT_X_DIR true
#define X_HOME_DIR 1
Also when I first got mine going, I had to change the config file to reflect the x axis direction and limit switch.
The correct settings are:
#define INVERT_X_DIR true
#define X_HOME_DIR 1
|
Re: Folger Tech 2020 i3 Printer Kit (Official Thread) August 13, 2015 07:55PM |
Registered: 8 years ago Posts: 171 |
Quote
Neverdone
So I finally powered it up last night. Started trying to calibrate it. When I hit the button to home the X-Axis the motor moves maybe 1/2" and then stops. I thought it seemed to me that it was the motor stalling from not enough power. I started trying to turn the stepper driver up but this did not help. when not powered it seems that the axis moves very easily no binding. Does anyone have an suggestions? I lubed the rails with a dry moly lubricant. But still nothing.
Yep, very common issue. Look back a page or so. As billyb2 says, you have a setting incorrect. Look at animoose's blog too. Easy fix.
|
Re: Folger Tech 2020 i3 Printer Kit (Official Thread) August 13, 2015 08:15PM |
Registered: 8 years ago Posts: 93 |
If you are using the firmware from folger, with the stock config settings, and everything is built according to the manual, try moving the X axis stop sensor from the max pins, to the min pin on the ramps board. That's the next set to the left from what it says in the manual - the second pair from the right end. Thats what fixed it for me.
Edited 3 time(s). Last edit at 08/13/2015 08:19PM by Bert3D.
Edited 3 time(s). Last edit at 08/13/2015 08:19PM by Bert3D.
|
Re: Folger Tech 2020 i3 Printer Kit (Official Thread) August 14, 2015 04:30AM |
Registered: 8 years ago Posts: 81 |
The current state of my printer..
Some prints:


Some prints:


|
Re: Folger Tech 2020 i3 Printer Kit (Official Thread) August 14, 2015 05:10AM |
Registered: 8 years ago Posts: 276 |
|
Re: Folger Tech 2020 i3 Printer Kit (Official Thread) August 14, 2015 06:11AM |
Registered: 8 years ago Posts: 81 |
This came about as it is now cause i had always wanted to put those diagonal braces between the Z post and the back of the bed. So i had to get rid of the supply from the side.
The best place i could think of is below the bed.. So i had to raise the base, similar to the mendelmax model. Those corner brackets were taken from the mendelmax's.
That's basically the motivation for the change on that frame.
Well, i also had a theory that there will be improvements on the stability on the Z but when everything was done, i realized that the Z posts were sufficiently stable as it was, granted that its right angle connectors were replaced.
The change i have done did make it dead stiff but as i mentioned, improvement concerning prints may have been marginal only.
Moving on to the print head, after a very bad clog on my original extruder and after much contemplation on removing the heavy mass from the X axis, replaced it with a dual bowden.
I used the original heatsink block. there were two holes on it, one is tapped, the other isn't. As you can see, its possible to use those two holes to mount two hotends granted you can get at least 3mm clearance between the heating blocks.
The original heatsink block is large enough to efficiently transfer heat from the two heatbreaks to the fan-cooled heatsink while both extruders are active at ABS melting temps.
This heatsink block is directly attached to an ABS X-carriage adapter and no signs of it melting yet. The hotends have PTFE liners btw..
As for the filament drive/extruder, I have posted it before on this thread. Its a printed planetary gear with a NEMA 17 profile. It drives very nice. Despite the small motors i used, i haven't noticed it struggle on driving those filaments.
Regarding the print, at 0.25 mm layer, Im very satisfied with the overall quality. But there are some anomalies that annoys me, specifically those lines that sticks out irregularly ( im talking bout those below the teeth on the lower jaw and those near the nostrils) .
I have been thinking if it was due to any of my axis getting loose. But then again, the succeeding layers came out just fine.
From the way it looks, it seems that more materials had been extruded on those lines. So i was thinking if it was due to my hotend oscillating at ~ +-4 'C.
I had tweaked it last night and found the perfect PID values for the two extruder (no oscillation on either). Haven't tried printing again with it though.
If you guys got other ideas on what might have caused it, id appreciate the info. I have yet to test the temp swing theory tonight after work..
|
Re: Folger Tech 2020 i3 Printer Kit (Official Thread) August 14, 2015 11:22AM |
Registered: 8 years ago Posts: 10 |
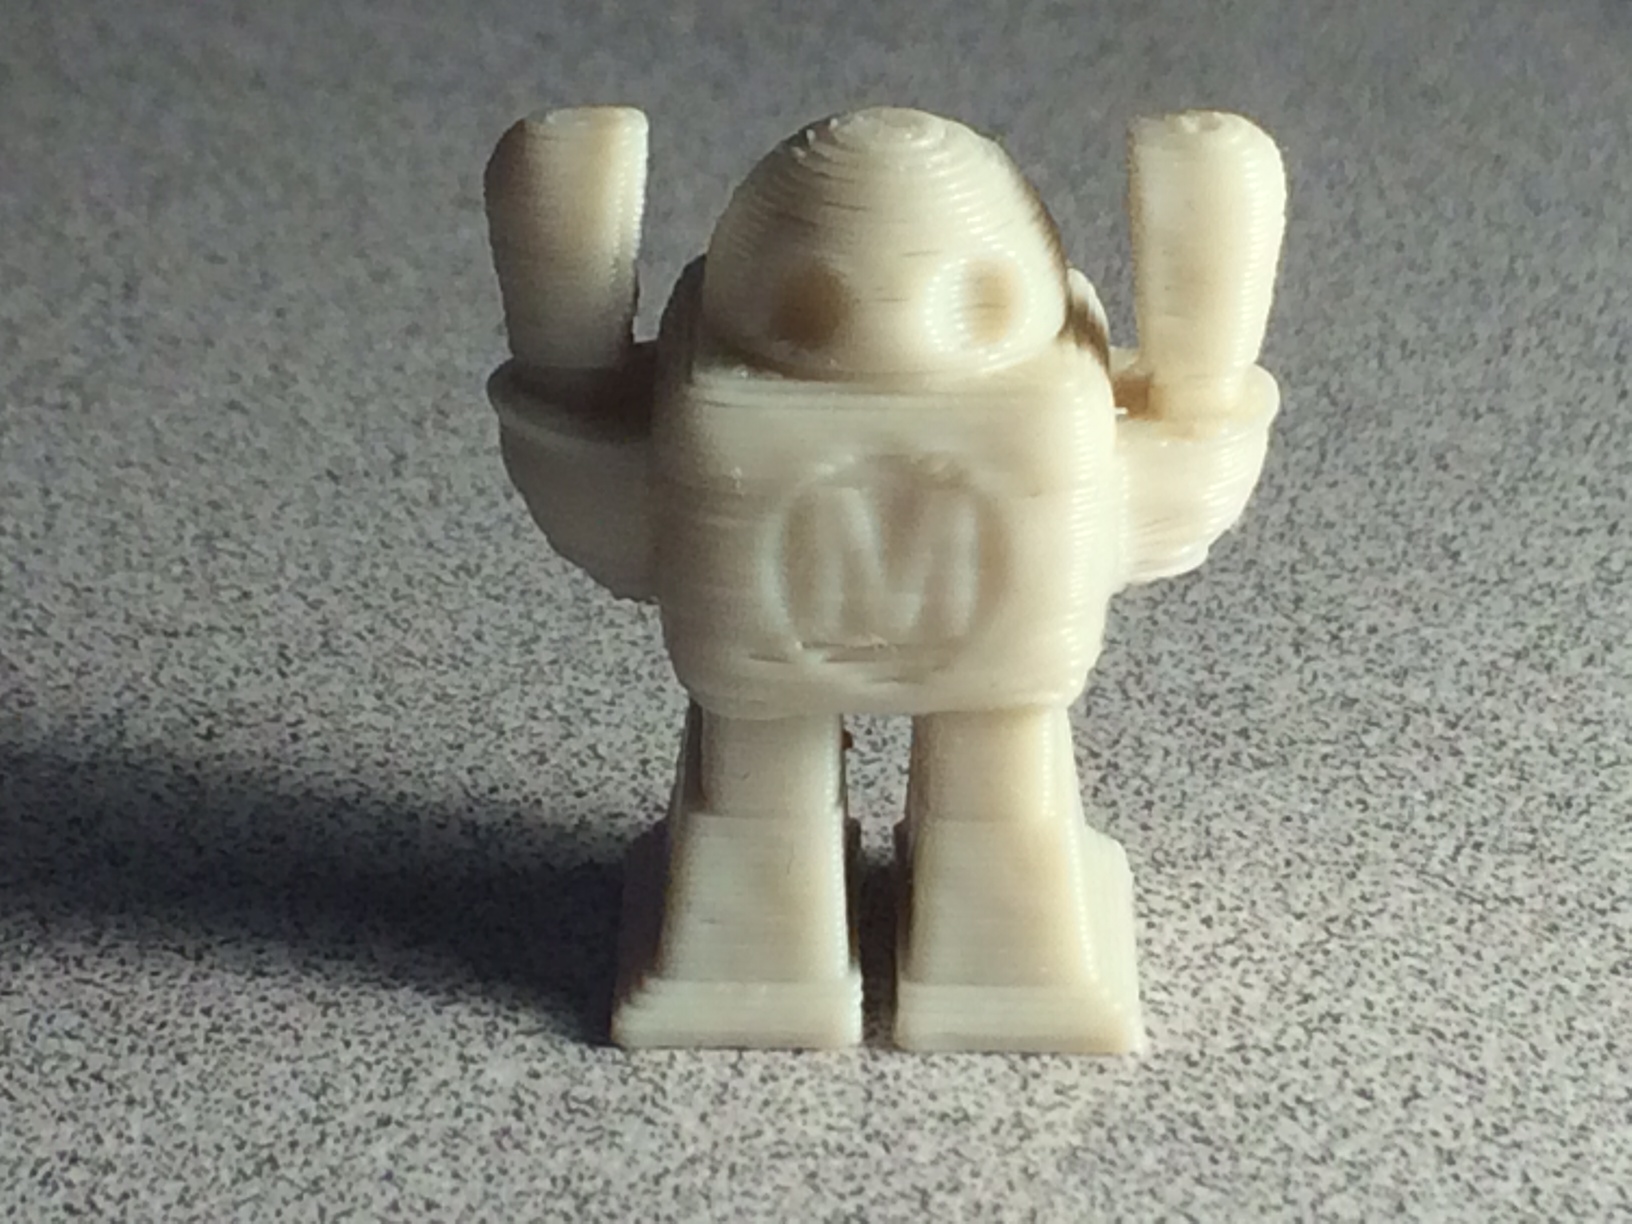
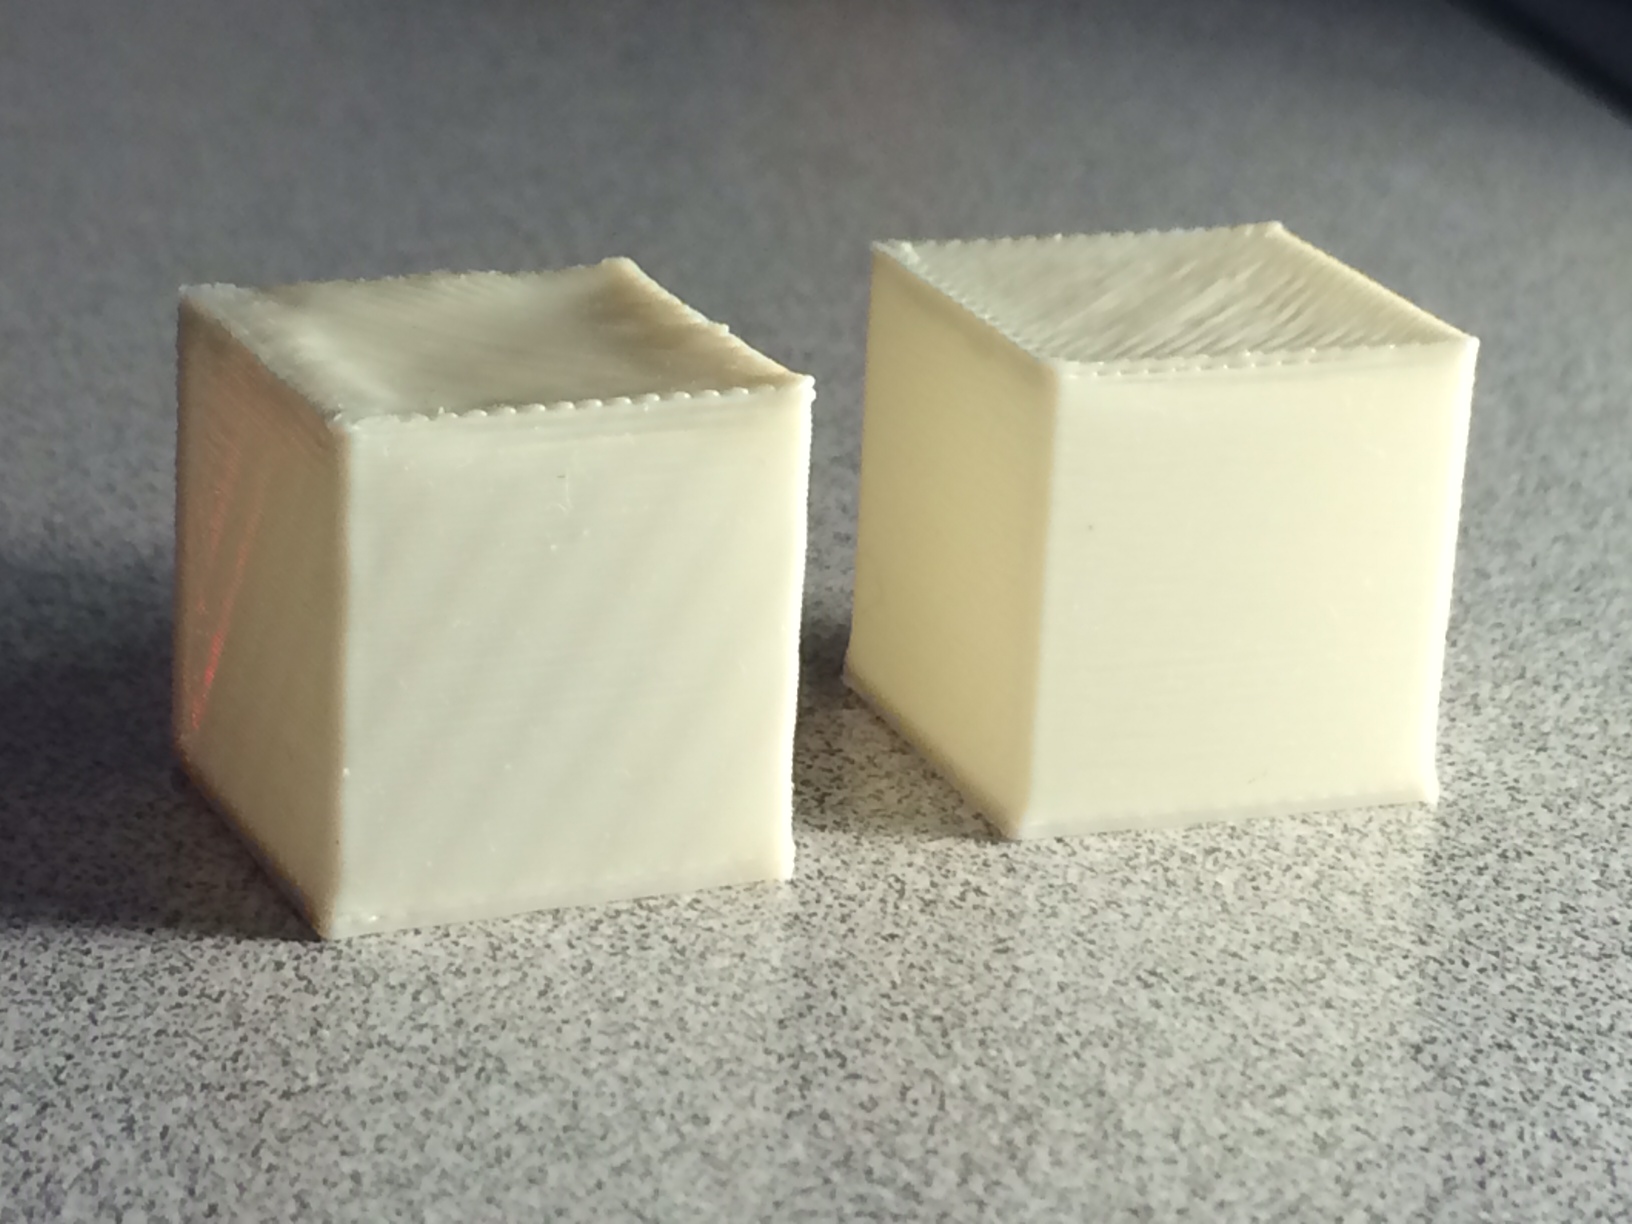
Thought I'd post a couple photos of some tests. Pretty happy with the quality of this printer so far. The cubes are 20mm and hollow with only 1 layer wall thickness. The one on the right was printed first and is totally smooth. I was having issues with a ripple pattern previously so I tweaked my stepper drivers and that was the result. The weird thing is the cube on the left was printed pretty much right after it and the ripples came back. I was messing with the feed rate though, I think I changed it to 140% on that cube. I put it back to 100% and printed the robot and it seems to be smooth again so there you go. These are printed at .3mm. The robot is 1 1/8" tall, which is the default size.
Thanks,
Dan
Thanks,
Dan
|
Re: Folger Tech 2020 i3 Printer Kit (Official Thread) August 14, 2015 11:39AM |
Registered: 8 years ago Posts: 135 |
Quote
Danmst3k
Thought I'd post a couple photos of some tests. Pretty happy with the quality of this printer so far. The cubes are 20mm and hollow with only 1 layer wall thickness. The one on the right was printed first and is totally smooth. I was having issues with a ripple pattern previously so I tweaked my stepper drivers and that was the result. The weird thing is the cube on the left was printed pretty much right after it and the ripples came back. I was messing with the feed rate though, I think I changed it to 140% on that cube. I put it back to 100% and printed the robot and it seems to be smooth again so there you go. These are printed at .3mm. The robot is 1 1/8" tall, which is the default size.
Thanks,
Dan
Nice! Were you printing in PLA or ABS? Also if PLA were you using any sort of cooling fan/duct? I only ask because your bridging on the top looks ok, but could be improved with further tweaking. Otherwise, looks great!
Thats cute haha. I thought about putting my endstop on the print head carriage, but I didn't like the idea of a moving endstop, plus its just more wires to see wear from moving constantly, and weight (though not much). How is it workin out for you?
Edited 2 time(s). Last edit at 08/14/2015 11:43AM by mel0n.
My creations/2020 aluminum parts/FolgerTech i3 upgrades [www.thingiverse.com]


Sorry, only registered users may post in this forum.