P802M Prusa i3 Unofficial Support Thread
Posted by gwc2795
|
Re: P802M Prusa i3 Unofficial Support Thread March 07, 2016 09:15AM |
Registered: 8 years ago Posts: 49 |
Has anyone done the Z axis upgrade to this printer? This one fromThingiverse.
I just finished this one this weekend. It is all working very well I must admit. The Z axis stays perfectly aligned... My question is how to I tell the board to operate the Z axis with only 1 motor plugged in. I currently still have both Z axis motors connected otherwise it will not work.
I just finished this one this weekend. It is all working very well I must admit. The Z axis stays perfectly aligned... My question is how to I tell the board to operate the Z axis with only 1 motor plugged in. I currently still have both Z axis motors connected otherwise it will not work.
|
Re: P802M Prusa i3 Unofficial Support Thread March 07, 2016 10:53AM |
Registered: 8 years ago Posts: 91 |
jnsbanman : There is no need to "tell the board" something, because the z-steppers are parallel connected to one driver output. Just disconnect the secondary z-stepper. If one stepper hasn't enough torque (or too much), you'll need to fine adjust the driver output. But I really see no benefit from this construction, but perhaps I'm wrong (I had never problems with the z-axis on my printer)
|
Re: P802M Prusa i3 Unofficial Support Thread March 07, 2016 11:04AM |
Registered: 8 years ago Posts: 49 |
Quote
madias
jnsbanman : There is no need to "tell the board" something, because the z-steppers are parallel connected to one driver output. Just disconnect the secondary z-stepper. If one stepper hasn't enough torque (or too much), you'll need to fine adjust the driver output. But I really see no benefit from this construction, but perhaps I'm wrong (I had never problems with the z-axis on my printer)
When I disconnect the 2nd stepper the Z axis no longer functions. I have to have both motors connected for it to work. As for issues with the z axis... I found I have to re level the z axis every 24 hours of printing or so and every time the printer is powered off. This design should eliminate that.
|
Re: P802M Prusa i3 Unofficial Support Thread March 07, 2016 11:16AM |
Registered: 8 years ago Posts: 91 |
So you must have the two steppers physically connected - so one stepper is build in on the top of the new thing, and the second stepper is just lying around? That's totally strange, only possible thing is, that you really have to adjust the vref of the stepper. So again: "Normally" both z-axis motors are running and if you disconnected one (have you tried to switch them?) the other one won't do anything? Even without connected to the mechanics?
I believe that the most problems with the z-axis are jamming parts. If you stiff the x-axis belt the two z-rods were compressed and you have to compensate it with the z-axis rods (stiff the x-axis belt and then pull the two z-rods a little bit apart - both z-axis should NOT building an "O" or a "X"). Best way to do that is without the z-lead-rods connected. The whole x-axis part should silde easily up and down without jamming on any position.
I believe that the most problems with the z-axis are jamming parts. If you stiff the x-axis belt the two z-rods were compressed and you have to compensate it with the z-axis rods (stiff the x-axis belt and then pull the two z-rods a little bit apart - both z-axis should NOT building an "O" or a "X"). Best way to do that is without the z-lead-rods connected. The whole x-axis part should silde easily up and down without jamming on any position.
|
Re: P802M Prusa i3 Unofficial Support Thread March 07, 2016 11:24AM |
Registered: 8 years ago Posts: 49 |
The X axis moves up and down in the Z axis very smoothly. This upgrade even stopped the high pitch whining the lead screws were making when moving up and down.Quote
madias
So you must have the two steppers physically connected - so one stepper is build in on the top of the new thing, and the second stepper is just lying around? Yes it is sitting beside the machine
That's totally strange, only possible thing is, that you really have to adjust the vref of the stepper. So again: "Normally" both z-axis motors are running and if you disconnected one (have you tried to switch them?) the other one won't do anything? Right they will only work when both are connected
Even without connected to the mechanics? Yes even if they are just sitting on the table
I believe that the most problems with the z-axis are jamming parts. If you stiff the x-axis belt the two z-rods were compressed and you have to compensate it with the z-axis rods (stiff the x-axis belt and then pull the two z-rods a little bit apart - both z-axis should NOT building an "O" or a "X"). Best way to do that is without the z-lead-rods connected. The whole x-axis part should slide easily up and down without jamming on any position.
|
Re: P802M Prusa i3 Unofficial Support Thread March 07, 2016 11:45AM |
Registered: 8 years ago Posts: 91 |
Ok, I'm sure you'll have to setup the motor current for the single z-motor (I think the current is much too high, because the driver current was calculated for driving two motors):
[reprap.org]
Connect only one motor and try out different trim poti settings (but stay within v-min and v-max!!!) until the motor runs smoothly. Begin at 0.4V and then turn it up
Edited 2 time(s). Last edit at 03/07/2016 11:49AM by madias.
[reprap.org]
Connect only one motor and try out different trim poti settings (but stay within v-min and v-max!!!) until the motor runs smoothly. Begin at 0.4V and then turn it up
Edited 2 time(s). Last edit at 03/07/2016 11:49AM by madias.
|
Re: P802M Prusa i3 Unofficial Support Thread March 07, 2016 11:51AM |
Registered: 8 years ago Posts: 49 |
Quote
madias
Ok, I'm sure you'll have to setup the motor current for the single z-motor (I think the current is much too high, because the driver current was calculated for driving two motors):
[reprap.org]
Connect only one motor and try out different trim poti settings (but stay within v-min and v-max!!!) until the motor runs smoothly. Begin at 0.4V and then turn it up
I had done this a while ago... My vref was set somewhere in the 0.7 to 0.8 range. It is the same for X and Y axis as well and they are only a single motor.
|
Re: P802M Prusa i3 Unofficial Support Thread March 07, 2016 11:53AM |
Registered: 8 years ago Posts: 91 |

|
Re: P802M Prusa i3 Unofficial Support Thread March 07, 2016 11:55AM |
Registered: 8 years ago Posts: 91 |
|
Re: P802M Prusa i3 Unofficial Support Thread March 07, 2016 11:59AM |
Registered: 8 years ago Posts: 91 |
|
Re: P802M Prusa i3 Unofficial Support Thread March 07, 2016 12:08PM |
Registered: 8 years ago Posts: 49 |
Quote
madias
If everything went wrong you can just adding some load resistors instead of the second stepper
I think this is what I might have to do... Trick the board in to believing it has 2 motors connect when there is only one.
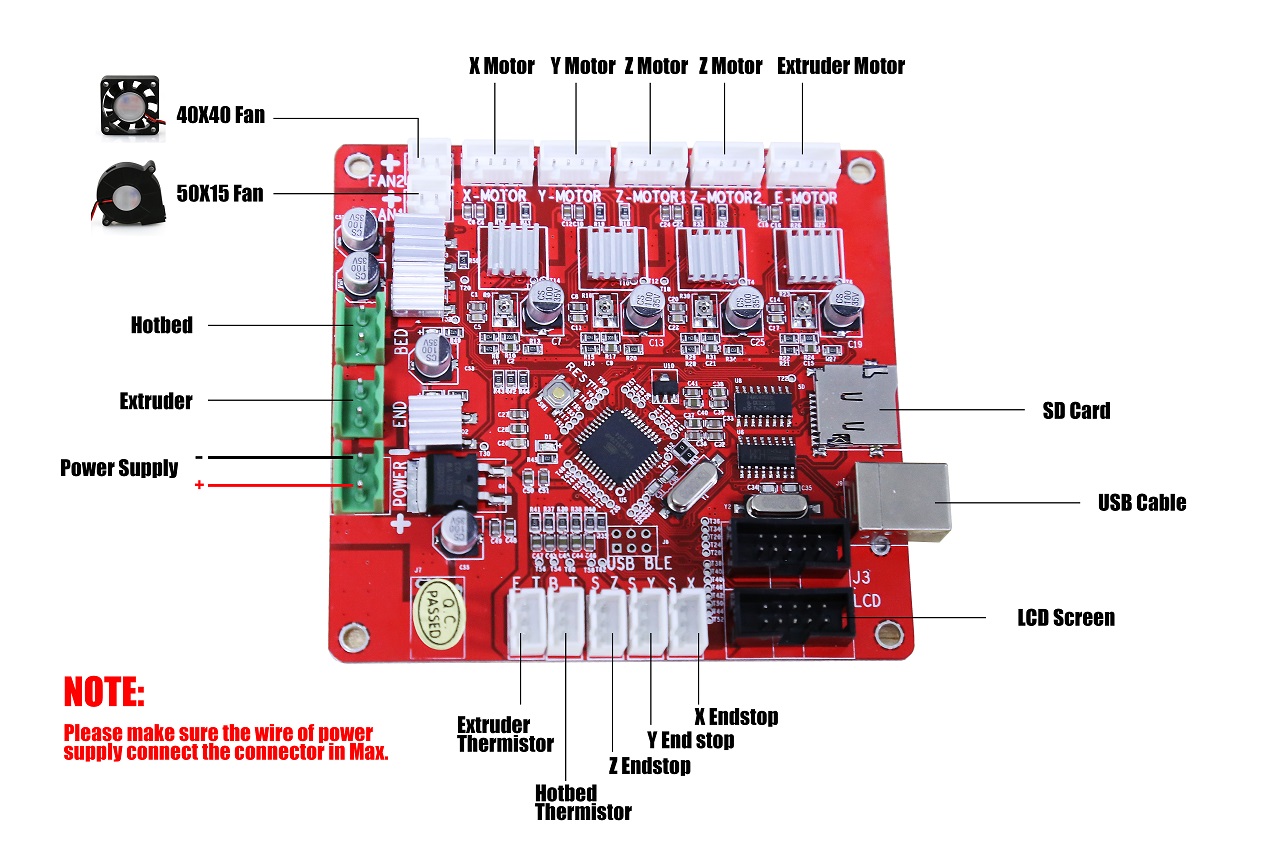
There are 2 plugs on the board for the Z Axis so its not quite the same as the X,Y and Extruder.
Edit: I have confirmed that the second plug must be modified to make it appear there is a motor attached... Does any one know which pins and what resistor would be needed?
Edited 3 time(s). Last edit at 03/08/2016 08:39AM by jnsbanman.
|
Re: P802M Prusa i3 Unofficial Support Thread March 11, 2016 07:13AM |
Registered: 12 years ago Posts: 13 |
Hi guys, just found this thread and want to contribute to it a bit.
I am also the owner of P802M sold by 3D star @ Aliexpress. Hope my finding may help someone.
1. Firmware. As you know, P802M uses 20x4 LCD and a keypad connected via resistive divider using single analog pin. To the moment the Repetier firmware did not support this, and all firmware sources were a "top secret" of printer makers. The printer community published some modified code for it for 0.91 version. I rewrote it a bit and asked Repetier to add it. Now the support for this display controller (LCD + keypad) is included into the official Repetier code. Check out a git version, look into boards/Zonestar P802M folder, read the README.txt and go ahead.
2. Building/flashing. I used Arduino IDE 1.6.7 for it. It has no support for Sanguino (Melzi) boards, but README.txt has a link to download and install the support for it using Board Manager. I used Mac for building, Windows version works the same way.
3. The bootloader installed in my board was weird. The board has 16MHz crystal, but bootloader was built for 57600 baud for flashing the firmware. You have two options: either edit the board definition and change expected 115200 by real 57600. Or better using any AVR ISP programmer (I used USBasp) flash new bootloader from Sanguino support using Arduino IDE "Flash bootloader" link. Then standard firmware flashing works well.
4. Z-steps/mm issue: AFAIK, there are two different hardware versions of the printer: with threaded rod and lead screw. They require 400 or 1600 Z-steps/mm. I published a config with 400 steps/mm for my printer. Another user has changed it to 1600. So now another git pull request is pending which adds a comment to the README.txt about the issue. If you have problems with one setting - change it to another.
5. Watchdog. While it is recommended by Repetier web configuration tool to enable it, I had to disable it. The reason is that mounting the SD card takes more than 1 second if no SD card inserted. In that case the printer constantly reboots. So it needs some fixing, but until that I disabled the watchdog.
6. I prefer using 250000 baud for communicating with the printer. The reason is that for 16MHz crystal this baud rate has zero baud errors (115200 has around 3%), fast enough and still can be processed by the 8-bit AVR reliably. It can be changed using EEPROM editor of Repetier host, then reconnect using new rate.
7. Why use newest version? Current version (0.92.8) has much improved bed leveling and fixes some bugs. So it makes sense to use the latest version. I did NOT yet mount my Z-probe, though. Still waiting for inductive one, but think I will go for mechanical one with a servo since I use a glass bed with different coatings.
8. Few users have issues with PIDs. Please note that by default my printer had (and has now) NOT a PID controller for hotend. It uses Dead Time Control (controller type = 3). That might be the reason why some people have issues with PIDs. Including the tuning of PIDs, but having DTC active instead. Pay attention. As for me, I use the same option as was supplied with my printer: DTC with 7 seconds delay time. It works very well for me. And I am able to keep even 265 degree hotend temperature within a narrow band.
9. Min X/Y positions. I saw few complains here that they are wrong. As supplied, my printer homed at X=-51, Y=-7 mm, not at zero. That is fine and it has options in Repetier firmware. Both can be changed via EEPROM too. For me I have modded an X endstop and moved it a bit right. So my Xhome changed to -45mm instead. Actually, it should be tuned for your hardware. Just move the hotend to 100/100 absolute position. The hotend must be in the center of bed. If not, change X/Y min positions accordingly. Then you will have exact visual representation of bed plate in slicing software (Repetier host, Simplify3D and others).
10. Minimum layer height. I saw in the topic that 0.05 is impossible. Wrong. I printed some samples using 0.05 layer with very good results. I had issues with top solid infill - yes, but they have nothing with 0.05 layer on this particular hardware. I even think it can be lowered more if necessary.
11. Free GPIO pins. As supplied, my printer has just ONE free pin - all the rest on the extension cable are used by power (2/10), keypad (1/10) and LCD (6/10). But I need more. So I added a convertor in between Melzi and display cable which frees up 5 (FIVE) total free pins. One is the same as before, two more are Tx1/Rx1 (I am waiting for Linux board to connect there still keeping the USB option), and SDL/SDA which I am going to use for Servo+Z probe, keeping Z endstop (maybe as a Z-max instead of Z-min). It was done using well-known shift register mod. Cheap 74HC164 shift register and 74LS08 AND gate do the trick (diode/register "AND" gate worked bad over long cables in 2-wire version, but if you are OK to use 3 wires for LCD instead of 2 then you only need a shift register and nothing else). Original Repetier firmware was extended to support this kind of display natively, and a pull request was created. I hope it soon will be accepted and takes its place in the official Repetier firmware.
Here is the thing I printed using mentioned above official Repetier firmware from their repository: [www.thingiverse.com]
Or a video with my Maine Coon cat: [www.youtube.com], he likes Saber :-)
Finally, I have two questions:
1) What is a real difference between Marlin and Repetier firmware? I used old Marlin on my RepRap Huxley printer 4 years ago, do not use it at the moment. Why people in this thread use mostly Marlin? Any REAL advantages? Features? Availability?
2) Do you have an issue with SD card and filament fan? Due to hardware reasons the original SS pin is used for fan, and another pin is used for SPI SD SS. As a weird result, my fan is rotating during any SD card access (say, when printing from SD or even shortly after printer power on when mounting the SD). I suspected a hardware issue, but my friend has the same on his (same) printer. Original firmware has the same issue. And I think even custom SD access code (simple Arduino example) has it either. Do you have such issues with Melzi board with your printers?
Edited 4 time(s). Last edit at 03/11/2016 07:25AM by osnwt.
|
Re: P802M Prusa i3 Unofficial Support Thread March 11, 2016 02:12PM |
Registered: 8 years ago Posts: 24 |
OSNWT, thank you for this good information. I also have the leadscrew rods and noticed my prints were coming out too small. Had to change the steps per mm in the firmware from 80 to 100 for X and Y, Z is set for 400. I might try changing the baud rate from 115200 to 25000.
Now I'm not sure if I have the same melzi board as you but my board is square (not rectangular). Is this board still compatible with Melzi 2.0, and can I upgrade the firmware on it? (see attached photo).
Edited 1 time(s). Last edit at 03/11/2016 02:15PM by broy55.
Now I'm not sure if I have the same melzi board as you but my board is square (not rectangular). Is this board still compatible with Melzi 2.0, and can I upgrade the firmware on it? (see attached photo).
Edited 1 time(s). Last edit at 03/11/2016 02:15PM by broy55.
|
Re: P802M Prusa i3 Unofficial Support Thread March 11, 2016 02:27PM |
Registered: 12 years ago Posts: 13 |
Mine are (and originally were) 100/100/400.Quote
broy55
OSNWT, thank you for this good information. I also have the leadscrew rods and noticed my prints were coming out too small. Had to change the steps per mm in the firmware from 80 to 100 for X and Y, Z is set for 400.
Not 25'000, but 250'000. The reason is we want faster communications, but ISO standard 230400 rate is not good for 16MHz crystal. That's why non-ISO baud rates: they just have an integer divider for crystal frequency (16000000/250000 = 64, 16000000/230400 = 69.44444444444, 16000000/115200. = 138.8888888889).Quote
I might try changing the baud rate from 115200 to 25000.
No idea, but I think no reason to develop a completely different board. I think it should be compatible.Quote
Now I'm not sure if I have the same melzi board as you but my board is square (not rectangular). Is this board still compatible with Melzi 2.0, and can I upgrade the firmware on it? (see attached photo).
|
Re: P802M Prusa i3 Unofficial Support Thread March 11, 2016 02:33PM |
Registered: 8 years ago Posts: 24 |
Sorry, I meant to say 250,000 baud. I might try upgrading the firmware this weekend. Only wish I could somehow determine what's currently installed. By the way, my DA Vinci 2.0 had Marlin firmware on it but I upgraded to repeiter 0.92. I hated Marlin, unless you plan on using Simplify3D with it, I couldn't get any other decent software working on it.
|
Re: P802M Prusa i3 Unofficial Support Thread March 11, 2016 09:23PM |
Registered: 8 years ago Posts: 14 |
|
Re: P802M Prusa i3 Unofficial Support Thread March 12, 2016 02:50PM |
Registered: 12 years ago Posts: 13 |
Here is the link to firmware hex file. It was built from official Repetier code using my own config (yet without LCD upgrade, so you can use it). Please save your original firmware first and EEPROM settings, just in case...
[drive.google.com]
Sorry for delay: spent a day playing with auto-leveling using servo + mechanical end-stop (keeping Z-min, thanks to shift register LCD). Seems it starts working, now printing the final servo mount.
PS. If you have a file access issue - let me know, I didn't use Google Drive for a long time, maybe some access rights are wrong.
Edited 1 time(s). Last edit at 03/12/2016 03:13PM by osnwt.
|
Re: P802M Prusa i3 Unofficial Support Thread March 12, 2016 05:44PM |
Registered: 8 years ago Posts: 14 |
|
Re: P802M Prusa i3 Unofficial Support Thread March 12, 2016 06:17PM |
Registered: 12 years ago Posts: 13 |
As I said, this printer is now supported (LCD + keypad) by official firmware. The best place to get it is this: [github.com] (official repository).
I put some sample config here: [github.com]. You may take it, upload to web configurator and download full source package.
That config is a bit different than mine. So mine is here (I hope that is it): [drive.google.com]
Also check this pull request: [github.com] (it is not yet in the official repository, in short: Z-steps/mm might be 400 or 1600, and disable watchdog if you have issues without SD card inserted).
Edited 2 time(s). Last edit at 03/12/2016 06:23PM by osnwt.
|
Re: P802M Prusa i3 Unofficial Support Thread March 13, 2016 07:24AM |
Registered: 8 years ago Posts: 8 |
The leadscrew Zonestar3D has was pitch 2mm but number of start is 4 that mean its pitch = 4*2 = 8mm so step is 400
Some use the leadscrew that pitch 2mm too but number of start is 1 that mean its pitch = 2*1 = 2mm so step is 1600
The GT2 Pully is 16 tooth so step is 100,
Some use GT2 20 tooths so step is 80
Edited 3 time(s). Last edit at 03/13/2016 12:43PM by minhtri.sm.
Some use the leadscrew that pitch 2mm too but number of start is 1 that mean its pitch = 2*1 = 2mm so step is 1600
The GT2 Pully is 16 tooth so step is 100,
Some use GT2 20 tooths so step is 80

Edited 3 time(s). Last edit at 03/13/2016 12:43PM by minhtri.sm.
|
Re: P802M Prusa i3 Unofficial Support Thread March 14, 2016 10:07AM |
Registered: 8 years ago Posts: 24 |
|
Re: P802M Prusa i3 Unofficial Support Thread March 14, 2016 11:19AM |
Registered: 8 years ago Posts: 91 |
...just forget the *hex or *elf files, because they are already compiled. Nothing you can do with them just to keep it as backup (but the better idea is to readout the firmware from your printer as backup so you can be really sure). Those chinese sellers and (more the) producers like zonestar are ignorant and stupid people who keep their source code like a holy grail secret unimpressed that they violate totally the guidelines of open source. I other words: They grab the work of other people, change some parameters and won't give it back to the people.
I've informed repetier about their practise, maybe they wanna take legal steps against these thefts.
Edited 2 time(s). Last edit at 03/14/2016 11:34AM by madias.
I've informed repetier about their practise, maybe they wanna take legal steps against these thefts.
Edited 2 time(s). Last edit at 03/14/2016 11:34AM by madias.
|
Re: P802M Prusa i3 Unofficial Support Thread March 14, 2016 12:20PM |
Registered: 8 years ago Posts: 24 |
|
Re: P802M Prusa i3 Unofficial Support Thread March 14, 2016 12:36PM |
Registered: 8 years ago Posts: 91 |
NOP. Forget the elf file, until you wanna play with avrdude and/or other command line tools and you cannot change anything in that file. It's the compiled source code - unchangeable and you cannot change the firmware via SD-card and the printer itself!
Meanwhile nice people of the community have added support to the zonestar printers in the repetier firmware configuration tool. So you can choose the zone star lcd 5 buttons under "display controller". This is the fork for the zonestar printers:
osnwt has done (and/or collect) the whole work into this [github.com]
But I don't wanna blame you, broy55: Is it really neccessary to upload a new firmware onto your printer? Keep in mind, that you need to take care of many settings (please refer to all things osnwt wrote some posts above). There is no "one click" firmware update solution for that kind of printer, because there are many minor differences (rods,...diameters...pulleys, auto levelling....) from model to model. So you must try and find out the firmware settings which matches to your printer by yourself and if you wanna take the time (and frustration) it is the best to start here: [www.repetier.com]
Edited 1 time(s). Last edit at 03/14/2016 12:37PM by madias.
|
Re: P802M Prusa i3 Unofficial Support Thread March 14, 2016 12:44PM |
Registered: 8 years ago Posts: 91 |
@broy55: I've take a look at your mainboard: This is a relative new one sold by chinese printer sellers: It *could* be compatible with the melzi board (also uses an 1280) but maybe some pins are different - so be careful!. It would be nice to have a schematic for this board. Interesting detail: It looks like, they are using a CH340/341 UART-controller instead of a fake FTDI chip. (I don't have problems with that chips neither on OSX or windows, but it tooks a while to get the right driver (ok, 3 minutes of searching via google (download time included)).
Edited 2 time(s). Last edit at 03/14/2016 12:45PM by madias.
Edited 2 time(s). Last edit at 03/14/2016 12:45PM by madias.
|
Re: P802M Prusa i3 Unofficial Support Thread March 14, 2016 01:22PM |
Registered: 8 years ago Posts: 24 |
That's strange that they would give you a firmware file that's totally useless if you needed it. I'm not sure what my board is as there is no documentation on the Internet. I think it's a variant of Melzi but not sure. I've attached a photo.
|
Re: P802M Prusa i3 Unofficial Support Thread March 14, 2016 01:44PM |
Registered: 8 years ago Posts: 91 |
|
Re: P802M Prusa i3 Unofficial Support Thread March 14, 2016 02:31PM |
Registered: 8 years ago Posts: 49 |
The 3d star seller has been like that for me... He has not stopped responding to me as I have had several issues with my printer and demanded replacement parts. He was very resistant to sending replacement parts.
But I guess what do you expect when you scrape the bottom of the price barrel.
But I guess what do you expect when you scrape the bottom of the price barrel.
|
Re: P802M Prusa i3 Unofficial Support Thread March 14, 2016 03:02PM |
Registered: 12 years ago Posts: 13 |
Yep, I also bought mine from 3d star. Exactly the same result. While I was having issues with customs (they sent printer without ANY customs value declared, and in the end it cost me 18% VAT + customs fee + month of clearance), 3D star seller somehow sent me some info for the printer (but was slow in responses). But after I asked him about the source, he said few times that he sent it to me, but I never received it. Remember, I received other mails from him and I use own mail server without SPAM filtering for such cases. After I had a working source, I offered him a link to the thread with discussion so he at least can publish it for other people not giving them the source from Zonestar. In reply I've got a weird message like "Use EEPROM editor to find out the configuration" - he talked about settings instead of firmware source configuration. So I stopped talking to him, it was useless.
About firmware: when I had an Idea of looking for free GPIO pins to it, I started searching. In the thread on repetier.com I found that people published the schematic (I did not look at mine yet) and some implementation. What I did was to rewrite it in a such way that it was possible to merge it into official firmware. Working on some open source projects, I know that often it is too easy to implement a feature for myself. Much harder is to write it that way that it can be reused by others. So at the moment my repository at github.com isn't necessary (all is merged into the official one) UNLESS you want to go further and free up some pins to add more features. For instance, a mechanical probe with servo AND aux serial port for wifi web interface or linux host. These changes are not yet merged, but are published in my repo.
Video of auto leveling test
|
Re: P802M Prusa i3 Unofficial Support Thread March 14, 2016 03:08PM |
Registered: 8 years ago Posts: 24 |
I'm not complaining too much since I have the printer working, just would have been nice had they provided the configuration files. Thanks to OSNWT I should be able to update to the latest firmware, since those settings do seem to match what's in my eerprom. I might upgrade to a ramps controller and e3dv6 later on.


Sorry, only registered users may post in this forum.