moving up (hopefully) Max Micron Alum frame..
Posted by Thomllama
|
moving up (hopefully) Max Micron Alum frame.. May 25, 2016 08:25AM |
Registered: 7 years ago Posts: 36 |
so, around Christmas time I got a M3D Micro printer.. it's cute but far from a quality printer.. and too small, and no heated bed... 
so I sold it yesterday.. and been looking at the i3 clones.. was looking at a few of the acrylic framed ones but read, heard, watched Y-tube videos and heard a lot about them cracking and being a bit flimsy.. but generally nice printers... went to order one and just searched around the other versions and found one with an alum frame for not much more .. kinda did a spur of the moment purchase and ordered it..
what I got..
Max Micron - Aluminium Frame Auto leveling Prusa i3 - See more at: [www.3dprintersonlinestore.com]
so has anyone else got it? issues I need to know right off? not finding a whole lot about it anywhere so now I'm not sure if it's just a newer model? maybe it doesn't have issues so no one is posting or asking questions about it? (ya right )
)
anyway.. any info before I get it and get started is gunna be awesome hopefully have it in a week or 2.. only been without the M3D for 12 hours and already jonesing to print something LOL
so I sold it yesterday.. and been looking at the i3 clones.. was looking at a few of the acrylic framed ones but read, heard, watched Y-tube videos and heard a lot about them cracking and being a bit flimsy.. but generally nice printers... went to order one and just searched around the other versions and found one with an alum frame for not much more .. kinda did a spur of the moment purchase and ordered it..
what I got..
Max Micron - Aluminium Frame Auto leveling Prusa i3 - See more at: [www.3dprintersonlinestore.com]
so has anyone else got it? issues I need to know right off? not finding a whole lot about it anywhere so now I'm not sure if it's just a newer model? maybe it doesn't have issues so no one is posting or asking questions about it? (ya right
) anyway.. any info before I get it and get started is gunna be awesome
hopefully have it in a week or 2.. only been without the M3D for 12 hours and already jonesing to print something LOL
|
Re: moving up (hopefully) Max Micron Alum frame.. May 28, 2016 08:09AM |
Registered: 7 years ago Posts: 36 |
OK, doing some pre-receiving research...
Emailed and asked them for assembly instructions, or a video or something.. they sent me this link stated that these are it...
assembly instructions
looks skimpy being just a few pictures,.. but after going through them,.. honestly.. I'm thinking I won't need much more as it's pretty straight forward looking..... I'll find out when it gets here I guess...
I will say any emails I've sent has been responded to in less than 5 minutes.. and I've sent a few.. that is pretty impressive
(just as I was typing this got the email it shipped!! 2-3 weeks(or months) I should have it

Edited 2 time(s). Last edit at 05/28/2016 08:23AM by Thomllama.
Emailed and asked them for assembly instructions, or a video or something.. they sent me this link stated that these are it...
assembly instructions
looks skimpy being just a few pictures,.. but after going through them,.. honestly.. I'm thinking I won't need much more as it's pretty straight forward looking.....
I'll find out when it gets here I guess...I will say any emails I've sent has been responded to in less than 5 minutes.. and I've sent a few.. that is pretty impressive
(just as I was typing this got the email it shipped!! 2-3 weeks(or months) I should have it
Edited 2 time(s). Last edit at 05/28/2016 08:23AM by Thomllama.
|
Re: moving up (hopefully) Max Micron Alum frame.. May 31, 2016 01:07PM |
Registered: 7 years ago Posts: 36 |
well, I ordered on the 25th, it shipped on the 28th, and I received it today, the 31st.. and that included the long, Memorial day weekend, hold up.. that's rather impressive I got to say for shipping from China.. doing a few things then going to make up a unboxing video and well as an assembly video...
|
Re: moving up (hopefully) Max Micron Alum frame.. May 31, 2016 05:30PM |
Registered: 7 years ago Posts: 36 |
|
Re: moving up (hopefully) Max Micron Alum frame.. May 31, 2016 08:53PM |
Registered: 7 years ago Posts: 36 |
|
Re: moving up (hopefully) Max Micron Alum frame.. June 01, 2016 05:38PM |
Registered: 7 years ago Posts: 36 |
OK, actually wasn't missing them.. they had changed the sizes and such and I had been sent an older manual version.. there are still a few things they have off in screws listed, but it's easy to figure out and the right ones are there..
probably about 70% assembled..
have to stop as i want to square everything up and my squares are at the job site :/
have to wait till tomorrow...
probably about 70% assembled..
have to stop as i want to square everything up and my squares are at the job site :/
have to wait till tomorrow...
|
Re: moving up (hopefully) Max Micron Alum frame.. June 02, 2016 07:14PM |
Registered: 7 years ago Posts: 36 |
|
it's ALIVE!!!! June 03, 2016 12:34PM |
Registered: 7 years ago Posts: 36 |
well, there were issue.. I'll go over it more later in a video or something.. but probably 2/3rds of them were me.. BUT theft that were the machine/parts/kit a few of were kinda major, though easy to fix.
but, she is ALIVE!!!
[youtu.be]
Edited 1 time(s). Last edit at 06/03/2016 12:35PM by Thomllama.
but, she is ALIVE!!!
[youtu.be]
Edited 1 time(s). Last edit at 06/03/2016 12:35PM by Thomllama.
|
Re: it's ALIVE!!!! June 03, 2016 05:28PM |
Registered: 7 years ago Posts: 36 |
|
Re: moving up (hopefully) Max Micron Alum frame.. June 05, 2016 02:34PM |
Registered: 7 years ago Posts: 36 |
|
Re: it's ALIVE!!!! June 07, 2016 03:41PM |
Registered: 7 years ago Posts: 36 |
|
Re: it's ALIVE!!!! June 09, 2016 03:10PM |
Registered: 7 years ago Posts: 36 |
|
Re: it's ALIVE!!!! September 17, 2016 11:15AM |
Registered: 7 years ago Posts: 5 |
I am currently assembling the same model... I have noticed some annoyances with the printed parts that are included as well. I had to ream out the 4 rail holders for the lower bed assembly so the rails would fit in them. Also the assembling the extruder assembly and motor is nothing like what is shown on the pictogram...errr,.. "Instructions"! I think that is because I got the upgraded extruder and auto leveling option.
I do have a question though, as I am very new in the 3d printer game. Do I have to have glass cut to go on top of the hot bed? If so... any particular thickness?
Thanks in advance, and I will add my experiences with assembly here. So far its "Go slow & figure things out" as well as using blue loctite to screws when possible.
|
Re: it's ALIVE!!!! September 17, 2016 11:46AM |
Registered: 7 years ago Posts: 36 |
ya, just replaced the last of my factory printed parts.
I will say... when this thing is working correctly it's friggin awesome... does really nice detail if everything is square and straight.
Ya, i just got glass.. it's a bit heavy so you need to tone down the jerk and acceleration or the thing vibrates mad. I only use it because it gives me a removable plate.. don't like trying to get items off the printer, just annoying. I got the 3mm boro glass. there are many who use and have no issues with basic window glass and many use mirrors as the face is higher processed/smoothed. I still use blue tape on the glass. Tried other tapes, buildtak, direct to glass with glue stick (2nd place in my book) and just always go back to blue tape.. seems the most reliable bond with the least cost and hassle.
As to the blue loctite... I Actually highly recommend NOT using it! Loctite always creaks and fails over time especially in high vibration use. Plumbers tape (teflon tape) is FAR better and MUCH easier to clean off the screws later when you taking things apart and adjusting them.. (which you will be as you get more and more knowledge on how it works and how to improve) NO it's NOT A LUBRICATE!! its a thread filler/locker just like loctite, but better as it pads and fills ALL thread faces but still keeps the screw removable later without crusty crap.
but moving on.
I have just about every part that needs to be modified up on Thingiverse... having the adjustable X and Y belt tensions is a big big help and improvement in both print quality and and reliability .. also the bed leveling corners make life SOOOO much easier when leveling the bed to the nozzle. the mounts for the motor and the 3mm lifted Y pulley mount much improves the belt path also.
Will say, during the build the #1 most importnt thing is to make sure it's square!!! the uprights are 90º both front to back and left to right, and the bed is sliding forward/back 90º to the uprights..
also before 1st real important print.. print one of these... [www.thingiverse.com] and use it to make sure the X rails are leveled with the Y rails... doing that makes leveling the bed SO much better.. !!
Edited 1 time(s). Last edit at 09/17/2016 11:47AM by Thomllama.
|
Re: moving up (hopefully) Max Micron Alum frame.. September 18, 2016 08:58AM |
Registered: 8 years ago Posts: 318 |
i have had an acrylic i3 for a while now, after I replaced the hot end with an e3d v6 I was extremely happy with it. I can post the files if you want to do the same and keep the exact same stepper motor and tensioner assembly.
Many people print on glass, mirrors are indeed the best if you area going to use glass. Blue tape is good, but need kapton tape if you have a heated bed and are going to print ABS (bed gets too hot for blue). Gluesticks work well, though I prefer hairspray. I used to print on my aluminum bed with kapton tape but got tired of dealing with tape. Now I have a Print Bite bed and love it, no tape, no glue, no warping and mirror smooth finish on the bottoms of my parts. I still hairspray particularly small parts just to be safe.
Edited 1 time(s). Last edit at 09/18/2016 09:07AM by DaGameFace.
If you need some help, or don't understand what I just said, feel free to send me a PM anytime
Printer: Prusa i3, 2 E3D v6 Hotends, Arduino + RAMPS 1.4 with a Bypassed 5V Regulator, 400w Insignia ATX PSU, Custom Designed Bowden Extruders
|
Re: it's ALIVE!!!! September 20, 2016 07:42PM |
Registered: 7 years ago Posts: 5 |
Thanks guys, great info. Just got her all wired up. Powered up and all axis motors work. Of course I found my first cracked part... one of those nice shiny acrylic plates at the top of the Z axis. Ugh, I'll probably glue and clamp it for now until I can find / figure out how to design one. I'm going to double check everything, level the bed, set the autoleveling sensor before I proceed.
|
Re: it's ALIVE!!!! September 21, 2016 04:53AM |
Registered: 7 years ago Posts: 36 |
Quote
ShooterT
Thanks guys, great info. Just got her all wired up. Powered up and all axis motors work. Of course I found my first cracked part... one of those nice shiny acrylic plates at the top of the Z axis. Ugh, I'll probably glue and clamp it for now until I can find / figure out how to design one. I'm going to double check everything, level the bed, set the autoleveling sensor before I proceed.
Well, timing is good, I was just getting ready to design better motor mounts and upper end supports to get rid of the acrylic stuff... just give me a day or 2 and you can be my 2nd beta tester
|
Re: it's ALIVE!!!! September 21, 2016 07:37AM |
Registered: 7 years ago Posts: 36 |
OK, uploaded top supports for Z axis [www.thingiverse.com] haven't printed to tested yet but should be fine ...
|
Re: it's ALIVE!!!! September 22, 2016 09:05AM |
Registered: 7 years ago Posts: 5 |
That is fantastic, thank you so much!
She is up and running, printed the gear for the tensioner and the alignment tool. I ran the alignment tool at .1/100% and it came out great. Took somewhere between 2 and 3 hrs... I am as green as it gets to this, so if that is normal and leaving the speed as 40 is the right thing to do, then great!
As far as the Z support goes, how should I print it? On its side? I'm using the slicer that came on the SD card if that helps.
Thanks again for your help, slowly learning...
|
Re: it's ALIVE!!!! September 22, 2016 01:03PM |
Registered: 7 years ago Posts: 36 |
Quote
ShooterT
As far as the Z support goes, how should I print it? On its side? I'm using the slicer that came on the SD card if that helps.
Thanks again for your help, slowly learning...
ya. just printed one out myself last night.. did on the side so there is the least supports. 0.1 layer height, 50% infill - do a "shell" of at least 3x your nozzle.. guessing the standard 0.4 so you want a 1.2 shell. took about 7 hours
but worth it.Not sure what slicer they are providing.. I use Cura mostly.. still like the older 15.X.X but getting used to the newer 2.X versions (2.3 really doesn't work well with I3 clone printer setup) there are a TON of extra settings that can be had in 2.
Edited 2 time(s). Last edit at 09/22/2016 01:05PM by Thomllama.
|
Re: moving up (hopefully) Max Micron Alum frame.. September 22, 2016 06:28PM |
Registered: 8 years ago Posts: 318 |
|
Re: moving up (hopefully) Max Micron Alum frame.. September 22, 2016 06:46PM |
Registered: 7 years ago Posts: 5 |
Ooh, ok... So the 13 hr 100% fill .1 was excessive on my part? I'm using Cura 15.x.x ( newest of the 15). I've been printing from the SD card because I can't get Win 10 to print yet. Light flashes on the board, but nothing happens. I'll deal with that later.
The part will be done soon, looks great so far!
The part will be done soon, looks great so far!
|
Re: moving up (hopefully) Max Micron Alum frame.. September 22, 2016 06:59PM |
Registered: 7 years ago Posts: 36 |
|
Re: moving up (hopefully) Max Micron Alum frame.. September 22, 2016 07:01PM |
Registered: 7 years ago Posts: 36 |
ya. Did a bunch at 100%. Kinda a waste... 1mm+ shell with a 50% infill at times can actually be stronger.Quote
ShooterT
Ooh, ok... So the 13 hr 100% fill .1 was excessive on my part? I'm using Cura 15.x.x ( newest of the 15). I've been printing from the SD card because I can't get Win 10 to print yet. Light flashes on the board, but nothing happens. I'll deal with that later.
The part will be done soon, looks great so far!
|
Re: moving up (hopefully) Max Micron Alum frame.. September 23, 2016 10:05AM |
Registered: 8 years ago Posts: 318 |
Did you get microstepping set up? Some build guides don't show how to jumper the pins under the stepper drivers, I ask because no microstepping would make a printer really loud and jerky. Two things you solved by turning down acceleration.
Also, unless I'm printing something that needs to look really good like a scale model, or herringbone gears, I almost always print at .2 it is close to twice as fast and still looks really good.
Edited 1 time(s). Last edit at 09/23/2016 10:07AM by DaGameFace.
If you need some help, or don't understand what I just said, feel free to send me a PM anytime
Printer: Prusa i3, 2 E3D v6 Hotends, Arduino + RAMPS 1.4 with a Bypassed 5V Regulator, 400w Insignia ATX PSU, Custom Designed Bowden Extruders
|
Re: moving up (hopefully) Max Micron Alum frame.. September 23, 2016 12:02PM |
Registered: 7 years ago Posts: 36 |

|
Re: moving up (hopefully) Max Micron Alum frame.. September 24, 2016 12:23PM |
Registered: 8 years ago Posts: 318 |
Step 1. Remove stepper drivers (WITH POWER OFF)
Step 2. jumper all pins as such in picture
Step 3. add a *16 after all your steps per mm settings in firmware and increase acceleration
Step 5. Profit! from the now musical sound of your smooth stepper motors
This is assuming your stepper drivers are fairly standard ones that are 1/16 max. A pretty safe assumption seeing you got it from a kit. There are ones with 1/32 max but havent seen those included in a kit.
Edited 1 time(s). Last edit at 09/24/2016 12:27PM by DaGameFace.
If you need some help, or don't understand what I just said, feel free to send me a PM anytime
Printer: Prusa i3, 2 E3D v6 Hotends, Arduino + RAMPS 1.4 with a Bypassed 5V Regulator, 400w Insignia ATX PSU, Custom Designed Bowden Extruders
Step 2. jumper all pins as such in picture

Step 3. add a *16 after all your steps per mm settings in firmware and increase acceleration
Step 5. Profit! from the now musical sound of your smooth stepper motors
This is assuming your stepper drivers are fairly standard ones that are 1/16 max. A pretty safe assumption seeing you got it from a kit. There are ones with 1/32 max but havent seen those included in a kit.
Edited 1 time(s). Last edit at 09/24/2016 12:27PM by DaGameFace.
If you need some help, or don't understand what I just said, feel free to send me a PM anytime
Printer: Prusa i3, 2 E3D v6 Hotends, Arduino + RAMPS 1.4 with a Bypassed 5V Regulator, 400w Insignia ATX PSU, Custom Designed Bowden Extruders
|
Re: moving up (hopefully) Max Micron Alum frame.. September 24, 2016 03:28PM |
Registered: 7 years ago Posts: 36 |
Quote
DaGameFace
Step 1. Remove stepper drivers (WITH POWER OFF)
Step 2. jumper all pins as such in picture
Step 3. add a *16 after all your steps per mm settings in firmware and increase acceleration
Step 5. Profit! from the now musical sound of your smooth stepper motors
This is assuming your stepper drivers are fairly standard ones that are 1/16 max. A pretty safe assumption seeing you got it from a kit. There are ones with 1/32 max but havent seen those included in a kit.
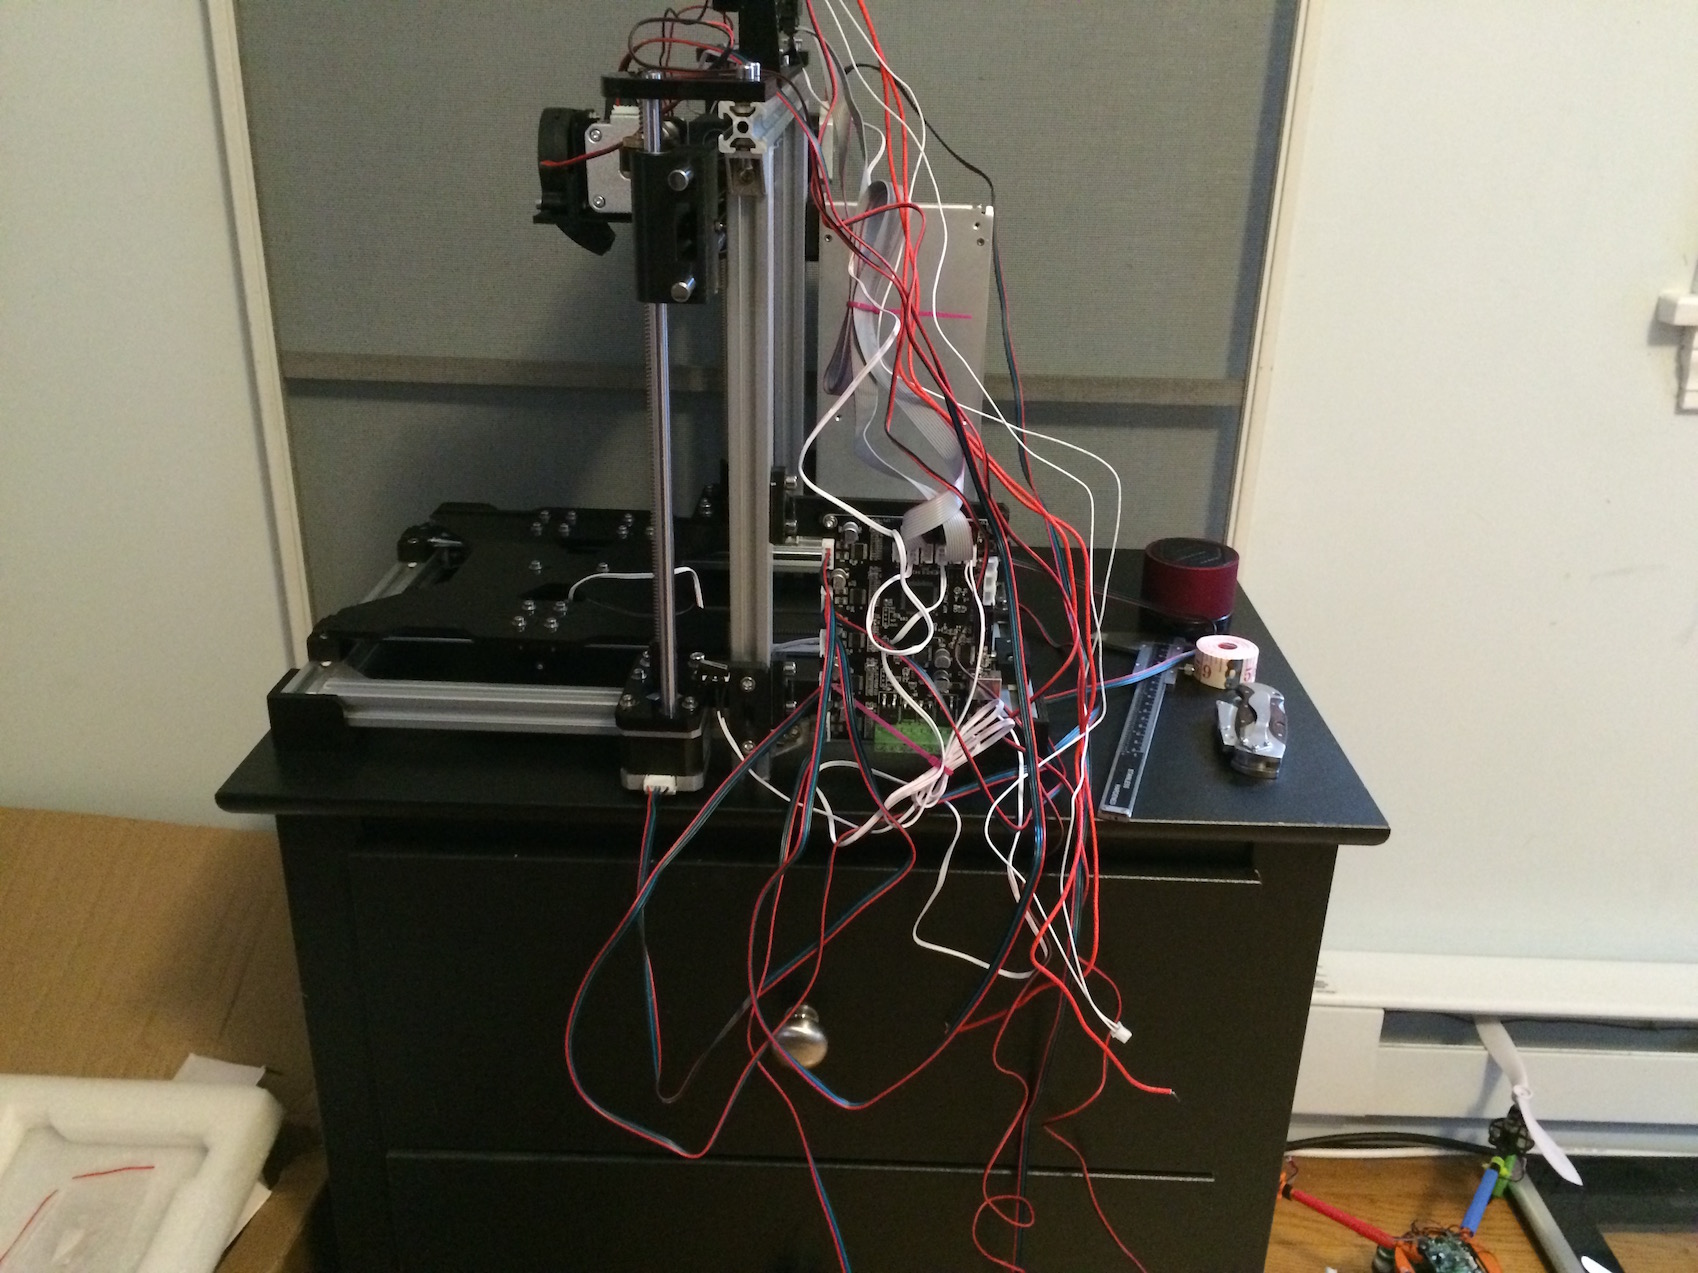
these Max Micron boards look nothing even close to that... not one area I see where a jumper can be installed..
|
Re: moving up (hopefully) Max Micron Alum frame.. September 24, 2016 07:54PM |
Registered: 8 years ago Posts: 318 |
hmm, thats unusual for a prusa to not use an arduino/ramps combo.. probably a 2 in one, in which case microstepping is either on by default or not at all.
If you need some help, or don't understand what I just said, feel free to send me a PM anytime
Printer: Prusa i3, 2 E3D v6 Hotends, Arduino + RAMPS 1.4 with a Bypassed 5V Regulator, 400w Insignia ATX PSU, Custom Designed Bowden Extruders
If you need some help, or don't understand what I just said, feel free to send me a PM anytime
Printer: Prusa i3, 2 E3D v6 Hotends, Arduino + RAMPS 1.4 with a Bypassed 5V Regulator, 400w Insignia ATX PSU, Custom Designed Bowden Extruders
|
Re: moving up (hopefully) Max Micron Alum frame.. September 24, 2016 08:05PM |
Registered: 7 years ago Posts: 36 |
not a clue. I'm really good with the mechanical side, but the electronics.. clue less. can handle wiring and the motors and such.. but boards, not a clue
image there.. for some reason it won't display photo bucket images but if you click and do the open in another window it's there

Edited 1 time(s). Last edit at 09/24/2016 08:07PM by Thomllama.
image there.. for some reason it won't display photo bucket images but if you click and do the open in another window it's there
Edited 1 time(s). Last edit at 09/24/2016 08:07PM by Thomllama.

Sorry, only registered users may post in this forum.