Cannot accomplish usable print  March 13, 2017 10:40AM |
Registered: 7 years ago Posts: 29 |
Hi there!
I have a Prusa i3 Rework done by myself and it seems I can't do a print that's good.. I mean: sometimes the plastic doesn't stick properly to the filament that's already on the bed (or so I guess it goes), other times some layers seem to miss or not to stick properly one to another, sometimes one or more layers are a bit off... I've tried and I'm still trying many things read on articles and documentations, but I can't figure out what I should change to do it better.
I don't want perfection, good and usable quality is enough..
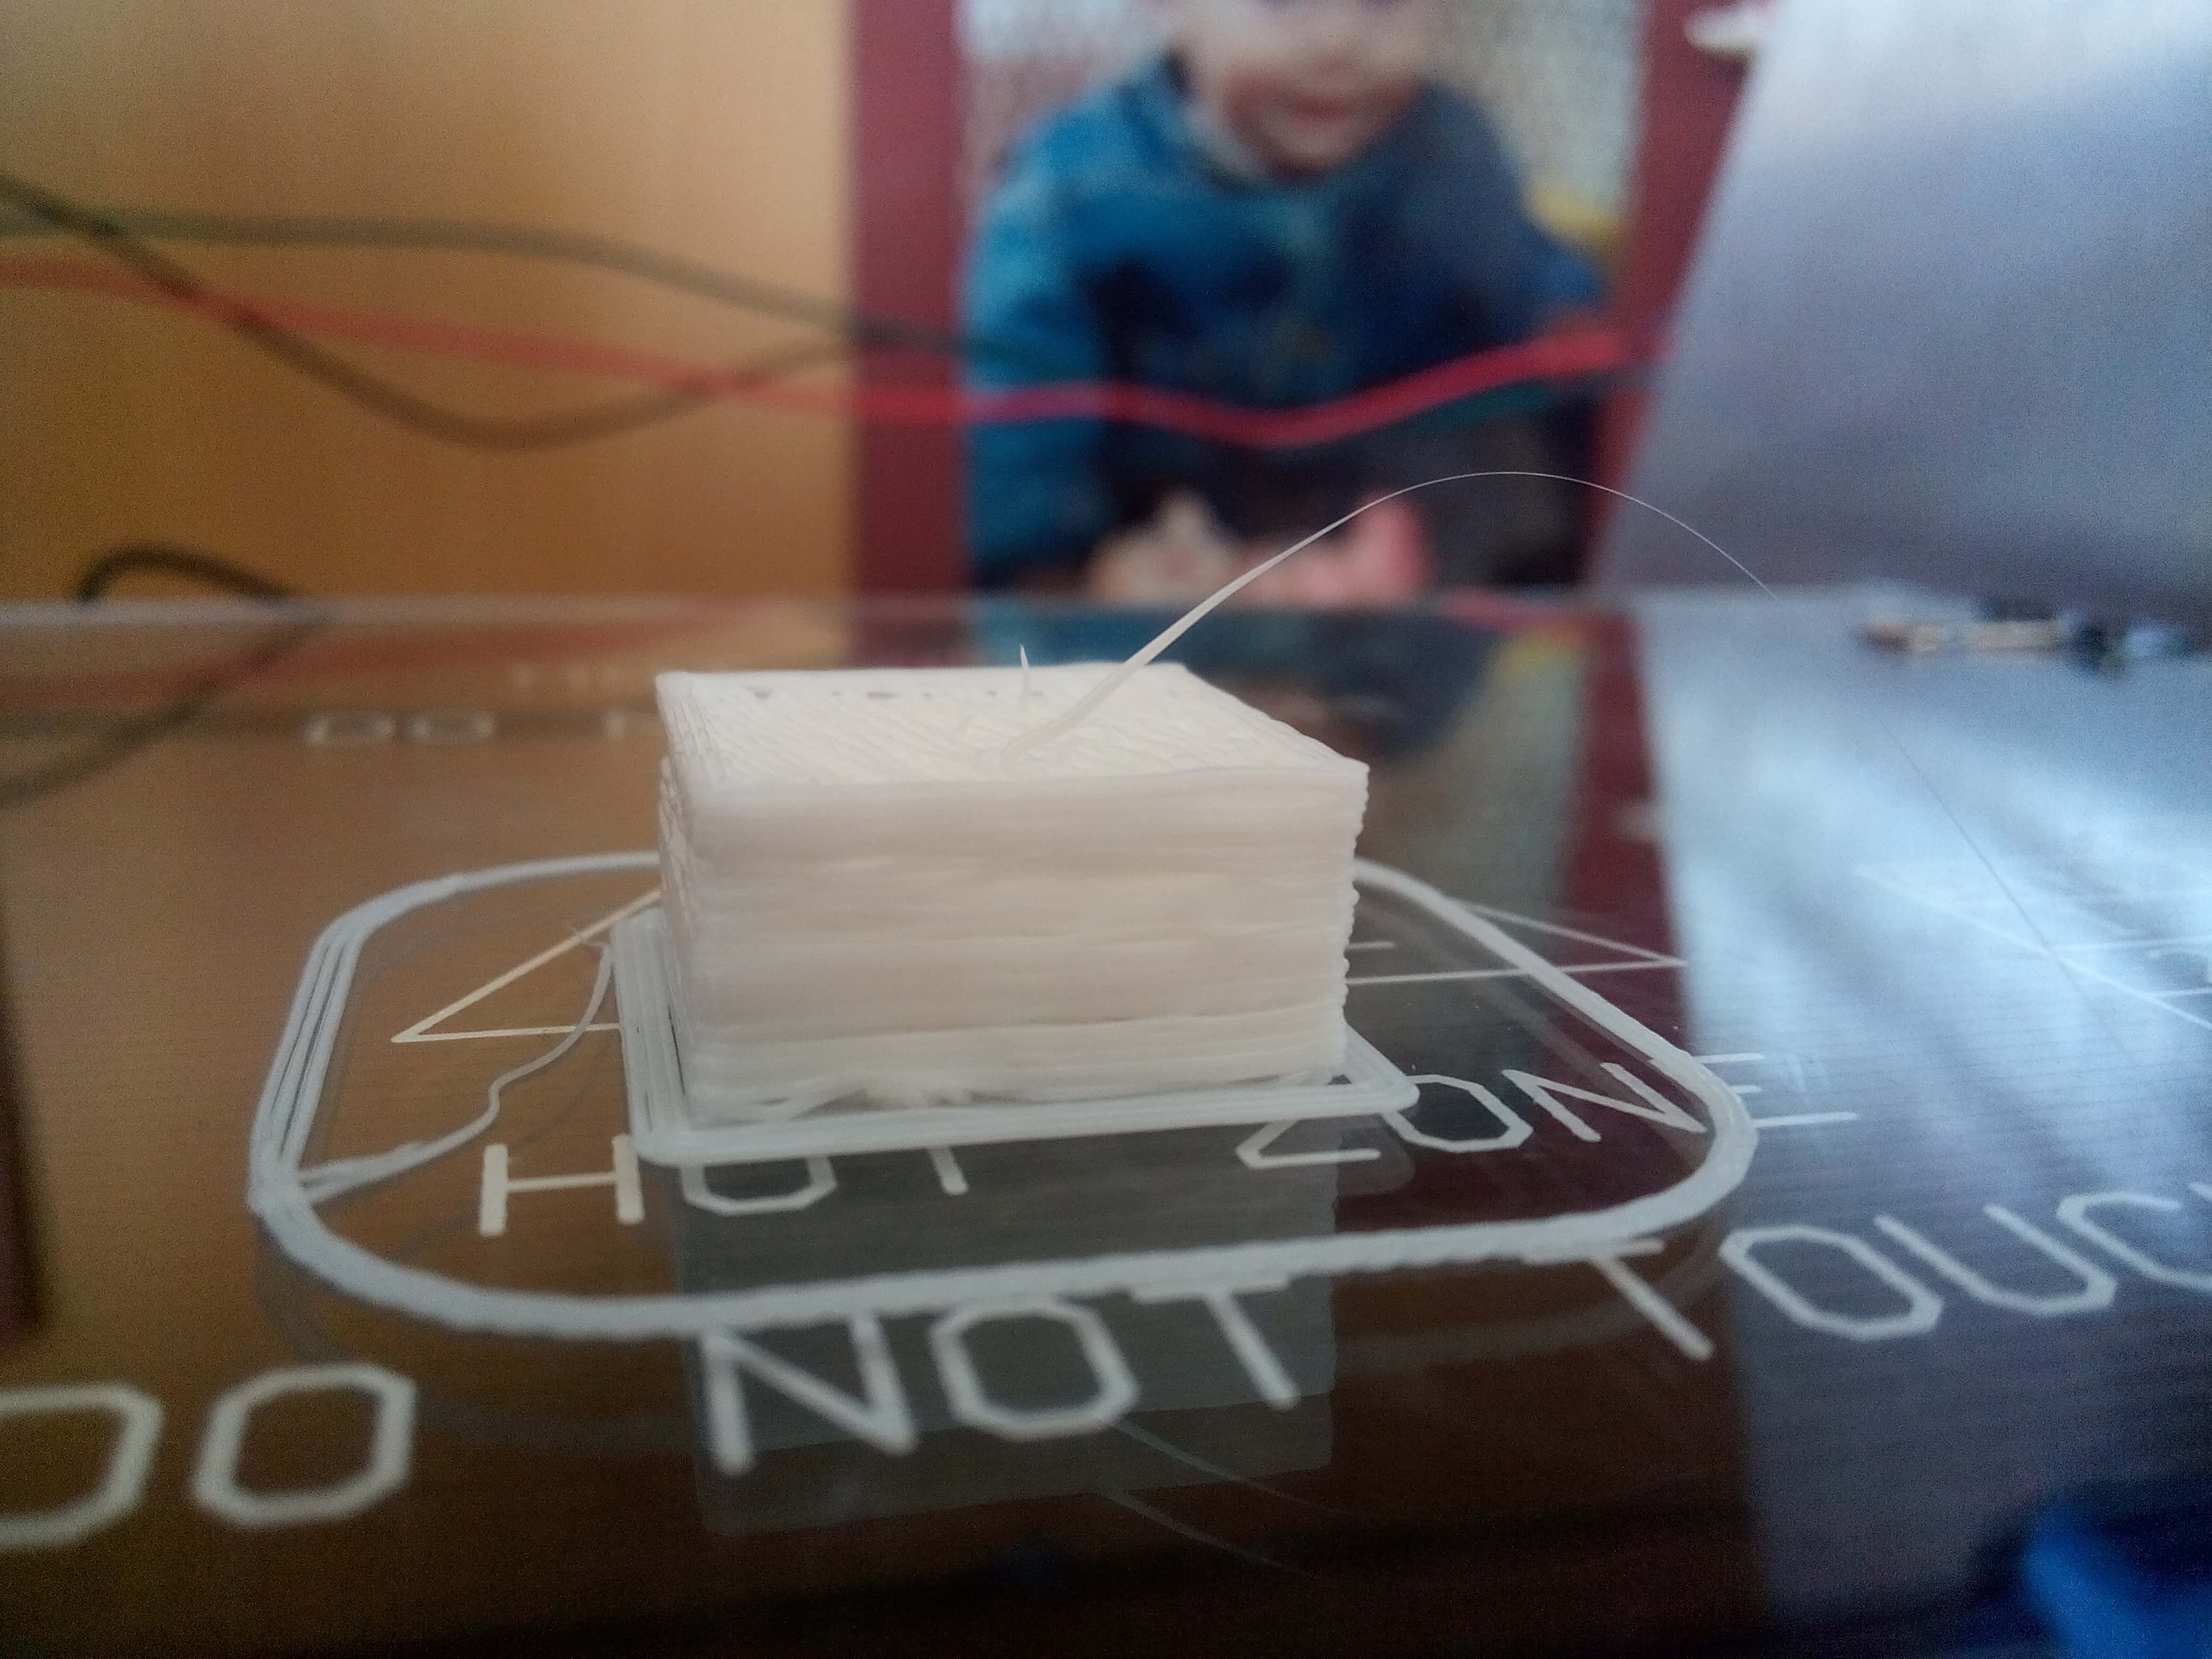
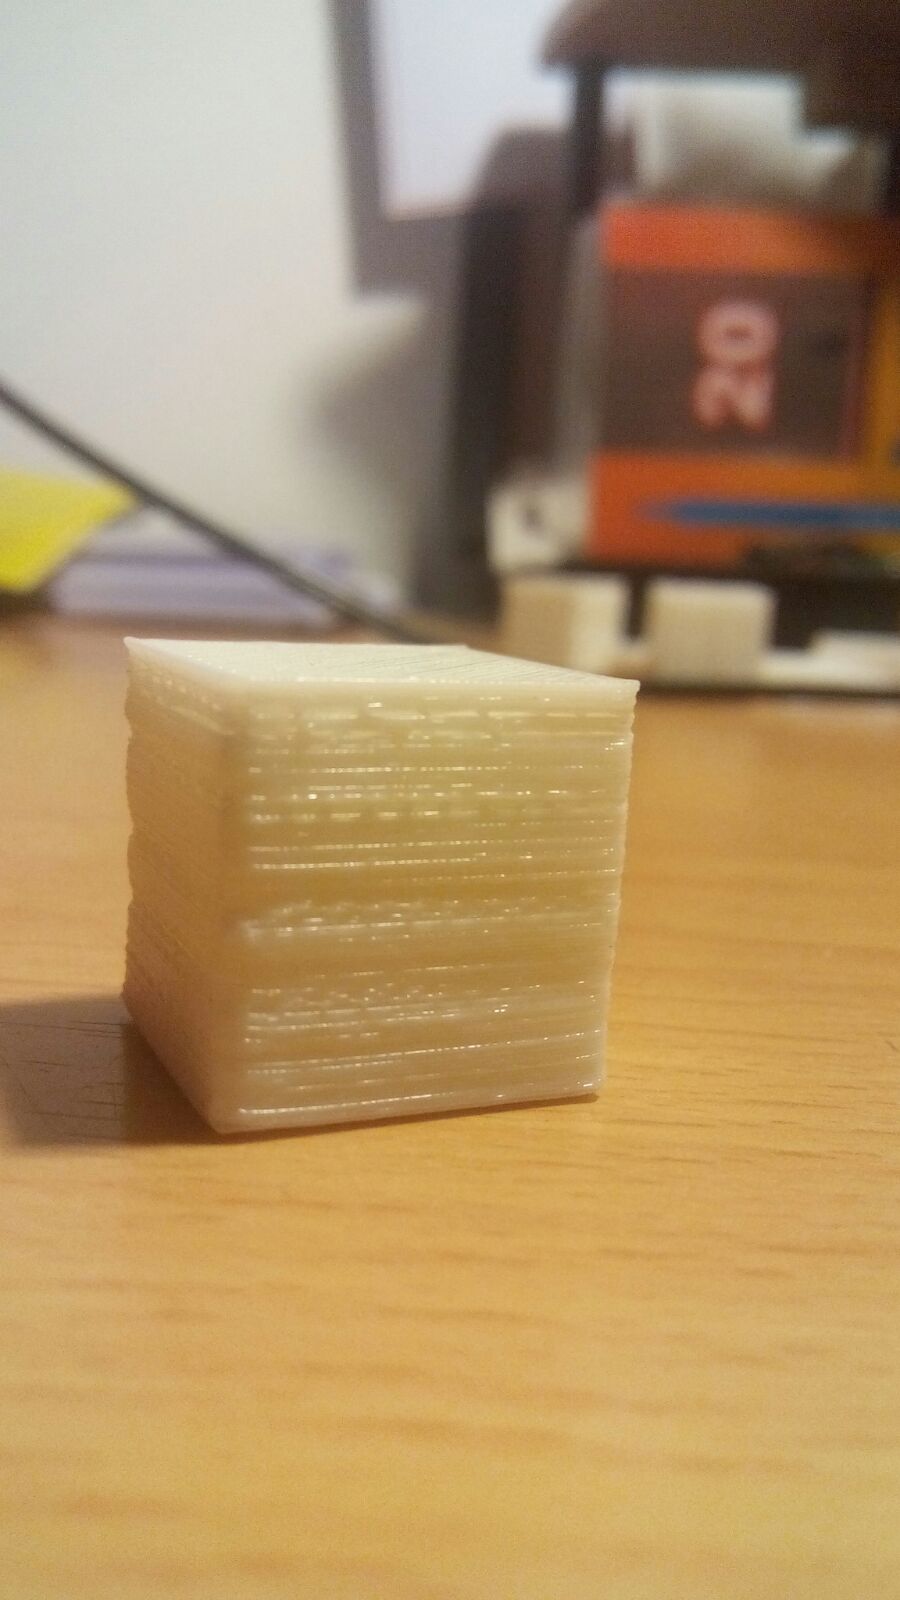
I'll attach some images of my best print (yes, it's the best I could do so far..) : it's just a calibration cube with 2cm sides. To be precise, the one in the picture is an incomplete one I stopped because it was exactly like the previous one..
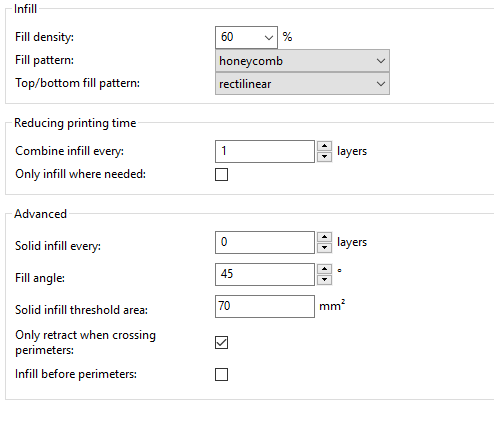
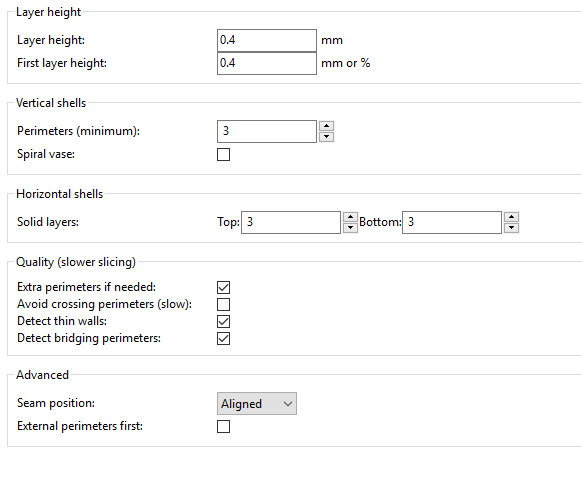
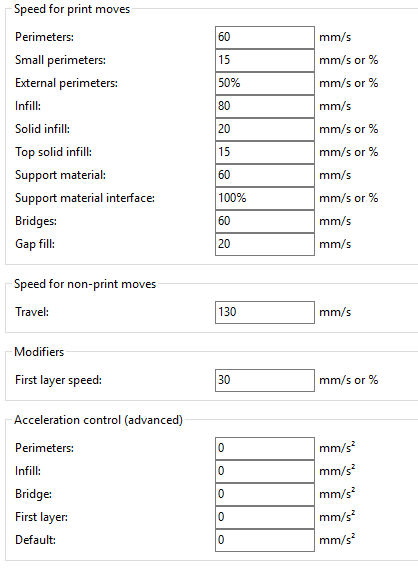
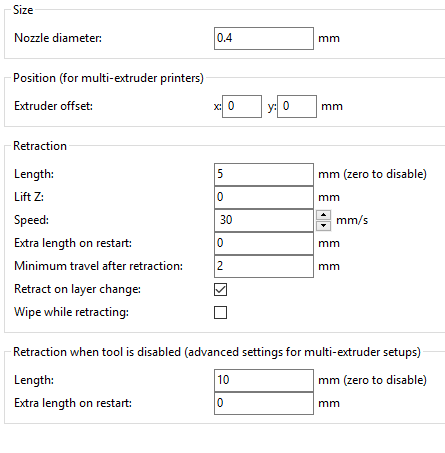
Oh, I guess it's useful to say I'm using Pronterface (Printrun 2014.08.01) and Slic3r 1.1.7, as I downloaded a zip file from the RepRap wiki. I'll attach some screenshots of the main settings I'm using. Also, I run Marlin firmware and I've done the calibration..Tell me if you need my code!
Thank to anybody will even try to help!
I have a Prusa i3 Rework done by myself and it seems I can't do a print that's good.. I mean: sometimes the plastic doesn't stick properly to the filament that's already on the bed (or so I guess it goes), other times some layers seem to miss or not to stick properly one to another, sometimes one or more layers are a bit off... I've tried and I'm still trying many things read on articles and documentations, but I can't figure out what I should change to do it better.
I don't want perfection, good and usable quality is enough..
I'll attach some images of my best print (yes, it's the best I could do so far..) : it's just a calibration cube with 2cm sides. To be precise, the one in the picture is an incomplete one I stopped because it was exactly like the previous one..
Oh, I guess it's useful to say I'm using Pronterface (Printrun 2014.08.01) and Slic3r 1.1.7, as I downloaded a zip file from the RepRap wiki. I'll attach some screenshots of the main settings I'm using. Also, I run Marlin firmware and I've done the calibration..Tell me if you need my code!
Thank to anybody will even try to help!
Attachments:
open | download - print settings advanced.PNG (13.1 KB)
open | download - print settings infill.PNG (10.8 KB)
open | download - print settings layers.PNG (12.7 KB)
open | download - print settings speed.PNG (15.5 KB)
open | download - printer settings extruder1.PNG (12.5 KB)
open | download - IMG_20170312_150509-min (1).jpg (586 KB)
open | download - IMG_20170312_150550-min.jpg (580.1 KB)
open | download - IMG_20170312_150605-min.jpg (579.6 KB)
|
Re: Cannot accomplish usable print March 13, 2017 05:57PM |
Registered: 7 years ago Posts: 267 |
It looks to me like your nozzle to too high from the bed, home your z axis and use a business card to check the corners and the centre. The card should just catch under the nozzle. Its a good idea to do this when the bed is heated as the bed will warp or bow when temperature is added.
You should also try a lower layer height, sounds odd but 0.4mm would be on the max for most nozzles, especially if you are using a 0.4. Try a layer height of 0.3mm or 0.2mm.
Edited 1 time(s). Last edit at 03/13/2017 05:58PM by scottybfg.
You should also try a lower layer height, sounds odd but 0.4mm would be on the max for most nozzles, especially if you are using a 0.4. Try a layer height of 0.3mm or 0.2mm.
Edited 1 time(s). Last edit at 03/13/2017 05:58PM by scottybfg.
|
Re: Cannot accomplish usable print March 13, 2017 06:08PM |
Registered: 7 years ago Posts: 29 |
|
Re: Cannot accomplish usable print March 13, 2017 07:39PM |
Registered: 7 years ago Posts: 267 |
I find the simply3D guide really good to troubleshoot with, The good thing is you dont need the software to use the guide, and it has pitches of the problems to make it easy to use
Link: [www.simplify3d.com]
Link: [www.simplify3d.com]
|
Re: Cannot accomplish usable print March 14, 2017 09:12AM |
Registered: 7 years ago Posts: 29 |
Thanks scottybfg, but I've already seen and tried that.. I thought there were more than one problem, so I tried several option listed there, but still haven't got any results so I decided to ask here..
Now I'm going to try what you said before, I'll get in touch later with some news (hopefully good)
Now I'm going to try what you said before, I'll get in touch later with some news (hopefully good)
|
Re: Cannot accomplish usable print March 14, 2017 05:02PM |
Registered: 7 years ago Posts: 267 |
|
Re: Cannot accomplish usable print March 15, 2017 05:01PM |
Registered: 7 years ago Posts: 29 |
So, I could try something just some minutes ago.. These are the results!
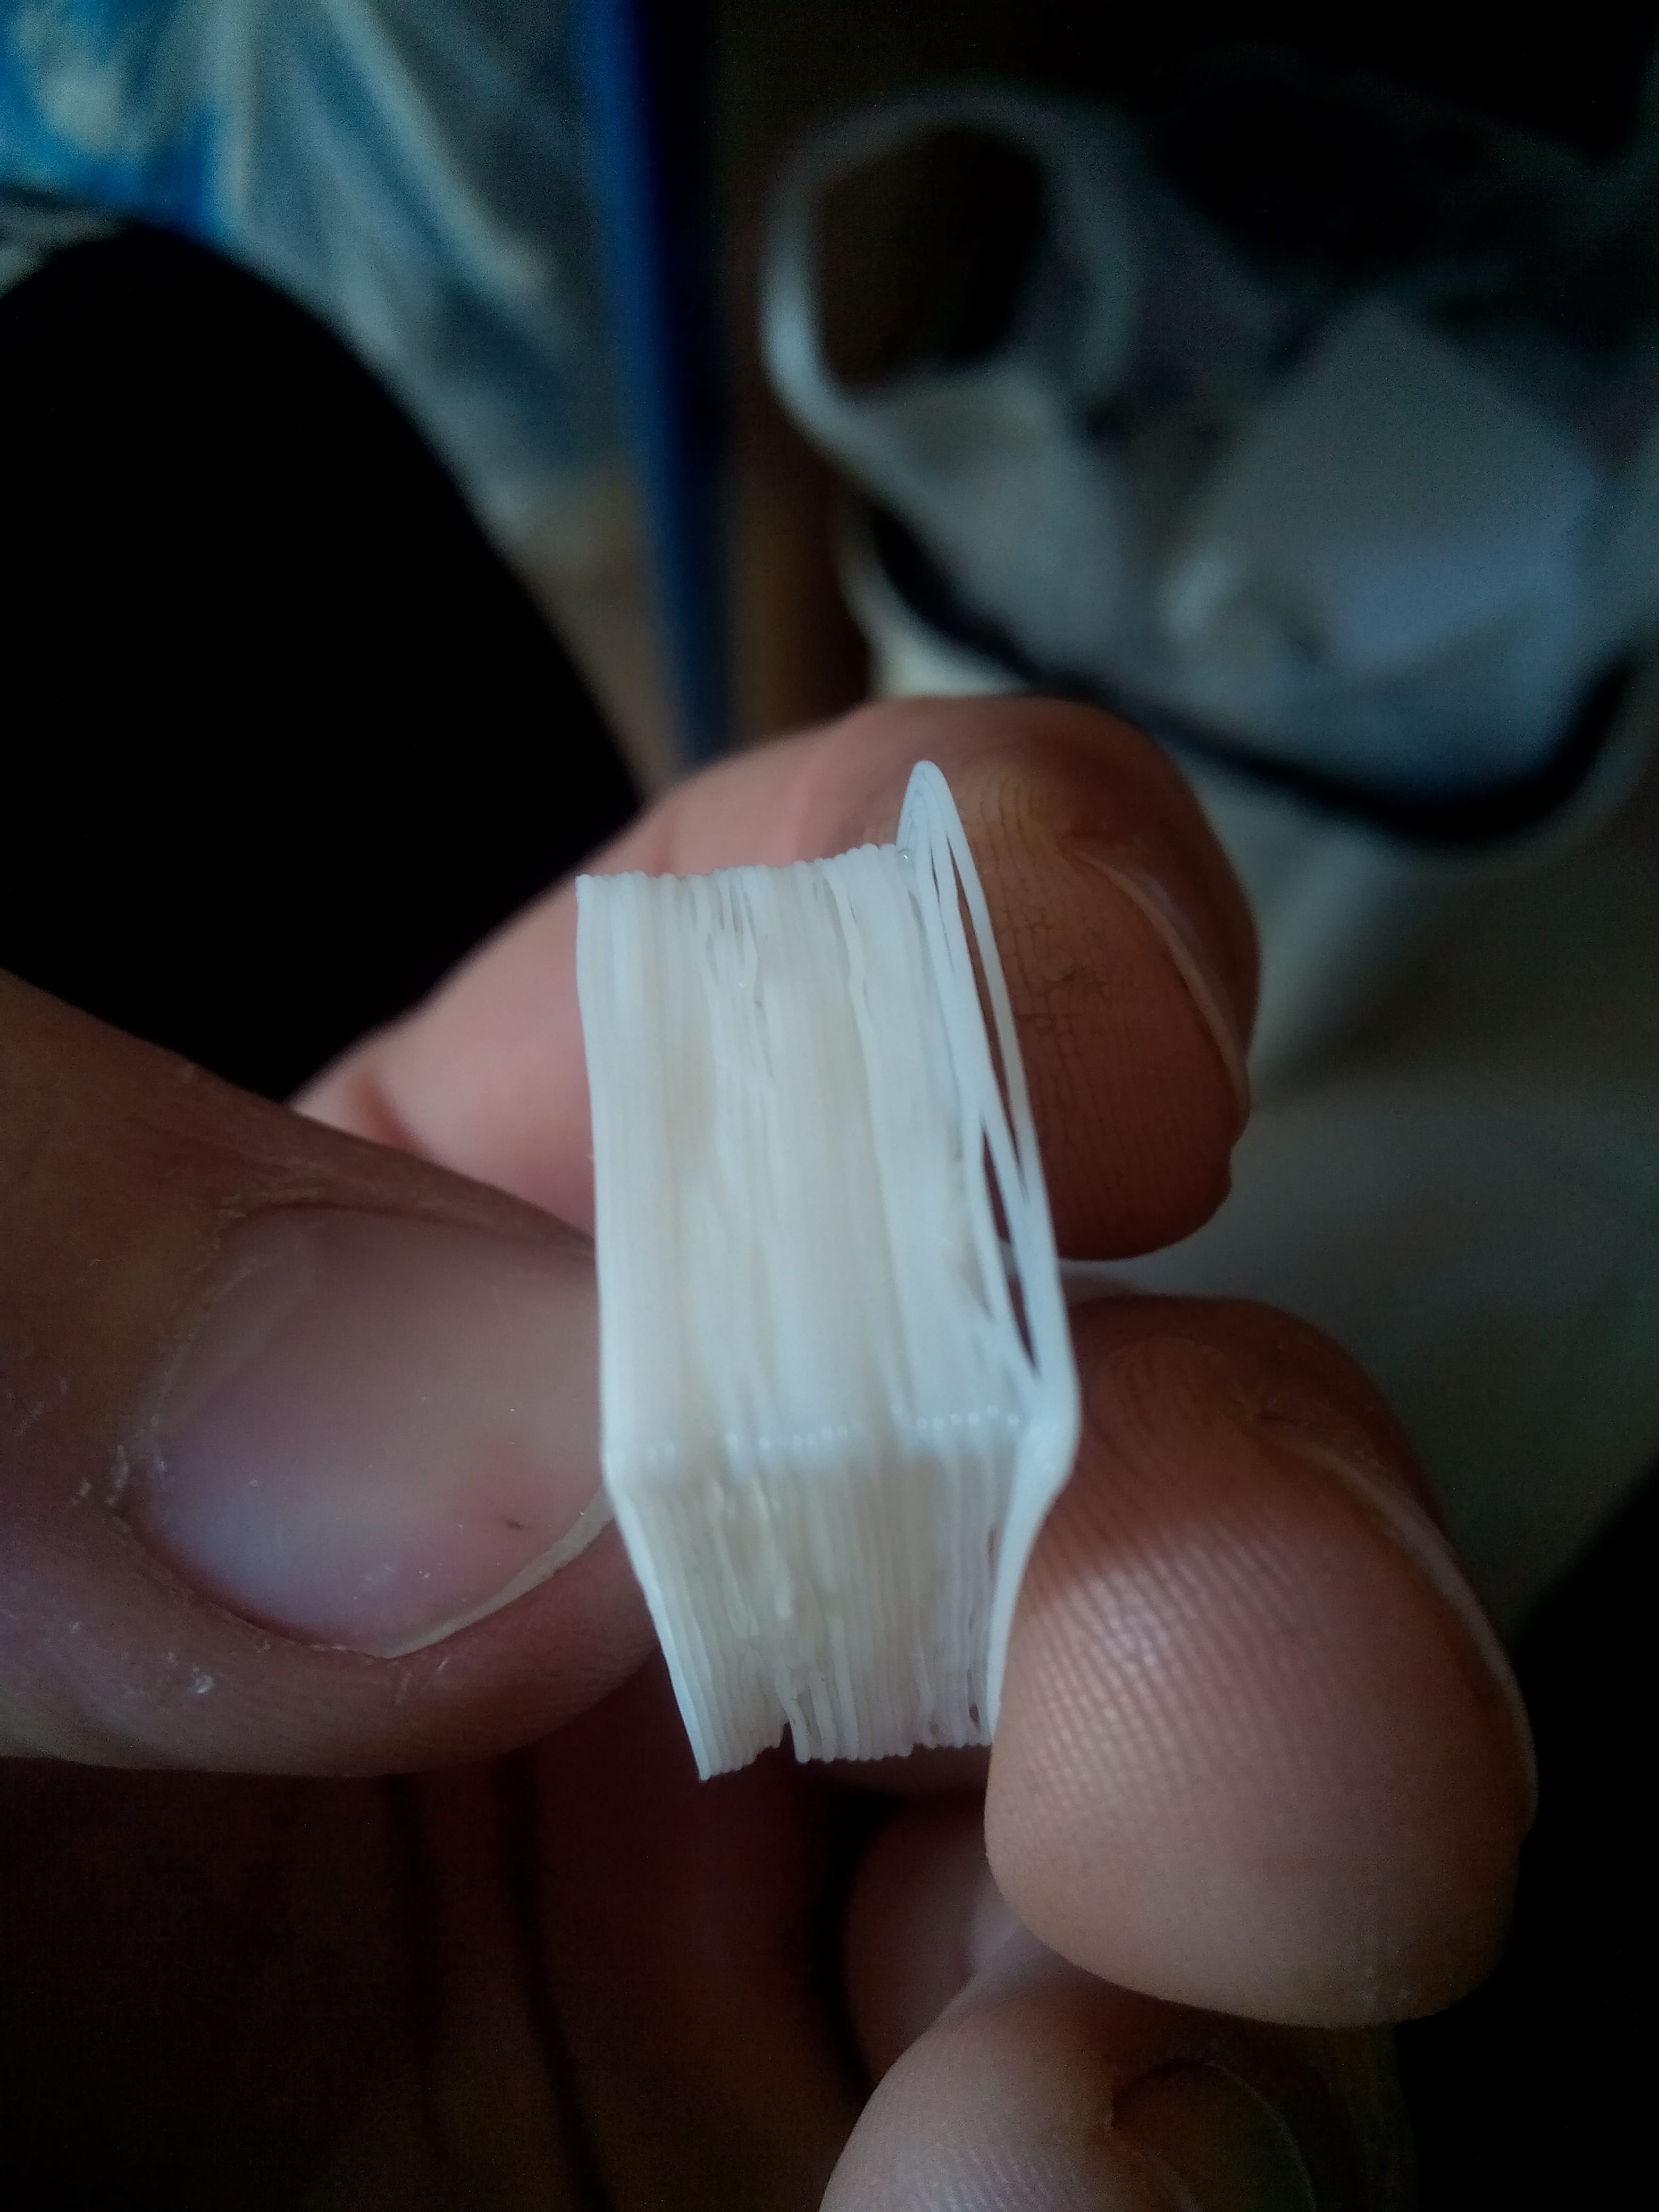
First, I tried to print without changing any Slic3r setting and after another (of many) levelling of the heatbed: that was strangely hard, but I got away with something. I stopped the print after just the first two layers, because (as you can see) there was not enough filament extruded.
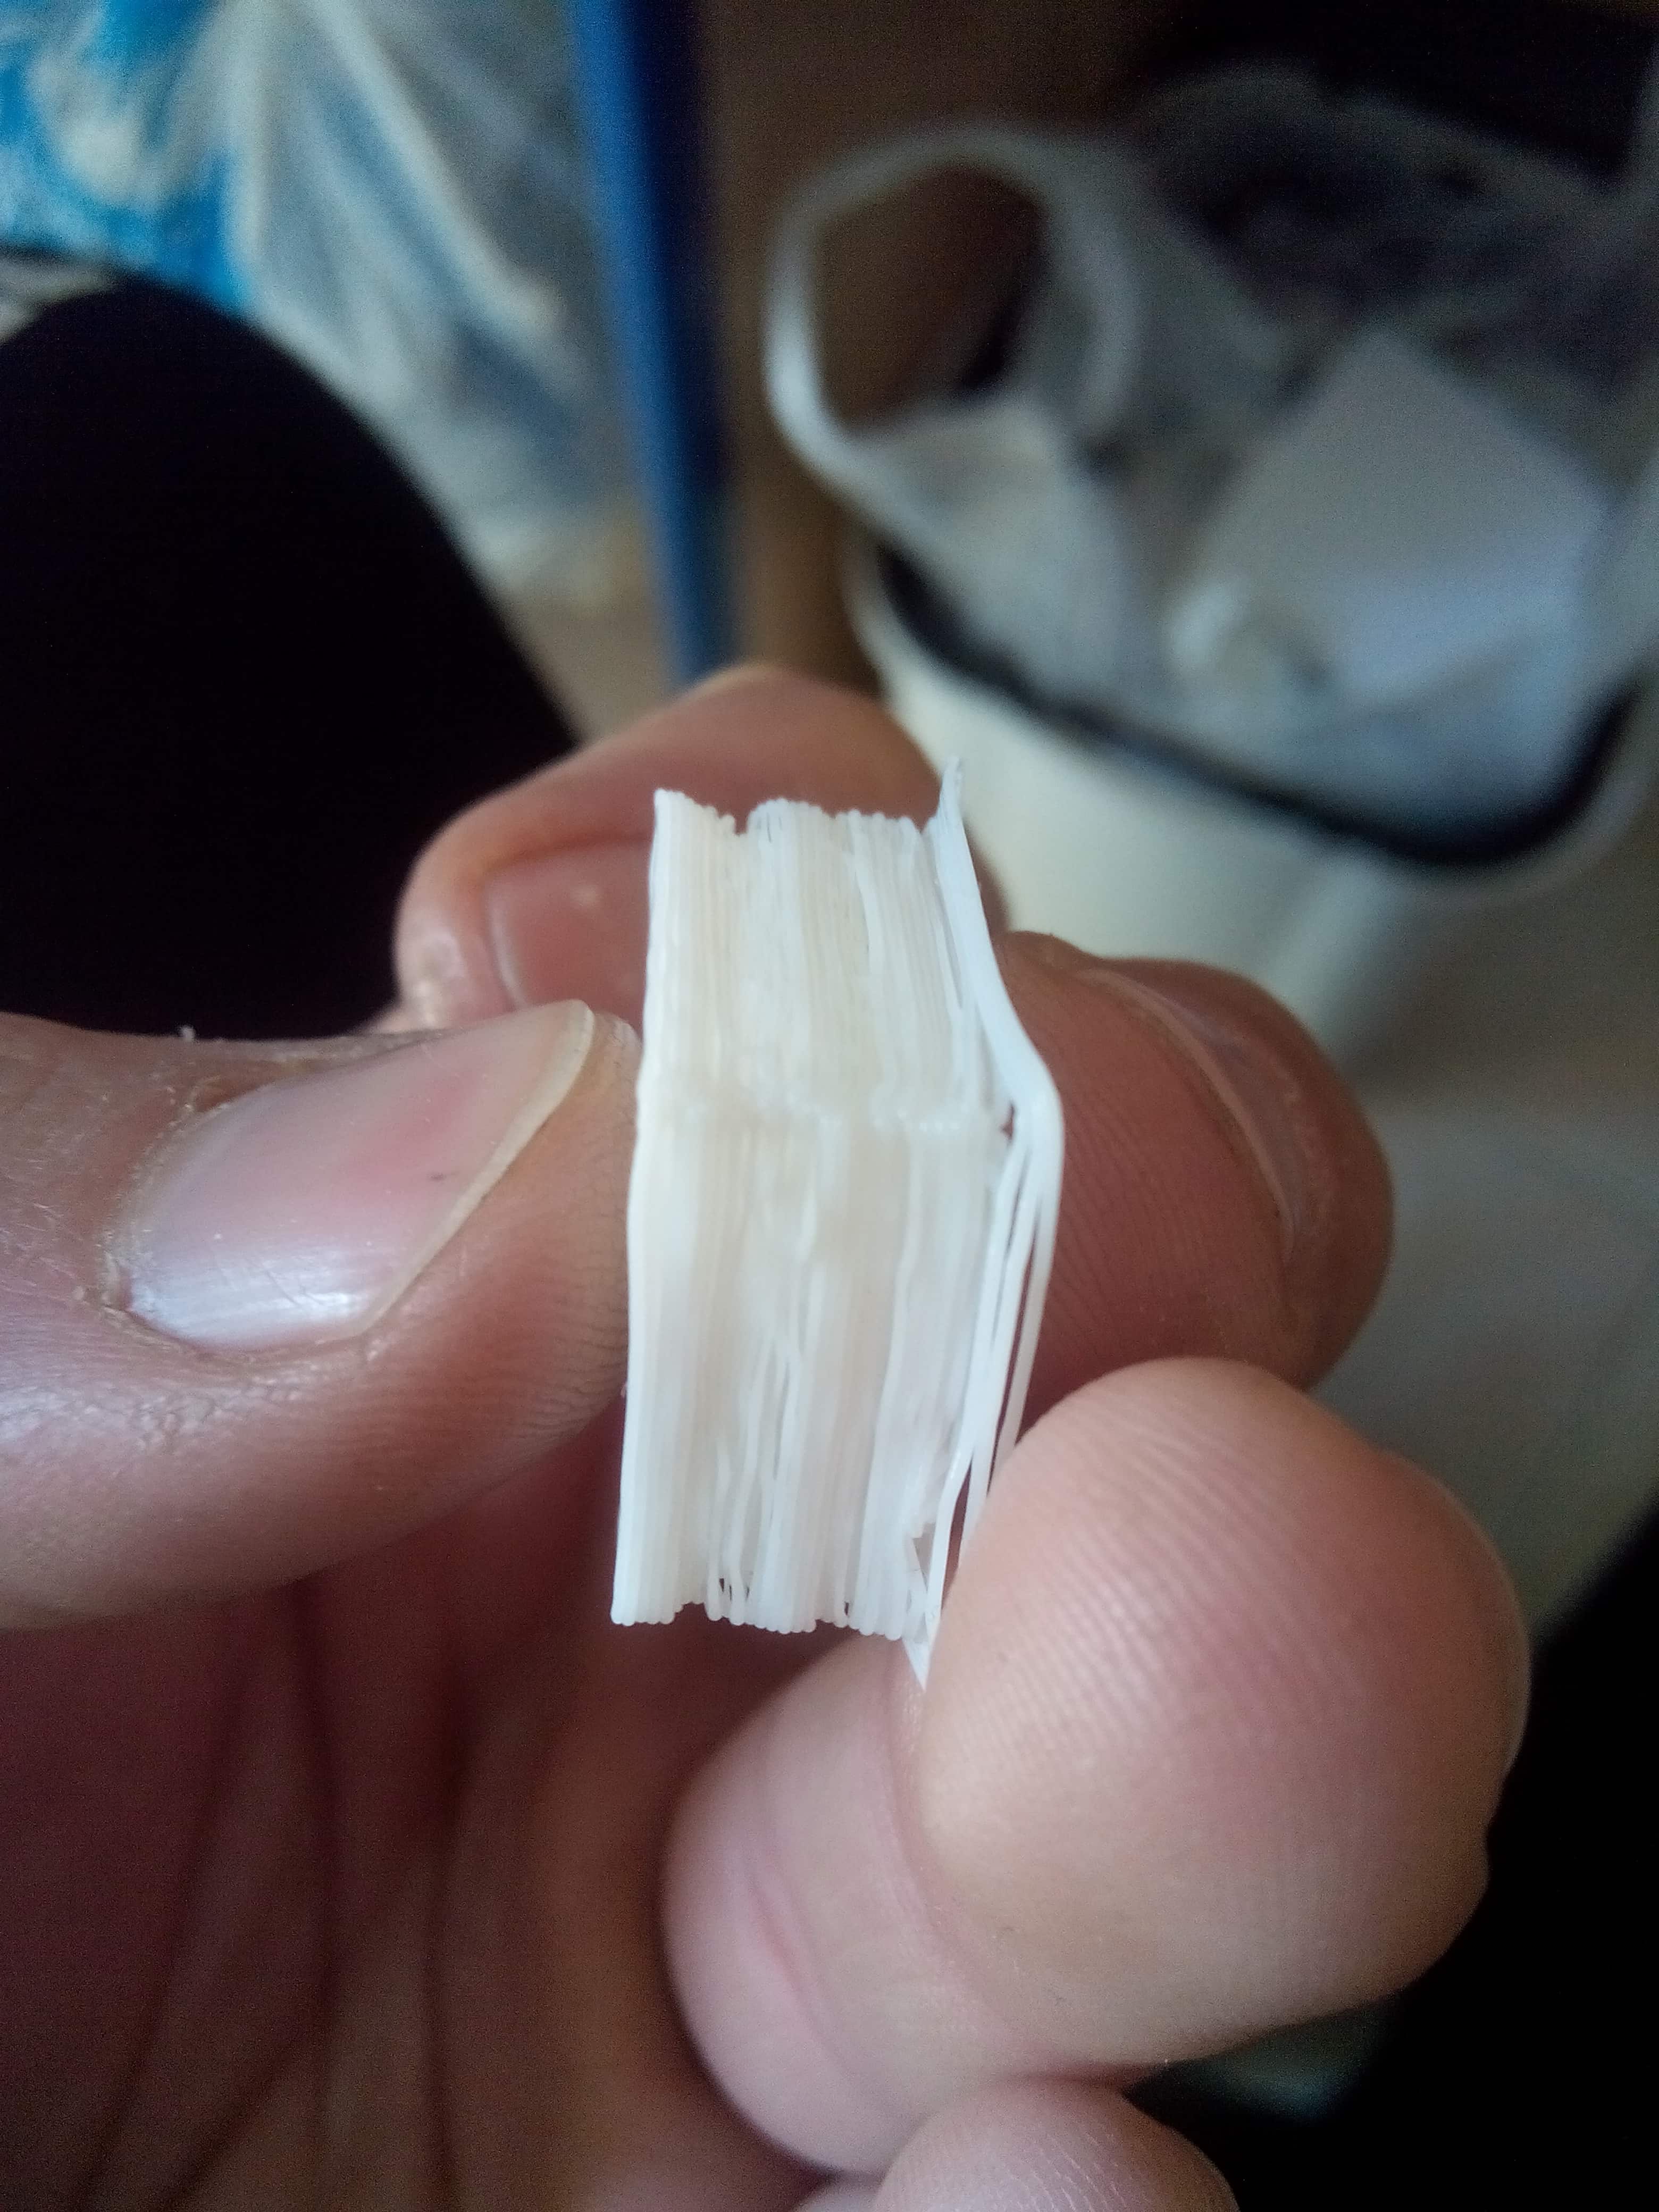
So I went on changing the layer height: 0.3mm for the first layer and 0.2mm for the others. This time the print was good! I'm happy with it (hoping it will be this way from now on ), but I have another suggestion to ask you. I don't know if you can see it clearly from the photo of the calibration cube, but some layers seems to need a bit more plastic, almost as it was under-extruding for a moment. Of course, I'm going to search something like "gaps in print" on the web, but I guessed I could also ask you: after all, talking to people is better than just reading something, I guess, and you helped me!
So thank you very much for what you have already said, and for what you'll (hopefully) have to suggest!
First, I tried to print without changing any Slic3r setting and after another (of many) levelling of the heatbed: that was strangely hard, but I got away with something. I stopped the print after just the first two layers, because (as you can see) there was not enough filament extruded.
So I went on changing the layer height: 0.3mm for the first layer and 0.2mm for the others. This time the print was good! I'm happy with it (hoping it will be this way from now on
), but I have another suggestion to ask you. I don't know if you can see it clearly from the photo of the calibration cube, but some layers seems to need a bit more plastic, almost as it was under-extruding for a moment. Of course, I'm going to search something like "gaps in print" on the web, but I guessed I could also ask you: after all, talking to people is better than just reading something, I guess, and you helped me!So thank you very much for what you have already said, and for what you'll (hopefully) have to suggest!
|
Re: Cannot accomplish usable print March 15, 2017 05:11PM |
Registered: 7 years ago Posts: 267 |
I cant see your pitcher in the post, so just working off your observations.
Have you fully "Calibrated" your printer? I ask like this as most people have different definitions of calibration.
This guide is great and will really help you out. Link:[reprap.org]
For the under extrusion jump the the E steps measure section and read on from there (But I strongly recommend you read everything before to make sure it has been done)
Also take note that the way the E steps is measured and adjusted only works of the E steps and should NOT be used for the XYZ
|
Re: Cannot accomplish usable print March 15, 2017 05:26PM |
Registered: 7 years ago Posts: 29 |
 Just edited the previous message!
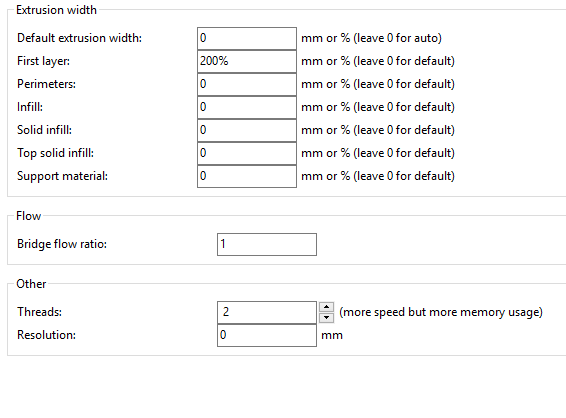
|
Re: Cannot accomplish usable print March 15, 2017 05:48PM |
Registered: 7 years ago Posts: 267 |
The prints are starting to look better,
Form what I can see you're still not getting nice flat faces on that cube. Have a look at your belt tension and that the pulley screws and tight against the motor.
You could also try dropping your acceleration and jerk settings in the firmware and see if that helps
Form what I can see you're still not getting nice flat faces on that cube. Have a look at your belt tension and that the pulley screws and tight against the motor.
You could also try dropping your acceleration and jerk settings in the firmware and see if that helps
|
Re: Cannot accomplish usable print March 17, 2017 08:56AM |
Registered: 8 years ago Posts: 413 |
What material and temperatures are you using?
If the variation in temperature at the nozzle is too great the change in "liquidity" of the filament can cause changes in extrusion rate. Try increasing the temperature 5 or 10 degrees. Make sure the pressure wheel on the extruder has full movement so as to contact the filament. We just have to assume the spring pressure is sufficient at this point. If you suspect its low then try to adjust it or put washers to shim the spring to a higher preload.
If the variation in temperature at the nozzle is too great the change in "liquidity" of the filament can cause changes in extrusion rate. Try increasing the temperature 5 or 10 degrees. Make sure the pressure wheel on the extruder has full movement so as to contact the filament. We just have to assume the spring pressure is sufficient at this point. If you suspect its low then try to adjust it or put washers to shim the spring to a higher preload.
|
Re: Cannot accomplish usable print March 20, 2017 05:31PM |
Registered: 7 years ago Posts: 29 |
So, time as passed by since I last wrote something.. I'm sorry I haven't answer before, but I haven't done much these days.. Anyway, I think now things are going good
First, to answer MCcarman: I'm using PLA filament, width 3mm, printing at 190°C (200°C for first layer) and heat bed at 65°C (70°C for first layer).
Well, it was a pain to redo everything, but it seems it helped! After levelling the bed (as I said before), I pondered what scottybfg said: "not getting nice flat faces" was what I thought a lot about... I set the layer height at 0.2mm (0.3 for first layer), then I decided to check all the extruder mounting: dang me! It was really hard to get to a point where the extruder stepper wasn't skipping (or whatever it was
  ) and the springs were not too tight and not too loose to not grind the filament.. Then I had to deal with the E steps: using the Triffid Hunter's Calibration Guide I first calculated the ideal value, then I checked and changed to a better one. Still, when I tried to print 5cm of filament, it didn't extrude that much. Is it due to the limited amount of plastic in the hot chamber?
Well, now I got to a good point I guess, even if there's something I want to ask you. According to the datasheet, my extruder stepper max input current is 1.5A, so initially I set the Pololu tension to 0.53V (more or less), 'cause I found out that the formula to calculate its output current was Imax=Vref/(8*Rcs) [I have A4988 driver]. Though I noticed that it wasn't enough, so while I was printing some filament I turned the potentiometer and I think I'm currently past that limit, but I haven't checked so I don't know how much I'm driving it with.. Is this safe for the stepper and everything else?
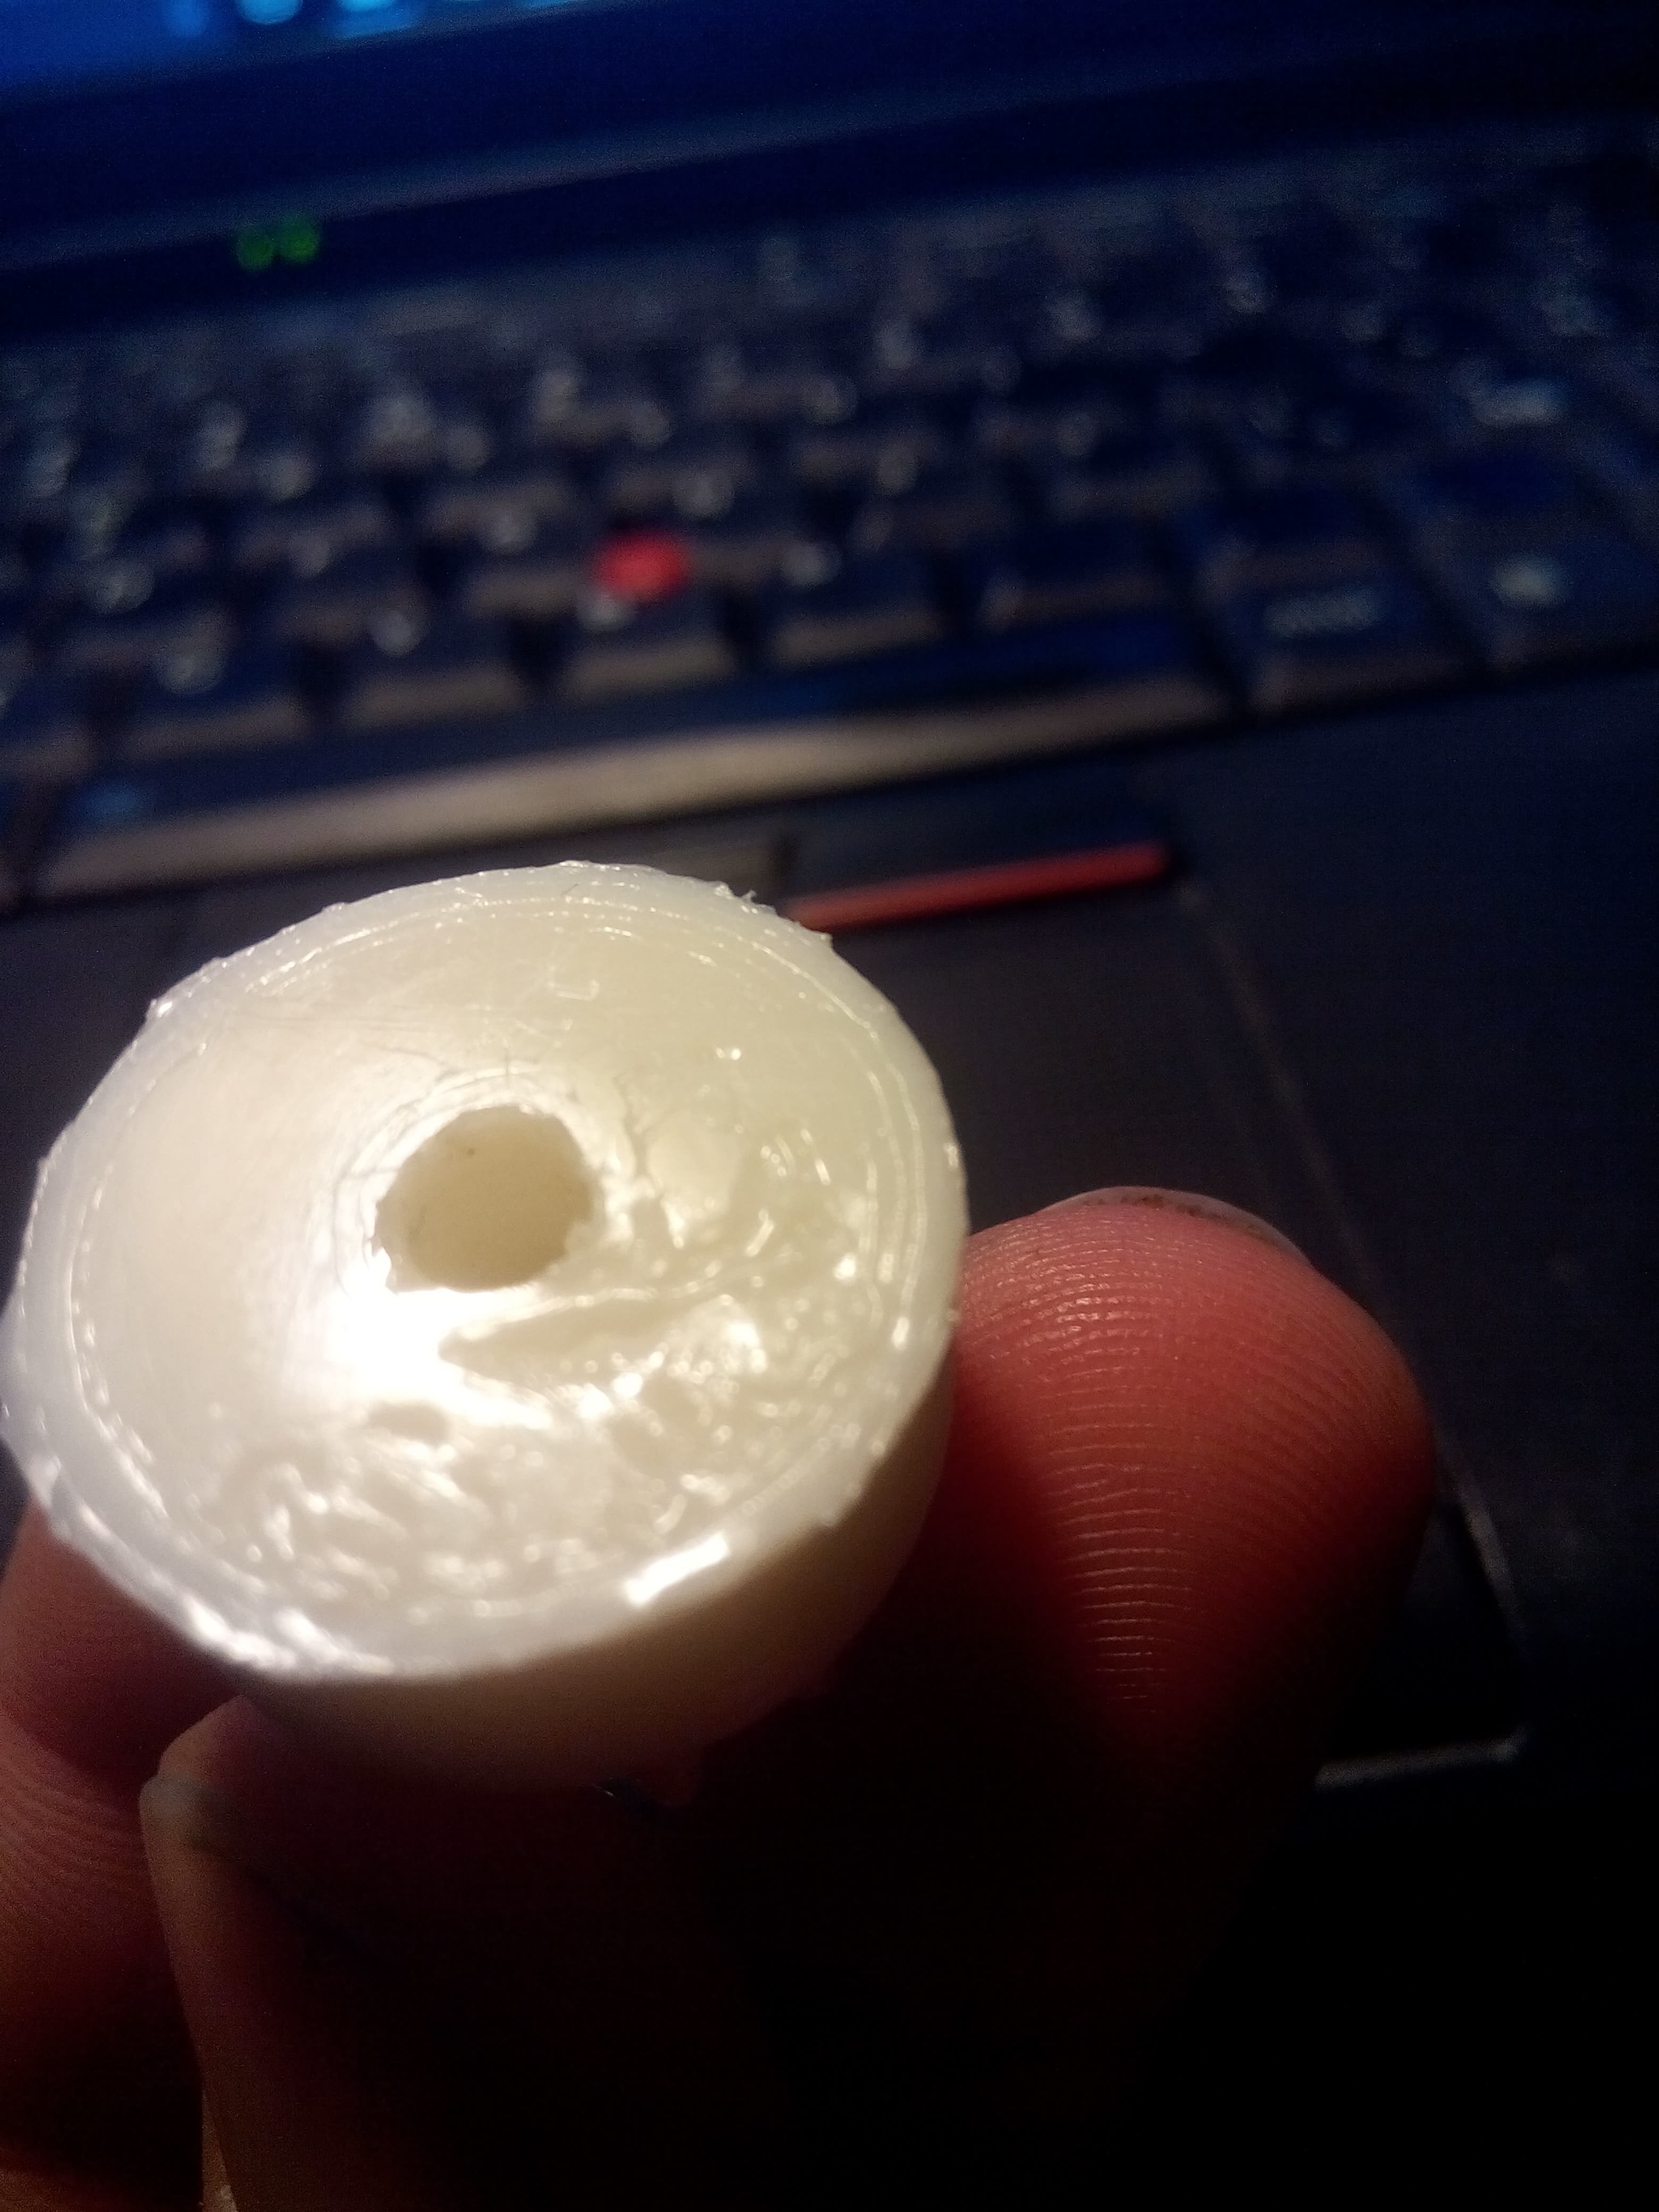
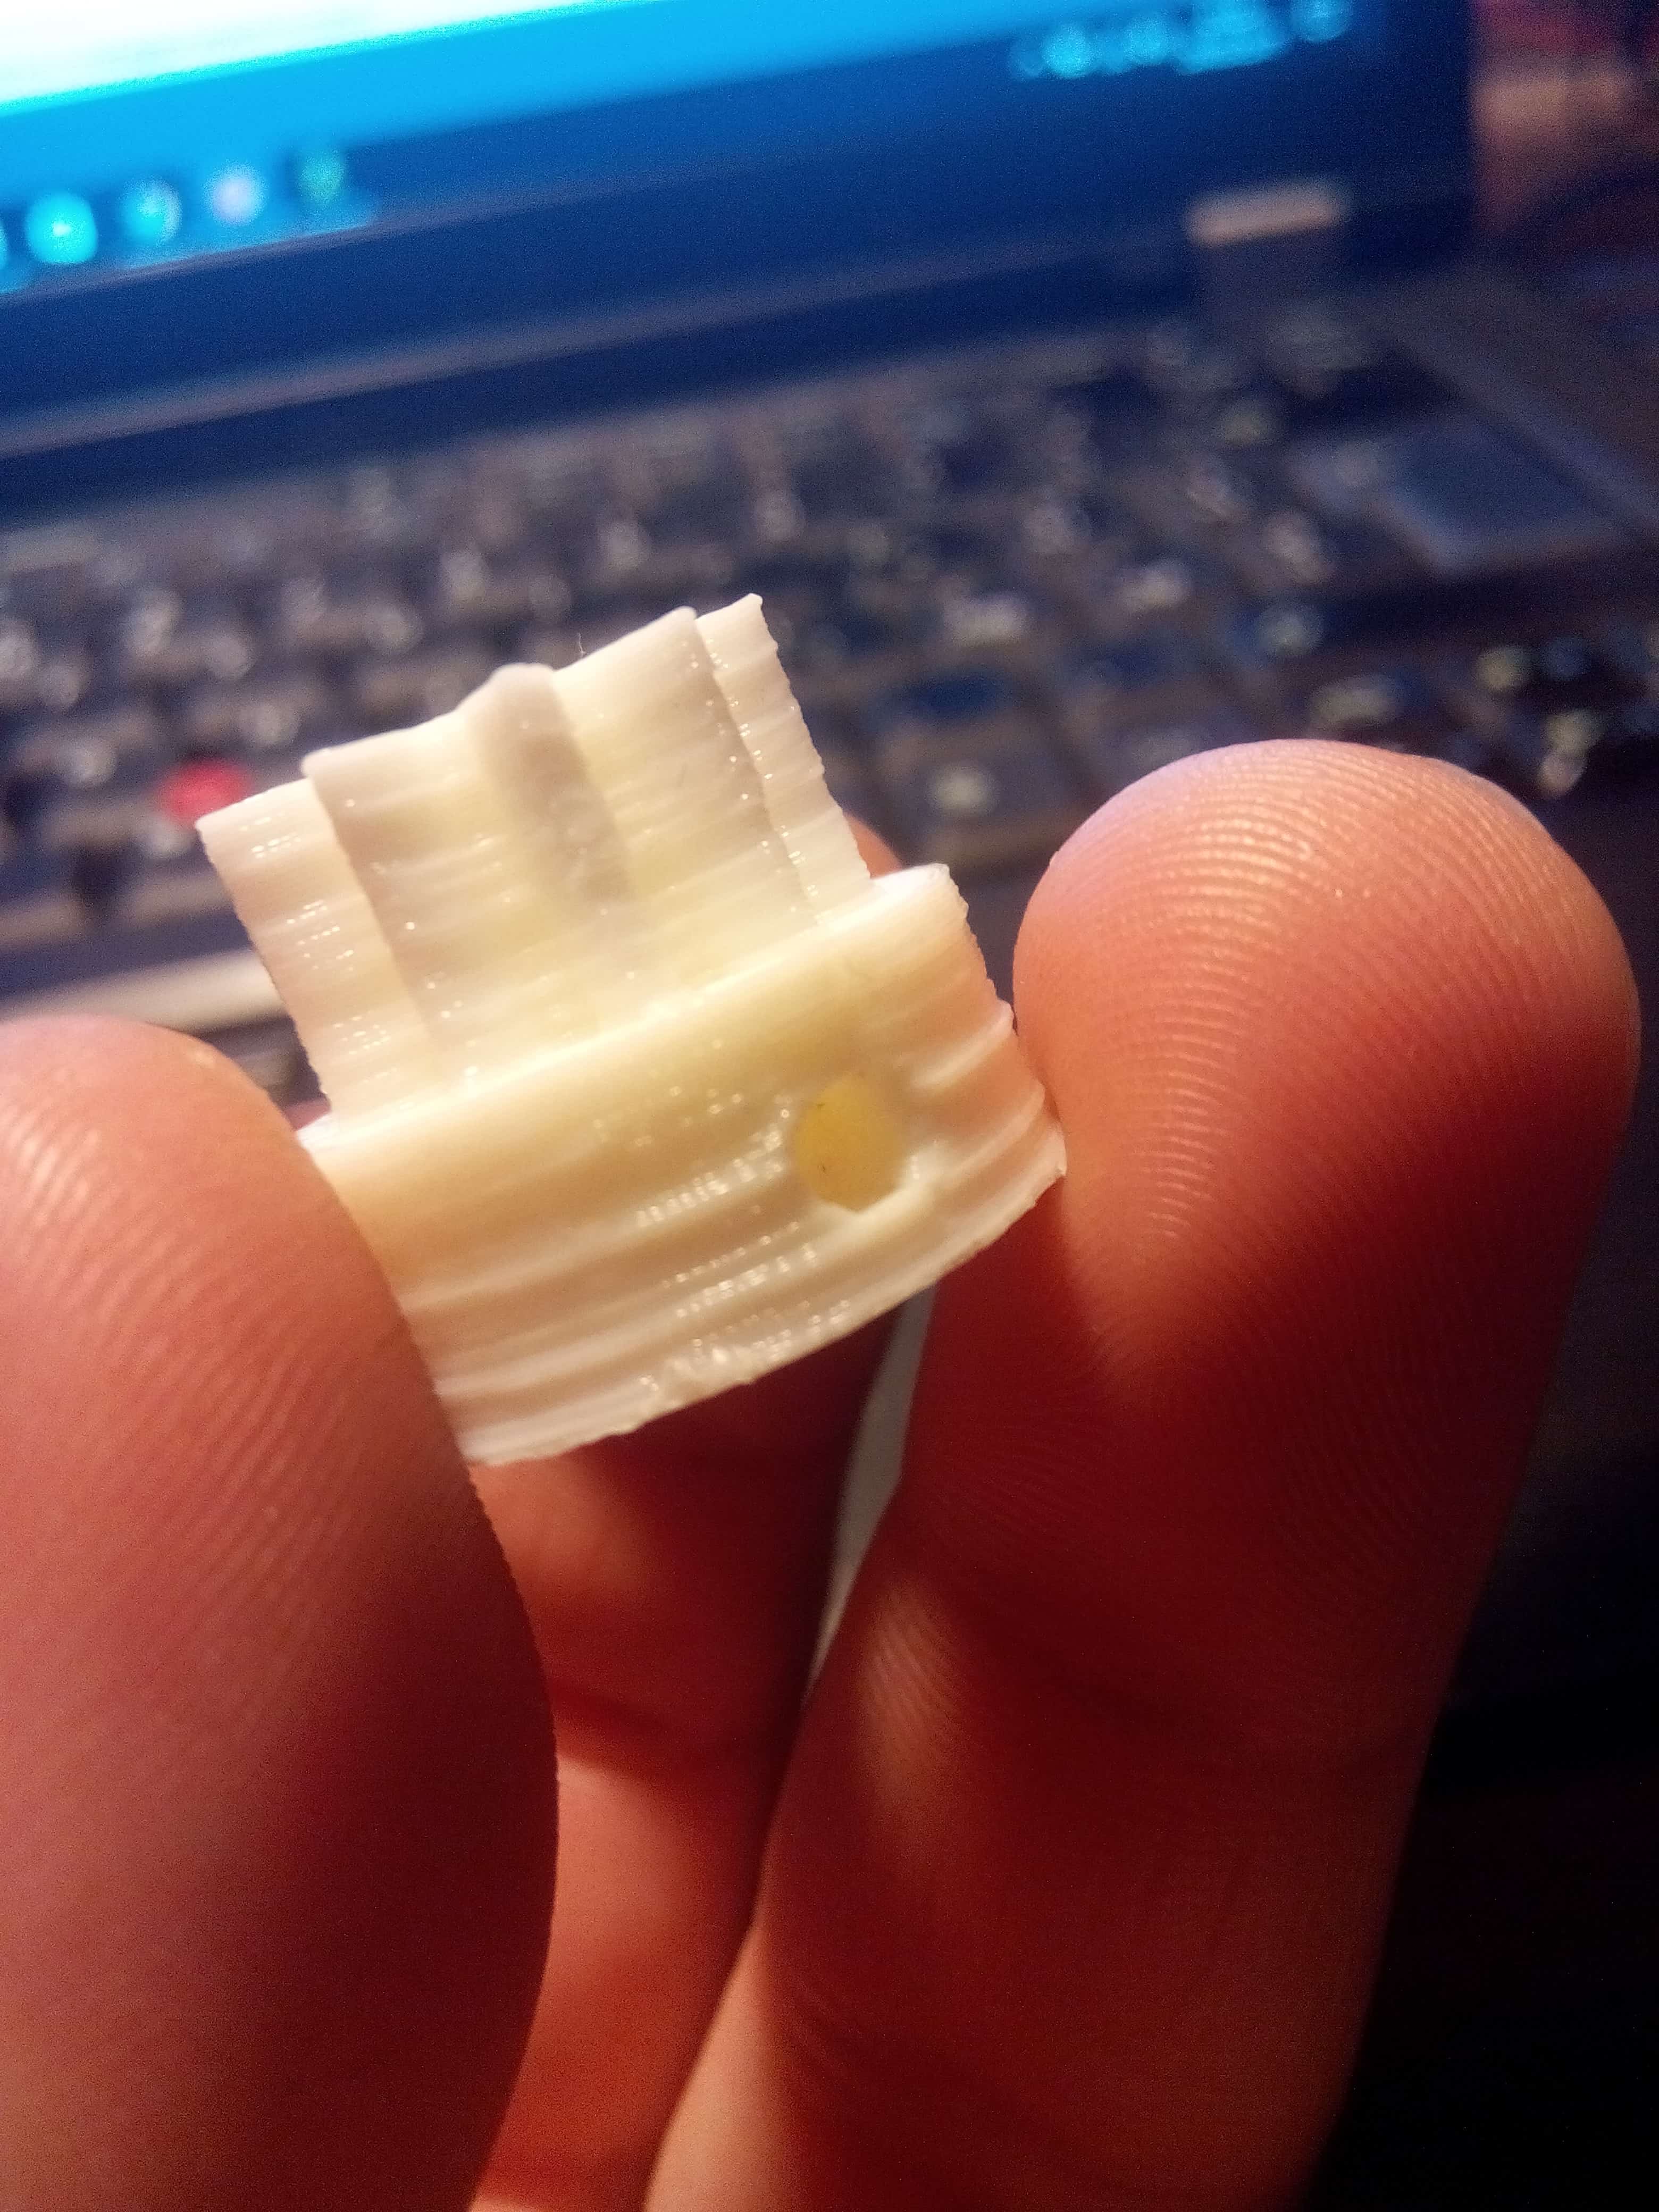
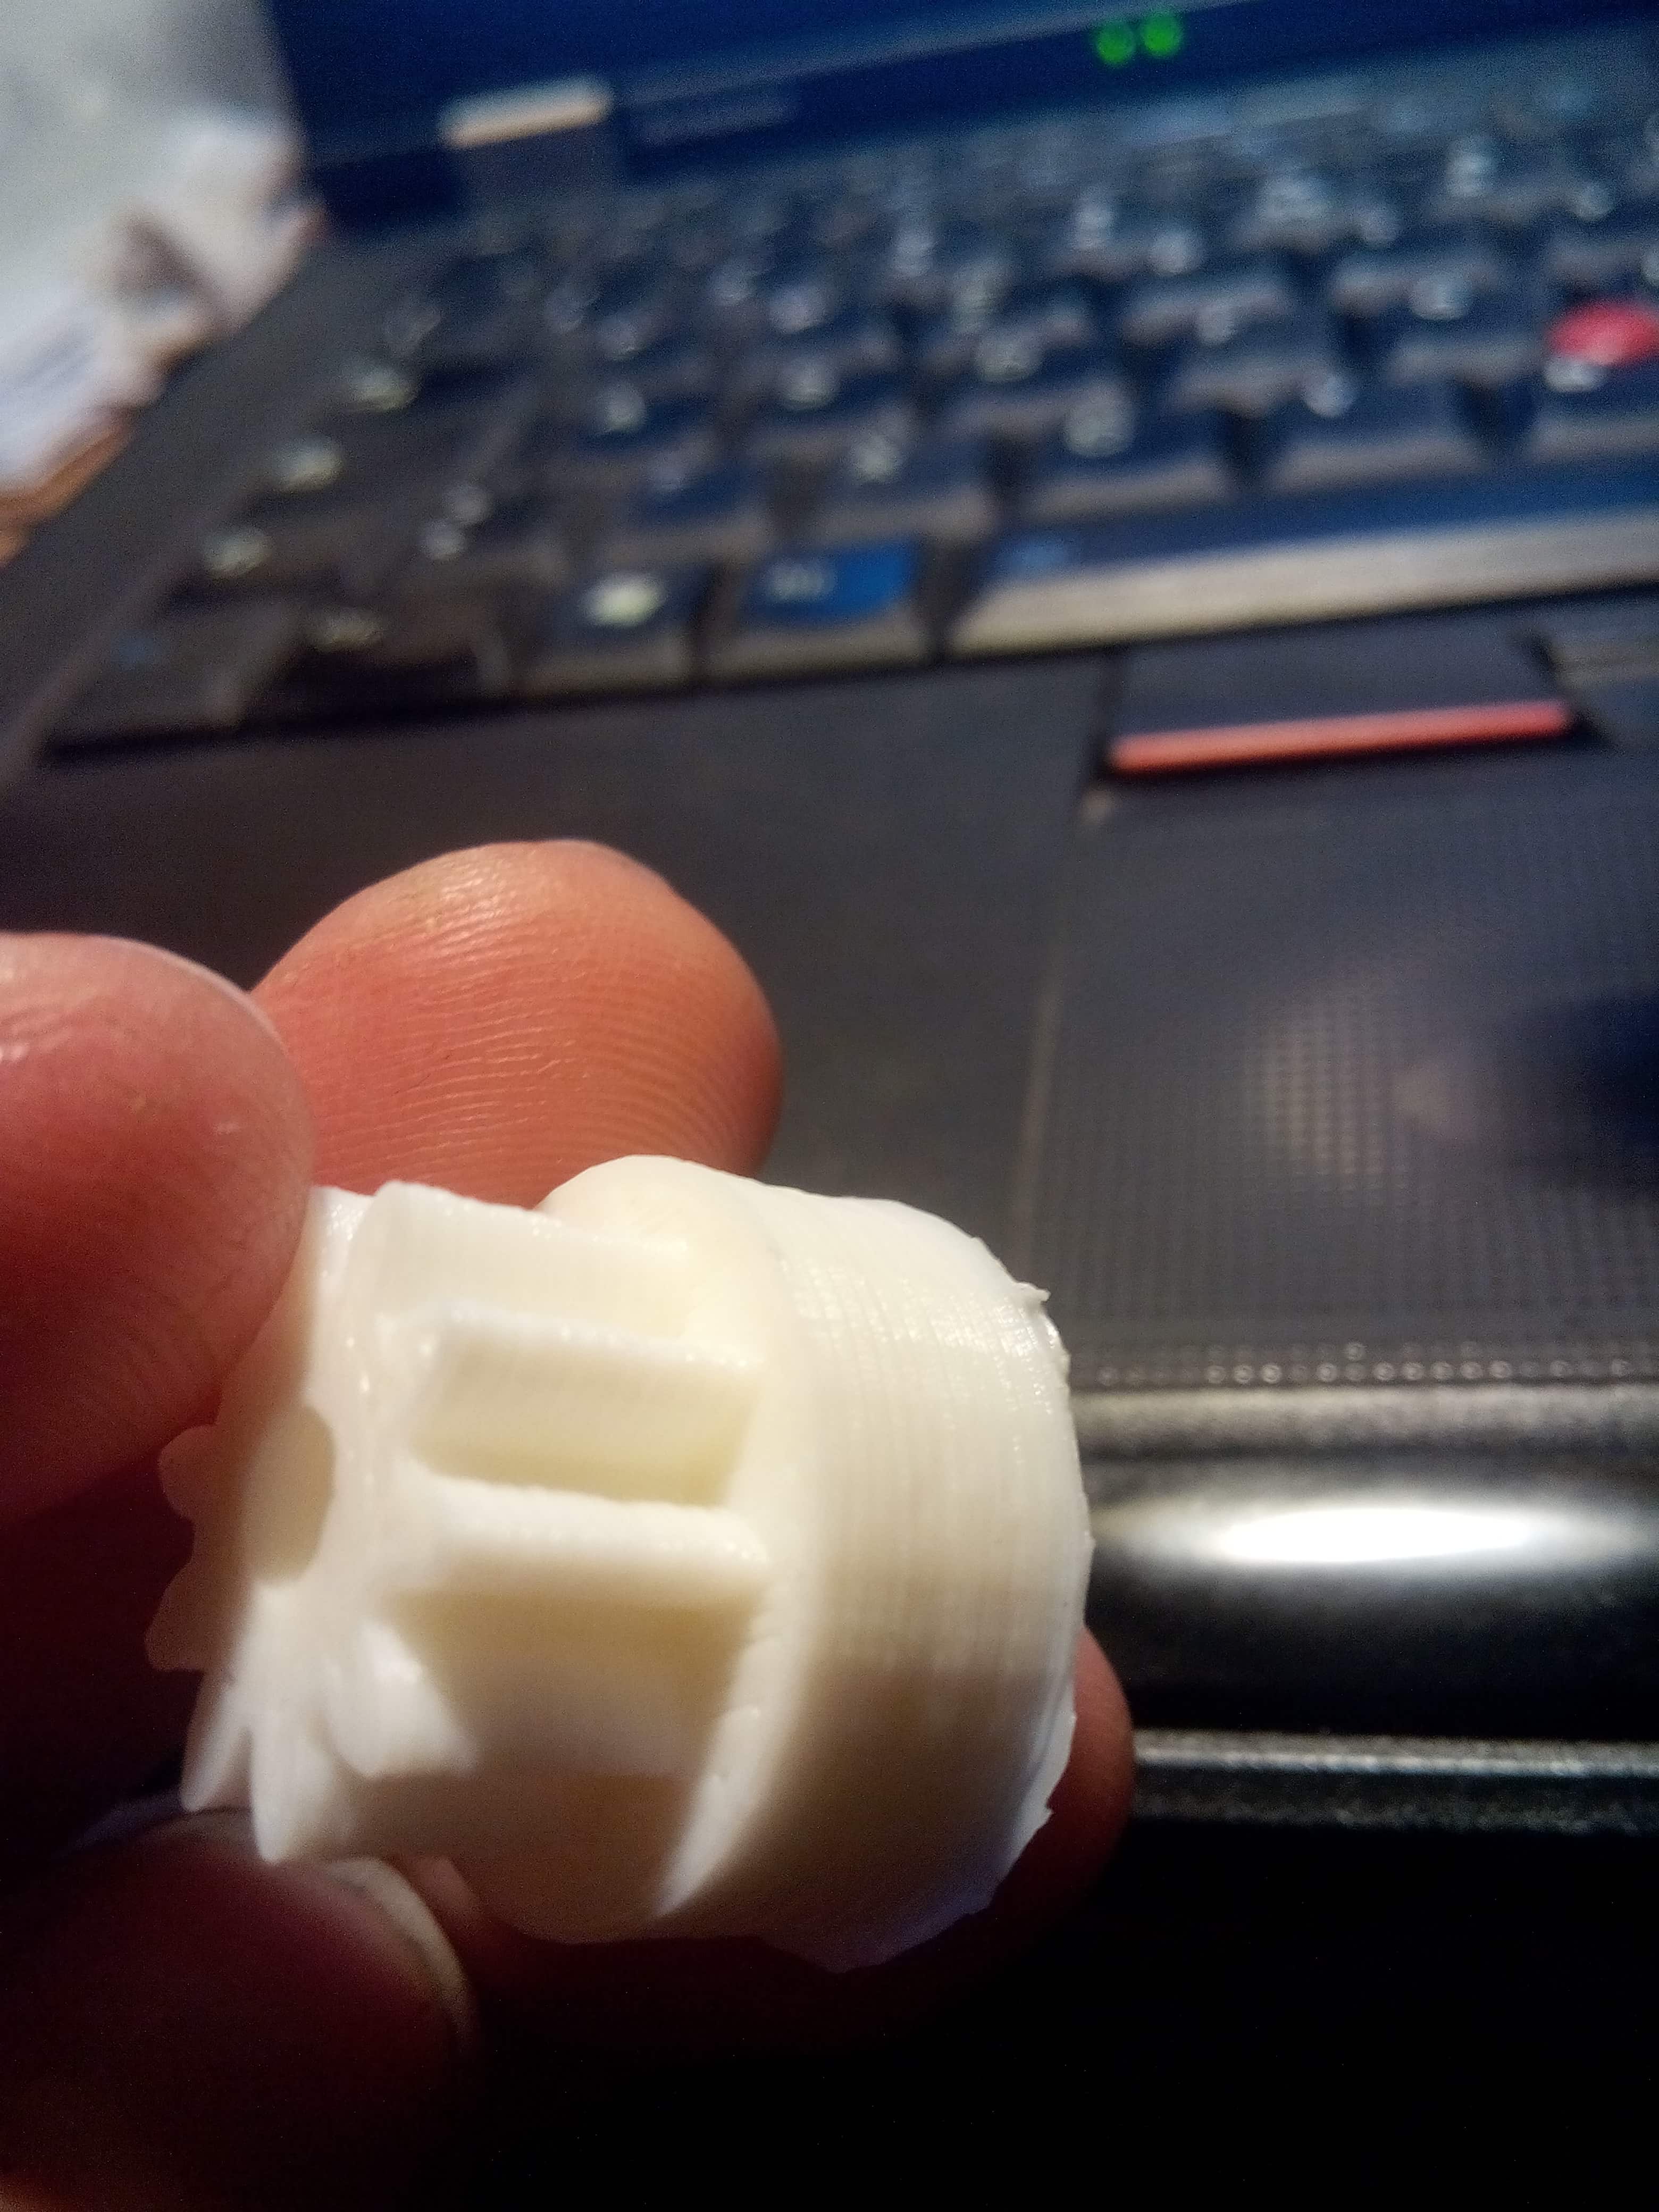
Anyway, printed parts are looking good and strong, as you can see from the pictures [this time I'm checking twice to be sure I'm adding them ]. The gear is solid and compact, so much that I couldn't detach the brim from the actual object (but that's my fault: I was lazy ).
Now there are just two things I want to improve:
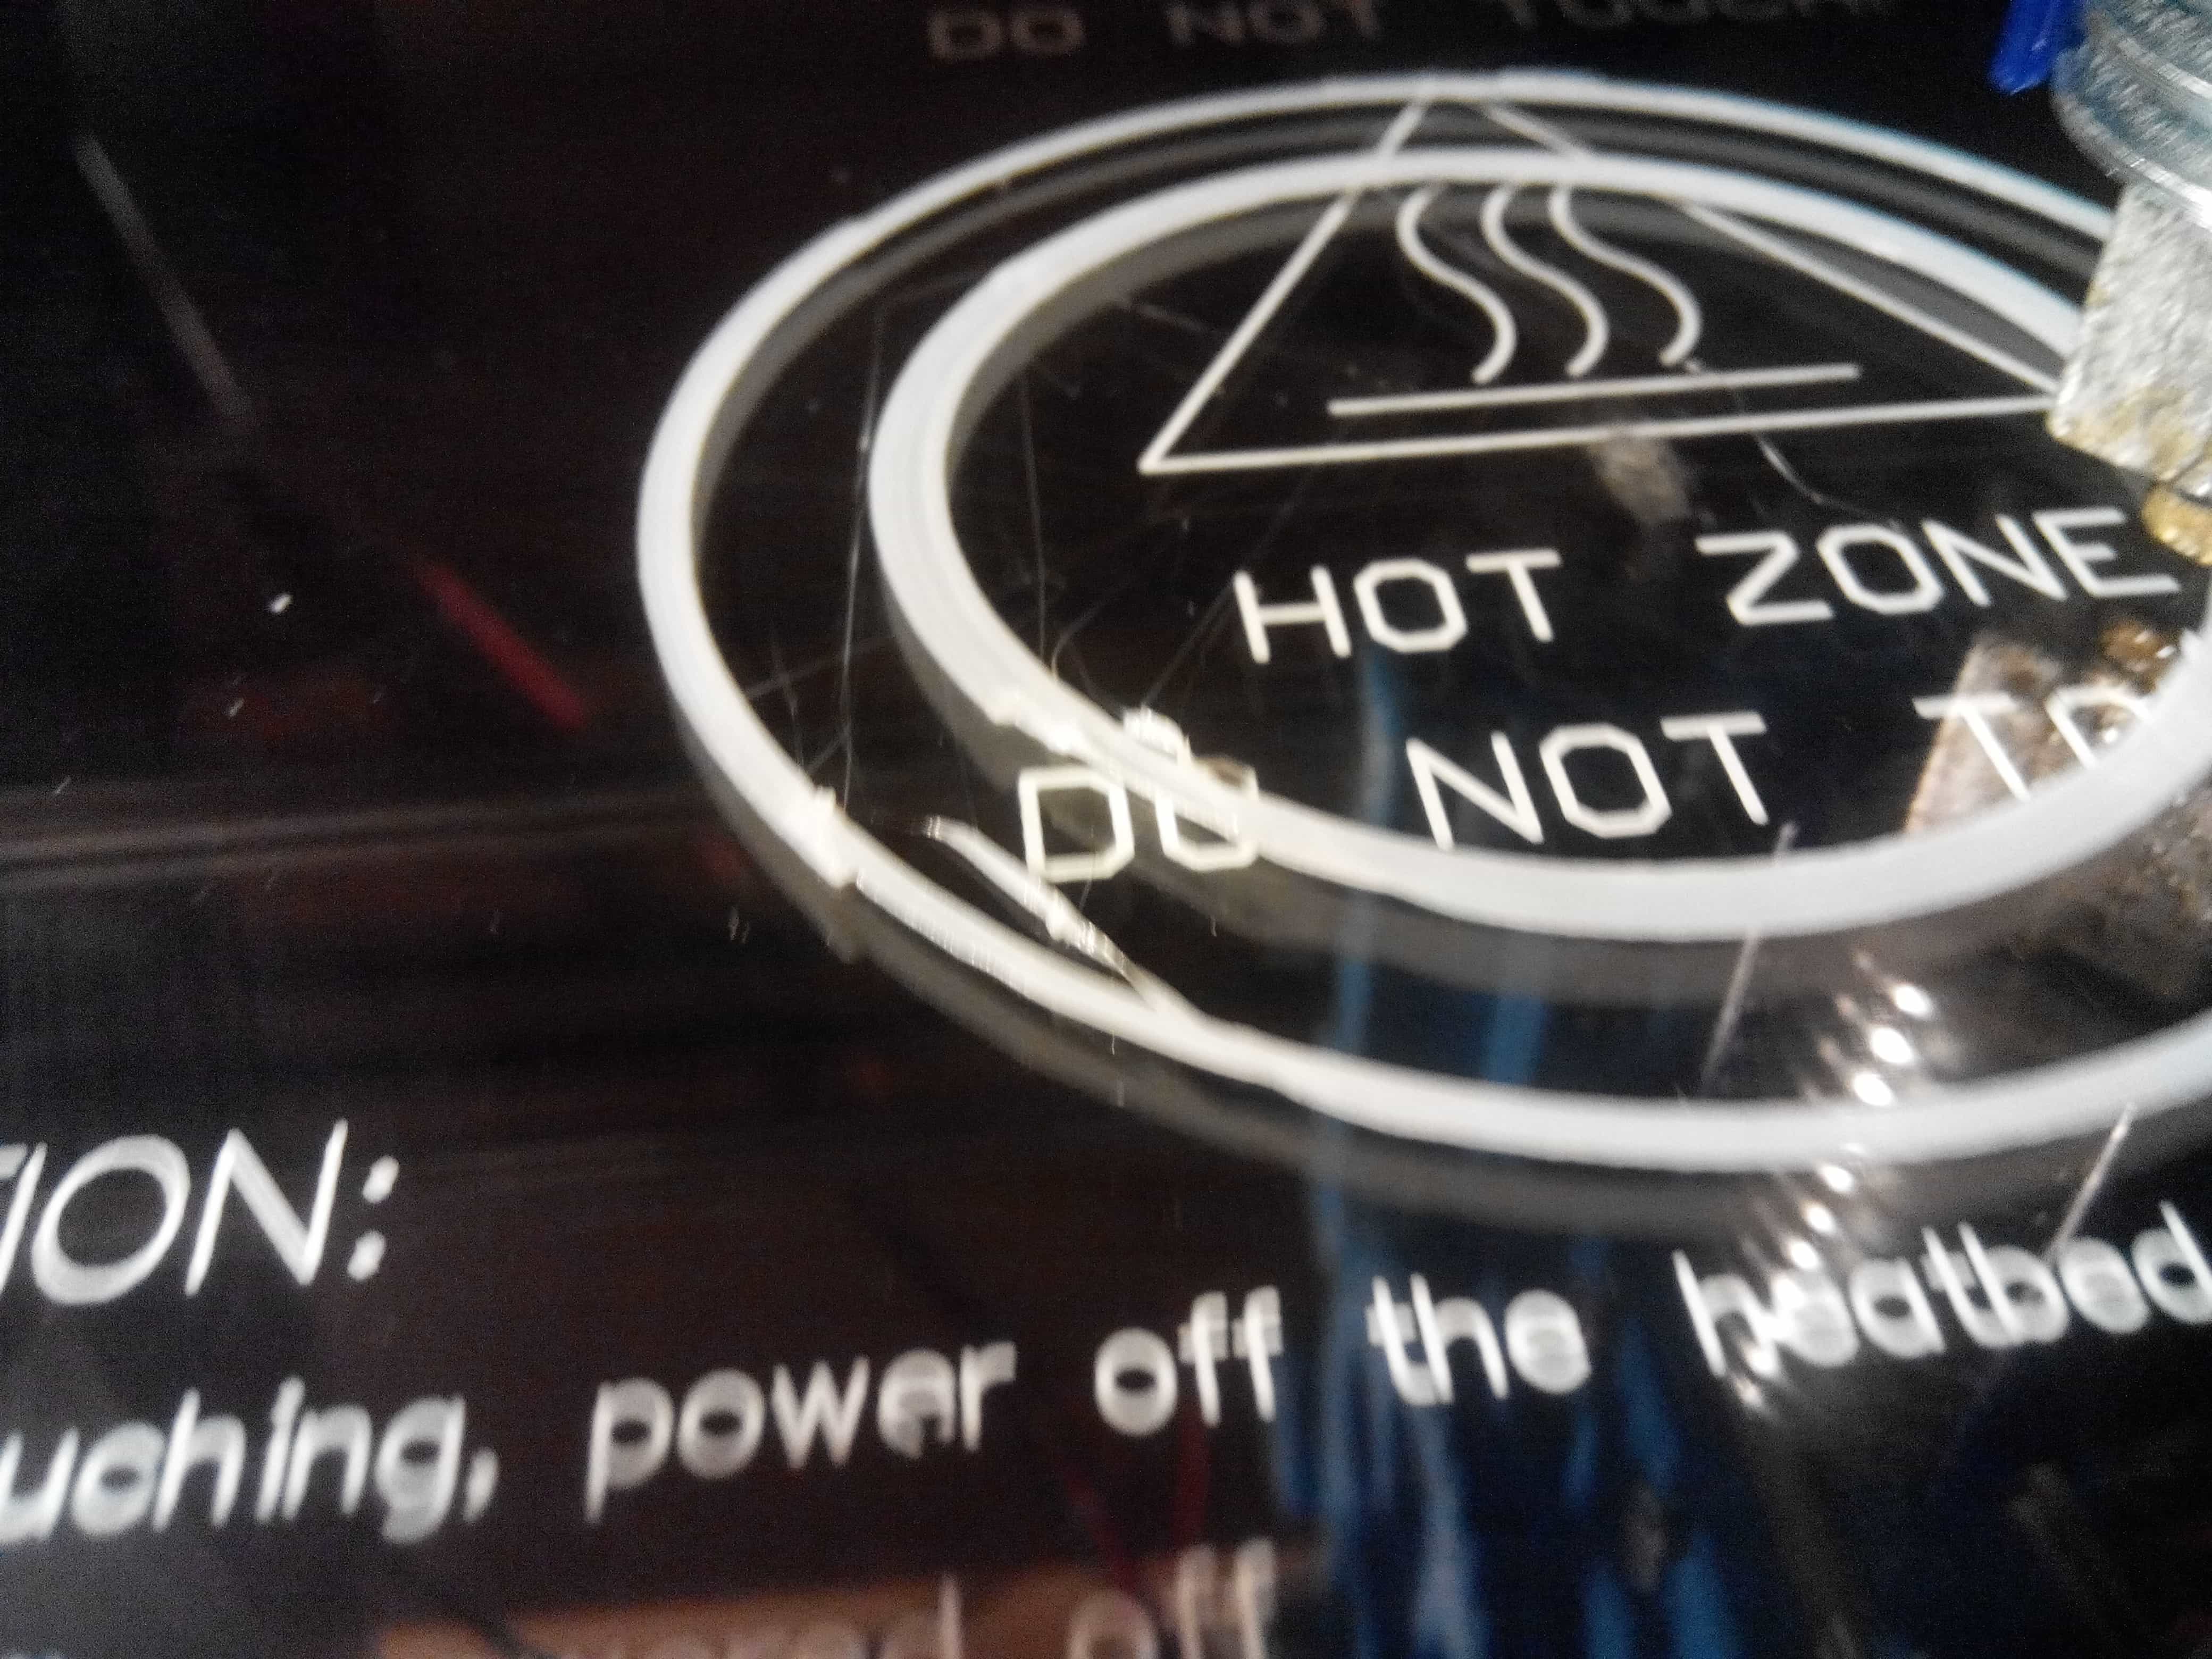
1) As you can also see from the cross-circle pictures, sometimes my first layer doesn't stick perfectly on the heat bed in some points (for example, near the "do" on my heat bed), maybe there's a bit of warping.. I guess that's what caused my not-so-good-looking bottom on the gear. Maybe it's a heat bed temperature issue?
2) It seems like my outline perimeter and the infill are not join perfectly. I don't think this will ruin the strenght of the printed parts, but I should check that. I thought I can try decresing the print speed, or maybe changing the acceleration and jerk settings in Marlin.
Regarding my acceleration and jerk settings, I'm currently using these ones:
Please, if you something I have to check about my printed parts, or you have suggestion about anything, feel free to write it! I'm really really glad I came here to ask you guys!
Thanks a lot for everything so far!
Anyway, I think now things are going good First, to answer MCcarman: I'm using PLA filament, width 3mm, printing at 190°C (200°C for first layer) and heat bed at 65°C (70°C for first layer).
Well, it was a pain to redo everything, but it seems it helped! After levelling the bed (as I said before), I pondered what scottybfg said: "not getting nice flat faces" was what I thought a lot about... I set the layer height at 0.2mm (0.3 for first layer), then I decided to check all the extruder mounting: dang me!
It was really hard to get to a point where the extruder stepper wasn't skipping (or whatever it was ) and the springs were not too tight and not too loose to not grind the filament.. Then I had to deal with the E steps: using the Triffid Hunter's Calibration Guide I first calculated the ideal value, then I checked and changed to a better one. Still, when I tried to print 5cm of filament, it didn't extrude that much. Is it due to the limited amount of plastic in the hot chamber?Well, now I got to a good point I guess, even if there's something I want to ask you. According to the datasheet, my extruder stepper max input current is 1.5A, so initially I set the Pololu tension to 0.53V (more or less), 'cause I found out that the formula to calculate its output current was Imax=Vref/(8*Rcs) [I have A4988 driver]. Though I noticed that it wasn't enough, so while I was printing some filament I turned the potentiometer and I think I'm currently past that limit, but I haven't checked so I don't know how much I'm driving it with.. Is this safe for the stepper and everything else?
Anyway, printed parts are looking good and strong, as you can see from the pictures [this time I'm checking twice to be sure I'm adding them
]. The gear is solid and compact, so much that I couldn't detach the brim from the actual object (but that's my fault: I was lazy ).Now there are just two things I want to improve:
1) As you can also see from the cross-circle pictures, sometimes my first layer doesn't stick perfectly on the heat bed in some points (for example, near the "do" on my heat bed), maybe there's a bit of warping.. I guess that's what caused my not-so-good-looking bottom on the gear. Maybe it's a heat bed temperature issue?
2) It seems like my outline perimeter and the infill are not join perfectly. I don't think this will ruin the strenght of the printed parts, but I should check that. I thought I can try decresing the print speed, or maybe changing the acceleration and jerk settings in Marlin.
Regarding my acceleration and jerk settings, I'm currently using these ones:
#define DEFAULT_MAX_FEEDRATE          {250, 250, 1.6, 25}    // Z was 3.3; (mm/sec)
#define DEFAULT_MAX_ACCELERATION      {3000,3000,100,10000}

#define DEFAULT_ACCELERATION          1000    // X, Y, Z and E max acceleration in mm/s^2 for printing moves
#define DEFAULT_RETRACT_ACCELERATION  1000   // X, Y, Z and E max acceleration in mm/s^2 for retracts

#define DEFAULT_XYJERK                20.0    // (mm/sec)
#define DEFAULT_ZJERK                 1.0     //it was 0.4; (mm/sec)
#define DEFAULT_EJERK                 5.0    // (mm/sec)
Please, if you something I have to check about my printed parts, or you have suggestion about anything, feel free to write it! I'm really really glad I came here to ask you guys!
Thanks a lot for everything so far!
|
Re: Cannot accomplish usable print March 20, 2017 07:14PM |
Registered: 7 years ago Posts: 181 |
The bottom layer problem can be improved by printing with a brim to assist with it sticking to the bed. With smaller objects set the minimum layer time to a suitable value or print off several objects at the same time. It is important that each layer hardens enough before printing the next layer on top. You bed temperatures are a bit high for PLA, and approaching the "glass temperature", I would try dropping them to 60 and 55. As far as the gaps in the gear print are concerned, run the STL file through a slicer that allows you to view a layer at a time and see how it is being modelled by the tool path. This looks to be happening as a result of the nozzle diameter coupled with the wall thicknesses. For best results wall thicknesses should be an exact multiple of nozzle diameter.
As far as the stepper current is concerned I can't really advise you, except to say that the cross sectional area of 3mm diameter filament is close to three times that of 1.75mm diameter. For the same pressure of molten filament at the nozzle it requires three times the driving force from the extruder stepper for 3mm, compared with 1.75mm. For a given length of printed filament, the amount of 3mm filament fed in is only 1/3 of that for 1.75mm. This gives you less fineness of control over the filament feed.
As far as the stepper current is concerned I can't really advise you, except to say that the cross sectional area of 3mm diameter filament is close to three times that of 1.75mm diameter. For the same pressure of molten filament at the nozzle it requires three times the driving force from the extruder stepper for 3mm, compared with 1.75mm. For a given length of printed filament, the amount of 3mm filament fed in is only 1/3 of that for 1.75mm. This gives you less fineness of control over the filament feed.
|
Re: Cannot accomplish usable print March 20, 2017 11:14PM |
Registered: 7 years ago Posts: 267 |
Looking good mate,
The E step calibration is for filament feeding into the extruder and not out, you dont need to worry about how much comes out of the nozzle (thats for the firmware to sort out)
As for the current of the steppers, I would advise against changing the current with the power on. You will find lots of posts here about people shorting out their drivers and even control boards. The calculated is just an ideal value, too much current can cause the driver or stepper motor to over heat, so its best to set the current to a point where the motor just runs fine. A cooling fan over the stepper drivers is a good idea too. As Supermec pointed out, you need a lot more force to drive a 3mm extruder. I would almost always recommend a geared extruder like a wades to help feed the filament and should let you reduce the stepper current.
The first lay is the key to 3D printing, If you stuff it up just kill the print (trust me its better to stop a bad print early). Try a lower first layer height to make sure you get good adhesion something like 0.2 or even lower should work nicely. There are also some mechanical changes you can make, PCB heatbeds are know to warp when they heat up, switching to an aluminium heatbed with silicone heat mat will fix this but is expensive depending where in the world you are.
Another option to getting a nice flat bed is to switch to a 3 point levelling system. Most printers level the bed by adjusting the four screws in each corner. I dont know why as this bows the bed in the middle and can make it really hard to level the bed so "auto bed levelling" came about (and is now a selling point on most printers). The way a bed is levelled in industry is with only three points, because 3 points defines a plane. Have a look around, there are some users who are converting to a 3 point levelling system, look at Digital dentist just to name one.
As for the prints, they are looking so much better, Play around with the extrusion width in the advance tab in slic3r to help with the gaps you are seeing (dont go lower than your nozzle diameter, a quick google for "extrudion width for 0.X nozzle" will give all the info you need). There is also some Z shifting visible in the prints, make sure you lead screws are straight and the frame is square.
|
Re: Cannot accomplish usable print March 21, 2017 09:44AM |
Registered: 7 years ago Posts: 29 |
I'm gonna try to drop the heatbed temp to 60-55 next time I'll use the printer: I hope it will help!
But I don't quite understand how to set a proper wall thickness.. In Slic3r I haven't seen settings for that, is it calculated from other settings?
Regarding the STL slicer to view all the layers, I downloaded Slic3r 1.2.9, 'cause it told me there was a newer version, and it does that now.

About changing the current, I understood that if you do that with a non-conductive screwdriver (well, I didn't have that so I used some kind of long toothpick ) there was no problem  If it's like you said, I'm really really glad I haven't shorted anything!
Anyway, I'm using exactly a Wade's extruder mounting. I tried to set a Vref of 0.6V max on the Pololu that is driving the extruder stepper, but it wasn't enough so I turn it up a bit. Can I keep it that way (maybe with a fan, like you're saying) or should I try to work out a point where it's enough? In that case, I guess I have to check springs tightening, right?
Unfortunately, I can't change my heatbed, so I'm just gonna try to lower the first layer height (a part from the heatbed temp). But I'm keeping the 3 point levelling bed as a plan for the future, together with the aluminium heatbed.
I'll play with the extrusion width a bit, I hope I'll find a good value; right now I have all extrusion width settings calculated automatically by Slic3r, except for the first layer that is set to 200%.
When I'll find out a good value that prevents those gaps, I'll post it right here for future references
Thanks a lot for all the suggestions!
But I don't quite understand how to set a proper wall thickness.. In Slic3r I haven't seen settings for that, is it calculated from other settings?
Regarding the STL slicer to view all the layers, I downloaded Slic3r 1.2.9, 'cause it told me there was a newer version, and it does that now.
That's a relief!Quote
scottybfg
The E step calibration is for filament feeding into the extruder and not out, you dont need to worry about how much comes out of the nozzle (thats for the firmware to sort out)
About changing the current, I understood that if you do that with a non-conductive screwdriver (well, I didn't have that so I used some kind of long toothpick
) there was no problem If it's like you said, I'm really really glad I haven't shorted anything!Anyway, I'm using exactly a Wade's extruder mounting. I tried to set a Vref of 0.6V max on the Pololu that is driving the extruder stepper, but it wasn't enough so I turn it up a bit. Can I keep it that way (maybe with a fan, like you're saying) or should I try to work out a point where it's enough? In that case, I guess I have to check springs tightening, right?
Unfortunately, I can't change my heatbed, so I'm just gonna try to lower the first layer height (a part from the heatbed temp). But I'm keeping the 3 point levelling bed as a plan for the future, together with the aluminium heatbed.
I'll play with the extrusion width a bit, I hope I'll find a good value; right now I have all extrusion width settings calculated automatically by Slic3r, except for the first layer that is set to 200%.
When I'll find out a good value that prevents those gaps, I'll post it right here for future references
Thanks a lot for all the suggestions!
|
Re: Cannot accomplish usable print March 21, 2017 05:09PM |
Registered: 7 years ago Posts: 267 |
Leave your extruder vref as it is. What i was trying to say is it should be set to the lowest current that still allows it to operate, sounds like you have done that so all good. You are also right about the non-conductive screwdriver (or toothpick for you), I always assume the worst as most people will just use a metal screwdriver to turn the dashpot, but sounds like you are all over it.
The wall thickness that Supermec was talking about is the extrusion width in slic3r.
The wall thickness that Supermec was talking about is the extrusion width in slic3r.
|
Re: Cannot accomplish usable print March 21, 2017 05:14PM |
Registered: 7 years ago Posts: 29 |
Well, that's a good info! Yeah, I'm not so new to this kind of stuff, and also I always use the web before doing something I'm not sure about You did right to assume the worst, though
Thanks a lot for that! So I just need to set it to an exact multiple of the nozzle diameter if I want a non-default value, got it. Will try that!
You did right to assume the worst, thoughQuote
scottybfg
The wall thickness that Supermec was talking about is the extrusion width in slic3r.
Thanks a lot for that! So I just need to set it to an exact multiple of the nozzle diameter if I want a non-default value, got it. Will try that!
|
Re: Cannot accomplish usable print March 27, 2017 07:22AM |
Registered: 7 years ago Posts: 29 |
Some days later, I just want to update you about the whole thing.
So, I finally achieve to print good, even if I haven't done much so far.. I've re-calibrate the bed for the (at least) third time, this time with the help of the "manual home position" setting in Marlin: this way I didn't have to adjust the Z endstop every time. I found a position where the melted filament exits the extruder in a good way, and set that. I'm not sure how much height is that, but I printed minor things good this way so I think I'll stay with that.
Also, yesterday I started the first big print (about 9 hours, even if I could try to increase print speed in the future) but after one hour the piece detached from the heatbed because the latter turned off. I think my mass wire (I'm not sure it's called this way in english, so let's say in general it's the black one) burnt, and that's the second time. Last time I just cut a piece on the burnt edge and soldered it on the heatbed. I can't recollect if I changed it before or after the wire burnt, but I have PID enabled for the heatbed, too, besides for the extruder. So I'll try using the bang-bang mode for the heatbed. Hope it will solve
EDIT: Now that I think about it: my soldered metal on the heatbed on the mass wire melted while the printer was doing its thing. Any clue?
Edited 1 time(s). Last edit at 03/27/2017 07:25AM by slim71.
Sorry, only registered users may post in this forum.