Prusa i3 Rework improvements suggestions 
Posted by slim71
|
Prusa i3 Rework improvements suggestions December 27, 2017 04:16AM |
Registered: 7 years ago Posts: 29 |
Hi all! 
I'm a proud owner of a Prusa i3 Rework I built a couple of years ago following a simple guide found on the RepRap wiki, and I'm currently thinking about making some improvements.
So far the printing quality is good, I've managed to print even a GOT figure which is the longest (in time) and tallest print I've done (it almost didn't make it! )
)
I recognize there are some parts I could change to improve the printer and make it better, but I'd like some other suggestions from you guys
My ideas cover:
Do you think there's something else that could be improved? Please let me know!
EDIT:
I know print times can vary and it depens from case to case, but I would also like to achieve shorter times.. Right now I'm printing the back cover of this and Pronterface estimates 4 hours more or less
Edited 1 time(s). Last edit at 12/27/2017 05:36AM by slim71.
I'm a proud owner of a Prusa i3 Rework I built a couple of years ago following a simple guide found on the RepRap wiki, and I'm currently thinking about making some improvements.
So far the printing quality is good, I've managed to print even a GOT figure which is the longest (in time) and tallest print I've done (it almost didn't make it!
)I recognize there are some parts I could change to improve the printer and make it better, but I'd like some other suggestions from you guys
My ideas cover:
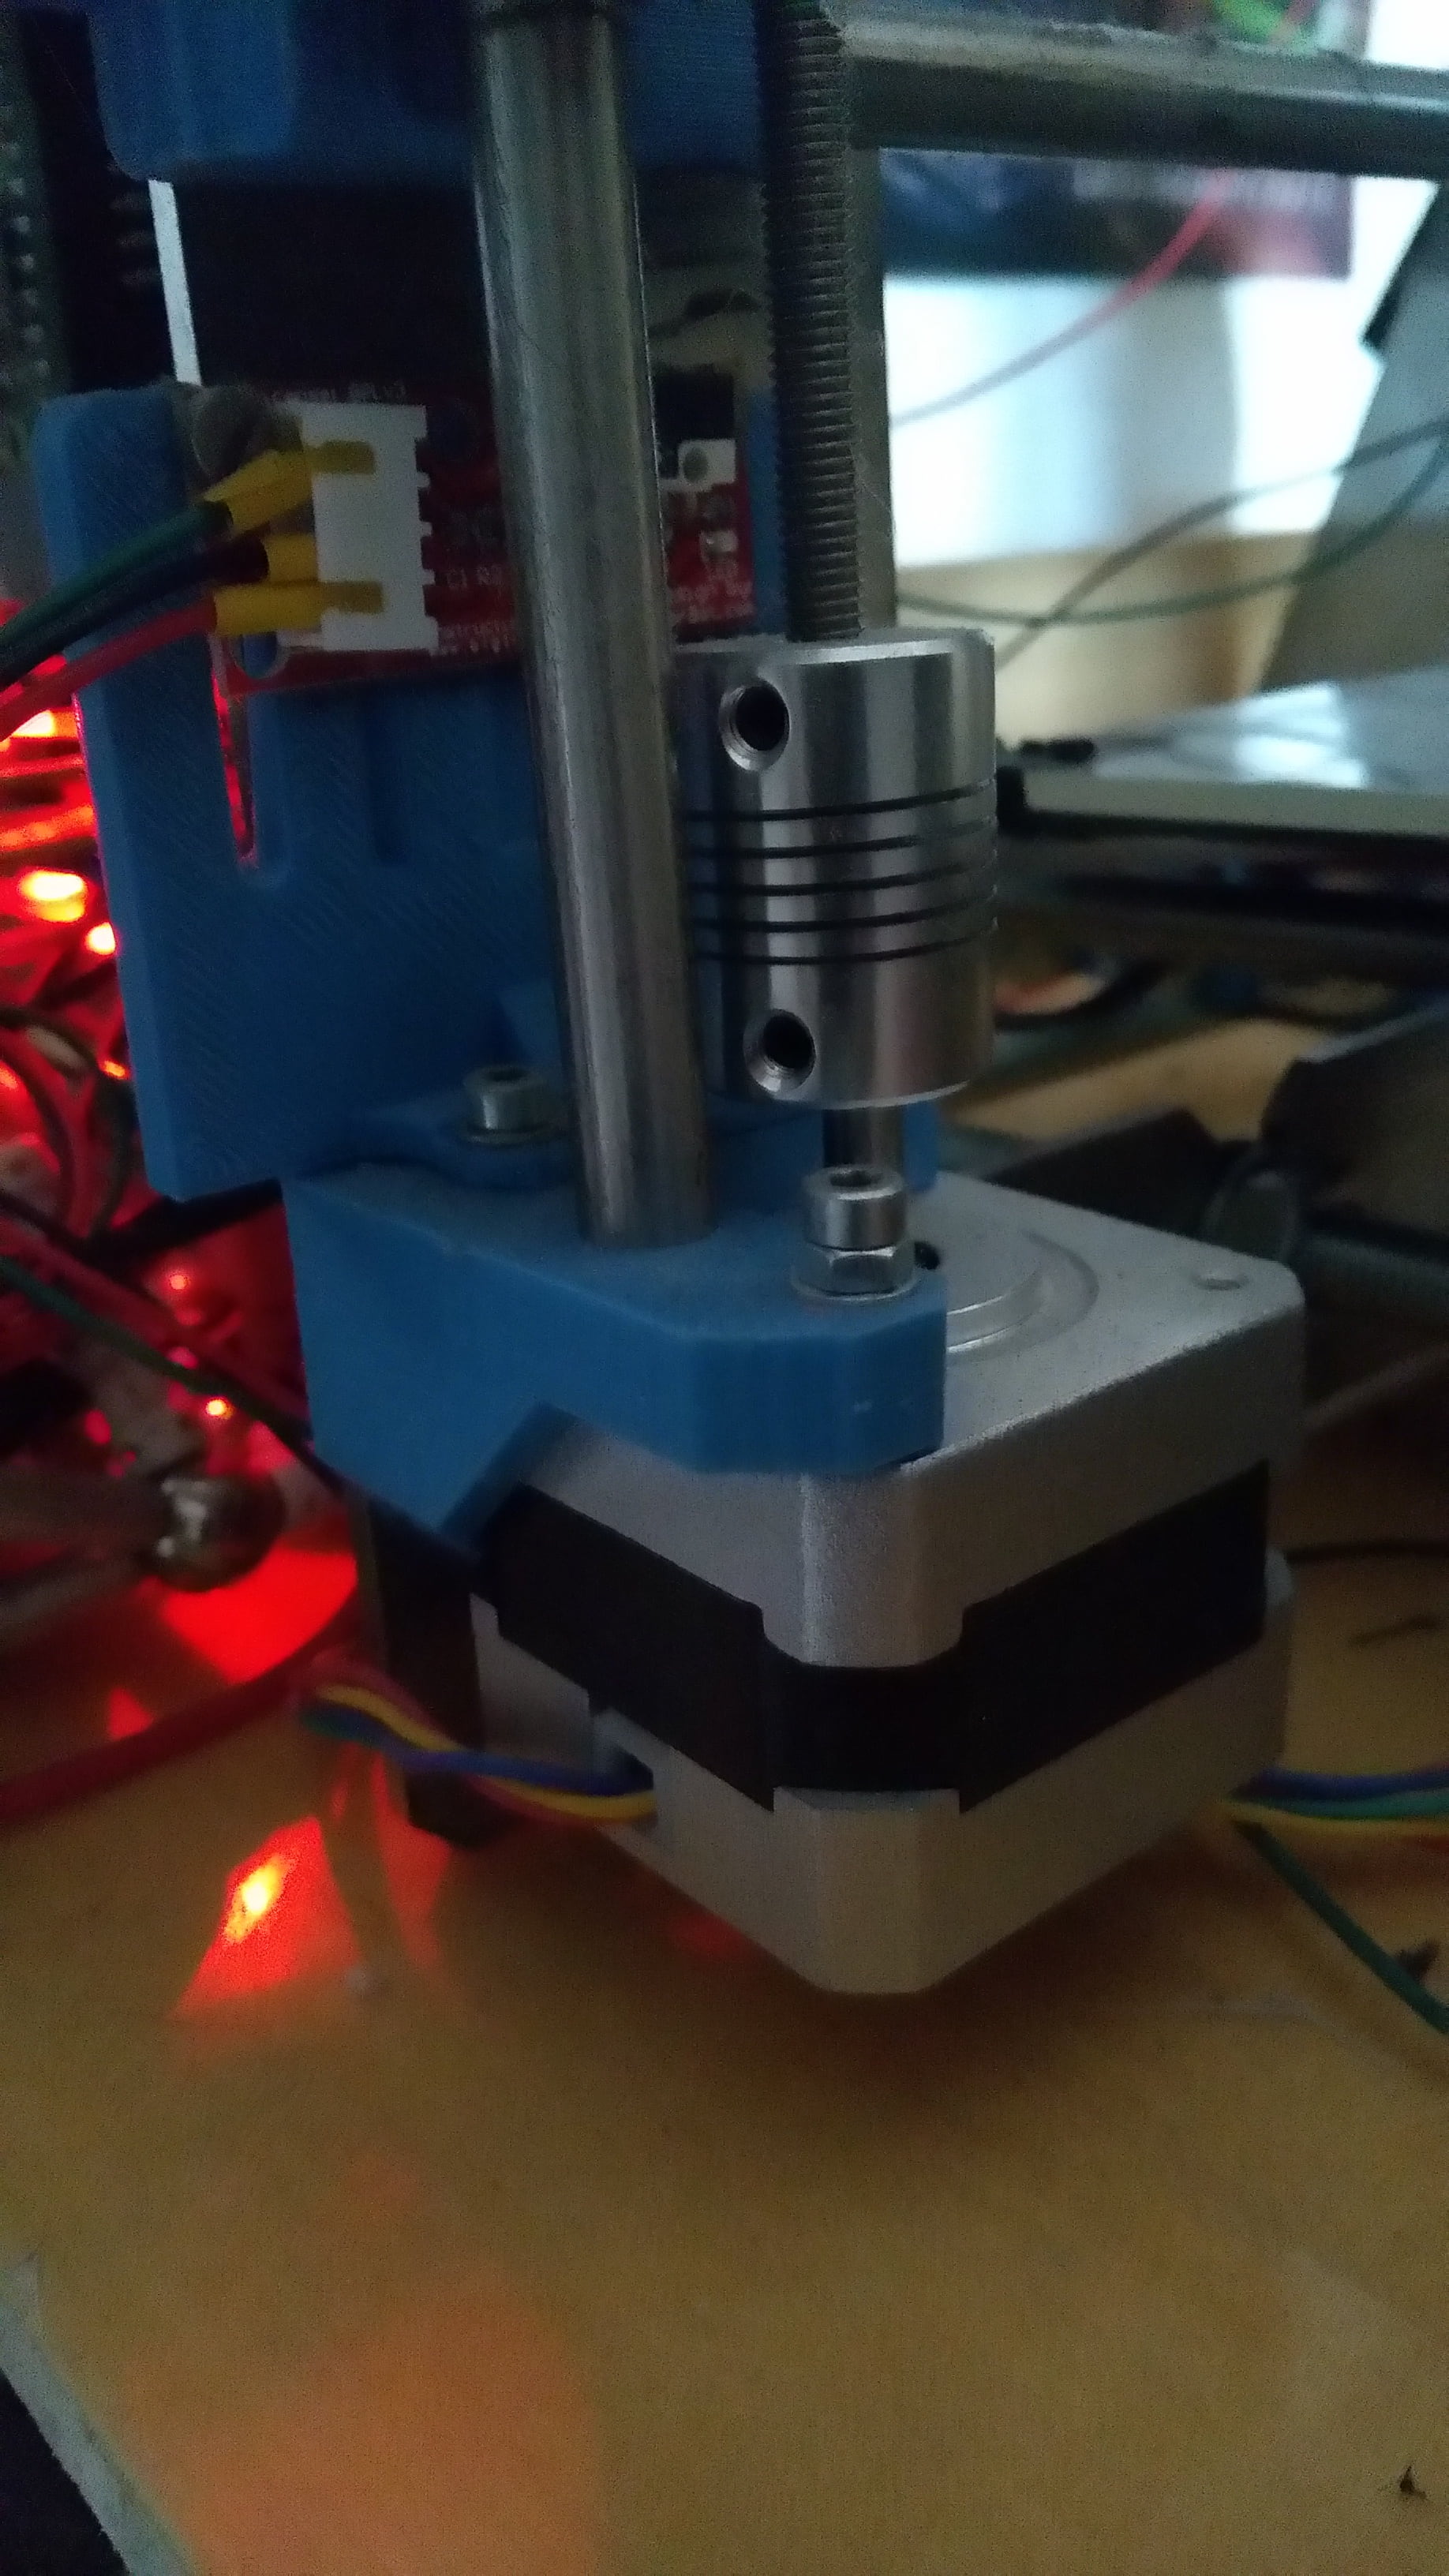
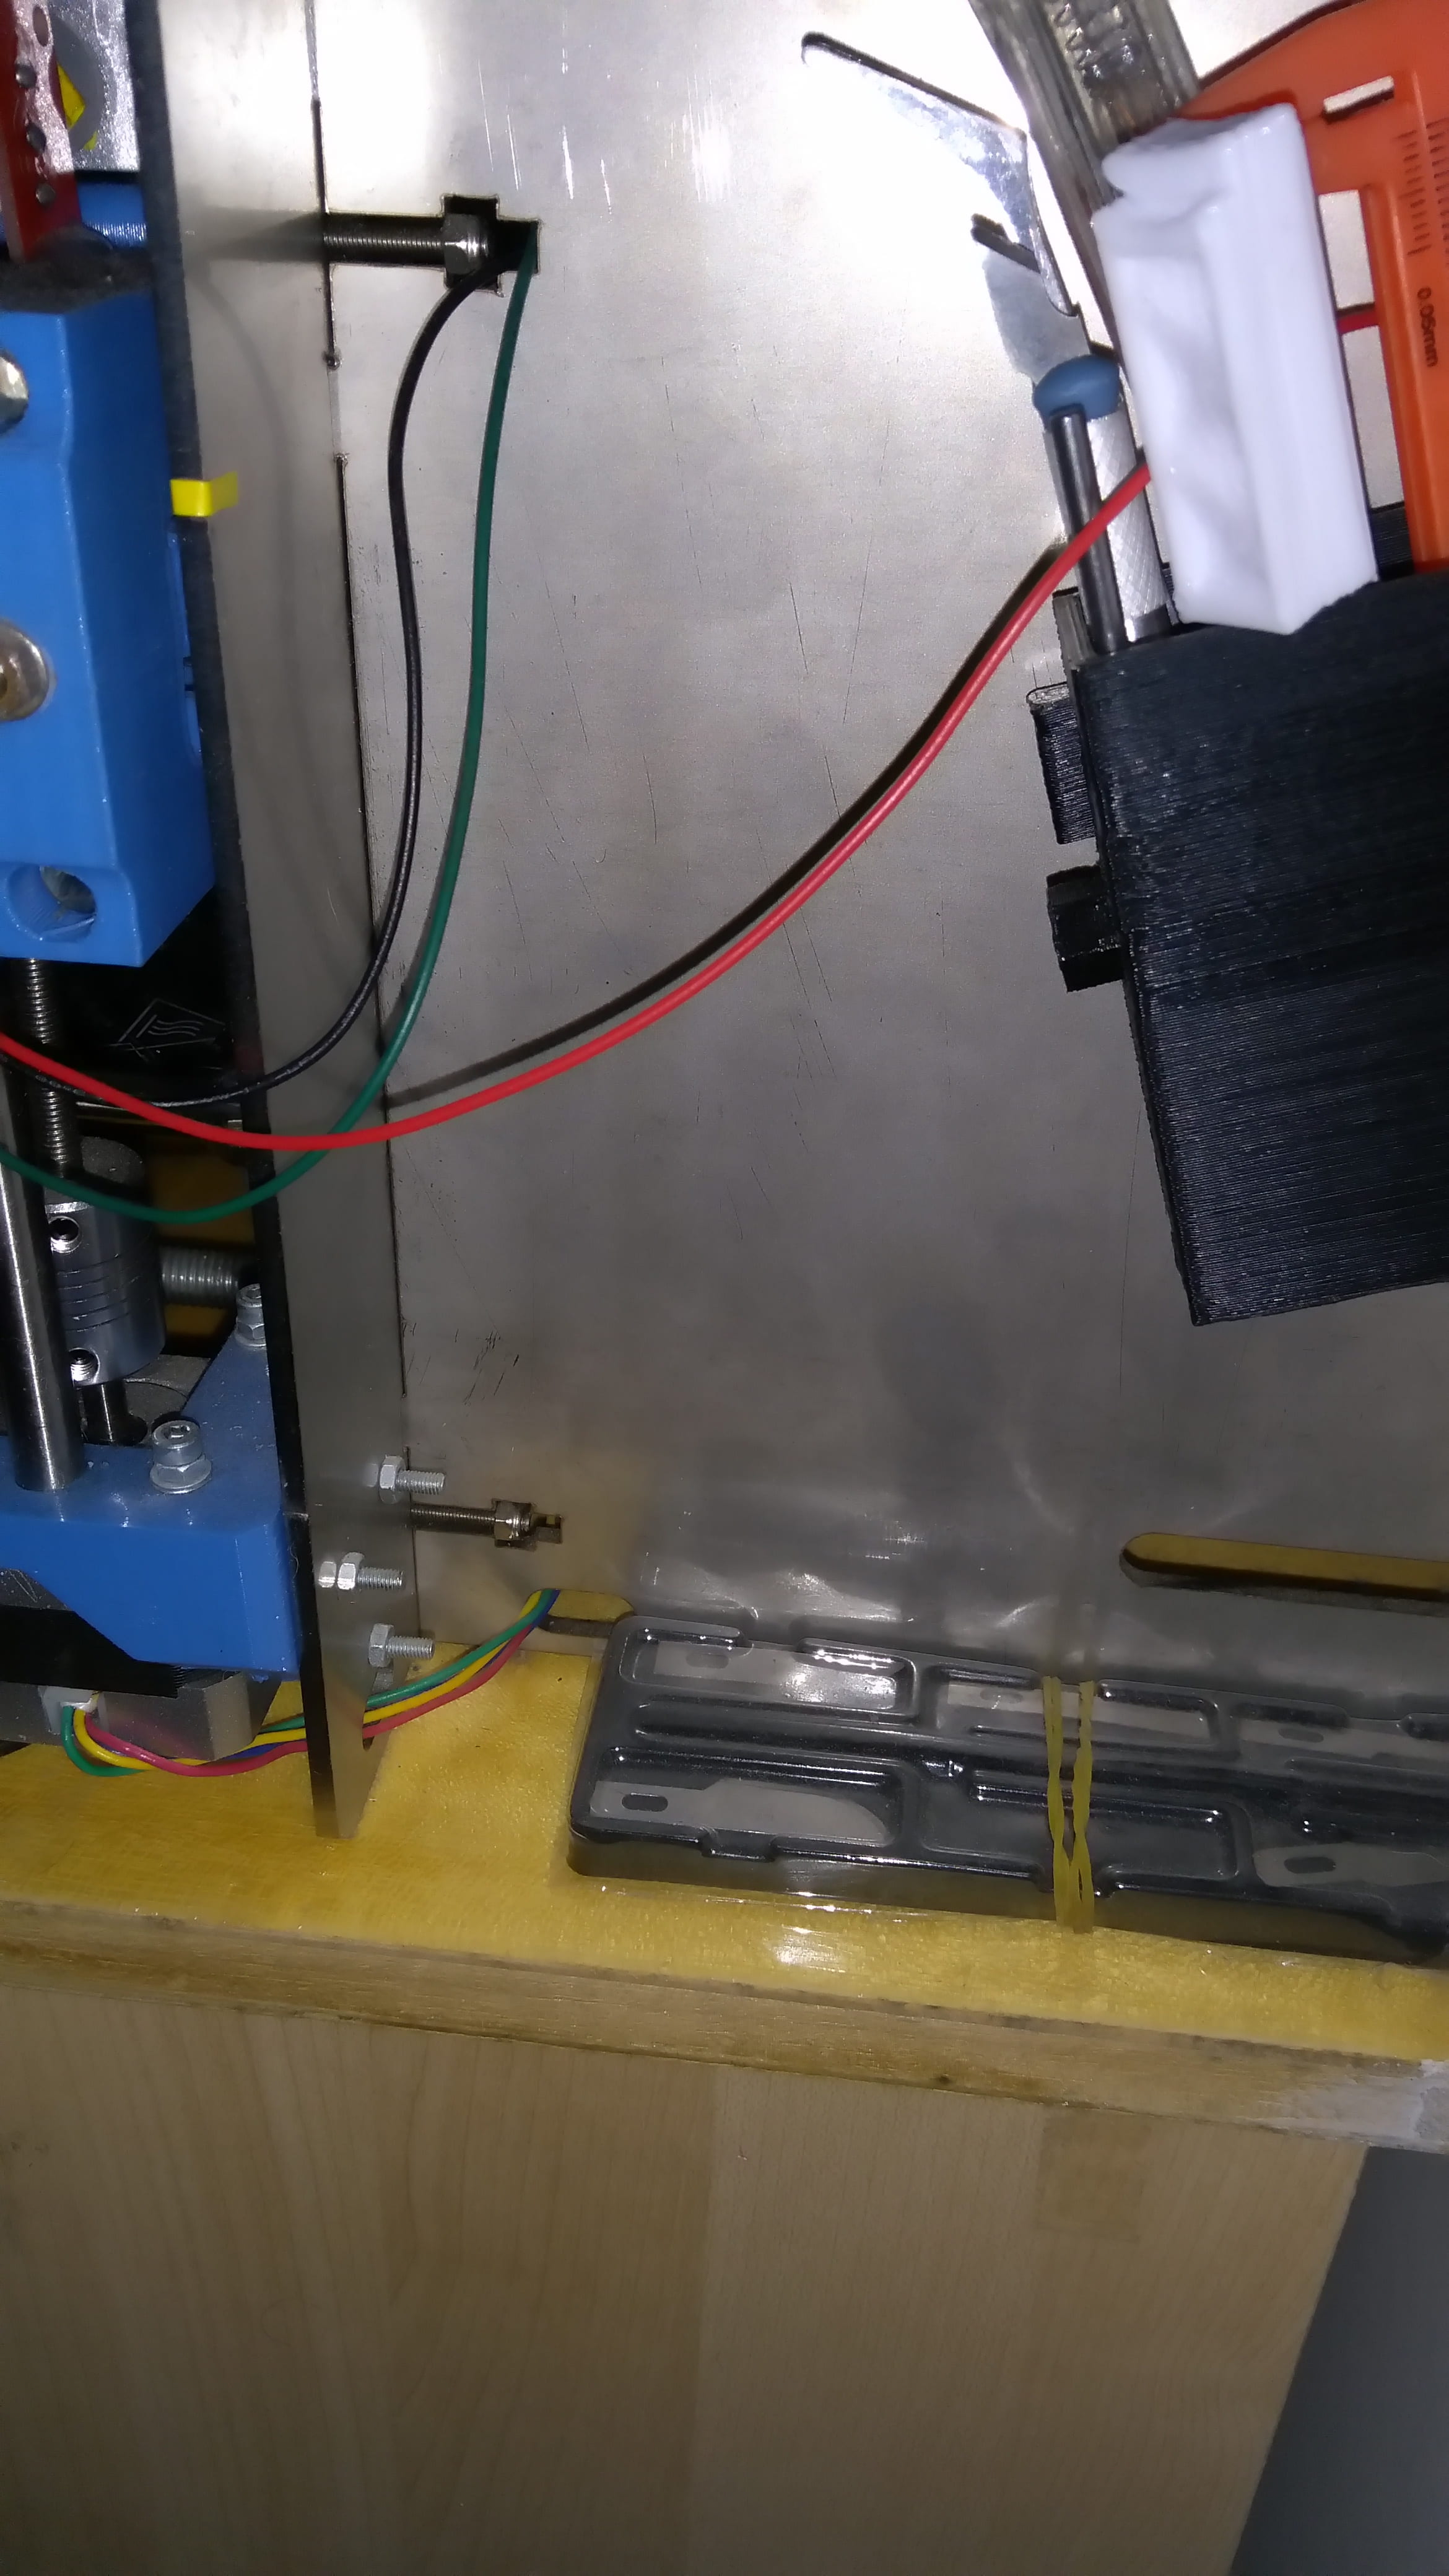
- endstop mounts, especially the Z-axis one that I don't like (pic in attachments)
- changing/moving endstops
- a smaller width extruder, since I'm using a 04mm one
- maybe changing from 3mm filament to 1.5mm one? Is that really much better?
- changing all or at least one of the stepper driver, since I now know (when I installed it I didn't) that I got some knock-off of the worst kind: not only they have 0.1 Ω resistors, but they don't even reach the current stated, and that causes my Y-axis motor to make a lot of noise (underpowered, I think)
- changing some printed parts to other I like more
- adding an auto-level mechanism
- using cable chains
Do you think there's something else that could be improved? Please let me know!
EDIT:
I know print times can vary and it depens from case to case, but I would also like to achieve shorter times.. Right now I'm printing the back cover of this and Pronterface estimates 4 hours more or less
Edited 1 time(s). Last edit at 12/27/2017 05:36AM by slim71.
|
Re: Prusa i3 Rework improvements suggestions December 27, 2017 08:15AM |
Registered: 6 years ago Posts: 1,007 |
If its an acrylic frame, don't waste your time on these modifications that are just cosmetic anyway or any other more complex (most of what is on Thingiverse is useless anyway).
Go for an other kind of machine, Ultimaker clone, CoreXY, Delta ...
"A comical prototype doesn't mean a dumb idea is possible" (Thunderf00t)
Go for an other kind of machine, Ultimaker clone, CoreXY, Delta ...
"A comical prototype doesn't mean a dumb idea is possible" (Thunderf00t)
|
Re: Prusa i3 Rework improvements suggestions December 27, 2017 08:25AM |
Registered: 7 years ago Posts: 29 |
|
Re: Prusa i3 Rework improvements suggestions December 27, 2017 09:30AM |
Registered: 6 years ago Posts: 1,863 |
Their is always one!
Even an acrylic can be modified to make great 3D models with the right mods.
They even complained about my Aluminum frame 3D Printer stating it should to be higher quality. Though I can easily out print some of their Printers.
The modifications you want to make sound like they will make it better.
Blow up the Z-Axis end-stop. You want A sensor for Auto leveling was the best upgrade that I have added to my printers.
Do not know what you have in mind for the Z-Axis, but my next 3D Printer evolutionary step will be a BLTouch.
I also want to purchase some bracing for the uprights, maybe an L bracket to help brace here and here.
I thought about a smaller Nozzle but, the smaller the nozzle the longer the print will take. If your print at .28 and it takes 4 hours then if you print at .14 it will take 8 hours.
As 1.75mm filament is quickly becoming the standard, meaning it is easier to get. if I were just starting out would purchase a 1.75mm filament 3D Printer.
1.75 mm filament requires less pressure to extrude, and allows for better control, feeding 1mm of filament will extruded less material. Meaning finer and better prints with less chance of over extruding.
Most controllers have a stepper current adjustment to set the required current levels for your stepper motors.
Cable chains work well to contain the wires and look good thou can be a pain when troubleshooting or replacing parts.
Edited 6 time(s). Last edit at 12/27/2017 09:36AM by Roberts_Clif.
|
Re: Prusa i3 Rework improvements suggestions December 27, 2017 09:48AM |
Registered: 7 years ago Posts: 29 |
With A-axis you meant Z-axis, right? If so, that's exactly what I thought to install: auto-level mechanism with a Z-endstop using a screw like this one
or a BLTouch as you said, if I'll be able to get one.
I don't really get the thing you said regarding the bracket, so I can't give you my opinion, I'm sorry.. Though from the images I think you're using profiles as frame?
About the nozzle, I'm not super expert but I don't think print time is linear to nozzle width: there are many others factors to consider, as non-profit moves and layer height.. Anyway, I thought about a smaller nozzle because I've read many times that's better to achieve more accurate and "beautiful" prints..
As for the filament, you're not the one saying that to me and I've seen it myself, so I might as well switch to 1.75mm too.
I know controllers have a pot to change output current flow, and that's indeed my problem: the a4988s I have do not reach enough current even at their max. That's the reason I want to change them. Actually, the only one causing me some head scratch is the one on the Y-axis, that causes the motor to make a lot of noise and vibrations, but maybe with better power even the other motors will work better.
Finally, I'll definitely add cable chains even if they can be a pain: I don't really like having wires all around the printer!
Thanks for sharing your thoughts!
or a BLTouch as you said, if I'll be able to get one.
I don't really get the thing you said regarding the bracket, so I can't give you my opinion, I'm sorry.. Though from the images I think you're using profiles as frame?
About the nozzle, I'm not super expert but I don't think print time is linear to nozzle width: there are many others factors to consider, as non-profit moves and layer height.. Anyway, I thought about a smaller nozzle because I've read many times that's better to achieve more accurate and "beautiful" prints..
As for the filament, you're not the one saying that to me and I've seen it myself, so I might as well switch to 1.75mm too.
I know controllers have a pot to change output current flow, and that's indeed my problem: the a4988s I have do not reach enough current even at their max.
That's the reason I want to change them. Actually, the only one causing me some head scratch is the one on the Y-axis, that causes the motor to make a lot of noise and vibrations, but maybe with better power even the other motors will work better.Finally, I'll definitely add cable chains even if they can be a pain: I don't really like having wires all around the printer!
Thanks for sharing your thoughts!
|
Re: Prusa i3 Rework improvements suggestions December 27, 2017 09:50AM |
Registered: 8 years ago Posts: 260 |
|
Re: Prusa i3 Rework improvements suggestions December 27, 2017 08:15PM |
Registered: 6 years ago Posts: 1,863 |
Quote
slim71
With A-axis you meant Z-axis, right?
I don't really get the thing you said regarding the bracket, so I can't give you my opinion, I'm sorry..
I know controllers have a pot to change output current flow, and that's indeed my problem: the a4988s I have do not reach enough current even at their max. That's the reason I want to change them. Actually, the only one causing me some head scratch is the one on the Y-axis, that causes the motor to make a lot of noise and vibrations, but maybe with better power even the other motors will work better.
Finally, I'll definitely add cable chains even if they can be a pain: I don't really like having wires all around the printer!
I looked at my post don't see an "A-axis"???
I was thinking of an L bracket to help support the main frame to the Z-Axis goal post type frame. not bad but could be stronger.
As for your A4988's current adjustment pots will do some research see if any information is available.
Do have the Cable chains myself just makes changing Hot-end heaters slower threading wire through the cable chain. I had the Spiral wrap but it look grose.
Edited 2 time(s). Last edit at 12/27/2017 08:16PM by Roberts_Clif.
|
Re: Prusa i3 Rework improvements suggestions December 28, 2017 03:53AM |
Registered: 7 years ago Posts: 29 |
Maybe you changed it in an edit and I noticed it before.. Anyway, not importantQuote
Roberts_Clif
I looked at my post don't see an "A-axis"???
I don't know if the L bracket could help you.. It seems a good idea if that can make it more robust though.
I personally have what you see in the pic attached and I liked it from the beginning! Never had a problem with it: I'll just add a little pad on a back end due to the surface I placed the printer..
About the a4988s, if you want to ahead! I searched high and low for more information and I'm fairly sure they're not working as intended. The official Pololu website has even a video example.
I've also considered to move from a4988s to drv8825, but I'm not sure.
Never seen the spiral wrap before, but I googled it and I also don't like it

|
Re: Prusa i3 Rework improvements suggestions December 28, 2017 09:02AM |
Registered: 6 years ago Posts: 1,863 |
Read this
[forum.pololu.com]
[www.pololu.com]
It appears you may have the right ideal switching to DRV8825
[forum.pololu.com]
[www.pololu.com]
It appears you may have the right ideal switching to DRV8825
|
Re: Prusa i3 Rework improvements suggestions December 28, 2017 02:24PM |
Registered: 10 years ago Posts: 477 |
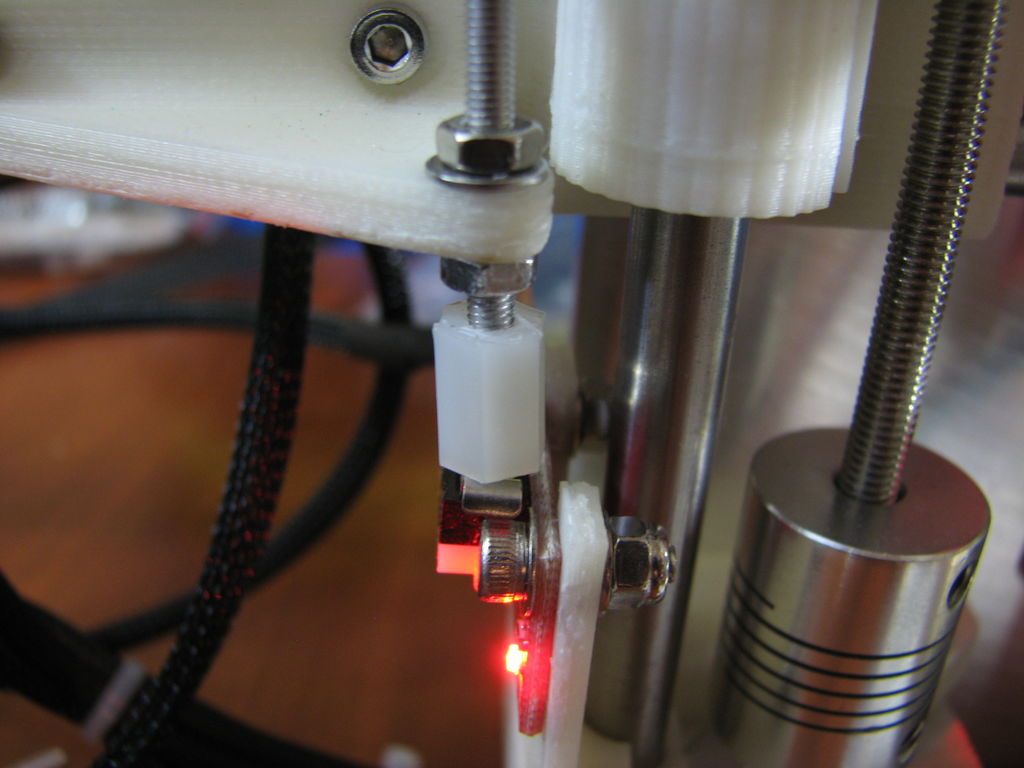
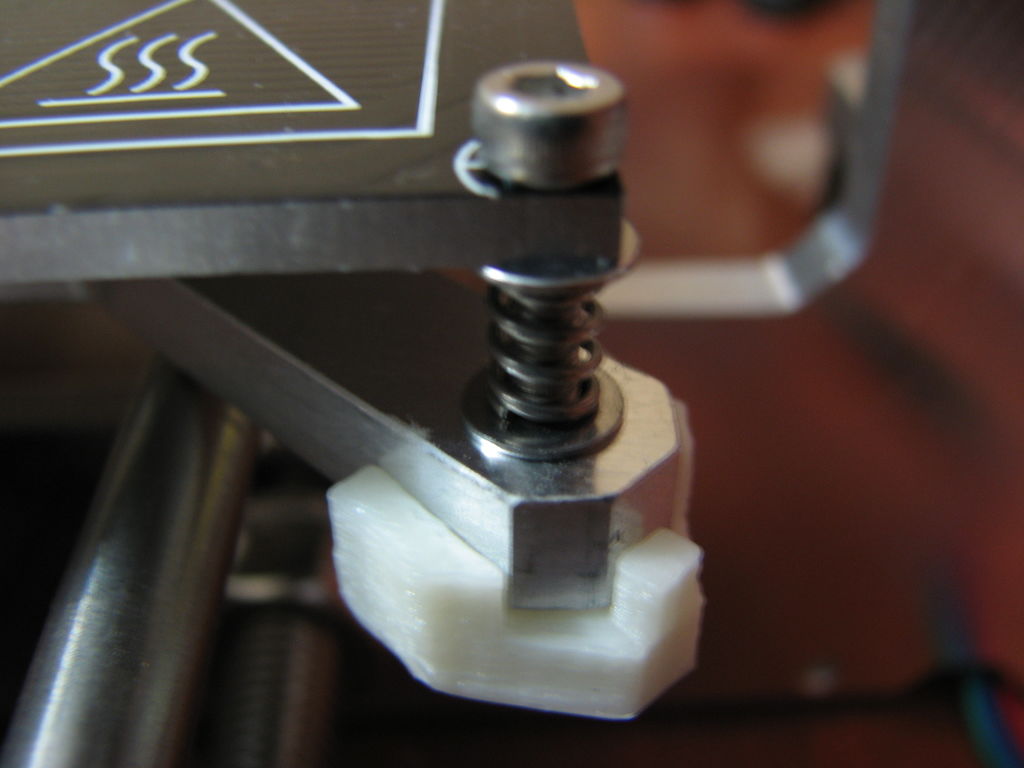
For the Z-endstop I use this design from thingiverse:
[www.thingiverse.com]
However I use it in a different way in that rather than adjust the bolt distance I use a tight fitting long nylon nut for the adjustment.
See the attached pictures. It's really set and forget and very easy to make slight adjustments. With this setup, an alloy frame/bed I adjust the z probably once every 50 objects I print.
I first get the home position right with the ususal "paper test", then adjust the other 3 corners. I use hex head bolts and nylocks, so it's a quick tweek without using downward pressure on the bolt and no pliers etc needed. The nylock nut holder stl can be found on my Instructable:
[www.instructables.com]
Never needed "auto-level" on any of the i3's I have built.
For the X-endstop I use this design:
[www.thingiverse.com]
Also switched my first i3 builds hot-end from a 3mm j-head to a 1.75 hexagon. 1.75mm filament isn't as hard to use as 3mm - it's the way the industry is going and worth changing
My updated Instructable on our Prusa i3 Build
[www.instructables.com]
[www.thingiverse.com]
However I use it in a different way in that rather than adjust the bolt distance I use a tight fitting long nylon nut for the adjustment.
See the attached pictures. It's really set and forget and very easy to make slight adjustments. With this setup, an alloy frame/bed I adjust the z probably once every 50 objects I print.
I first get the home position right with the ususal "paper test", then adjust the other 3 corners. I use hex head bolts and nylocks, so it's a quick tweek without using downward pressure on the bolt and no pliers etc needed. The nylock nut holder stl can be found on my Instructable:
[www.instructables.com]
Never needed "auto-level" on any of the i3's I have built.
For the X-endstop I use this design:
[www.thingiverse.com]
Also switched my first i3 builds hot-end from a 3mm j-head to a 1.75 hexagon. 1.75mm filament isn't as hard to use as 3mm - it's the way the industry is going and worth changing
My updated Instructable on our Prusa i3 Build
[www.instructables.com]
|
Re: Prusa i3 Rework improvements suggestions December 29, 2017 04:23AM |
Registered: 7 years ago Posts: 29 |
Definitely going to switch to 1.75mm filament.. By the way, do you have suggestion on the extruder nozzle width?
I already knew the design of the X-endstop you liked, the same designer made also the Y and Z ones: I've printed all of them for future use.
About the auto-level, I decided to mount that for a more "man-indipendent" machine.
To be honest, when I started using my printer I struggled a lot with bed calibrations: findings the best way to do it, and doing it right, was so hard for me. But then experience kicked in and now it's way easier for me. That is, if needed: I don't really have to repeatedly do it any more. But it is also true that, since I'm constantly getting good prints, I don't really check or even touch my bed anymore, so maybe I just don't know that it needs a slight fix.. Anyway, with auto-level it will do it on its own, so I'll be sure it'll be good.
Looking at your pictures, I don't really get the bedpost system what improvements implicates: isn't the spring system for bed bolts better?
|
Re: Prusa i3 Rework improvements suggestions December 29, 2017 12:37PM |
Registered: 10 years ago Posts: 477 |
On my Z height adjustment - the bed to frame at the home position doesn't have a spring as that adjustment is done via the long nylon nut off the bolt attached to the X motor mount. So if it needs adjustment I move the nozzle to the home position (then in a little). With the bed and nozzle at working temp I use pronterface to do a Z home, slide paper under the nozzle and tweek the long nylon nut to make a fine adjustment - using pronterface to re-test the height each time. If I need to I then hove the nozzle to the next corner and use a hex driver to adjust the spring tension and continue on the remaining corners.
Most times I only need to adjust the home position as the others don't go out of alignment.
When I slice an stl model in Cura I also place the piece close to the home position. That way I know it's at the most accurate z height location and as the blue tape on the bed wears I can rotate the glass 90 degrees and have fresh blue tape.
|
Re: Prusa i3 Rework improvements suggestions December 30, 2017 05:27AM |
Registered: 7 years ago Posts: 29 |
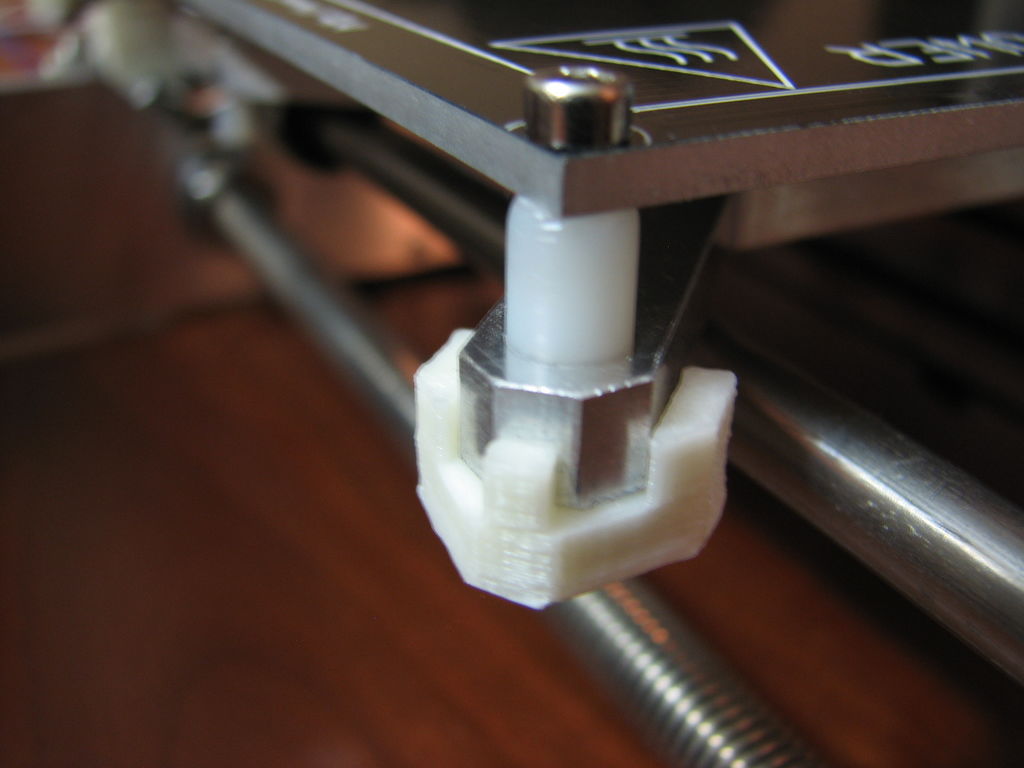
Sorry @SteveRoy, maybe I wasn't clear: I meant the springs on bed bolts...
You attached two pics about them: one with springs and one with what seems to be a 3D-printed spacer.. What is the difference? I thought springs were good to separate the heatbed frame mount (the x-shaped one, to be clear) and the PCB heatbed itself, so why using that?
You attached two pics about them: one with springs and one with what seems to be a 3D-printed spacer.. What is the difference? I thought springs were good to separate the heatbed frame mount (the x-shaped one, to be clear) and the PCB heatbed itself, so why using that?
|
Re: Prusa i3 Rework improvements suggestions December 30, 2017 04:51PM |
Registered: 10 years ago Posts: 477 |
The bed doesn't need a spring for adjustment at the home position, this is done with the long nylon nut off the X motor mount.
I find it easier to home x & y, then home z, check with paper, adjust the long nylon nut slightly if needed, recheck the z home again.
The other 3 positions have springs as they occasionally need adjustment.
So the spacer is used at X & Y home position, the other 3 have springs.
I find it easier to home x & y, then home z, check with paper, adjust the long nylon nut slightly if needed, recheck the z home again.
The other 3 positions have springs as they occasionally need adjustment.
So the spacer is used at X & Y home position, the other 3 have springs.
Quote
slim71
Sorry @SteveRoy, maybe I wasn't clear: I meant the springs on bed bolts...
You attached two pics about them: one with springs and one with what seems to be a 3D-printed spacer.. What is the difference? I thought springs were good to separate the heatbed frame mount (the x-shaped one, to be clear) and the PCB heatbed itself, so why using that?
|
Re: Prusa i3 Rework improvements suggestions December 30, 2017 05:51PM |
Registered: 6 years ago Posts: 1,863 |
Quote
slim71
By the waydo you have suggestion on the extruder nozzle width?
I Mainly use a .4 Nozzle but they are inexpensive and that being said I have .2, .3, .4 and .5
Never know When I will use one, and when it is on hand is is easier to install.
Edited 1 time(s). Last edit at 12/30/2017 05:52PM by Roberts_Clif.
|
Re: Prusa i3 Rework improvements suggestions December 31, 2017 02:25AM |
Registered: 6 years ago Posts: 1,007 |
Quote
SteveRoy
The bed doesn't need a spring for adjustment at the home position, this is done with the long nylon nut off the X motor mount.
...
The spring is there to allow the bed to eventually move down during the Z homing to trigger a frame mounted Z switch and avoid head crash, Z motor stalling etc.... For ex: in case of a thick plastic blob on the nozzle ....
It is not necessary if one use the nozzle contacting the bed to set the Z home (switch, piezo, strain gauge .....) or proximity sensor.
Edited 1 time(s). Last edit at 12/31/2017 05:24AM by MKSA.
"A comical prototype doesn't mean a dumb idea is possible" (Thunderf00t)
|
Re: Prusa i3 Rework improvements suggestions December 31, 2017 04:10AM |
Registered: 7 years ago Posts: 29 |
OK @SteveRoy, I got you now!
So, I don't really know what is best for bed bolts with auto-level. Will do a research, but if you guys have any suggestion please let me know!
About the nozzle too! I'm currently using a 0.4mm one, but being able to print more detailed things would be nice. Though the printing time is what makes me unconfortable: even now I don't like to wait too much for simple but "big" prints. Big in time, not in dimensions, since even the body of a push drill will print in 3 hours according to pronterface.. Without considering that that time will most likely double!
That makes me remember a thing I should deepen more: the printing speed in Pronterface. I don't know what values to use there, I've just left it 100mm/min so far
So, I don't really know what is best for bed bolts with auto-level. Will do a research, but if you guys have any suggestion please let me know!
About the nozzle too! I'm currently using a 0.4mm one, but being able to print more detailed things would be nice. Though the printing time is what makes me unconfortable: even now I don't like to wait too much for simple but "big" prints.
Big in time, not in dimensions, since even the body of a push drill will print in 3 hours according to pronterface.. Without considering that that time will most likely double!That makes me remember a thing I should deepen more: the printing speed in Pronterface. I don't know what values to use there, I've just left it 100mm/min so far
|
Re: Prusa i3 Rework improvements suggestions January 01, 2018 06:05PM |
Registered: 10 years ago Posts: 477 |
Quote
MKSA
The spring is there to allow the bed to eventually move down during the Z homing to trigger a frame mounted Z switch and avoid head crash, Z motor stalling etc.... For ex: in case of a thick plastic blob on the nozzle ....
It is not necessary if one use the nozzle contacting the bed to set the Z home (switch, piezo, strain gauge .....) or proximity sensor.
The z stop should stop the head before a head crash. Plastic on the nozzle would be melted as you pre-heat the bed and nozzle before doing a z height adjustment.
The only way my printer would have a head crash now is if the z stop failed completely - like a broken wire.
When I first setup the z stop after building the printer I made sure the z-stop stopped the nozzle before it hit the bed and then slowly adjusted the long bolt to where I could then use the long nylon nut for a final adjustment. That was probably 2 years ago and since then it's just needed a slight tweek with the long nylon nut every 50 prints of so.
My updated Instructable on our Prusa i3 Build
[www.instructables.com]
|
Re: Prusa i3 Rework improvements suggestions January 02, 2018 03:57AM |
Registered: 6 years ago Posts: 1,007 |
Sorry, only registered users may post in this forum.