My Fisher experience (so far..) and advice for anyone about to build one
Posted by Geoffro
|
My Fisher experience (so far..) and advice for anyone about to build one August 03, 2015 04:34AM |
Registered: 8 years ago Posts: 20 |
Heya!
I just finished and tested my Fisher kit and although alot of my comments I know have been iterated in other posts already I'll still mention them, hopefully the more people that mention the same things, the more people will see it.
Overall, I was pretty impressed with the kit and the value. I took advantage of the Beta pricing and after some conversion it ended up around $540AU, so less than say buying a kossel kit (about the closest comparison I could make) The parts supplied were all fairly good quality, packed well and the only very very small gripe I had was with the quality of the plastic parts. I sent and email to support just mentioning they were not all that crash hot and they replied in about 10 seconds, great support, that was impressive. On a side note tho, the instructions I think need to be arranged in a more efficient order also, to save you undoing things you have already done - or at least more information on what you shouldn't do before doing something else (if that makes sense...) not a big issue, just would save time and less chance to break components.
The plastic parts had alot of printing hiccups, and although they would not really affect the machine in any way, besides the small inconsistencies I really am a fan of Red and black so I printed out a set of ABS parts in red instead for my build. This picture shows the layer splitting that occured with alot of the parts I received:
Now, as I said no big deal, I just printed out another set (I have a few printers built now..) and that only took a few hours on a few machines. The build was very easy but there are some parts you really need to be careful of when assembling. I know some have had issues with the Rods snapping, I did not but came very close.
They do tell you not to force anything in the instructions, so I didnt!! I was very very careful - but the Bottom and Top plate do not have holes large enough to fit the 8mm rods. This was a little dissapointing. After breaking the below piece, I ended up filing all the holes to get a snug fit - and not break them all... You can see my super glue effort below...
There was only 2 parts of the build I had to modify to actually build the kit. I could absolutely not, in no way possible get the two Belts through that slit, whether my newly printed parts had a slight offset.. I don't know, but my solution was simply to drill the slot wide enough to get them through, tighten them gently then Epoxy the buggers, it worked a treat. I left enough for adjustments.
The other part was the Brass collar that goes into the output of the extruder assembly. It would not fit snug so I epoxied that in place, which also worked well. I also broke one of the front panels (with the logo) just above the logo, it split in half without much force at all - BE CAREFUL with these. Once all three are on the machine they will bow a little, but this works out well because if they didn't, the carriages would hit them on the way up.
Well, after the robot file test, all seems pretty good. In comparing it to a Delta I have calibrated pretty well, it's not so bad. It still needs some work, as the layers are not terribly consistent all the way up the print, I still have some small banding but for the most part it is functional and is doing a pretty good job. I used a Groot sculpt for a test as I knew it had alot of detail and I can compare it to the same print on other printers, and besides some small spiderwebbing, 1 or 2 layers stepping out a little.. it actually did a pretty good job, I would say I'm about 65 - 70 % calibrated for my liking.
Here is a small list of things I can think of that sort of got in the way when I built my kit...
* Be careful when putting your Bearings on your Rods!!! The rods I received had very sharp bits at the end, not filed at all and cut I have to say a little rather poorly. I have a $29 angle grinder I use for cutting 8mm rods and it does a pretty good job. I might lend it to them :p
The little tiny ball bearings inside can catch on the sharp ends of the rod as you slide them down, which can knock a few of them out of the runners and you will see them fly all over the room.
If you do lose some small bearings, check the sliding action on the rod. If it is still smooth, it's ok - but if it jigs and jags a bit as you slide it, throw it away and use a new one. I was lucky to have spares on hand, but if you don't please pay attention to the above advice.
* End Stop micro switches wires/crimps will not hold on the poles, soldering was required for these (and for peace of mind they wouldn't slip off)
* End Stops need to be bent a little outward to make good contact (I know alot of you have mentioned this already, it was a bit of a pain but not hard to resolve)
* Cable management is good, but needs to be improved to make clear way for the carriage. If not for my back plate bowing out (as in it curves) the cables would hit the carriage.
* Ensure all cable ties are external and to the side. All cables run up one thin wall on the back panel - the Filament reel will catch on them if they are around the back, and if they are inside the machine, the carriage will hit the cable tie end locks.
* Make sure you follow the extruder instructions to the letter, getting the teflon tubing screwed into the Heatsink AFTER its all assembled is not fun.
* No screws and nuts to fix the panels to the top and bottom of the machine, well I didn't anyway - not that it really needs it, but it would be a bit more stable (i've seen others mention this too)
* Autolevel system - Reprap need to add the gcode to run the compensation before the print. I noticed the Slic3r profile provided does not include this in the Gcode , it seems if you do not manually do the bed compensation it can score your nice BuildTak plate.
I did not run the bed compensation before a print and I nearly destroyed the bed - I got to it just in time, but have a nice 3 inch score mark on the builtak
* Be super careful with pretty much ALL the large black laser cut parts and the Arms. They are not as strong as they look. Treat them gently, if something won't fit, trust me, don't make it. As thick as that bottom plate looks, mine was as fragile as a china plate and shattered like one. When I find all the pieces I will glue them back in.. The extruder and hot end were pretty tough tho, go nuts with them!
* When they say measure the resistance between the - and + terminals in your final checks , they mean make sure there is no short, use the beeper on your multimeter. or a continuity tester, No beep = good. Not hard for most but for the non-techy people they might get a bit confused on that. Technically there should be no resistance as they should not be connected in anyway - so 'measuring the resistance' between the two seems a little illogical (RIP Spock) it should be simply - 'make sure there is no short'
* Hot end Cooling ducts - too close to the hot end. I printed mine in ABS and yet still, they are melting slightly around the outlets of the twin fan ducts. They don't appear to be melting anymore, but they have both melted about 2mm off the top lip - I would not print these in PLA. If ABS, which I printed at 235c is getting soft and melting (which at 200c it will if held close enough to the nozzle) then PLA would probably start gooping mid print at a 200c print, and the duct fans might even melt and close up (maybe?)
* When you tighten your Arms, you just want them not to 'tick tack' and have no play around the ball joints. Tighten - wobble them. Tighten.. wobble them. When they are not 'tick tacking' then you are done. Nyloc nuts are notoriously hard to tell when you are at the screws maximum tightness - I could see myself easily over tightening them and snapping the black laser cut arms.
* I found it easier to apply all the grease to the ball joints as I put the rods on. I could get the grease all around the ball - if the arms are attached already, you can't. I'm a photocopier technician by day , so I had some good quality grease and oil for the job - the better it is, the less you need to re-do it.
* Make sure your endstops all "Click" when the carriages are raised before you even turn anything on. Mine didn't and I know what happens if they don't register from previous Delta builds, so make sure they all click - even if you mess up the X/Y/Z axis on your machine, that's an easy fix - but if an endstop doesnt click, it can lead to troubles.
That's about all I can think of for now...
If I were to give the kit a score out of 10, I would probably be going with an 9 at the moment, and the point only really deducted for lack of components and I think the Acrylic Top and Base pieces need to have 8.15mm bore holes, at 8mm they are just too tight.
The lack of a screen is something I guess I will get used to, or add one at a later date using a small Android tablet or something I that has an intergrated HTML interface (anyone tried a Pi on this yet?) and I would have not minded the extra cost, so that's where one point get's deducted. The reason is not for wanting, it's purely for extra safety and monitoring. Eg. I ran a laptop and set a print off.. the print finished but the laptop had gone to sleep. I was running VMware on a mac, in windows... so it had a dummy spit when it it booted back up. The problem was, the print had finished but the hot end did not set itself to idle, it was still on. I had no way besides pulling the plug at that time to turn the hot end off.
So while the machine is very neat and compact (boy is it compact) the lack of a panel, buttons or a screen can sometimes be a little frustrating. The cool HTML interface does make up for it somewhat tho, that was extremely well done.
The only bug so far I have found is trying to upload Gcode files via the interface that are large, up to about 4 megabytes was OK, but a 15mb Gcode file would give me AJAX errors and refused to upload no matter how many reboots. I had to take the SD card out and copy it manually. It printed the file fine (the large Groot sculpt) .
Pros:
* Very neat design, compact, great for a small desk printer.
* Great HTML interface, easy to use.
* Price / affordability - you pay for what you get. 8mm Rods (6 of, at 430mm long and 6 bearings) are inherently cheaper than Linear rails and linear bearing carriages, this is basic math - so yes, you get pretty good value with this kit. The Ethernet based Duet is handy. I connected mine to a wifi router and can print now from anywhere, which is great and beats remote desktop to other pc's to control printers.
* Print quality - I believe when calibrated well it will perform pretty well, even the first print was impressive for a machine I'd never printed on or built before.
* Build Ease! Compared to a CoreXy, a PrusaI3, a Kossel or Delta kit, Printrbot.. this is a piece of cake. What looks like more components when you look at the plastic parts ends up not being alot at all. once you have your 12 motor mounts on.. there ain't much left!
My daughter is going to build the next fisher we buy, (she's 10).. she watched my build this one in about 2-3 hours, I think she'll probably do it quicker than I did. White and blue is the next one, we are painting the black lasercut parts gloss white (so i'm told) with glow Blue ABS.
* Filament Thumbwheel is a handy addition. Saves pushing and breaking filament on delta machines.
* Very tiny Hot end! probably the smallest out of any of my machines. Heatup time due to steel pipes and nozzle is insane, like there practically is no preheat time.
* Build plate levelling system is unique (for me anyway) and well designed (can be very easily removed and put back in without worrying about levels)
* Filament supplied with kit is a nice quality/ consistent diameter.
* Looks sexy!!
Cons: Not many - it's in Beta so I'm trying to be nice lol...
* Black plastic parts can be fragile and break if forced at all (even lightly)
* No Screen buttons or panel, but you knew that before you bought it didn't you so no great dissapointment.
* Logos are very snug fit into the black front plates. Be careful not to snap a plate near the logo when you push it through - make sure its the right way round before you try.
* Bed levelling not very well explained in instructions. Needs revising.
* No cooling fans for the electronics. You have 3 motors surrounding a circuit board that has no heat sinks on it. I am adding a cooling fan underneath ASAP. it gets warm under there!
* Cooling fan seems to run constantly at full speed, cutting it down to about 225 instead of 255 would make it a tad quieter and not vibrate so much. I'm adding some kapton padding in there keep it tight around the fan exit.
That's about it really, it's been a pretty enjoyable process so far, especially in comparison to the first prusa I built - it is nice for once not to have to be loading code, flashing boards, checking measurements... re-flashing boards... argh..
It was great to just build it after breakfast and have it printing by lunch, although not 100% perfect prints, they are pretty close even at this stage - also no print failures to speak of. Each print job has gone well, and fast at 60ms feed for all of them. I have not gone faster yet, I like to wear them in a bit before stressing them out
Edited 4 time(s). Last edit at 08/03/2015 11:12AM by Geoffro.
I just finished and tested my Fisher kit and although alot of my comments I know have been iterated in other posts already I'll still mention them, hopefully the more people that mention the same things, the more people will see it.
Overall, I was pretty impressed with the kit and the value. I took advantage of the Beta pricing and after some conversion it ended up around $540AU, so less than say buying a kossel kit (about the closest comparison I could make) The parts supplied were all fairly good quality, packed well and the only very very small gripe I had was with the quality of the plastic parts. I sent and email to support just mentioning they were not all that crash hot and they replied in about 10 seconds, great support, that was impressive. On a side note tho, the instructions I think need to be arranged in a more efficient order also, to save you undoing things you have already done - or at least more information on what you shouldn't do before doing something else (if that makes sense...) not a big issue, just would save time and less chance to break components.
The plastic parts had alot of printing hiccups, and although they would not really affect the machine in any way, besides the small inconsistencies I really am a fan of Red and black
so I printed out a set of ABS parts in red instead for my build. This picture shows the layer splitting that occured with alot of the parts I received:
Now, as I said no big deal, I just printed out another set (I have a few printers built now..) and that only took a few hours on a few machines. The build was very easy but there are some parts you really need to be careful of when assembling. I know some have had issues with the Rods snapping, I did not but came very close.
They do tell you not to force anything in the instructions, so I didnt!! I was very very careful - but the Bottom and Top plate do not have holes large enough to fit the 8mm rods. This was a little dissapointing. After breaking the below piece, I ended up filing all the holes to get a snug fit - and not break them all... You can see my super glue effort below...

There was only 2 parts of the build I had to modify to actually build the kit. I could absolutely not, in no way possible get the two Belts through that slit, whether my newly printed parts had a slight offset.. I don't know, but my solution was simply to drill the slot wide enough to get them through, tighten them gently then Epoxy the buggers, it worked a treat. I left enough for adjustments.

The other part was the Brass collar that goes into the output of the extruder assembly. It would not fit snug so I epoxied that in place, which also worked well. I also broke one of the front panels (with the logo) just above the logo, it split in half without much force at all - BE CAREFUL with these. Once all three are on the machine they will bow a little, but this works out well because if they didn't, the carriages would hit them on the way up.
Well, after the robot file test, all seems pretty good. In comparing it to a Delta I have calibrated pretty well, it's not so bad. It still needs some work, as the layers are not terribly consistent all the way up the print, I still have some small banding but for the most part it is functional and is doing a pretty good job. I used a Groot sculpt for a test as I knew it had alot of detail and I can compare it to the same print on other printers, and besides some small spiderwebbing, 1 or 2 layers stepping out a little.. it actually did a pretty good job, I would say I'm about 65 - 70 % calibrated for my liking.


Here is a small list of things I can think of that sort of got in the way when I built my kit...
* Be careful when putting your Bearings on your Rods!!! The rods I received had very sharp bits at the end, not filed at all and cut I have to say a little rather poorly. I have a $29 angle grinder I use for cutting 8mm rods and it does a pretty good job. I might lend it to them :p
The little tiny ball bearings inside can catch on the sharp ends of the rod as you slide them down, which can knock a few of them out of the runners and you will see them fly all over the room.
If you do lose some small bearings, check the sliding action on the rod. If it is still smooth, it's ok - but if it jigs and jags a bit as you slide it, throw it away and use a new one. I was lucky to have spares on hand, but if you don't please pay attention to the above advice.
* End Stop micro switches wires/crimps will not hold on the poles, soldering was required for these (and for peace of mind they wouldn't slip off)
* End Stops need to be bent a little outward to make good contact (I know alot of you have mentioned this already, it was a bit of a pain but not hard to resolve)
* Cable management is good, but needs to be improved to make clear way for the carriage. If not for my back plate bowing out (as in it curves) the cables would hit the carriage.
* Ensure all cable ties are external and to the side. All cables run up one thin wall on the back panel - the Filament reel will catch on them if they are around the back, and if they are inside the machine, the carriage will hit the cable tie end locks.
* Make sure you follow the extruder instructions to the letter, getting the teflon tubing screwed into the Heatsink AFTER its all assembled is not fun.
* No screws and nuts to fix the panels to the top and bottom of the machine, well I didn't anyway - not that it really needs it, but it would be a bit more stable (i've seen others mention this too)
* Autolevel system - Reprap need to add the gcode to run the compensation before the print. I noticed the Slic3r profile provided does not include this in the Gcode , it seems if you do not manually do the bed compensation it can score your nice BuildTak plate.
I did not run the bed compensation before a print and I nearly destroyed the bed - I got to it just in time, but have a nice 3 inch score mark on the builtak
* Be super careful with pretty much ALL the large black laser cut parts and the Arms. They are not as strong as they look. Treat them gently, if something won't fit, trust me, don't make it. As thick as that bottom plate looks, mine was as fragile as a china plate and shattered like one. When I find all the pieces I will glue them back in.. The extruder and hot end were pretty tough tho, go nuts with them!
* When they say measure the resistance between the - and + terminals in your final checks , they mean make sure there is no short, use the beeper on your multimeter. or a continuity tester, No beep = good. Not hard for most but for the non-techy people they might get a bit confused on that. Technically there should be no resistance as they should not be connected in anyway - so 'measuring the resistance' between the two seems a little illogical (RIP Spock) it should be simply - 'make sure there is no short'
* Hot end Cooling ducts - too close to the hot end. I printed mine in ABS and yet still, they are melting slightly around the outlets of the twin fan ducts. They don't appear to be melting anymore, but they have both melted about 2mm off the top lip - I would not print these in PLA. If ABS, which I printed at 235c is getting soft and melting (which at 200c it will if held close enough to the nozzle) then PLA would probably start gooping mid print at a 200c print, and the duct fans might even melt and close up (maybe?)
* When you tighten your Arms, you just want them not to 'tick tack' and have no play around the ball joints. Tighten - wobble them. Tighten.. wobble them. When they are not 'tick tacking' then you are done. Nyloc nuts are notoriously hard to tell when you are at the screws maximum tightness - I could see myself easily over tightening them and snapping the black laser cut arms.
* I found it easier to apply all the grease to the ball joints as I put the rods on. I could get the grease all around the ball - if the arms are attached already, you can't. I'm a photocopier technician by day , so I had some good quality grease and oil for the job - the better it is, the less you need to re-do it.
* Make sure your endstops all "Click" when the carriages are raised before you even turn anything on. Mine didn't and I know what happens if they don't register from previous Delta builds, so make sure they all click - even if you mess up the X/Y/Z axis on your machine, that's an easy fix - but if an endstop doesnt click, it can lead to troubles.
That's about all I can think of for now...
If I were to give the kit a score out of 10, I would probably be going with an 9 at the moment, and the point only really deducted for lack of components and I think the Acrylic Top and Base pieces need to have 8.15mm bore holes, at 8mm they are just too tight.
The lack of a screen is something I guess I will get used to, or add one at a later date using a small Android tablet or something I that has an intergrated HTML interface (anyone tried a Pi on this yet?) and I would have not minded the extra cost, so that's where one point get's deducted. The reason is not for wanting, it's purely for extra safety and monitoring. Eg. I ran a laptop and set a print off.. the print finished but the laptop had gone to sleep. I was running VMware on a mac, in windows... so it had a dummy spit when it it booted back up. The problem was, the print had finished but the hot end did not set itself to idle, it was still on. I had no way besides pulling the plug at that time to turn the hot end off.
So while the machine is very neat and compact (boy is it compact) the lack of a panel, buttons or a screen can sometimes be a little frustrating. The cool HTML interface does make up for it somewhat tho, that was extremely well done.
The only bug so far I have found is trying to upload Gcode files via the interface that are large, up to about 4 megabytes was OK, but a 15mb Gcode file would give me AJAX errors and refused to upload no matter how many reboots. I had to take the SD card out and copy it manually. It printed the file fine (the large Groot sculpt) .
Pros:
* Very neat design, compact, great for a small desk printer.
* Great HTML interface, easy to use.
* Price / affordability - you pay for what you get. 8mm Rods (6 of, at 430mm long and 6 bearings) are inherently cheaper than Linear rails and linear bearing carriages, this is basic math - so yes, you get pretty good value with this kit. The Ethernet based Duet is handy. I connected mine to a wifi router and can print now from anywhere, which is great and beats remote desktop to other pc's to control printers.
* Print quality - I believe when calibrated well it will perform pretty well, even the first print was impressive for a machine I'd never printed on or built before.
* Build Ease! Compared to a CoreXy, a PrusaI3, a Kossel or Delta kit, Printrbot.. this is a piece of cake. What looks like more components when you look at the plastic parts ends up not being alot at all. once you have your 12 motor mounts on.. there ain't much left!
My daughter is going to build the next fisher we buy, (she's 10).. she watched my build this one in about 2-3 hours, I think she'll probably do it quicker than I did. White and blue is the next one, we are painting the black lasercut parts gloss white (so i'm told) with glow Blue ABS.
* Filament Thumbwheel is a handy addition. Saves pushing and breaking filament on delta machines.
* Very tiny Hot end! probably the smallest out of any of my machines. Heatup time due to steel pipes and nozzle is insane, like there practically is no preheat time.
* Build plate levelling system is unique (for me anyway) and well designed (can be very easily removed and put back in without worrying about levels)
* Filament supplied with kit is a nice quality/ consistent diameter.
* Looks sexy!!
Cons: Not many - it's in Beta so I'm trying to be nice lol...
* Black plastic parts can be fragile and break if forced at all (even lightly)
* No Screen buttons or panel, but you knew that before you bought it didn't you
so no great dissapointment.* Logos are very snug fit into the black front plates. Be careful not to snap a plate near the logo when you push it through - make sure its the right way round before you try.
* Bed levelling not very well explained in instructions. Needs revising.
* No cooling fans for the electronics. You have 3 motors surrounding a circuit board that has no heat sinks on it. I am adding a cooling fan underneath ASAP. it gets warm under there!
* Cooling fan seems to run constantly at full speed, cutting it down to about 225 instead of 255 would make it a tad quieter and not vibrate so much. I'm adding some kapton padding in there keep it tight around the fan exit.
That's about it really, it's been a pretty enjoyable process so far, especially in comparison to the first prusa I built - it is nice for once not to have to be loading code, flashing boards, checking measurements... re-flashing boards... argh..
It was great to just build it after breakfast and have it printing by lunch, although not 100% perfect prints, they are pretty close even at this stage - also no print failures to speak of. Each print job has gone well, and fast at 60ms feed for all of them. I have not gone faster yet, I like to wear them in a bit before stressing them out
Edited 4 time(s). Last edit at 08/03/2015 11:12AM by Geoffro.
|
Re: My Fisher experience (so far..) and advice for anyone about to build one August 03, 2015 05:37AM |
Registered: 10 years ago Posts: 14,672 |
Geoffro, many thanks for your comprehensive description of your build experience. I am sure others will find it useful.
I have just a few comments on some of the points you mention:
1. The web interface button "Auto bed compensation" should really be called "Auto delta calibration" when the web interface detects a delta printer, because that is what it does. If you want to run this at the start of every print, just include G32 in your slic3r start gcode.
2. The calibration process it uses is described at [reprap.org]. If you follow the steps listed in the last section on that page, you should find that you don't need to run delta calibration so often, and don't risk damaging the print surface if you forget to run it.
3. You can get a colour touch screen add-on called PanelDue. It's very nice (although I would say that, because I designed and manufacture it), but not cheap. You can either get the complete kit from Think3DPrint3D, or just the controller board and optionally the cable from me and source the touch panel yourself.
See [miscsolutions.wordpress.com] for more, and PM me letting me know what country you are in if you want a price for a controller board.
4. I think the cooling fan is a good idea, given that the Duet is mounted horizontally in a confined space, so I expect there will be little natural convective cooling.
Edited 1 time(s). Last edit at 08/03/2015 05:41AM by dc42.
Large delta printer [miscsolutions.wordpress.com], E3D tool changer, Robotdigg SCARA printer, Crane Quad and Ormerod
Disclosure: I design Duet electronics and work on RepRapFirmware, [duet3d.com].
I have just a few comments on some of the points you mention:
1. The web interface button "Auto bed compensation" should really be called "Auto delta calibration" when the web interface detects a delta printer, because that is what it does. If you want to run this at the start of every print, just include G32 in your slic3r start gcode.
2. The calibration process it uses is described at [reprap.org]. If you follow the steps listed in the last section on that page, you should find that you don't need to run delta calibration so often, and don't risk damaging the print surface if you forget to run it.
3. You can get a colour touch screen add-on called PanelDue. It's very nice (although I would say that, because I designed and manufacture it), but not cheap. You can either get the complete kit from Think3DPrint3D, or just the controller board and optionally the cable from me and source the touch panel yourself.

See [miscsolutions.wordpress.com] for more, and PM me letting me know what country you are in if you want a price for a controller board.
4. I think the cooling fan is a good idea, given that the Duet is mounted horizontally in a confined space, so I expect there will be little natural convective cooling.
Edited 1 time(s). Last edit at 08/03/2015 05:41AM by dc42.
Large delta printer [miscsolutions.wordpress.com], E3D tool changer, Robotdigg SCARA printer, Crane Quad and Ormerod
Disclosure: I design Duet electronics and work on RepRapFirmware, [duet3d.com].
|
Re: My Fisher experience (so far..) and advice for anyone about to build one August 03, 2015 05:58AM |
Registered: 8 years ago Posts: 20 |
|
Re: My Fisher experience (so far..) and advice for anyone about to build one August 03, 2015 09:56AM |
Registered: 8 years ago Posts: 475 |
|
Re: My Fisher experience (so far..) and advice for anyone about to build one September 02, 2015 01:07PM |
Registered: 8 years ago Posts: 5 |
|
Re: My Fisher experience (so far..) and advice for anyone about to build one September 04, 2015 09:48AM |
Registered: 8 years ago Posts: 24 |
|
Re: My Fisher experience (so far..) and advice for anyone about to build one March 16, 2016 02:44AM |
Registered: 8 years ago Posts: 20 |
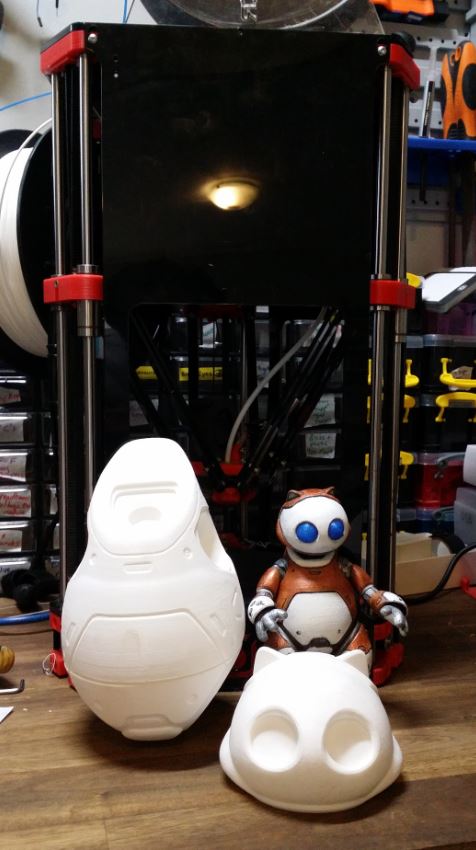
I thought I would add a small screenshot, it has been about 6 or so months since I built this kit and so far so good, I so wish Reprap had not closed down.. JUST when they had the machine to beat everyone else... Yes there are alot of asian clone companies (and sadly I've bought most of their cruddy printers) but the fisher was different to them all.
The only mods I've made to it is add a raspberry pi and 7 inch LCD so I can control it autonomously no matter where it is, no PC required.
I'm printing massive things with it now, here is a 200% scale version of my robokitty model
These were printed in amazing time.. what would have taken about 30 hours on my flashforge, or kossel.. took only 9 hours on the fisher... and with honestly better quality than my other machines. The small kitty was printed on a CTC and a flashforge in ABS, the large kitty in PLA on the fisher... it came out so smooth I barely need to sand it. Body is printed in two halves hence the big line... was too tall.
0.2mm, 20%infill, 2 shells.
Edited 2 time(s). Last edit at 03/16/2016 02:46AM by Geoffro.
|
Re: My Fisher experience (so far..) and advice for anyone about to build one March 16, 2016 10:50AM |
Registered: 9 years ago Posts: 189 |
Sorry, only registered users may post in this forum.