Fisher Enclosure!!!
Posted by Sean.kennedy
|
Fisher Enclosure!!! January 02, 2016 02:38PM |
Registered: 8 years ago Posts: 75 |
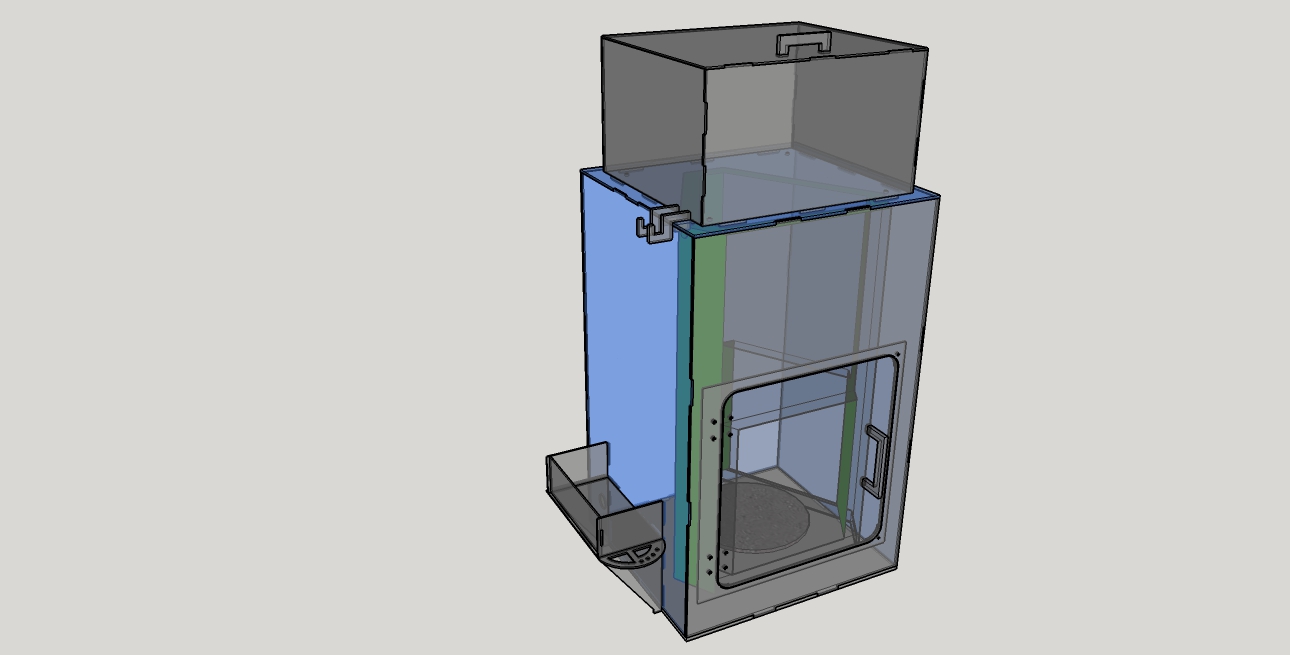
I have been working hard with this, and now have all the pieces into dxf files ready for my laser cutter on monday. Any Suggestions? I want to keep the build area clean, and warm, (my house is freezing) but im kinda worried about making the fan work to hard to cool the nozzle.
let me know what you think.
let me know what you think.
|
Re: Fisher Enclosure!!! January 02, 2016 08:07PM |
Registered: 8 years ago Posts: 443 |
First let me start by saying that I have built an enclosure for my Mendel 3 and it worked great, solves all the problems I had, I also added lighting and a smoke alarm to it......but an enclosure on a fisher is fairly pointless, will take up more work space and serve to clutter more than clutter.
The difference is the Mendel prints ABS which I've found does greatly benefit from an elevated local temperature, and a cold draught will adversely affect a print, the Fisher is a PLA machine, and it really doesn't have the same kind of temperature sensitivity.
The amount of work the fan does doesn't really change with ambient temperature, the fan is fixed speed, if anything it works less when pumping thin hot air than it does when pumping cold dense air, but what will change is the amount of work the nozzle heater does, in a hotter ambient temperature its power output will be reduced.
IF you are finding that the ambient temperature is having an adverse effect then a far the simpler and more elegant solution is to make panels that block the three side openings.
RepRapPro Mendel 3 Tricolour
RepRapPro Fisher
-Carbon Arms
-Easy adjust Carriage+effector
-axis stiffness mods
HE3D -600 delta
-Duet 0.8.5
-PanelDue
-DC42 Height probe
-RobotDigg metal components
Simplyfy3D
RS Design Spark CAD
|
Re: Fisher Enclosure!!! January 03, 2016 02:26AM |
Registered: 8 years ago Posts: 301 |
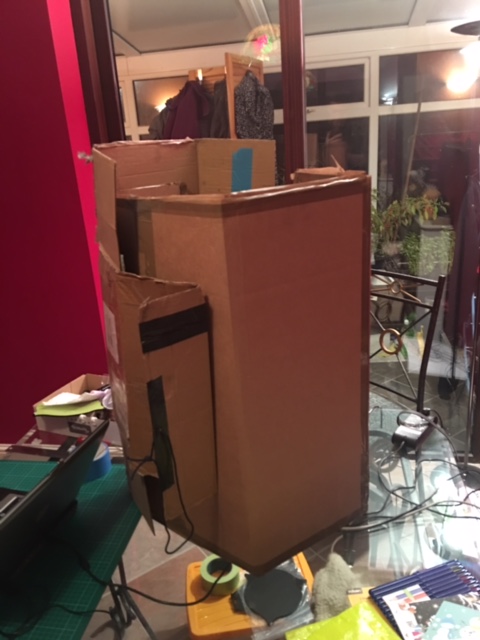
My house is cold too, especially at the moment as the heating is broken. What I found to be my biggest issue wasn't the ambient temperature but rather changing temperature. For example if someone left the front door open the breeze would create lines in the print. I got round this by printing a bit warmer. (220c for first layer then 205c for the rest with cheap £12kg filament) and by using a temporary enclosure made from cardboard - see attachment , might be worth a test to see if it helps before committing to laser cut parts.
Edited 1 time(s). Last edit at 01/03/2016 02:27AM by DADIY.

Edited 1 time(s). Last edit at 01/03/2016 02:27AM by DADIY.
|
Re: Fisher Enclosure!!! January 03, 2016 02:35AM |
Registered: 8 years ago Posts: 75 |
Thanks very much for the info @bgkdavis
That certainly puts my mind nope to ease about the fan concern. Panels on the sides won't work as the effector protrudes while printing near the it's limits.
As for temperature, though I understand it's a pla printer, I do, occasionally encounter warping, given im Canadian and love my cold.
As for other benefits, I have kids who live watching it print and have wandering hands... So it puts another level of security in there. Next is printer and desk cleanliness, tool organizer on the side, and caliper holder on the top (out of kid reach), as well as independent filament compartment that 1. Keeps filament dust free, 2. Will be packed with silicone jell the keep filament dry, 3. Will aleve stress on the side acrylic panel that holds the filament. 4. Will make the angle that filament enters the boden tube a far more comfortable angle.
Lastly, this printer is loud! It doesn't seem loud during the bustle throughout the day, but when kids are asleep and you try to sit down with a beer and watch the hockey... It's loud. So, at the moment I have a foam pad under the feet, and these cut the noise down by half. With the enclosure, I'm keeping the foam feet on the printer as well as putting foam feet on the enclosure! It will be a stealth printer.
@DADIY
That crazy awesome. Like mentioned above, I've encountered bad layers occasionally, but more frequent warping, even with a brim. But this it more about the larger picture of making it all a nice self contained unit encompassing all things mentioned above.
Edited 1 time(s). Last edit at 01/03/2016 02:42AM by Sean.kennedy.
|
Re: Fisher Enclosure!!! January 03, 2016 03:35AM |
Registered: 8 years ago Posts: 301 |
I found the carbon fibre rods reduced the noise levels but after 6 kgs of filament the cooling fan is getting louder, it's on my list to convert that to 12v so cheap fans can be used.
I was really suggesting you did a temporary enclosure just to prove it will fix your warping issue as that may be down to something else like bad bed adhesion or needing a raft.
I was really suggesting you did a temporary enclosure just to prove it will fix your warping issue as that may be down to something else like bad bed adhesion or needing a raft.
|
Re: Fisher Enclosure!!! January 03, 2016 03:54AM |
Registered: 8 years ago Posts: 75 |
Quote
DADIY
I found the carbon fibre rods reduced the noise levels but after 6 kgs of filament the cooling fan is getting louder, it's on my list to convert that to 12v so cheap fans can be used.
I was really suggesting you did a temporary enclosure just to prove it will fix your warping issue as that may be down to something else like bad bed adhesion or needing a raft.
The warping only occurs when my living room is below 19 degrees or so I have calculated from a smart thermometer and gopro I have next to the printer. I have 2 ultimaker 2s as well that I was temperature testing in the same way when I got them. I don't think it's bed adhesion, all my printers have buildtak and I'm quite used to its calibration.
Though I completely agree with you, a temp one could be fashioned to test it.
I'm going to have to look into these carbon fibre rods.
|
Re: Fisher Enclosure!!! January 03, 2016 05:03AM |
Registered: 8 years ago Posts: 301 |
The carbon fibre rods made a big difference to me. To make them I used two 5.5mm drill bit spaced at 160mm slotted into a scrap of wood and then as I glued up each set I could slide them over the drill bits to get them all perfectly spaced, I could have used some dowel or rod but didn't have anything the right size.
The mugen track rod ends that are popular only come in packs of 10 which is a shame, but you might have different luck in Canada.
The mugen track rod ends that are popular only come in packs of 10 which is a shame, but you might have different luck in Canada.
|
Re: Fisher Enclosure!!! January 03, 2016 05:32AM |
Registered: 8 years ago Posts: 75 |
Quote
DADIY
The carbon fibre rods made a big difference to me. To make them I used two 5.5mm drill bit spaced at 160mm slotted into a scrap of wood and then as I glued up each set I could slide them over the drill bits to get them all perfectly spaced, I could have used some dowel or rod but didn't have anything the right size.
The mugen track rod ends that are popular only come in packs of 10 which is a shame, but you might have different luck in Canada.
I will seriously have a look. I'm Canadian, but I'm on the south coast of England! There are a few model shops around here as well. I will have a look. My next projects are aluminium side plans to hold endstops and new build plate. I was just reading your other thread on them. I have lots of class at work, I may have a try.
|
Re: Fisher Enclosure!!! January 03, 2016 11:48AM |
Registered: 8 years ago Posts: 301 |

|
Re: Fisher Enclosure!!! January 03, 2016 12:07PM |
Registered: 8 years ago Posts: 75 |
Sorry, only registered users may post in this forum.