Panel designs optimized for metal
Posted by StupendousMan
|
Panel designs optimized for metal February 22, 2016 06:32AM |
Registered: 8 years ago Posts: 26 |
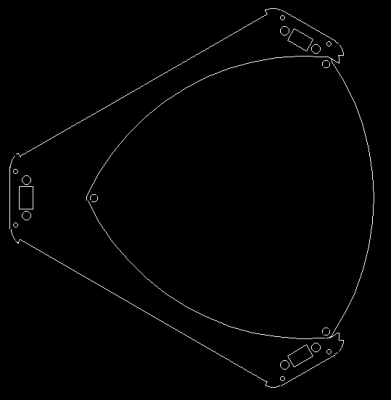
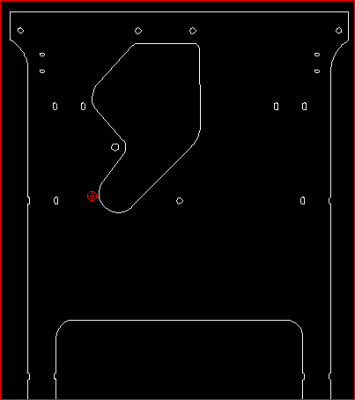
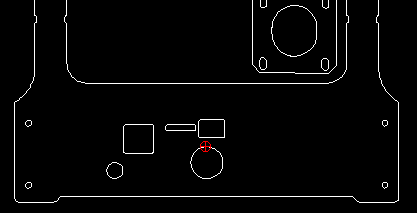
My next Fisher will use metal panels, cut by a local laser shop. That requires small changes:
- Originally M3 self tapping holes enlarged to 3mm, use nuts instead
- Bed height probing screw holes enlarged to 5mm, to make room for insulating bushings
- Added negative bevels to bottom and top plate inside corners, to negate effect of laser firmware that makes tiny radiuses instead of sharp corners (some of them do this, I learned the hard way)
Also made some other optimizations:
- Removed unused holes etc, and logo holes, to save a few euros worth of cutting time
- Removed effector rods from drawings, because metal ones would be poor anyway
- Made side panels 74mm taller to facilitate use of uncut 500mm linear rods
- Made a cutout in top panel to make room for bowden, bed now fits inside top for cutting
- Enlarged holes very slightly in extruder tensioning arm, to ease self tapping
Bug reports very welcome.
Edited 1 time(s). Last edit at 02/22/2016 05:08PM by StupendousMan.
|
Re: Panel designs optimized for metal February 22, 2016 09:54AM |
Registered: 8 years ago Posts: 301 |
I took the design for the outside panels and modified them for additional height to create the Fisher XT (using standard 800mm rods). I had these laser cut in 3 mm aluminium and all the screw holes etc were fine without modification. I also added extra points for the cable ties and micro switches so that the cabling could be distributed between all three axis.
If you would like to take a look the outside panels are on thingiverse here - [www.thingiverse.com]
DC42 Kossel 330mm x 2meters
My Thingiverse Creations
If you would like to take a look the outside panels are on thingiverse here - [www.thingiverse.com]
DC42 Kossel 330mm x 2meters
My Thingiverse Creations
|
Re: Panel designs optimized for metal February 22, 2016 10:40AM |
Registered: 8 years ago Posts: 26 |
I did see, and was inspired by, your XT panels. 
If I remember correctly, the only self tapping sized holes were in the bottom plate, for duet mounting. That is so the screws would stay put, making duet installation easier, I guess?
I'll have to check the extruder tensioning arm, actually...

If I remember correctly, the only self tapping sized holes were in the bottom plate, for duet mounting. That is so the screws would stay put, making duet installation easier, I guess?
I'll have to check the extruder tensioning arm, actually...
|
Re: Panel designs optimized for metal February 22, 2016 12:50PM |
Registered: 8 years ago Posts: 301 |
One thing I should mention, when I increased the height I had to increase the bowden tube length, the extra length means the top has to be removed for the homing to work otherwise there isnt room for the tube.
For PLA/PETG this hasnt been a problem, for ABS I have a cardboard enclosure but thats not tested with ABS yet - it does work to draft exclude PLA etc. When my solid state relay finally arrives I can test my new heated bed which is a laser cut MDF print bed, and a kaptop heater attached to glass. The MDF is notched to allow the cables to escape.
DC42 Kossel 330mm x 2meters
My Thingiverse Creations
|
Re: Panel designs optimized for metal February 22, 2016 05:20PM |
Registered: 8 years ago Posts: 26 |
Good point about the bowden tube, it does bind a bit while homing even on a standard Fisher. I took a chunk out of the top, and jammed the bed in there.
|
Re: Panel designs optimized for metal February 23, 2016 10:14AM |
Registered: 8 years ago Posts: 301 |
Nice - I like that idea. I'm not sure if it will add much rigidity as the aluminum panels seem to do this on their own.
One thing I would consider is a better way of mounting the micro limit switches, I'm sure that they move a little when cable tied adding to the calibration deviation.
Also if you are going to the hassle to extend wiring/tubes etc why not add more height than just 57mm.
DC42 Kossel 330mm x 2meters
My Thingiverse Creations
|
Re: Panel designs optimized for metal February 23, 2016 01:21PM |
Registered: 8 years ago Posts: 26 |
|
Re: Panel designs optimized for metal February 23, 2016 01:31PM |
Registered: 8 years ago Posts: 301 |
One other thing I regret is not adding a hole for a power switch.
DC42 Kossel 330mm x 2meters
My Thingiverse Creations
DC42 Kossel 330mm x 2meters
My Thingiverse Creations
|
Re: Panel designs optimized for metal February 24, 2016 10:56AM |
Registered: 8 years ago Posts: 40 |
Have you considered moving away from micro switches?
I have stopped using micro switches on my fisher, and moved over to open collector hall sensors
Hall Sensor NJK5002C Detective Distance 5-8mm DC 6V-36V 300mA NPN 3 Wire
which are £5 on Amazon, They give much more repeatable results for the homing positions compared to the micro switches. As an added bonus, the sensors have LEDs in them so you can see when they are triggered without looking at the web interface.
I designed a bracket to mount them to the top plate available on On Shape as Fisher Hall Bracket Then I just glued some small magnets to carriages.
Electrically - the ground and sense wires go to the two pins that the micro switches connect to on the duet, and then the power wire goes to the 5V pin on the expansion connector. Nothing else needed.
I'll try and pop some pictures up if it would be usedul
|
Re: Panel designs optimized for metal March 01, 2016 09:57AM |
Registered: 8 years ago Posts: 26 |
Made access hole for extruder in front panel.
...And 16mm power switch hole. Under the usb socket.
Edited 1 time(s). Last edit at 03/01/2016 10:42AM by StupendousMan.
...And 16mm power switch hole. Under the usb socket.
Edited 1 time(s). Last edit at 03/01/2016 10:42AM by StupendousMan.
|
Re: Panel designs optimized for metal March 01, 2016 10:54AM |
Registered: 8 years ago Posts: 26 |
|
Re: Panel designs optimized for metal March 02, 2016 08:11AM |
Registered: 8 years ago Posts: 40 |
Here is my fisher, the three hall sensors are on the dark blue brackets at the top. You can just see magnets i glued on to the cyan carriages as well. The hall sensors have a polarity so make sure you get the magnet the correct way round. The dark blue brackets allow the height and depth of the sensors to be individually adjusted . I'll try and get some better photos when i get home tonight. I have upgraded my fisher beta with a complete set of 1.0 plastics in ABS, and milled out modified new panels in polycarbonate, so now i have space for three extruders.
Edited 2 time(s). Last edit at 03/02/2016 08:16AM by jmg123.
Edited 2 time(s). Last edit at 03/02/2016 08:16AM by jmg123.
|
Re: Panel designs optimized for metal March 03, 2016 05:11AM |
Registered: 8 years ago Posts: 26 |
That's one happy looking Fisher. 
The hall sensors are definitely nicer, but I did reach decent accuracy with microswitches last night. At first I tried epoxy, that was a messy failure. What worked was drilling the switch mounting holes in panels to 3mm, and honing the microswitch holes slightly with a 2.5mm drill bit. The microswitch holes are already 2.5mm diameter, but removing a tiny bit of material allows M3 screws to self tap nicely.
I now get deviations under 0.03. I don't know if that's good or not, but significantly better than the 0.5mm range of before.
Edit: Attached panels with 3mm mounting holes for microswitches, moved slightly inward to avoid carrier hitting switch body.
Edited 2 time(s). Last edit at 03/03/2016 07:45AM by StupendousMan.
Sorry, only registered users may post in this forum.


