Assembly woes.
Posted by Neil Mudford
|
Assembly woes. September 20, 2016 04:03AM |
Registered: 7 years ago Posts: 10 |
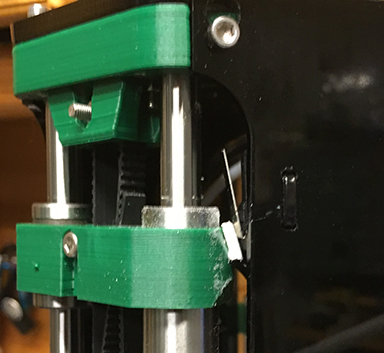
One of my carriages won't move the microswitch lever sufficiently. The gap between the steel rod and the Perspex cover is a good 0.5mm wider than the other two. I'm talking to the supplier about this and will let you know the outcome.
As you can see, it travels further up than it should.
Rgds Neil.
As you can see, it travels further up than it should.
Rgds Neil.
|
Re: Assembly woes. September 20, 2016 03:49PM |
Registered: 8 years ago Posts: 7 |
See the uploaded image
. Move the part on the red cycle on the top side NOT the button

|
Re: Assembly woes. September 22, 2016 07:05PM |
Registered: 7 years ago Posts: 10 |
|
Re: Assembly woes. September 23, 2016 05:31AM |
Registered: 8 years ago Posts: 301 |
Ideally, you want all the carriages to be at the same height when they home. You might want to consider printing a new carriage to replace this one when you get the printer working or at least placing wedges on the carriages.
Out of interest was the carriage getting to the absolute top before the switch didn't trigger or was it getting stuck roughly where you have it in the photo. I have seen the later happen on a Fisher and the fix was to increase the motor currents and slow down the initial home in homedelta.g.
For example the default -
G1 S1 X180 Y180 Z180 F5000 ; move all carriages up 320mm, stopping at the endstops
becomes
G1 S1 X180 Y180 Z180 F4000 ; move all carriages up 320mm, stopping at the endstops
and in config.g
M906 X800 Y800 Z800 E1000 ; Set motor currents (mA)
became
M906 X900 Y900 Z900 E1000 ; Set motor currents (mA)
DC42 Kossel 330mm x 2meters
My Thingiverse Creations
|
Re: Assembly woes. September 23, 2016 06:01AM |
Registered: 7 years ago Posts: 21 |
|
Re: Assembly woes. September 23, 2016 06:28PM |
Registered: 7 years ago Posts: 10 |
Hi Dadiy,
Roughly as per the photo. The toothed belt top surplus prevented further movement up (as visible in the first photo).
I used my callipers to measure the drop from the underside of the top brackets to the carriage top on the x-tower and used that to set the correct distance. I made the wedge slightly thicker before gluing it into position then used a small file to narrow it until the microswitch clicked at the right height.
Rgds,
Neil.
|
Re: Assembly woes. September 24, 2016 04:02AM |
Registered: 8 years ago Posts: 301 |
I think I would have trimmed the belt surplus a little but you might also find more power to the motors pushed it to the side.
Just be sure to have a measure after homing to check the distance between carriages and the top are all the same.
DC42 Kossel 330mm x 2meters
My Thingiverse Creations
Just be sure to have a measure after homing to check the distance between carriages and the top are all the same.
DC42 Kossel 330mm x 2meters
My Thingiverse Creations
|
Re: Assembly woes. September 24, 2016 05:30PM |
Registered: 7 years ago Posts: 10 |


|
Re: Assembly woes. September 26, 2016 02:51AM |
Registered: 8 years ago Posts: 301 |
Here are a couple links for UK fans -
[reprapltd.com]
[emaker.io]
DC42 Kossel 330mm x 2meters
My Thingiverse Creations
[reprapltd.com]
[emaker.io]
DC42 Kossel 330mm x 2meters
My Thingiverse Creations
|
Re: Assembly woes. September 26, 2016 12:36PM |
Registered: 7 years ago Posts: 10 |
Sorry, only registered users may post in this forum.