|
Re: Mendel 90 - Anyone want dibond parts? May 02, 2013 04:38PM |
Registered: 11 years ago Posts: 76 |

|
Re: Mendel 90 - Anyone want dibond parts? May 04, 2013 12:09AM |
Registered: 11 years ago Posts: 18 |
|
Re: Mendel 90 - Anyone want dibond parts? May 04, 2013 01:38AM |
Registered: 11 years ago Posts: 76 |
|
Re: Mendel 90 - Anyone want dibond parts? May 06, 2013 04:02AM |
Registered: 11 years ago Posts: 18 |
Ah, a wise decision.
Shame about the nuts! That sort of thing can really be a downer, but I'm sure you'll forget all about it when that first print finishes and you hold that object a machine you built has brought into reality! Even if it looks very little like the object it was suppose to be, that first print will always be one of the most beautiful things you will ever see.
That's how I felt anyway (with a bit of added flair!)
Here's my first print for reference:
It's a RepRap coin.
http://www.thingiverse.com/thing:12413
I would recommend the object as a first print for everyone, it's a nice quick and simple object. See if you can do a better first object than I did!
(just so you know, that first print is in no way representative or my current print quality)
EDIT: Yes it is an oval, nobody's perfect.
Edited 1 time(s). Last edit at 05/06/2013 04:03AM by King Sandvich.
Shame about the nuts! That sort of thing can really be a downer, but I'm sure you'll forget all about it when that first print finishes and you hold that object a machine you built has brought into reality! Even if it looks very little like the object it was suppose to be, that first print will always be one of the most beautiful things you will ever see.
That's how I felt anyway (with a bit of added flair!)
Here's my first print for reference:

It's a RepRap coin.
http://www.thingiverse.com/thing:12413
I would recommend the object as a first print for everyone, it's a nice quick and simple object. See if you can do a better first object than I did!
(just so you know, that first print is in no way representative or my current print quality)
EDIT: Yes it is an oval, nobody's perfect.
Edited 1 time(s). Last edit at 05/06/2013 04:03AM by King Sandvich.
|
Re: Mendel 90 - Anyone want dibond parts? June 20, 2013 07:24AM |
I am sure I can supply dibond cnc cut parts for these much cheaper than that original quote. send me an email, and if you have cad file i can easily include it while cutting other jobs (we cut dibond all the time). As usual better to cut as many as possible at same time, as setup takes longer than cutting this stuff! the material is about $100 a sheet to buy from PSP plastics, it is 1200 x 2400mm square, so how many parts will fit? other option is cut these from other jobs end of sheets, but this would spread parts over multiple jobs, but in the end you have all you need.
Anyway, get in touch, routercut at clear dot net dot nz. (spambot free email text!). if you would like to arrange details to supply more to others, i am happy to oblige and help the open source community with cheap cnc cut parts courtesy routercut dot com. we are based in seaview wellington. regards, tony. ps, can someone tell forum admin that the "recaptcha" dosent work well, it takes 20 tries to make it post!
Anyway, get in touch, routercut at clear dot net dot nz. (spambot free email text!). if you would like to arrange details to supply more to others, i am happy to oblige and help the open source community with cheap cnc cut parts courtesy routercut dot com. we are based in seaview wellington. regards, tony. ps, can someone tell forum admin that the "recaptcha" dosent work well, it takes 20 tries to make it post!
|
Re: Mendel 90 - Anyone want dibond parts? June 21, 2013 11:52PM |
Registered: 11 years ago Posts: 1,592 |
|
Re: Mendel 90 - Anyone want dibond parts? July 01, 2013 06:14AM |
Registered: 11 years ago Posts: 76 |
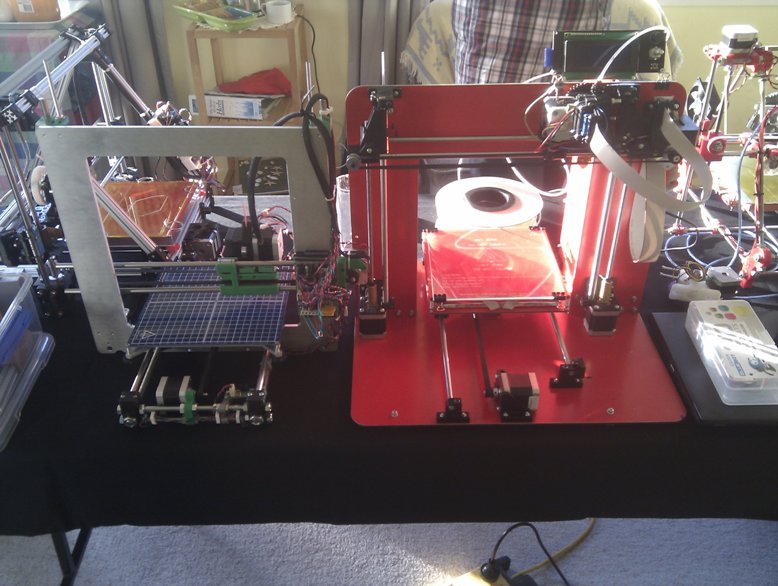
Finally got my Mendel90 assembled and my first successful print was Sunday night!
I went to an Auckland printer meet up and got a photo of it next to an i3, quite an interesting comparison.
Still a bit of work to do tidying up wires, making a spool holder and trying to find some plastic for the cable chain.
I'll post a bit about the build process for you other NZ guys.
Edited 1 time(s). Last edit at 07/01/2013 06:16AM by isolt.
I went to an Auckland printer meet up and got a photo of it next to an i3, quite an interesting comparison.
Still a bit of work to do tidying up wires, making a spool holder and trying to find some plastic for the cable chain.
I'll post a bit about the build process for you other NZ guys.

Edited 1 time(s). Last edit at 07/01/2013 06:16AM by isolt.
|
Re: Mendel 90 - Anyone want dibond parts? July 02, 2013 03:58AM |
Registered: 11 years ago Posts: 18 |
|
Re: Mendel 90 - Anyone want dibond parts? July 02, 2013 05:08PM |
Registered: 11 years ago Posts: 76 |
Yeah I'm excited!
Len wanted to know how the build went so I thought I'd write it up here for anyone else trying to build one from scratch.
Screws:
Buying the exact screws on the BOM is quite important in places. A lot of those hex headed ones can't be reached except with a spanner (a 5.5mm spanner that was smaller than any I owned, and my adjustable wrench was too fat).
The lengths are also important especially on the M3x45's that replace the extruder motor screws, I had to grind mine down from 50mm's.
I couldn't find any 2 Gauge x 13mm self tapping screws anywhere! They're needed to secure the microswitches and covers. I tried to drill the microswitches to suit a 4 Gauge but cracked the first one. Eventually I got some M2.5 (the largest that would fit the switch) and tapped the holes to suit.
Washer thickness's are also important, my M4 washers were too fat to fit into my Y idler assembly, I had to hunt round for some thinner ones.
Wiring:
Instead of buying 20 way and 26way ribbon cable I just bough 2m of 26 way (there was a minimum sale of 1m).
This meant that I could strip the cable down to 15 wires going the the X carriage rather than 14 and still have enough left over for the X endstop and motor. I way use that extra wire for LED's or something.
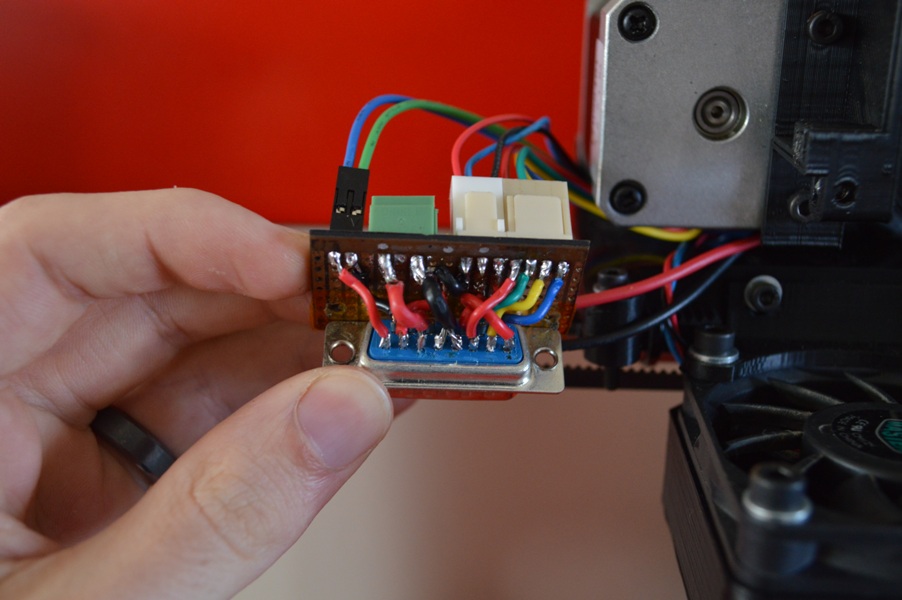
I didn't have Nopheads extruder PCB so I had to make my own. I couldn't find a PCB mount 15 way D Connector so had to go for a solder one. I ended up sandwiching my board between the D motor bracket and the cover, that worked well.
If you're going to make your own board remember that the electronics use MOSFETs so there's a common 12v and it switches the ground. This will be important if you only want to use 1 wire for the fan like in the original. There is a spare wire (or 2 is you use 26way ribbon) so this isn't entirely necessary.
]
Assembling my Wades block the centre of one bearing jammed on a raised part from slightly droopy bridging. If your parts aren't perfect you may want to countersink this to 13mm to avoid and jamming.
I turned my heated bed around because I couldn't stand the though of all the writing being backward (if you buy 2m of 26 way ribbon there will be enough for this and the X assembly). Also noticed that my MKA2 hotbed has a hole at the front for 3 way mounting rather than 4. A hole could be drilled in the front centre of the Dibond sheet now that it isn't over the Ribbon cable cut out,
Still to do:
Print a spool holder.
Print some electronics enclosures.
Source some Polypropylene strip for the cable chain. Where do you get this? I was going to use an A3 folder but even that wasn't big enough.
Edited 1 time(s). Last edit at 07/02/2013 05:10PM by isolt.
Len wanted to know how the build went so I thought I'd write it up here for anyone else trying to build one from scratch.

Screws:
Buying the exact screws on the BOM is quite important in places. A lot of those hex headed ones can't be reached except with a spanner (a 5.5mm spanner that was smaller than any I owned, and my adjustable wrench was too fat).
The lengths are also important especially on the M3x45's that replace the extruder motor screws, I had to grind mine down from 50mm's.
I couldn't find any 2 Gauge x 13mm self tapping screws anywhere! They're needed to secure the microswitches and covers. I tried to drill the microswitches to suit a 4 Gauge but cracked the first one. Eventually I got some M2.5 (the largest that would fit the switch) and tapped the holes to suit.
Washer thickness's are also important, my M4 washers were too fat to fit into my Y idler assembly, I had to hunt round for some thinner ones.
Wiring:
Instead of buying 20 way and 26way ribbon cable I just bough 2m of 26 way (there was a minimum sale of 1m).
This meant that I could strip the cable down to 15 wires going the the X carriage rather than 14 and still have enough left over for the X endstop and motor. I way use that extra wire for LED's or something.
I didn't have Nopheads extruder PCB so I had to make my own. I couldn't find a PCB mount 15 way D Connector so had to go for a solder one. I ended up sandwiching my board between the D motor bracket and the cover, that worked well.
If you're going to make your own board remember that the electronics use MOSFETs so there's a common 12v and it switches the ground. This will be important if you only want to use 1 wire for the fan like in the original. There is a spare wire (or 2 is you use 26way ribbon) so this isn't entirely necessary.

]
Assembling my Wades block the centre of one bearing jammed on a raised part from slightly droopy bridging. If your parts aren't perfect you may want to countersink this to 13mm to avoid and jamming.
I turned my heated bed around because I couldn't stand the though of all the writing being backward (if you buy 2m of 26 way ribbon there will be enough for this and the X assembly). Also noticed that my MKA2 hotbed has a hole at the front for 3 way mounting rather than 4. A hole could be drilled in the front centre of the Dibond sheet now that it isn't over the Ribbon cable cut out,
Still to do:
Print a spool holder.
Print some electronics enclosures.
Source some Polypropylene strip for the cable chain. Where do you get this? I was going to use an A3 folder but even that wasn't big enough.
Edited 1 time(s). Last edit at 07/02/2013 05:10PM by isolt.
|
Re: Mendel 90 - Anyone want dibond parts? July 03, 2013 01:51AM |
Registered: 10 years ago Posts: 38 |
|
Re: Mendel 90 - Anyone want dibond parts? July 03, 2013 05:15AM |
Registered: 11 years ago Posts: 18 |
|
Re: Mendel 90 - Anyone want dibond parts? July 03, 2013 06:03AM |
Registered: 11 years ago Posts: 76 |

|
Re: Mendel 90 - Anyone want dibond parts? July 03, 2013 06:37AM |
Registered: 10 years ago Posts: 8 |
|
Re: Mendel 90 - Anyone want dibond parts? July 03, 2013 08:42PM |
Registered: 11 years ago Posts: 76 |
Parts, so many parts...
Screws - EDL/Atom fasteners/Bunnings
Electronics/pulleys/belts/motors/bearings - Ebay (reprap discount)/Aliexpress
Electronics components - Jaycar/surplustronics
Hot end - made it myself - Dotmar/atom fasteners
Smooth rod - Trade tools
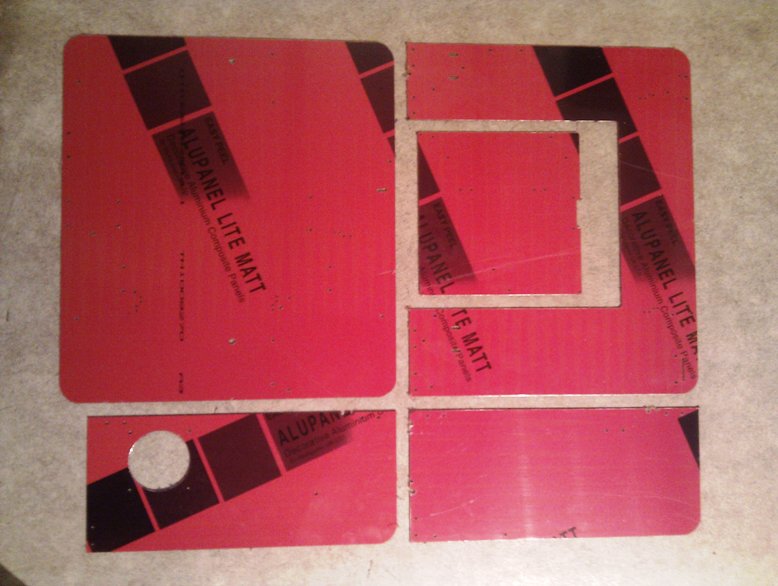
ACM/Dibond - CREATIVE Cam NZ Ltd
ali extrusions/threaded rods/misc - had it at home
Hope that helps
Screws - EDL/Atom fasteners/Bunnings
Electronics/pulleys/belts/motors/bearings - Ebay (reprap discount)/Aliexpress
Electronics components - Jaycar/surplustronics
Hot end - made it myself - Dotmar/atom fasteners
Smooth rod - Trade tools
ACM/Dibond - CREATIVE Cam NZ Ltd
ali extrusions/threaded rods/misc - had it at home
Hope that helps
|
Re: Mendel 90 - Anyone want dibond parts? July 04, 2013 04:56AM |
Registered: 11 years ago Posts: 18 |
|
Re: Mendel 90 - Anyone want dibond parts? July 07, 2013 12:04AM |
Registered: 11 years ago Posts: 76 |
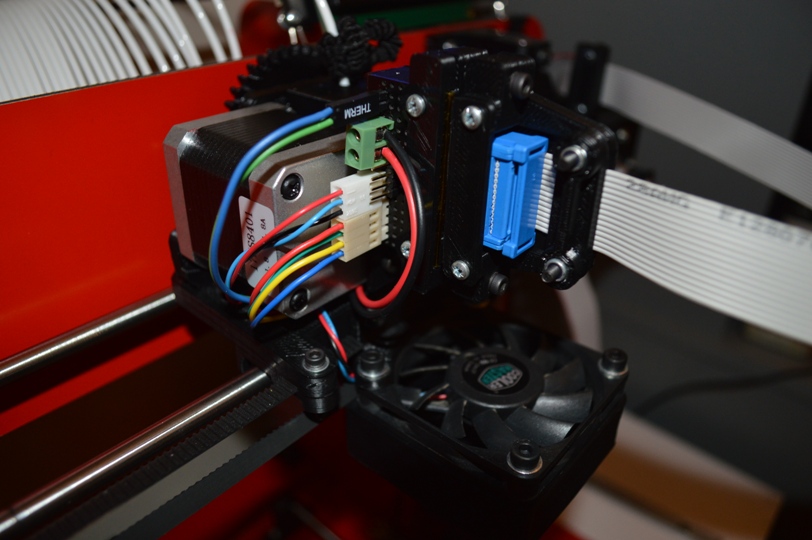
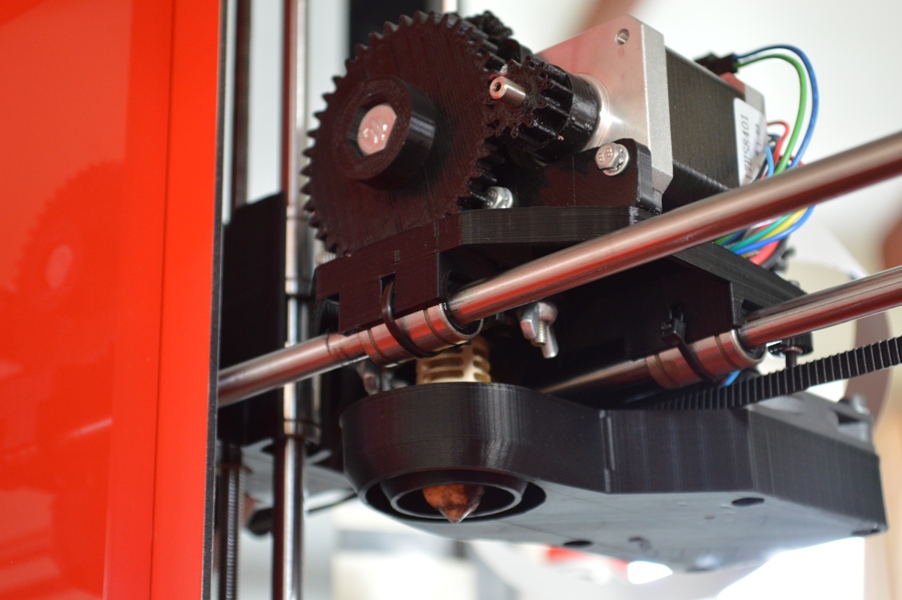
More pictures!
The extruder wiring design is quite nice, the connecting cable just detaches at a Dplug, then the entire extruder assembly can be removed. If the hot end is blocked the element wires and thermistor wires unplug and the Jhead can be pulled off.
This is why you want a PCB mount Dplug. there are two spare wires in the 15 way ribbon cable. I've connected them up to the spare headers seen above. The other pins on the headers as well as the fan supply share the hot end supply.
Underside of extruder showing quick release wing nuts and fan duct.
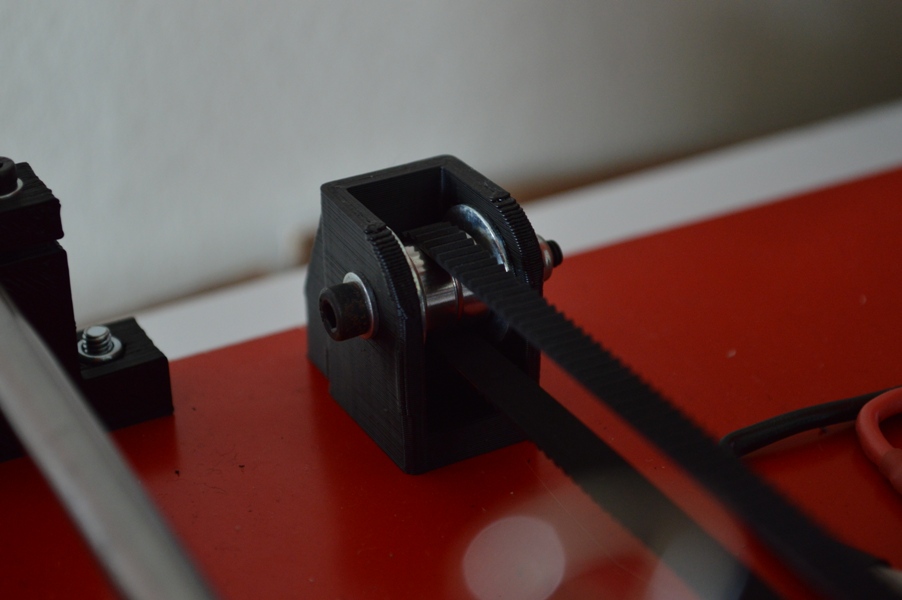
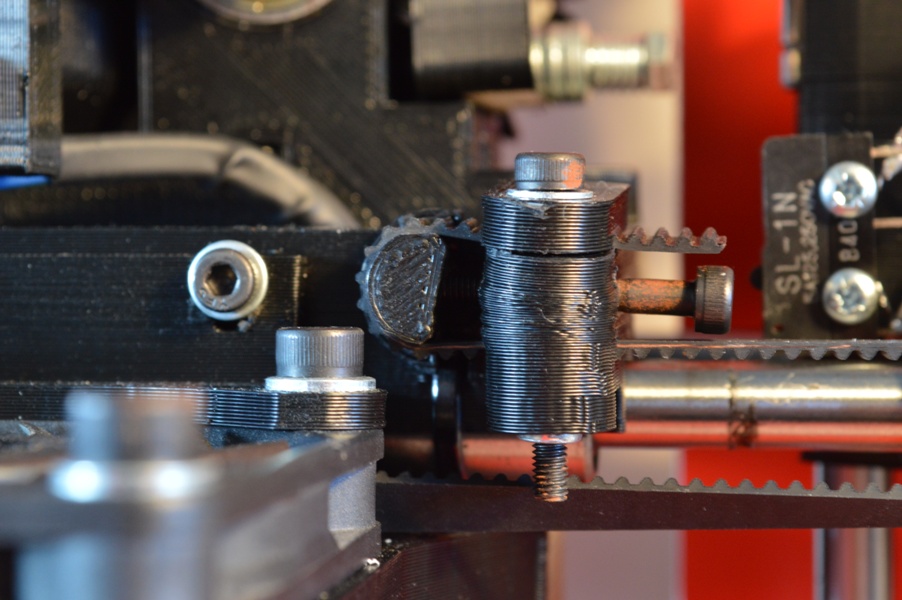
X belt tightener, I love this thing.
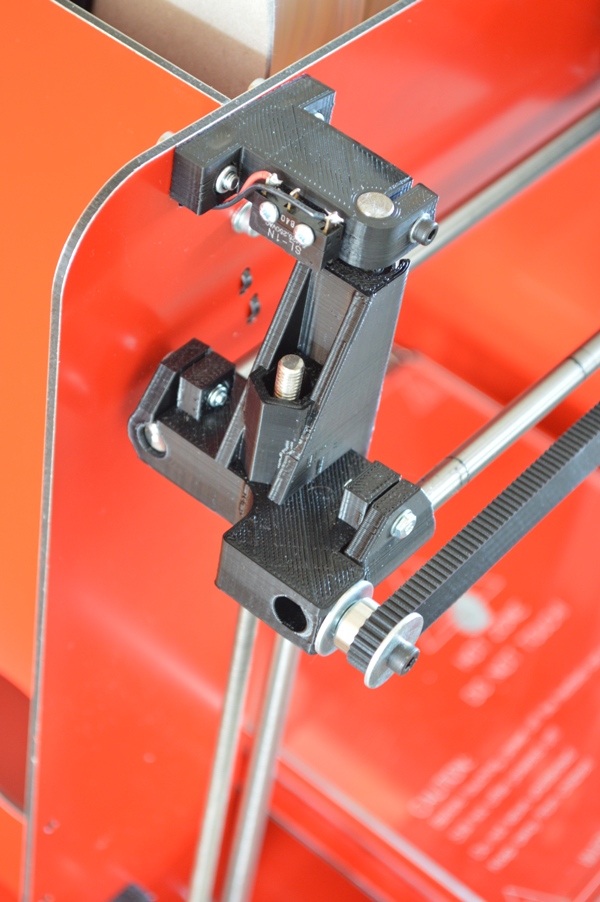
X idler, this is where you want hex head screws so you can tighten up that back rod clamp.
Y idler, make sure you use the correct thickness washers, even then its a tight squeeze getting them in there.
Don't try and make your own leadscrew couplers. Took me three times to get these good enough and they're still not perfect.
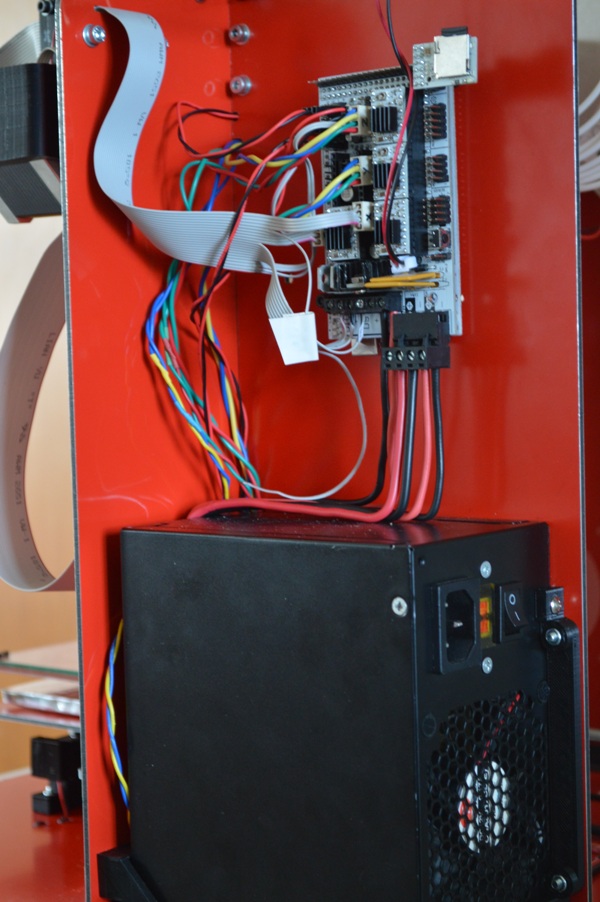
Ramps needs a bit of tidying and a case. You can see a couple of spare wires that lead to the X carriage. Maybe LED lighting one day?
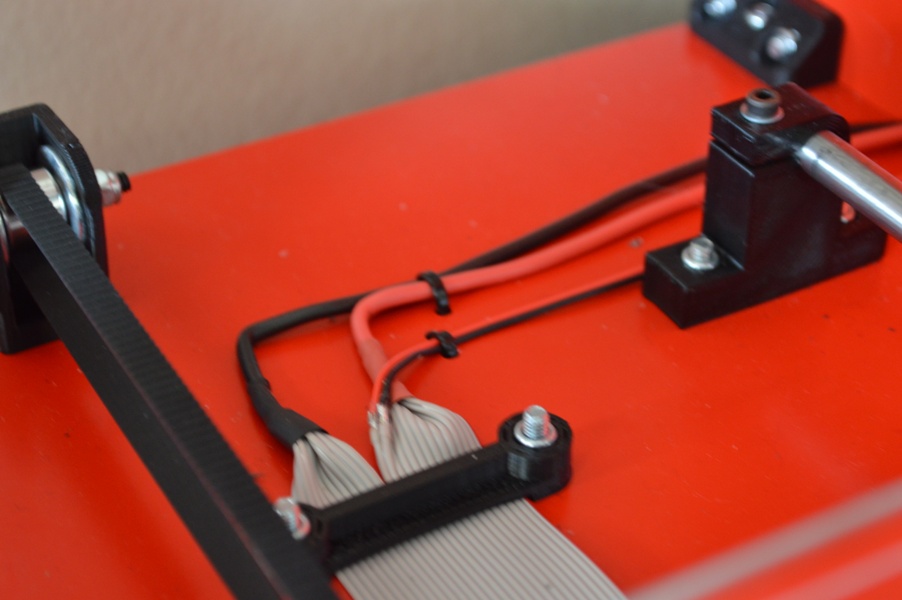
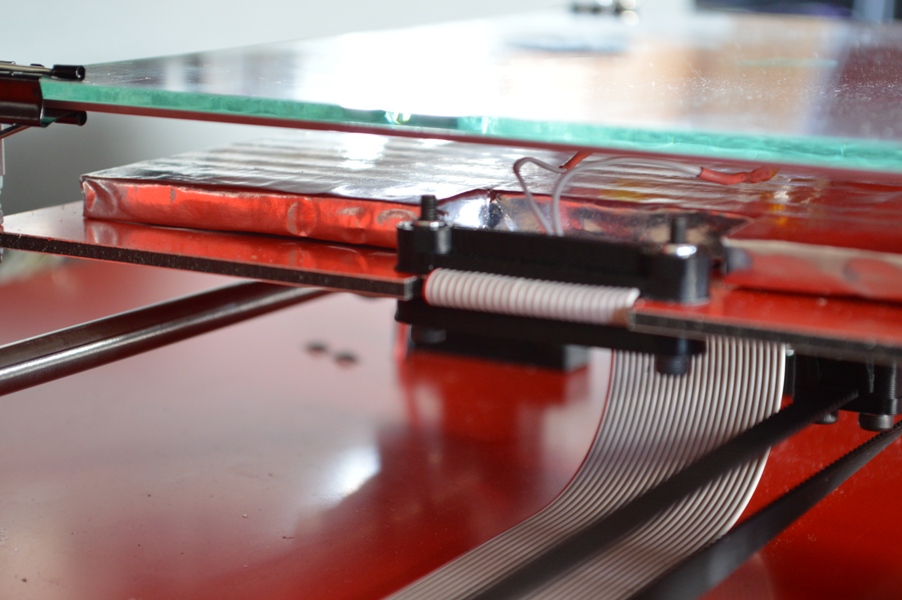
Hot bed Wiring.
Edited 1 time(s). Last edit at 07/07/2013 12:09AM by isolt.

The extruder wiring design is quite nice, the connecting cable just detaches at a Dplug, then the entire extruder assembly can be removed. If the hot end is blocked the element wires and thermistor wires unplug and the Jhead can be pulled off.

This is why you want a PCB mount Dplug. there are two spare wires in the 15 way ribbon cable. I've connected them up to the spare headers seen above. The other pins on the headers as well as the fan supply share the hot end supply.

Underside of extruder showing quick release wing nuts and fan duct.

X belt tightener, I love this thing.

X idler, this is where you want hex head screws so you can tighten up that back rod clamp.

Y idler, make sure you use the correct thickness washers, even then its a tight squeeze getting them in there.

Don't try and make your own leadscrew couplers. Took me three times to get these good enough and they're still not perfect.

Ramps needs a bit of tidying and a case. You can see a couple of spare wires that lead to the X carriage. Maybe LED lighting one day?


Hot bed Wiring.
Edited 1 time(s). Last edit at 07/07/2013 12:09AM by isolt.
Attachments:
open | download - DSC_0087.JPG (174.8 KB)
open | download - DSC_0088.JPG (155 KB)
open | download - DSC_0090.JPG (147.6 KB)
open | download - DSC_0093.JPG (191 KB)
open | download - DSC_0094.JPG (164.4 KB)
open | download - DSC_0097.JPG (233.9 KB)
open | download - DSC_0099.JPG (149.8 KB)
open | download - DSC_0104.JPG (216 KB)
open | download - DSC_0105.JPG (223.1 KB)
open | download - DSC_0119.JPG (193.5 KB)
|
Re: Mendel 90 - Anyone want dibond parts? July 07, 2013 04:58AM |
Registered: 11 years ago Posts: 18 |
|
Re: Mendel 90 - Anyone want dibond parts? September 12, 2013 04:02AM |
Registered: 15 years ago Posts: 81 |
I figured I should post a couple of pics now that my Mendel90 is up and running. I'm using it with a RUMBA kit I got during their kickstarter, it's a very nice board and is supported by current Marlin. I can send/post my Configuration.h for anyone interested. For a power supply I'm using this one from dealextreme that has adjustable output voltage. I've got it cranked up to 14.5V and the hot end and HBP come up to temperature in no time at all compared to my old ATX-powered Sells Mendel.
For the extruder PCB I basically did the same as isolt and used headers mounted to a piece of protoboard sandwiched under the D motor bracket lid. For extruder itself I converted it to a semi-accessible by carving out a channel at the top with my dremel so I can check whether the hobbing is getting clogged (I initially had some trouble with filament losing grip, due to having temperatures a bit low).
I am going to make a mount that lets the smart controller sit on the top right (possibly adjustable angle), and have yet to take the corners off the mirror tile I am using on the build platform (currently just have it sitting slightly skew to avoid the M3 bolt heads.
I have set up my start gcode to use nopheads ooze-free unattended start and I'm definitely liking that.
|
Re: Mendel 90 - Anyone want dibond parts? September 12, 2013 04:32AM |
Registered: 11 years ago Posts: 76 |
Hey looking nice! What do you slice with? I've been using cura but can't get the start gcode to work the way I want.
If you're looking for some cable chains I bought a large stationary folder for mine. It was the only source of polypropylene I could find that was long enough. If you're up this way again I've got quite a bit left.
Did you see my post on LCD controllers, mine could have been positioned better.
If you're looking for some cable chains I bought a large stationary folder for mine. It was the only source of polypropylene I could find that was long enough. If you're up this way again I've got quite a bit left.
Did you see my post on LCD controllers, mine could have been positioned better.

Sorry, only registered users may post in this forum.