i3 aurora kit build.
Posted by clogs51
|
i3 aurora kit build. October 14, 2014 11:41PM |
Registered: 9 years ago Posts: 118 |
Since i'm not building a mendel90,i thought i should start a new thread.
I've had a closer look at the controller,and it appears to be a Melzi Ardentissimo v.1.
These boards are reputed to be rather poor,incomplete,or shorted tracks being some of the complaints.
Should i just bin this thing,and get something better?
There's no point in using it if it's going to do nothing more than give me grief.
There's some software on the cd called Cura.Does anyone have any experience with this?
Or should i go with something better known,such as Marlin or Repetier?
Questions,questions.
Edited 1 time(s). Last edit at 10/15/2014 01:14AM by clogs51.
|
Re: i3 aurora kit build. October 15, 2014 02:57AM |
Admin Registered: 13 years ago Posts: 6,998 |
Read the number on the cpu chip.. if it a 644p, bin it, if its a 1284p its worth trying it.
Cura is a well know slicer and control software, basically there are two contenders pronterface/slic3r or Cura (there are others..)
Marlin or Repetier are firmware (though there is Repetier-host, control software)
Cura is a well know slicer and control software, basically there are two contenders pronterface/slic3r or Cura (there are others..)
Marlin or Repetier are firmware (though there is Repetier-host, control software)
|
Re: i3 aurora kit build. October 15, 2014 04:51AM |
Registered: 9 years ago Posts: 118 |
|
Re: i3 aurora kit build. October 15, 2014 05:18AM |
Admin Registered: 13 years ago Posts: 6,998 |
|
Re: i3 aurora kit build. October 15, 2014 05:23PM |
Registered: 9 years ago Posts: 118 |
|
Re: i3 aurora kit build. October 17, 2014 12:36AM |
Registered: 9 years ago Posts: 118 |
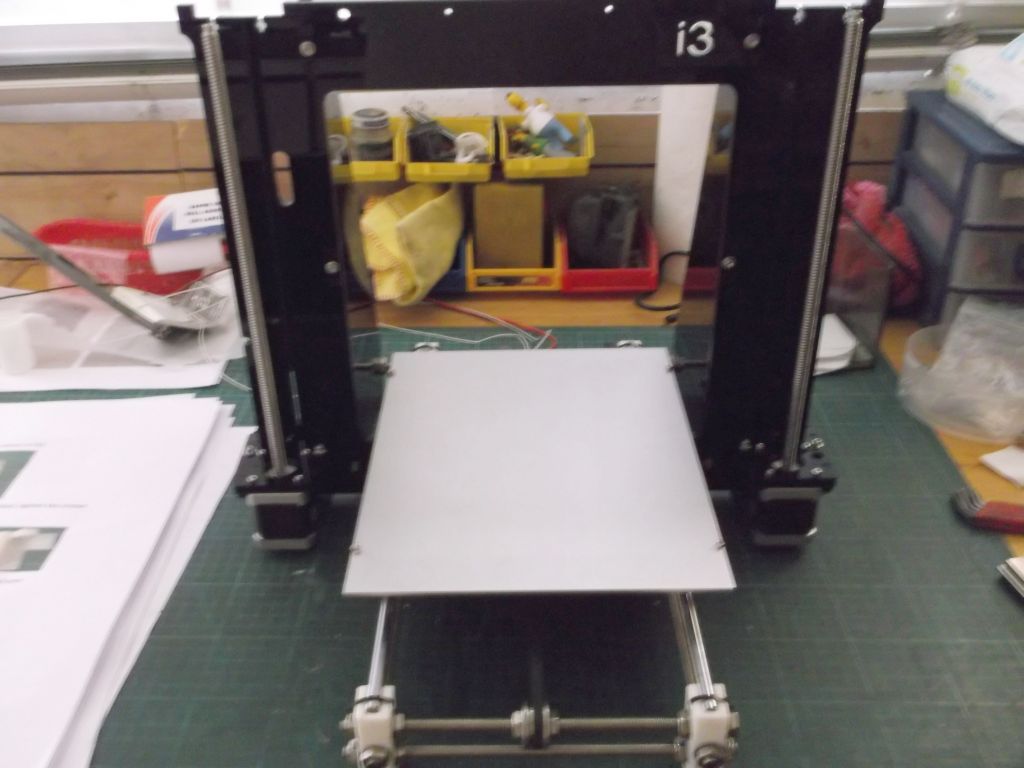
Done a bit more assembling today,and after several mistakes,due to the "chinglish" instructions,I now have a frame sitting upright,and the sliding bed mounted.
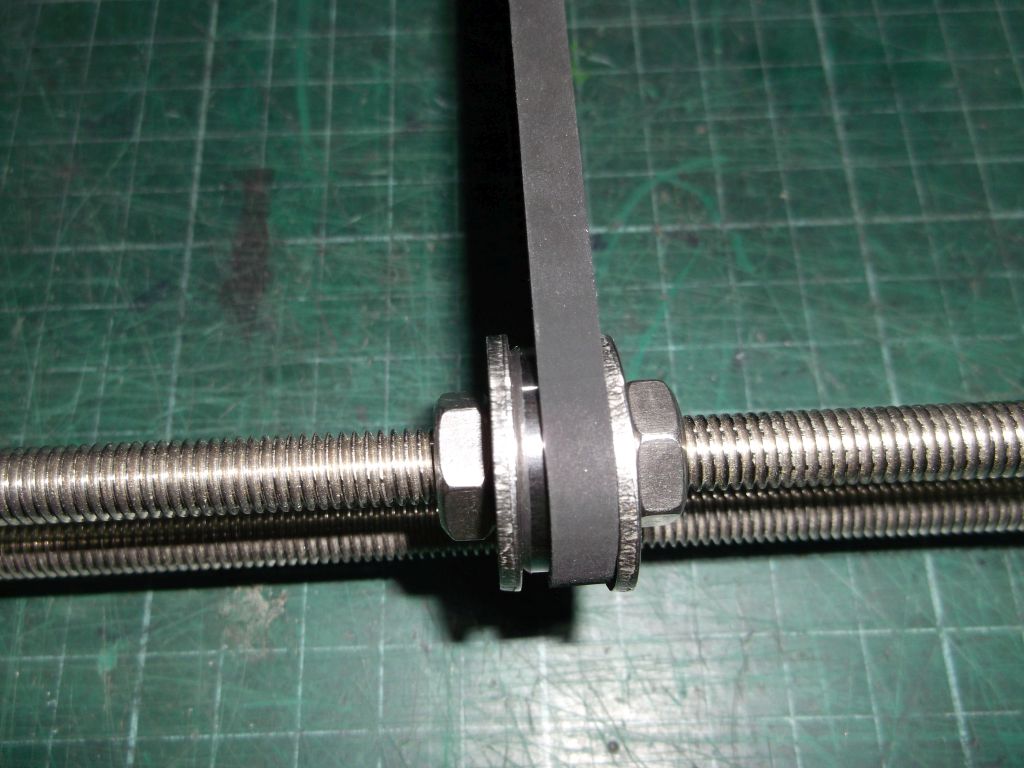
One thing that bothers me a bit is the y-axis idler.It's just a bearing between 2 washers,and if i tighten the nuts enough to hold the bearing,there is of course no turning movement to run the belt on.
There is also no provision for adjusting the belt,other than perhaps taking it off and shortening the belt.
If i leave the nuts finger tight,they keep working loose.I will have to see if i can knock up some sort of belt guide/bearing holder like the standard i3.I suppose it was a cost cutting measure.
I presume i will have the same problem on the x-axis.
The bed surface is an aluminium plate rather than glass.Is that going to be a problem?I have heaps of glass in the shed,so it wouldn't be a big deal to cut a piece to fit.
The instructions to start were ok,but a bit further in they're fairly sketchy,especially since the photos aren't very clear.But a bit of mystery adds spice to the proceedings .
.
A few pics attached.
Seeing the photo's reminded me of something else. Is the end stop micro switch supposed to contact the frame,or the edge of the bed?It seems to be too low to contact the bed.
One thing that bothers me a bit is the y-axis idler.It's just a bearing between 2 washers,and if i tighten the nuts enough to hold the bearing,there is of course no turning movement to run the belt on.
There is also no provision for adjusting the belt,other than perhaps taking it off and shortening the belt.
If i leave the nuts finger tight,they keep working loose.I will have to see if i can knock up some sort of belt guide/bearing holder like the standard i3.I suppose it was a cost cutting measure.
I presume i will have the same problem on the x-axis.
The bed surface is an aluminium plate rather than glass.Is that going to be a problem?I have heaps of glass in the shed,so it wouldn't be a big deal to cut a piece to fit.
The instructions to start were ok,but a bit further in they're fairly sketchy,especially since the photos aren't very clear.But a bit of mystery adds spice to the proceedings
.A few pics attached.
Seeing the photo's reminded me of something else. Is the end stop micro switch supposed to contact the frame,or the edge of the bed?It seems to be too low to contact the bed.
|
Re: i3 aurora kit build. October 17, 2014 12:39AM |
Registered: 9 years ago Posts: 118 |
|
Re: i3 aurora kit build. October 17, 2014 03:21AM |
Admin Registered: 13 years ago Posts: 6,998 |
Python 2.7.2 is a computer language, not a firmware
You adjust the Y tension with the large m10 nuts on the end of the Y axis, if you loosen the outside ones and tighten the inside ones the belt get tightened
Re the idler, normally you have small washers inside the large ones that only sit on the centre part leaving the outer ring free to turn.
You adjust the Y tension with the large m10 nuts on the end of the Y axis, if you loosen the outside ones and tighten the inside ones the belt get tightened
Re the idler, normally you have small washers inside the large ones that only sit on the centre part leaving the outer ring free to turn.
|
Re: i3 aurora kit build. October 17, 2014 04:32PM |
Registered: 9 years ago Posts: 118 |
Thanks for that,Dust,I'll get some smaller washers.
So if I unstand you correctly,the python stuff is no use to me?Odd thing to put on the cd then. .I'll have to download Marlin.
I see what you mean about the belt adjustment.I've tracked down a pla idler block on thingiverse.Guess that will be my first print.
Back to the batcave.
So if I unstand you correctly,the python stuff is no use to me?Odd thing to put on the cd then.
.I'll have to download Marlin.I see what you mean about the belt adjustment.I've tracked down a pla idler block on thingiverse.Guess that will be my first print.
Back to the batcave.
|
Re: i3 aurora kit build. October 17, 2014 06:32PM |
Registered: 11 years ago Posts: 1,592 |
Hi Clogs,
You can also cure the washer/ bearing problem by "dishing" the washers. I used a metal rod with a rounded end (or centre punch) and just struck the centre of the washer (the hole) into a wood cavity.
_______________________________________
Waitaki 3D Printer
You can also cure the washer/ bearing problem by "dishing" the washers. I used a metal rod with a rounded end (or centre punch) and just struck the centre of the washer (the hole) into a wood cavity.
_______________________________________
Waitaki 3D Printer
|
Re: i3 aurora kit build. October 17, 2014 06:36PM |
Admin Registered: 13 years ago Posts: 6,998 |
|
Re: i3 aurora kit build. October 18, 2014 12:10AM |
Registered: 9 years ago Posts: 118 |
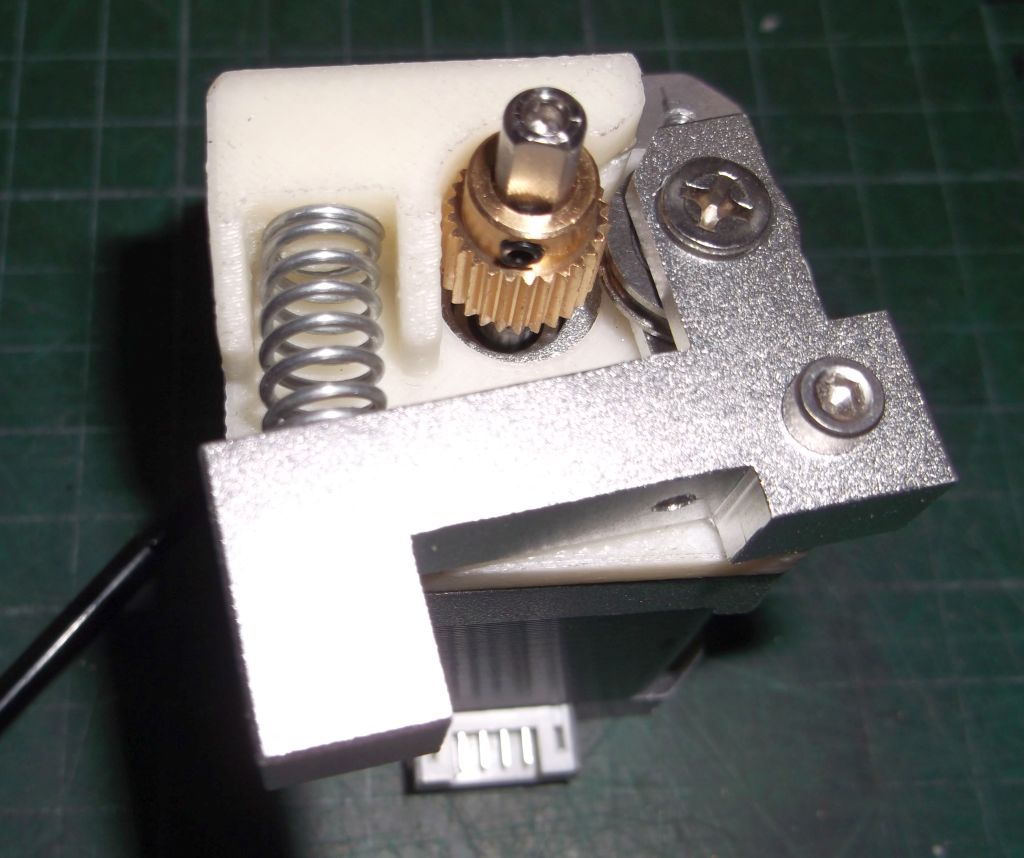
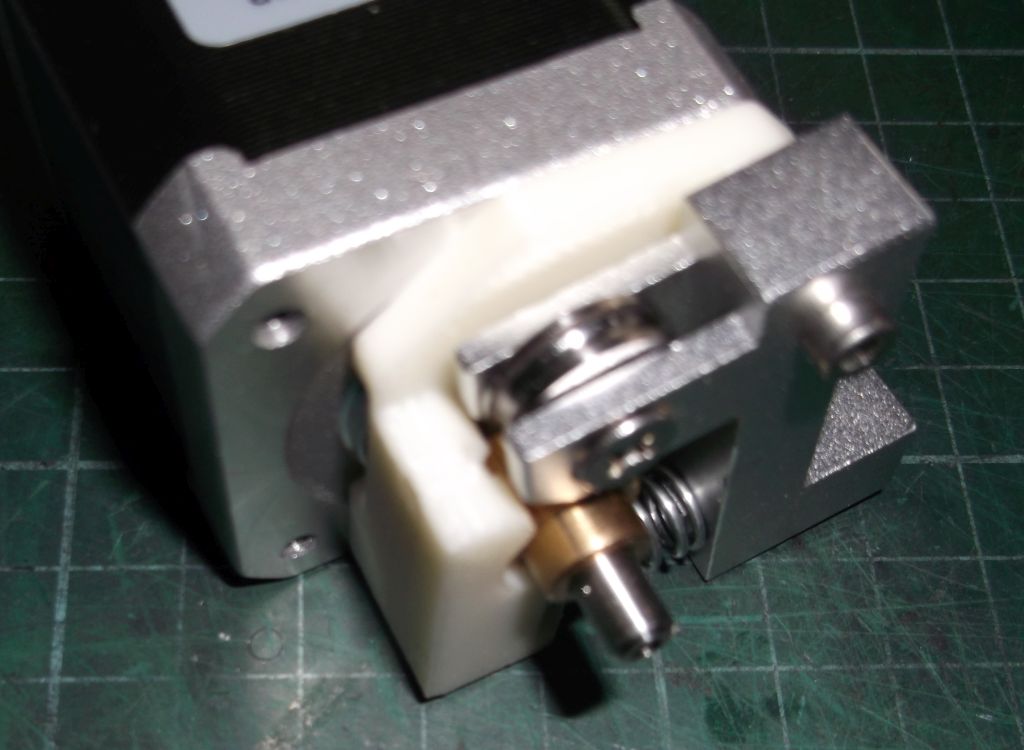
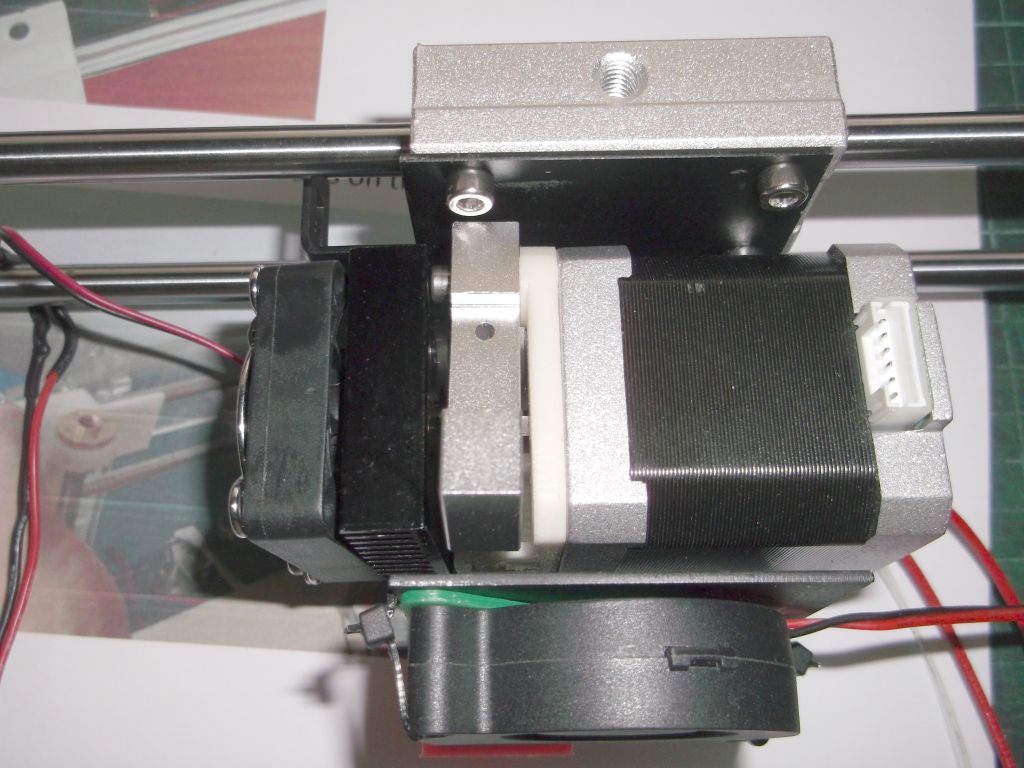
Didn't get much time in the workshop today.Assembled the extruder and x-axis .I have no idea if this is a common extruder,or something the vendor dreamed up.The filament goes in the hole,and is then drawn through by the brass gear running in a close fitting semi-circular channel.
As you can see on one of the photos,I left out something,causing the distorted look of the fan and heatsink.I actually had a couple of plastic spacers in the bag,which improved the fit a lot.
The aluminium "arm" that the filament passes through is spring loaded by quite a strong coil spring.I don't know why it's there,is there a reason for that spring?
Looking at the hot end,the whole aluminium block must be heated up,rather than just the nozzle.A spare thermistor was provided,in addition to the one already fitted.Are they a fragile part?
Sorry about all the questions,peeps,but it's all so new to me.Enjoying it though
|
Re: i3 aurora kit build. October 18, 2014 04:53AM |
Registered: 10 years ago Posts: 167 |
That looks like something the vendor dreamed up.
The spring is forcing the disk on the right hand side against the brass gear in order to push the fillament against the teeth of the gear as it turns so that it will move down as the gear bites into the fillament.
on a wades they use a bearing instead of that groved disk and also most commonly a hobbed bolt instead of that brass gear, though there are geared versions like the all mettal gear system that Dust used on his I3.
The hot end appears to be using a seperate heated block to make machining easier, just cut drill and tap a rectangle of aluminiumn or whatever metal that is rather than how the Jhead does it, where the nozzle and heater block are in one part.
also you may (speculation) be able to remove the nozzle on yours and swap it out for a different size without having to remove the whole hotend.
|
Re: i3 aurora kit build. October 18, 2014 06:34AM |
Admin Registered: 13 years ago Posts: 6,998 |
|
Re: i3 aurora kit build. October 18, 2014 06:13PM |
Registered: 9 years ago Posts: 118 |
Yes, the nozzle is a separate part,so it would be easy to swap.
For a reason i can't remember,I had to measure the thickness of the acrylic.
It seems to be around 7.5-7.6mm,rather than the 8 I thought it was.Maybe they size it with the paper on both sides included!
We'll see how well(or how badly) the extruder works,I can always get a better one later on.
All in all,I'm quite surprised by the quality of the hardware.I've had cap screws from Chinese manufacturers that resembled soft cheese,
but the stuff provided here is really good.The threaded rod is stainless,and the smooth rods nicely chrome plated.
The z-axis drive is actually an acme thread,and directly attached to the motors.I can't see any coupling at all.
Don't know how I'd get on if that ever needed replacing.
|
Re: i3 aurora kit build. October 18, 2014 06:20PM |
Admin Registered: 13 years ago Posts: 6,998 |
|
Re: i3 aurora kit build. October 18, 2014 07:33PM |
Registered: 9 years ago Posts: 118 |
|
Re: i3 aurora kit build. October 19, 2014 01:22AM |
Registered: 9 years ago Posts: 118 |
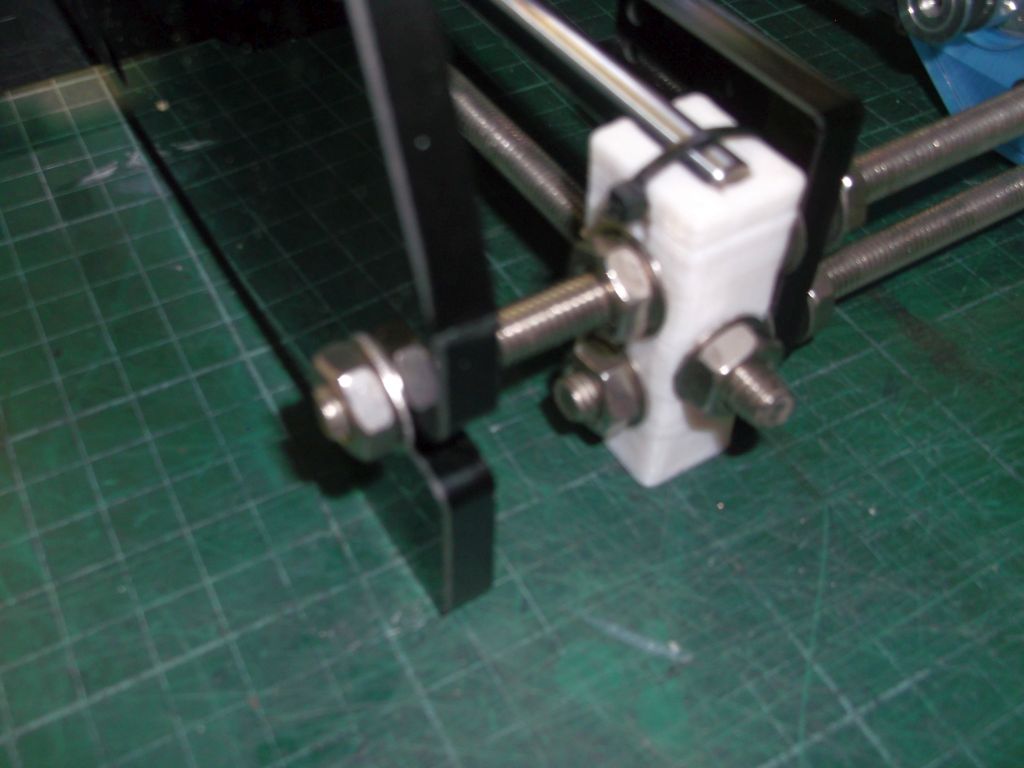
Finished mechanical assembly today.The only problem was the y-axis end stop not contacting the sliding frame.
I made a little adapter plate out of 1/8th plexiglass scrap,moving the micro switch about 15mm further towards the sliding block holding the acrylic frame plate.
The instructions at this point proclaim"you are success".Woohoo.
Wiring up next.
I made a little adapter plate out of 1/8th plexiglass scrap,moving the micro switch about 15mm further towards the sliding block holding the acrylic frame plate.
The instructions at this point proclaim"you are success".Woohoo.
Wiring up next.
|
Re: i3 aurora kit build. October 22, 2014 07:33PM |
Registered: 9 years ago Posts: 118 |
Got printer finished,and now working through set up.Should the 2 fans on the extruder be running from the start?Mine are not.
Only the power supply fan is running.Also,the Migbot program doesn't seem to recognize the end stops while calibrating,yet when levelling the table,
everything seems to work as it should,i.e. checking each corner in turn.
I had to remove the plastic shroud that directs air to the print,'cause it was hitting the bed before the nozzle was low enough.
I may be able to remove a bit from the bottom,but I'll have to reshape the part a bit to redirect the airflow.
Is a PLA printed partable to be reheated to modify the shape?
|
Re: i3 aurora kit build. October 22, 2014 08:46PM |
Registered: 10 years ago Posts: 167 |
there should be a setting in the firmware to have the fans always on
otherwise if you wire them to the PSU directly instead of the control board you will have them always on, just wont get any of the features that the controller gives you.
Edited 1 time(s). Last edit at 10/22/2014 08:48PM by Zerker.
otherwise if you wire them to the PSU directly instead of the control board you will have them always on, just wont get any of the features that the controller gives you.
Edited 1 time(s). Last edit at 10/22/2014 08:48PM by Zerker.
|
Re: i3 aurora kit build. October 24, 2014 03:45AM |
Registered: 9 years ago Posts: 118 |
Printed my first part today,a new Y-idler bearing holder thingy.I'm quite surprised how smooth the part came out,I expected it to be rougher.
But for some reason,the end stops just don't seem to be recognized.When starting the print,the bed gets pulled right to the end,
but the motor keeps running for a bit,rattling the belt over the pulley.
This happened on X and Y axes,Z is fine..Also,the print is not centred on the bed,but that doesn't worry me so much.
Would optical end stops be a better option?
|
Re: i3 aurora kit build. October 24, 2014 05:47AM |
Registered: 10 years ago Posts: 167 |
take this bit of advise below with a grain of salt, i havent wired up my endstops yet, but this is what I think could be happening based on what I've read so far
the print file may have gcode in it to home the bed before printing. in your firmware's configuration.h you should have a bit of code that resembles this
the homed axis will move from wherever it is until it reaches the min or max depending on which direction you have set home to be, or the endstop triggers whichever happens first, this is why the motor eventually stops.
you may find that either your endstop is not quite aligned with the axis which can cause it to touch the lever but not fully engage leaving it un- triggered.
or that you have not wired up the endstop correctly, if you have it wired to normally open instead of normally closed then you would have to set the firmware to ignore endstops or invert in order to get the motors to move in their home direction (otherwise it would be constantly told it had reached the endstop).
depending on your firmware if it is an out of date version there may be other errors causing this that are not fixable other than changing to a later version.
Hope this helps
i don't know what slicer or host software you are using but in some you can preview the file and its position relative the printers bed, this file you are printing may have been set to print near the edge rather than the middle.
the print file may have gcode in it to home the bed before printing. in your firmware's configuration.h you should have a bit of code that resembles this
#define X_MAX_POS 200
#define X_MIN_POS 0
#define Y_MAX_POS 200
#define Y_MIN_POS 0
the homed axis will move from wherever it is until it reaches the min or max depending on which direction you have set home to be, or the endstop triggers whichever happens first, this is why the motor eventually stops.
you may find that either your endstop is not quite aligned with the axis which can cause it to touch the lever but not fully engage leaving it un- triggered.
or that you have not wired up the endstop correctly, if you have it wired to normally open instead of normally closed then you would have to set the firmware to ignore endstops or invert in order to get the motors to move in their home direction (otherwise it would be constantly told it had reached the endstop).
depending on your firmware if it is an out of date version there may be other errors causing this that are not fixable other than changing to a later version.
Hope this helps
i don't know what slicer or host software you are using but in some you can preview the file and its position relative the printers bed, this file you are printing may have been set to print near the edge rather than the middle.
|
Re: i3 aurora kit build. October 24, 2014 05:50AM |
Admin Registered: 13 years ago Posts: 6,998 |
move off all your endstop and send a m119 to the printer
then hold done one endstop and repeat
test all endstops...
if one seems to fail swap one that work onto that connection. and try again... till you work out if its the endstops or the board. if it is the board it could be firmware or a fault...
more info when you have tested and worked out what is going on some more
|
Re: i3 aurora kit build. October 24, 2014 05:08PM |
Registered: 9 years ago Posts: 118 |
Please forgive my ignorance,Dust,but what's a "m119"?
The software is "Migbot".It does have an option of testing the endstops,but this doesn't appear to be working.
The chap i bought my pla from gave me some extra switches,so i'll test the ones on the machine,and replace if there are duds.
I'll have a look at the connections on the board too.Thanks guys.
|
Re: i3 aurora kit build. October 24, 2014 07:30PM |
Admin Registered: 13 years ago Posts: 6,998 |
|
Re: i3 aurora kit build. October 27, 2014 03:57AM |
Registered: 9 years ago Posts: 118 |
I have moved one of the bearing holders on the Y-axis to hopefully negate the overrunning.But I'll still have this problem on the Z.
My first few prints went fine,now it's all gone to sh*t.It looks like the nozzle is scraping the bed,because it tears the kapton tape.
I have levveled the bed so many times,i'm seeing stars.I simply don't seem to get a consistent level.
It's pulling the print off once it gets a few lines down.
I tried hairspray on top of the kapton,no improvement.
I noted that on most I3's the frame plate under the heated bed is aluminium.On mine this is acrylic,and actually can be flexed a bit with my fingers.
Could this be the cause of the inconsistent levelling?
There is another difference that might have some bearing(excuse the lousy pun)
On the left side ,I have a small,almost square holder for the lm8uu bearing.The one on the right however is a longer version,almost double the length.
This is not in the middle of the y-axis.I moved it back a bit to get closer,but it's still a bit offset.
On other I3's,there seem to be 2 short bearing holders,like the one on the left side.It,s almost as if the supplier ran out of the short holders,and chucked in a long one instead.
some of the drawings actually show the 2 short ones on the right.
Anyway,i've ordered a set of 4 short holders,but it'll be a while till they get here.In the meantime,I'm going to get some blue tape to try.
Btw.,what,if anything,will dissolve pla?The nozzle is in quite a mess now,so i'd like to clean it out.
|
Re: i3 aurora kit build. October 27, 2014 04:35AM |
Registered: 9 years ago Posts: 118 |
|
Re: i3 aurora kit build. October 27, 2014 07:26PM |
Registered: 10 years ago Posts: 167 |
have you used a spirit level to check that the X axis is level? if you level the bed but the x axis does not stay level then the bed will not be parallell with it anymore.
this could be a problem if one Z motor is turning more or less than the other.
did you wire your Z motors in series? Linked Pic is parallel which is not what you want, you want this
if this is not the problem and it is instead that your Bed is warping, I'd find this strange, you should have an air gap between the HBP PCB and the bed base (the acrylic) and your aluminumn plate should be clamped to the PCB (not sure if it makes a diff but you should probably clamp all 4 corners)
you can insulate the back of the PCB with ceramic blanket so that it focuses the heat up and minimize the heat going down.
Did you get your endstops sorted?
if you havent found how to send Gcode commands to your printer, try running this host software when you have the printer connected to a PC [www.pronterface.com] Select the same Baud rate as what is set in Configuration .h or whater your firmware calls it's config file, check that you have the right Com connected ( I only see Com3 when using the laptop) and hit connect, you should see the console on the right show that it connected. down the bottm right is a text bar where you can submit Gcode to the printer, m119 will ask for the current state of all the endstop pins for your controll board, if you have only 3 conected it will still reply for the other pins as well
|
Re: i3 aurora kit build. October 27, 2014 11:53PM |
Registered: 9 years ago Posts: 118 |
I wasn't aware the z motors were supposed to be in series.There was nothing in the instructions to tell me.I do indeed have them in parallel.
Anyway,I did manage a small print this morning,but when i tried printing the same item again,it started pulling off the bed again.
I covered the bed with blue painter's tape.
I 'm thinking half the trouble is the nozzle.I cleaned it out before doing the 1st print.Should it need cleaning after every 2 prints or so?
It's a pity i sold my lathe,otherwise i could have run up a few nozzles myself.I may be tempted just to get a small lathe for little jobs like that.
I'm considering re-flashing the firmware to see if I can improve the bed's positioning.It's still wildly overrunning the y-axis,and a bit less on x,
but still annoying.I imagine it's not doing the belts any favours either.I can't adjust the travel in the software,so would i be able to do that in the firmware?
I haven,t been able to connect the board's firmware to my laptop so far,yet the migbot software runs ok on it.
I do have a couple of usb/uav dongles,but i'm not sure they are the right ones to do this job.It will need further investigation.
Thanks for the pronterface link,zerker,i have downloaded the package,and wil transfer it to my laptop.
|
Re: i3 aurora kit build. October 28, 2014 02:51AM |
Registered: 10 years ago Posts: 167 |
according to the wiki [reprap.org] it should use a USB Mini, not the micro that most smart phones (not apple) eventually adopted as a standard around 2012, if you have an older smart phone or even an old MP3 player or camera, it is possible that it uses the correct USB Micro cable.
looking at this for you, I'm glad I went for a RAMPS Board. if you get fed up with the Melzi you can always opt to switche to a different controler board.
if like me you found that wiki page a bit Too Long Didn't Read, then jump straight to this link to look at how to change the firmware.
[reprappro.com]
You appear to need an arduino Uno as well, not sure if a different Arduino board could be used.

Sorry, only registered users may post in this forum.