incomplete part
Posted by clogs51
|
incomplete part December 22, 2014 12:46AM |
Registered: 9 years ago Posts: 118 |
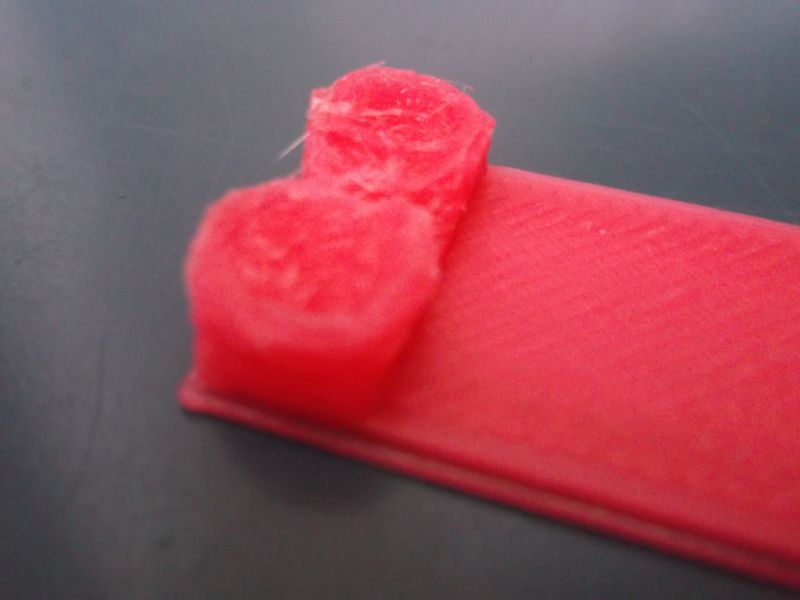
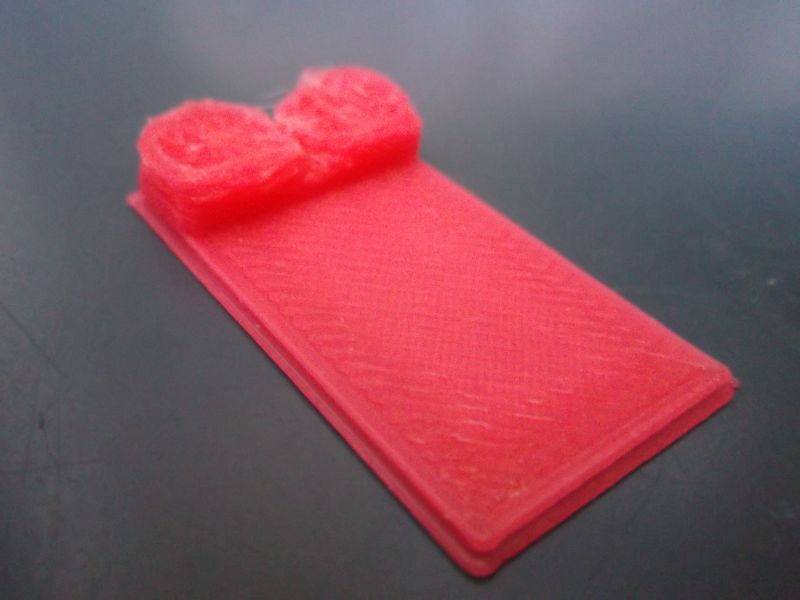
I now have my printer printing at least something,but not yet of satisfactory quality.
As you can see from the pics,I was trying to print a flag for an opto endstop.
Nice simple piece.
The base is very nice,but the raised part at the end turned into a blobby mess.
It's supposed to be 10mm high,with a 3mm hole in the centre.
[www.thingiverse.com]
The end piece got to about 5mm high,then got knocked off the bed by the nozzle.
The sides of the raised piece seemed to have run outwards,as if they were squashed .
I have tried 4 of these flags by now,and not 1 of them came out right.
Any tips?
|
Re: incomplete part December 22, 2014 05:52AM |
Registered: 11 years ago Posts: 1,592 |
|
Re: incomplete part December 22, 2014 03:08PM |
Registered: 10 years ago Posts: 77 |
Also - put some fan onto the part. It can be as simple as a desk fan alongside the printer initially but ultimately you will benefit from a 40mm or 50mm fan mounted on the machine and directed onto the part. I have one 40mm fan mounted on the extruder and speed controlled by RAMPS plus one 50mm fan mounted on an adjustable arm that I can fit anywhere and direct at any problem areas. This helps printing PLA with regions of small area or big overhangs or bridging. You want to be able to turn fans down or off as well because too much cooling can result in poor layer to layer adhesion or "tufting up" when printing the first solid layers on top of larger areas of low density infil. You don't really want your fans to run during the first few layers or it will affect bed adhesion and you don't want the fans blasting the hot end too much as it will take too much heat from it.
With experience you will soon work out the best combination of variables for each part you want to print.
My Prusa Mendel i2 inspired Repstrap with welded steel frame: [youtu.be]
And my Smartrap derived Briefcase 3D printer: [youtu.be]
With experience you will soon work out the best combination of variables for each part you want to print.
My Prusa Mendel i2 inspired Repstrap with welded steel frame: [youtu.be]
And my Smartrap derived Briefcase 3D printer: [youtu.be]
|
Re: incomplete part December 23, 2014 03:32AM |
Registered: 10 years ago Posts: 167 |
|
Re: incomplete part December 23, 2014 04:22PM |
Registered: 9 years ago Posts: 118 |
No,I didn't ,there's no overhang on the part,and the bridging is only over the 3mm hole.
I think it's possibly something the do with the filament feed,i'm still playing around with that to get it right.
I,ve put a 40 mm fan hanging off the extruder now,but it's hard to get it in the right position so
it doesn't cool the nozzle too much.I,m sure there are plenty of fan shroud designs,but i have to get it to print me one first
Incidentally,I have the Z motor steps at 398 now,which gives the correct amount of movement,
but the motors make a slightly harsh sound to my untrained ears.
Edited 1 time(s). Last edit at 12/23/2014 04:31PM by clogs51.
|
Re: incomplete part December 23, 2014 06:01PM |
Admin Registered: 13 years ago Posts: 6,998 |
|
Re: incomplete part December 26, 2014 03:08AM |
Registered: 9 years ago Posts: 118 |
I've come to the conclusion my problem is that the z-axis is not moving upwards after the first couple of layers.
If I tap,say, z 10mm up in Pronterface,I first have to home the z axis,or it won't move anywhere.
I've added a 40mm fan to cool the print,and tried printing even 4 parts,but i'm just wasting filament.
The 3rd layer,I can actually feel the nozzle rubbing over the previous layer.It doesn't get any better from there on.
Obviously,it's a software or firmware setting that,s giving me grief.
How do I get my settings from marlin into a file i can post?
I tried cutting and pasting,but that doesn't seem to work.
|
Re: incomplete part December 26, 2014 06:51AM |
Registered: 10 years ago Posts: 167 |
|
Re: incomplete part December 28, 2014 12:53AM |
Registered: 9 years ago Posts: 118 |
After some more hunting online,I slowed the accelleration right down to 100 on the Z-axis,
and the max feedrate to only 4.
These seem ridiculously low values,but it worked.
I slowed the x and y down to 300,but this is probably unneccesary.
Tomorrow I'll try another print with those 2 axes back up to 500.
I'm printing bits to get an auto bed levelling setup organized.
I'm glad to at last have a printer that does something useful
Sorry, only registered users may post in this forum.