Auto Bed Leveling Setup issues - I don't understand :-(
Posted by imwhoim54
|
Auto Bed Leveling Setup issues - I don't understand :-( January 03, 2017 12:59PM |
Registered: 7 years ago Posts: 45 |
Hi Guys (and girls)
Ok. I have an ANET A8 chinese knockoff and after a number of THEIR driver boards being bad, I replaced it with a standard R.A.M.P.S setup and I FINALLY got it printer "printing", The prints are very rough but they are what I told them to do so It's time to get it working withing tolerances...
After MUCH finagling, I managed to get the steps per MM down to about a .01 mm accuracy per 10mm movement. Decent! (I think)
Now, time to set up the auto bed leveling... and, I've hit a roadblock... I keep getting messages like " LEFT_PROBE_BED_POSITION can't be reached" (sub RIGHT, FORWARD or REAR as desired) When I adjust the grid settings for the leveling. I am using the A8 that ROKO SN04-4 inductive sensor. My problem is that with the values I have plugged into Marlin, the ones that don't generate an error anyway, actually test the bed far in from the edges of the bed. Not an Ideal situation. Here are some of the values I have in Marlin:
#define X_PROBE_OFFSET_FROM_EXTRUDER 18 // X offset: -left +right [of the nozzle]
#define Y_PROBE_OFFSET_FROM_EXTRUDER 56 // Y offset: -front +behind [the nozzle]
#define Z_PROBE_OFFSET_FROM_EXTRUDER 0 // Z offset: -below +above [the nozzle]
.....................
// Travel limits after homing (units are in mm)
#define X_MIN_POS 0
#define Y_MIN_POS 0
#define Z_MIN_POS 0
#define X_MAX_POS 220
#define Y_MAX_POS 220
#define Z_MAX_POS 240
...........
#if ENABLED(AUTO_BED_LEVELING_GRID)
#define LEFT_PROBE_BED_POSITION 50
#define RIGHT_PROBE_BED_POSITION 180
#define FRONT_PROBE_BED_POSITION 50
#define BACK_PROBE_BED_POSITION 150
..................
If you need to know more I will be happy to provide it.
I find myself confused by these entries. If someone could explain to me how they work that would be wonderful!
My Aim here is to have the sensor physically check the box defined with these corners:
X = 0 and 187
Y = 156 and 12
Given that information, can anyone help?
Thanks so much in advance for your help!
Don W.
|
Re: Auto Bed Leveling Setup issues - I don't understand :-( January 03, 2017 02:09PM |
Registered: 8 years ago Posts: 552 |
You have not properly accounted for your probe offsets. For example, you say the probe is offset 56mm in the Y direction. But you are saying you want the front bed probe position to be 50. That implies the nozzle needs to go to -6mm in order to make that happen. But you have specified the Y_MIN_POS to be 0. So it can't get there.
|
Re: Auto Bed Leveling Setup issues - I don't understand :-( January 03, 2017 04:06PM |
Registered: 7 years ago Posts: 45 |
Hi Roxy
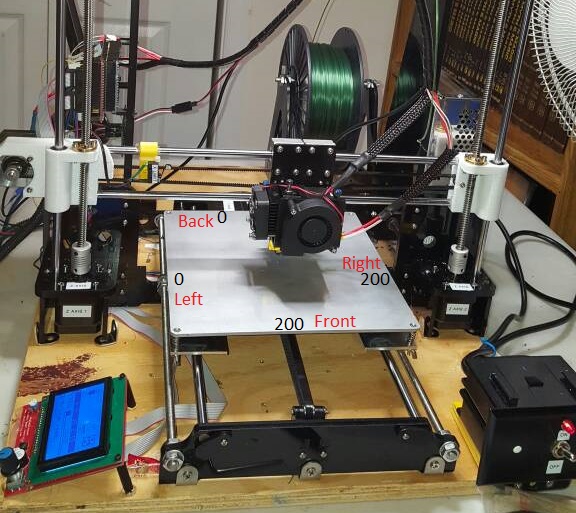
Maybe this is where I'M getting confused? On my printer, The 0 position for the bed (the Y axis) is all the way back where the edge of the bed is over the stepper. The "Front" is where the printers Y axis is fully extended toward the user.
I am presuming that the "Front" of the bed is the end of the bed where Y is at it's Min where Y = 0. and the "Back" is where the Y axis is at it's Max position where Y = 200. Confused? Look at the attached picture, if you please, and tell me if my thinking is correct on this.
Thanks for your help Roxy!
Don
|
Re: Auto Bed Leveling Setup issues - I don't understand :-( January 03, 2017 04:15PM |
Registered: 8 years ago Posts: 552 |
I don't like the "Front" and "Back" labels just because of situations like this.
But historically... The origin of the printer is normally in the front left of the bed.
If your origin is in the back right (like my printer) you need to ignore those terms or at least mentally rotate the bed to see what is being communicated.
Looking at the picture, your origin is in the back left. So... you are rotated the opposite way from how I'm positioned. Still... what I said applies.
Move to the left side of the printer... and when you look at the printer, The side of the bed that is closest to you would be "Front". (Or in other words, from the front, the left side is what the software is calling "Front".)
Edited 1 time(s). Last edit at 01/03/2017 04:19PM by Roxy.
|
Re: Auto Bed Leveling Setup issues - I don't understand :-( January 03, 2017 09:22PM |
Registered: 7 years ago Posts: 45 |
Hi Roxy!
Thanks SO much for your help! I still don't understand the math behind how it arrives at the points to check, but your information cleared a LOT up in my mind as to how things are adjusted! I made some general entries using your information that got me into the ballpark the slowly changed the values until they wouldn't work any more OR landed on the areas I wanted to test!
Now, Have to level the bed properly to get the nozzle to the right height and place glass on it to set my printing surface. I usually use(d) glass with metal duct tape on the surface to provide the inductive reaction. This seems to be working well but I need to predict where the probe will be on each one of the corners so that I can stick the tape down.
Alternative here (which I'll probably do) is to run the bed leveling a couple of times and try to capture the numbers on the display as they whizz by! LOL
But once again... thanks so much for your help!
Take care!
Don
|
Re: Auto Bed Leveling Setup issues - I don't understand :-( January 04, 2017 12:06AM |
Registered: 8 years ago Posts: 552 |
Quote
imwhoim54
Hi Roxy!
Thanks SO much for your help! I still don't understand the math behind how it arrives at the points to check, but your information cleared a LOT up in my mind as to how things are adjusted! I made some general entries using your information that got me into the ballpark the slowly changed the values until they wouldn't work any more OR landed on the areas I wanted to test!
Good! I almost said "Set your Probe Position area real small in the center of the bed and slowly expand them until you get them to where you want with no errors... But I didn't want to complicate things too much.
Quote
imwhoim54
Now, Have to level the bed properly to get the nozzle to the right height and place glass on it to set my printing surface. I usually use(d) glass with metal duct tape on the surface to provide the inductive reaction. This seems to be working well but I need to predict where the probe will be on each one of the corners so that I can stick the tape down.
My suggestion is go to Configuration_adv.h and turn on the Z-BabyStepping. Set your Z_PROBE_OFFSET_FROM_EXTRUDER a tiny bit high. (Like .05mm too high.) And when you start a print, use the Z_BabyStepping to get the first layer adhesion exactly correct. In RC-8, it is a little bit of a nuisance to get to the Z-BabyStepping easily. But when you are ready to bring up the UBL Bed Leveling System, the Z-BabyStepping menu is very easy and convenient to get to.
Quote
imwhoim54
Alternative here (which I'll probably do) is to run the bed leveling a couple of times and try to capture the numbers on the display as they whizz by! LOL
But once again... thanks so much for your help!
If you are doing Mesh Bed Leveling... You should consider bringing up the UBL code base. You will get 100% adhesion across the entire bed every time. And the tools to get the mesh perfect (and saved) are built into the system.
You could put the metal tape on just one corner and do the G28 Home sequence there. And then the mesh will automatically be loaded (at reset or power up) and be active. Combined with the Z-BabyStepping, it really works nice to get a perfect first layer every time.
Edited 3 time(s). Last edit at 01/04/2017 11:12AM by Roxy.
|
Re: Auto Bed Leveling Setup issues - I don't understand :-( January 04, 2017 06:20AM |
Registered: 7 years ago Posts: 759 |
|
Re: Auto Bed Leveling Setup issues - I don't understand :-( January 04, 2017 01:29PM |
Registered: 7 years ago Posts: 45 |
Thanks again Roxy and Thanks obewan...
The one thing that alludes me is how to set the x-y home position print printing is complete. Right now it's square in the middle of the bed Which is fine for leveling but I imagine when making a large print, that could defiantly get in the way...
Any takers? :-)
Thanks again!
Don
The one thing that alludes me is how to set the x-y home position print printing is complete. Right now it's square in the middle of the bed Which is fine for leveling but I imagine when making a large print, that could defiantly get in the way...
Any takers? :-)
Thanks again!
Don
|
Re: Auto Bed Leveling Setup issues - I don't understand :-( January 04, 2017 02:33PM |
Registered: 8 years ago Posts: 29 |
|
Re: Auto Bed Leveling Setup issues - I don't understand :-( January 04, 2017 03:41PM |
Registered: 7 years ago Posts: 759 |
After taking another look at your picture, Is your Y end stop located at the back(as you call it) of the printer, ie oposit end to the dsplay,
if it is then that would be a Y min endstop and homing Y should move the bed towards it.
This puts the nozzle at X0 Y0 (front left corner of the bed.
if it is then that would be a Y min endstop and homing Y should move the bed towards it.
This puts the nozzle at X0 Y0 (front left corner of the bed.
|
Re: Auto Bed Leveling Setup issues - I don't understand :-( January 04, 2017 04:07PM |
Registered: 7 years ago Posts: 45 |
Hi Obewan
You are absolutely correct. The "rear" of my bed when facing the front of the printer is where 0,0 is located. That was my initial stumbling block. One I set the "Front" of the printer at the left of the bed, everything starting falling into place.
It Seems as though people are finding this unusual though... Since it's my frist printer, not sure which corner is "supposed" to be home... can anyone enlighten me?
Thanks!
|
Re: Auto Bed Leveling Setup issues - I don't understand :-( January 05, 2017 10:01AM |
Registered: 8 years ago Posts: 552 |
|
Re: Auto Bed Leveling Setup issues - I don't understand :-( January 05, 2017 01:22PM |
Registered: 10 years ago Posts: 770 |
|
Re: Auto Bed Leveling Setup issues - I don't understand :-( January 07, 2017 05:52PM |
Registered: 7 years ago Posts: 45 |
Thanks for your help guys!
I finally got the printing working and homing where I want it to! Now that it's printing, having one final issue with the prints.
I am using a MakerGeeks Translucent green pla filament that is 1.75mm in diameter and a .4MM nozzle. (because it's the only one I have!) Well, I have Translucent Red PLA and Translucent white PETG as well. It has a .4MM nozzle and I am printing at a .35 initial layer height followed by .3MM layers from there on out.
Hot End is set to 230, bed at 0. The setting of the printer I have so far is:
--------------------------------------------------
#define DEFAULT_AXIS_STEPS_PER_UNIT {102.1737135399413,100.6627936942481,402,104} // default steps per unit for iPrusa
#define DEFAULT_MAX_FEEDRATE {100, 100, 100, 50} // (mm/sec)
#define DEFAULT_MAX_ACCELERATION {600,600,50,500} // X, Y, Z, E maximum start speed for accelerated moves.
#define DEFAULT_ACCELERATION 1200 // X, Y, Z and E acceleration in mm/s^2 for printing moves
#define DEFAULT_RETRACT_ACCELERATION 2000 // E acceleration in mm/s^2 for retracts
#define DEFAULT_TRAVEL_ACCELERATION 500 // X, Y, Z acceleration in mm/s^2 for travel (non printing) moves
// The speed change that does not require acceleration (i.e. the software might assume it can be done instantaneously)
#define DEFAULT_XYJERK 15.0 // (mm/sec)
#define DEFAULT_ZJERK 0.4 // (mm/sec)
#define DEFAULT_EJERK 5.0 // (mm/sec)
Retraction multiplier in Slicer is.9
-------------------------------------------------------
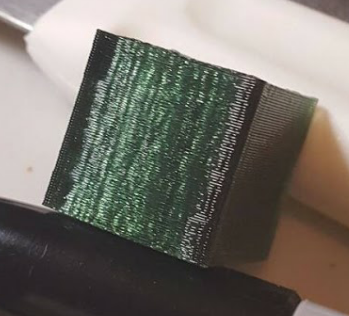
After all these setting are made, the result looks like the attached photo. Note that the corners are bulged and the the layers are VERY apparent. You can feel each layer with your finger nail...
So. Given all that.. any ideas how I can make this print better?
Thanks again for your help!
Don
I finally got the printing working and homing where I want it to!
Now that it's printing, having one final issue with the prints.I am using a MakerGeeks Translucent green pla filament that is 1.75mm in diameter and a .4MM nozzle. (because it's the only one I have!) Well, I have Translucent Red PLA and Translucent white PETG as well. It has a .4MM nozzle and I am printing at a .35 initial layer height followed by .3MM layers from there on out.
Hot End is set to 230, bed at 0. The setting of the printer I have so far is:
--------------------------------------------------
#define DEFAULT_AXIS_STEPS_PER_UNIT {102.1737135399413,100.6627936942481,402,104} // default steps per unit for iPrusa
#define DEFAULT_MAX_FEEDRATE {100, 100, 100, 50} // (mm/sec)
#define DEFAULT_MAX_ACCELERATION {600,600,50,500} // X, Y, Z, E maximum start speed for accelerated moves.
#define DEFAULT_ACCELERATION 1200 // X, Y, Z and E acceleration in mm/s^2 for printing moves
#define DEFAULT_RETRACT_ACCELERATION 2000 // E acceleration in mm/s^2 for retracts
#define DEFAULT_TRAVEL_ACCELERATION 500 // X, Y, Z acceleration in mm/s^2 for travel (non printing) moves
// The speed change that does not require acceleration (i.e. the software might assume it can be done instantaneously)
#define DEFAULT_XYJERK 15.0 // (mm/sec)
#define DEFAULT_ZJERK 0.4 // (mm/sec)
#define DEFAULT_EJERK 5.0 // (mm/sec)
Retraction multiplier in Slicer is.9
-------------------------------------------------------
After all these setting are made, the result looks like the attached photo. Note that the corners are bulged and the the layers are VERY apparent. You can feel each layer with your finger nail...
So. Given all that.. any ideas how I can make this print better?
Thanks again for your help!
Don
|
Re: Auto Bed Leveling Setup issues - I don't understand :-( January 09, 2017 09:20AM |
Registered: 10 years ago Posts: 770 |
|
Re: Auto Bed Leveling Setup issues - I don't understand :-( January 09, 2017 12:40PM |
Registered: 7 years ago Posts: 45 |
Hi Floyd!
Thanks for your response!
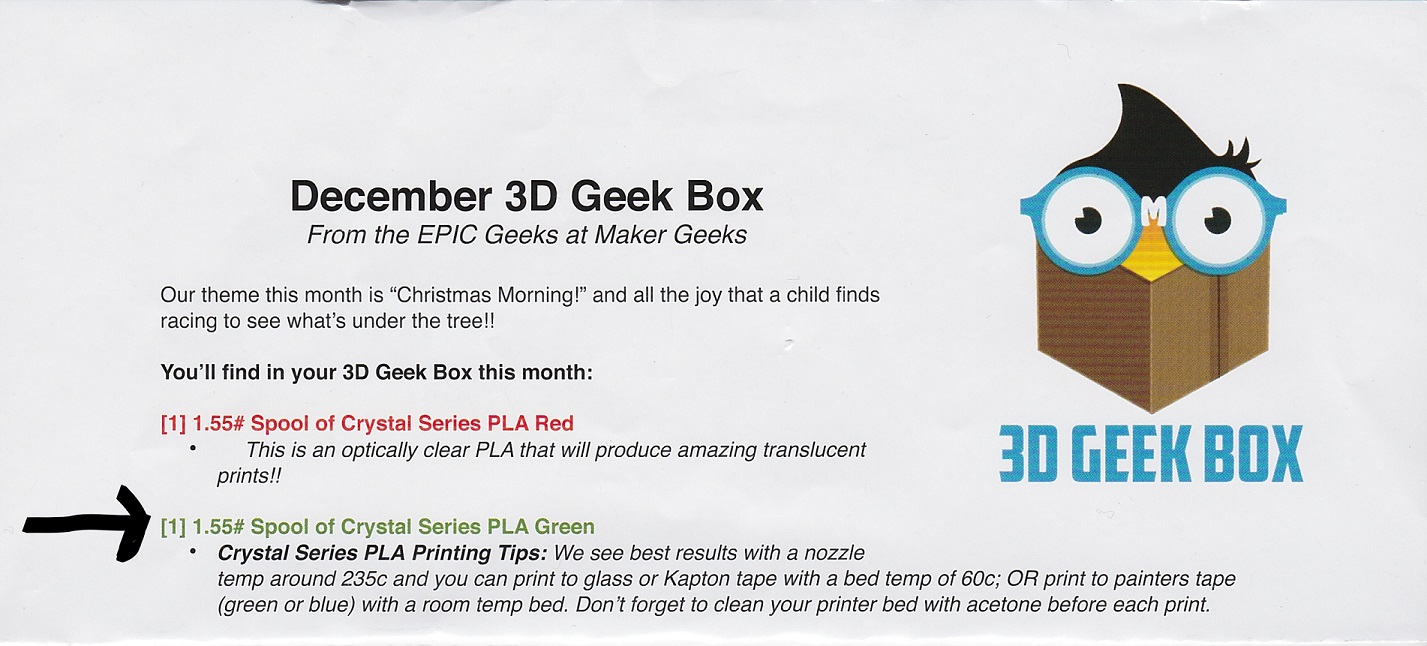
I will try the .2 layer height as you suggested and see what happens. The 230C I actually got from the paperwork (attached is a copy). From what I have read elsewhere, it is a minimum of 230C because of the transparent quality of the PLA. Read the attached and see if you agree...
My layer height for this cube was set to .3 though the paperwork suggests .4 for maximum transparency.
I do have the "stock" part cooling fan in place
Do you think the temp or the layer height is involved in the corners being the way they are? it almost looks like the nozzle is overshooting the corner...
Thanks again for you response!
Don W.
Edited 1 time(s). Last edit at 01/09/2017 12:50PM by imwhoim54.
Thanks for your response!
I will try the .2 layer height as you suggested and see what happens. The 230C I actually got from the paperwork (attached is a copy). From what I have read elsewhere, it is a minimum of 230C because of the transparent quality of the PLA. Read the attached and see if you agree...
My layer height for this cube was set to .3 though the paperwork suggests .4 for maximum transparency.
I do have the "stock" part cooling fan in place
Do you think the temp or the layer height is involved in the corners being the way they are? it almost looks like the nozzle is overshooting the corner...
Thanks again for you response!
Don W.
Edited 1 time(s). Last edit at 01/09/2017 12:50PM by imwhoim54.
|
Re: Auto Bed Leveling Setup issues - I don't understand :-( January 09, 2017 04:30PM |
Registered: 8 years ago Posts: 552 |
If you have the PLA temperature too hot, the plastic will be too soft. You will especially notice the effects at the corners because the plastic stretches when it is hot. As it cools, it starts pulling against itself. And at the corner, there is nothing to equalize the tension. As a result, the corners start to lift up.
I print most of my PLA at 205 C. Sometimes, on a particular roll I will bump the temperature up or down a few degrees. But pretty much... I print PLA at 203 to 208 C. With most of it at 205 C.
I print most of my PLA at 205 C. Sometimes, on a particular roll I will bump the temperature up or down a few degrees. But pretty much... I print PLA at 203 to 208 C. With most of it at 205 C.
|
Re: Auto Bed Leveling Setup issues - I don't understand :-( January 09, 2017 10:14PM |
Registered: 7 years ago Posts: 45 |
|
Re: Auto Bed Leveling Setup issues - I don't understand :-( January 10, 2017 03:12PM |
Registered: 10 years ago Posts: 770 |
|
Re: Auto Bed Leveling Setup issues - I don't understand :-( January 11, 2017 12:07PM |
Registered: 7 years ago Posts: 45 |
Hi Guys...
Got just got back from a "medical thing" that left me incapacitated for a day. Still not 100% nut at least I can sit upright for a while! :-)
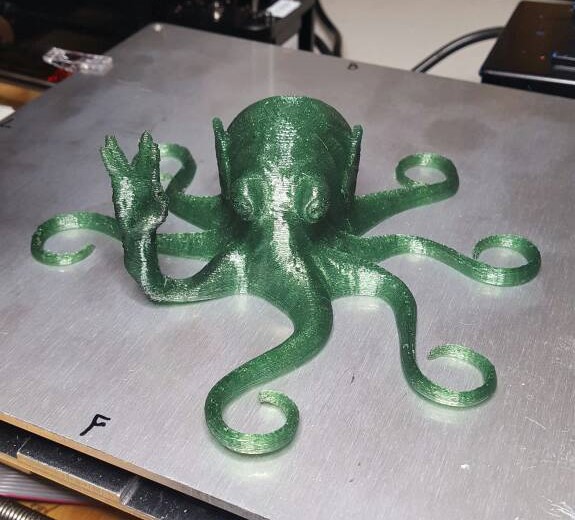
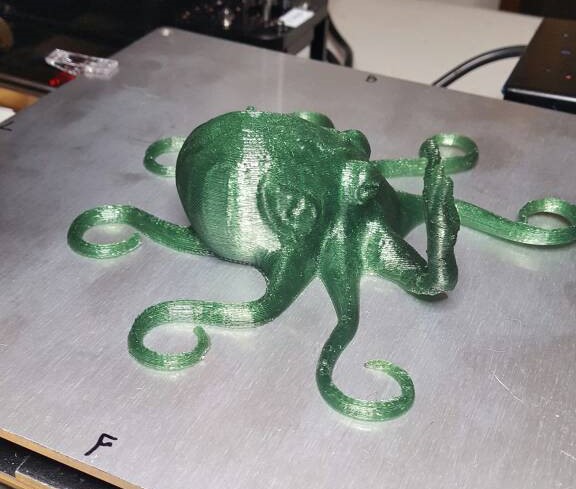
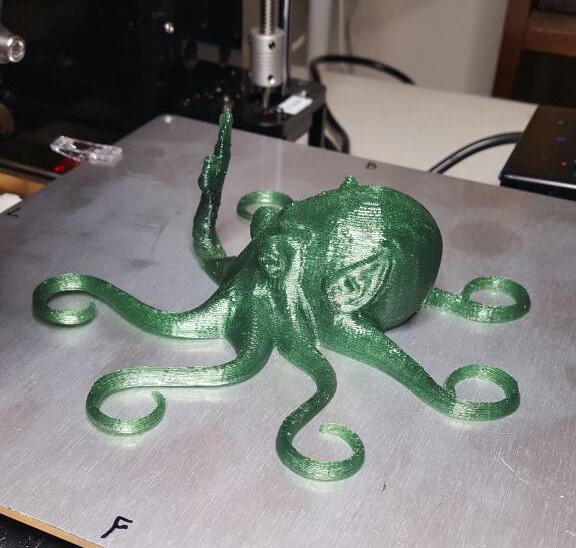
Attached are pictures of my "Spocktipus" (available on [www.thingiverse.com]). It measures about 6" in diameter and I'm fairly impressed by the detail my printer put into it even though is used such a high layer height and temperature (the translucent filament makes it look the a gemstone!)
The.4MM layer height was actually the specification that the filament make gave to maximize the transparency of the plastic. I tend to think the stringing I experience was a result of the high temp of the plastic itself. At 230C the plastic become VERY fluid (example, while the Hot end was heating up, the plastic would tend to drip out of the end of the nozzle as it got close to temp.) Will try it again with a lower nozzle temp and see what that does.
One thing I have had answered yet is this - on MY printer, when it's done printing, the bed goes all the way beck into the machine (resetting the position of the machine to 0X, 0Y) but to get the print out I have to manually move the bed all the way forward (Y220) to make it accessible. My question - Is there a way to manually set the "Home" after printing to the required Y22 or will Ihave to do this forever? :-) Not a big hassle just a minor irritation...
Thanks for ALL your help guy! I really appreciate it!
Don
P.S. - As a test.. Just ran the Spoctipus again. This time I used 203C for the temp and .2 layer height. The head got hung up on the model and offset the layer quite badly and one of the tentacles broke loose from the bed and curled up. This hung on the head and threw the the layer off... so apparently the filament was not sticking to the bed properly thus allowing it to pop up. I think this would be a funtion of the Temp.. I am printing on Plue tape on an unheated bed.... hmmm the beat goes on.
Edited 1 time(s). Last edit at 01/11/2017 01:24PM by imwhoim54.
Got just got back from a "medical thing" that left me incapacitated for a day. Still not 100% nut at least I can sit upright for a while! :-)
Attached are pictures of my "Spocktipus" (available on [www.thingiverse.com]). It measures about 6" in diameter and I'm fairly impressed by the detail my printer put into it even though is used such a high layer height and temperature (the translucent filament makes it look the a gemstone!)
The.4MM layer height was actually the specification that the filament make gave to maximize the transparency of the plastic. I tend to think the stringing I experience was a result of the high temp of the plastic itself. At 230C the plastic become VERY fluid (example, while the Hot end was heating up, the plastic would tend to drip out of the end of the nozzle as it got close to temp.) Will try it again with a lower nozzle temp and see what that does.
One thing I have had answered yet is this - on MY printer, when it's done printing, the bed goes all the way beck into the machine (resetting the position of the machine to 0X, 0Y) but to get the print out I have to manually move the bed all the way forward (Y220) to make it accessible. My question - Is there a way to manually set the "Home" after printing to the required Y22 or will Ihave to do this forever? :-) Not a big hassle just a minor irritation...
Thanks for ALL your help guy! I really appreciate it!
Don
P.S. - As a test.. Just ran the Spoctipus again. This time I used 203C for the temp and .2 layer height. The head got hung up on the model and offset the layer quite badly and one of the tentacles broke loose from the bed and curled up. This hung on the head and threw the the layer off... so apparently the filament was not sticking to the bed properly thus allowing it to pop up. I think this would be a funtion of the Temp.. I am printing on Plue tape on an unheated bed.... hmmm the beat goes on.
Edited 1 time(s). Last edit at 01/11/2017 01:24PM by imwhoim54.
|
Re: Auto Bed Leveling Setup issues - I don't understand :-( January 11, 2017 02:42PM |
Registered: 7 years ago Posts: 759 |
|
Re: Auto Bed Leveling Setup issues - I don't understand :-( January 13, 2017 12:25AM |
Registered: 7 years ago Posts: 45 |
Thanks again Obewan!
I looked in my post processing scripts and saw a G28 X0 in it but no change to the Y axis
I have added a G1 Y200 to the post so next time I print it SHOULD go to the proper position (for me anyway)
It's going to be a while before I print anything again (waiting for some legit PLA to come in) But I will let you know how it works!
Thanks Again!
Don W.
Sorry, only registered users may post in this forum.