5 x Tool changer Marlin E3D style
Posted by melb_maker
|
5 x Tool changer Marlin E3D style May 26, 2019 03:18AM |
Registered: 8 years ago Posts: 34 |
Good afternoon everyone
After watching a YouTube video explaining the E3D tool changing system (Kinematic coupling concept) I haven't been able to shake the idea of making one for myself. The mechanical side off it seems relatively straight forward, I even have an idea to simplify the locking mechanism.
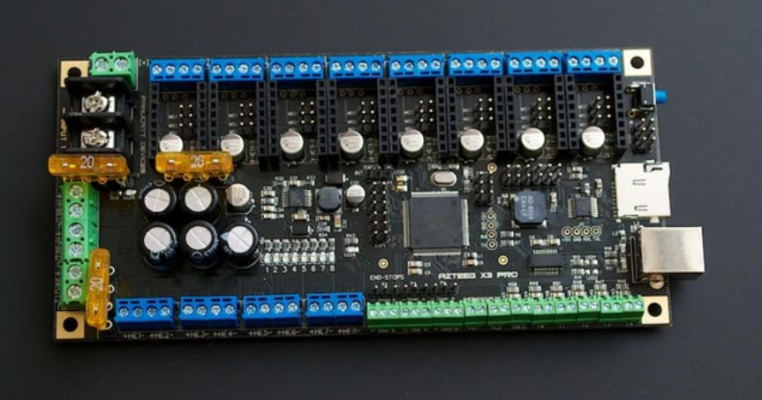
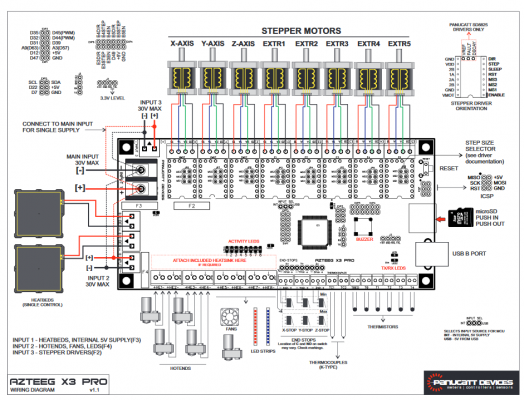
After spending the last 2 weeks playing around with the Marlin firmware and a controller mock-up of a 3D printer I am fairly certain this will be achievable within Marlin firmware. During my investigations I kept stumbling across this controller board MOTHERBOARD BOARD_AZTEEG_X3_PRO, it doesn't seem very popular but when I was looking Into how to re map the Arduino pins within the marlin firmware I kept stumbling across this pins_ BOARD_AZTEEG_X3_PRO configuration file for the controller that seems to have everything I need:
• Atmel ATmega 2560 with FT231x FTDI USB chip
• Compatible with Marlin, Repetier, others.
• 3 Separate Power inputs with its own fast acting blade fuse
• Dual Mosfet Output for Heatbeds
• 8 Stepper driver slots with Digital pot control (when using SD8825)
• 8 Mosfets with PWM control for Hotends/Fans/LEDs
• 6 end stops inputs
• 6 Thermistor inputs
• 2 Thermocouple inputs
• Wide input(12-24V) high efficiency switching Power supply (5v @ 1A)
• microSD card socket built-in
• On board SMT buzzer
• Fused and Zener protected +5v Vcc line.
• Ultra Low RDSon, High power Mosfets for minimal heat buildup
• Input power selector for micro controller [USB or internal regulator]
• High current capacity connectors and PCB traces.
• Made with 2 oz. copper 4 Layer and RoHS compliant PCB
• Expansion ports and breakout pins
• Screw terminal or crimp type connector options
• Level shifted RX/TX line ( for direct serial connection to Raspberry Pi and similar 3.3v boards)
The pins_ BOARD_AZTEEG_X3_PRO Seems to use the pins_RAMPS and then overwrite some of the mapping.
does anyone have any information on a tool changing system done within the Marlin firmware using a ATmega2560 based control board?? I am doing this regardless but a starting point and knowing what difficulties other people have encountered would be very beneficial to me.
I have purchased the Azteeg x3 pro control board as it seems to meets the hardware requirements of this type of system and the mapping within Marlin seems to already be done. I was going to construct my own breakout boards for the Arduino controller that wire into the Arduino but this solution seems a lot quicker and more elegant.
If anyone has any information or ideas I would be eager to discuss them, I just cant seem to find any information on the topic all my searches return is people having more basic issues with Marlin printers.
I should hopefully have the control board in a week or 2 so I might take a break from the Marlin firmware and start playing with post processing of gcode using a find and replace tool to modify the tool change commands from slic3r in order to handle the Slic3r placeholders functions.
do u think it is possible with minimal firmware modifications?
|
Re: 5 x Tool changer Marlin E3D style May 26, 2019 03:48AM |
Admin Registered: 13 years ago Posts: 6,998 |
Tool changing is simply T command, this swaps the active extruder/hotend. the 'magic' is implemented in your slicer to wrap the appropriate g codes around the T commands to do things like physically swap the tools.
This may need additional post processing scripts the edit the gcode and make it do what you need.
This may need additional post processing scripts the edit the gcode and make it do what you need.
|
Re: 5 x Tool changer Marlin E3D style May 26, 2019 11:18AM |
Registered: 8 years ago Posts: 34 |
OK that doesn't sound too difficult, tomorrow night I might sit down and start again with a fresh copy of Marlin, that way I can document my changes. It would be nice to see Marlin managing more than two hot ends during a print. I have some hot ends I can use in a test jig if I re map the extruder and temp sensor to the heat bed ports then I can test my post processed gcode.
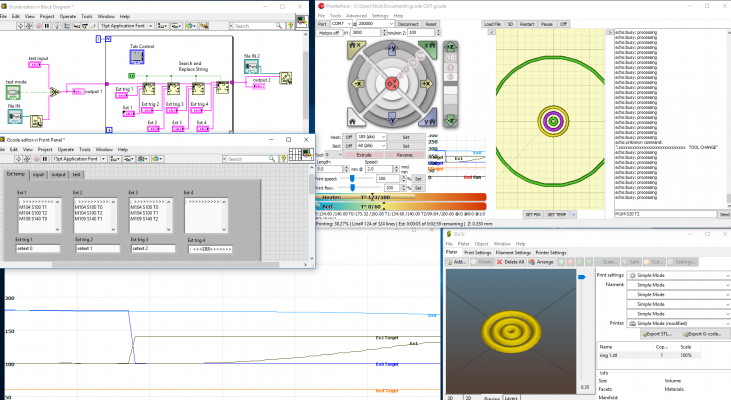
Im using labview to do the post processing of the gcode, its so frustrating that slic3r only gives one tool change input option, it should one per material that way you could use it to over come the lack of an ability to make logical decisions in marlin gcode. I think the marlin gcode Is a little watered down as you can't even save a set of coordinates and then use G command with a slic3r placeholder as a offset (say for the x axis offset for each tools location) to move the machine to that location.
Im using labview to do the post processing of the gcode, its so frustrating that slic3r only gives one tool change input option, it should one per material that way you could use it to over come the lack of an ability to make logical decisions in marlin gcode. I think the marlin gcode Is a little watered down as you can't even save a set of coordinates and then use G command with a slic3r placeholder as a offset (say for the x axis offset for each tools location) to move the machine to that location.
|
Re: 5 x Tool changer Marlin E3D style May 28, 2019 07:52AM |
Registered: 8 years ago Posts: 34 |
After figuring out that one of the mosfets wasn't working on my Ramps bored I have managed to re-map the heater pins to digital pins, Unfortunately the Mosfet inputs are supposed to be 12 volts so I have had to power the mosfets through a relays, clickety click.
I extracted all of the #define pin lines out of the temperature sensor and heater pins section and got rid of the #ifndef stuff:
//
// Temperature Sensors
//
#define TEMP_BED_PIN 11// // Analog Input
#define TEMP_0_PIN 13 // // Analog Input
#define TEMP_1_PIN 14 // // Analog Input
#define TEMP_2_PIN 15 //
#define TEMP_SENSOR_1 11 //
#define TEMP_SENSOR_2 11 //
//
// hotends
//
#define HEATER_0_PIN 45
#define HEATER_1_PIN 47
#define HEATER_2_PIN 32
//
// Stepper
//
#define E2_STEP_PIN 17
#define E2_DIR_PIN 23
#define E2_ENABLE_PIN 25
//
// Servos
//
Also had to do this in Configuration.h
#define EXTRUDERS 3
#define TEMP_SENSOR_0 1
#define TEMP_SENSOR_1 1
#define TEMP_SENSOR_2 1
#define TEMP_SENSOR_3 0
#define TEMP_SENSOR_4 0
#define TEMP_SENSOR_BED 0
#define TEMP_SENSOR_CHAMBER 0
But it works! Im happy to say, im controlling 3 hotends now. Next step is to work on the gcode editor and start designing the physical tool changer. This is a big relief for me as I was warred it would be the firmware that would stop me from achieving my goal as I can’t follow marlins programming language. I'm actually a bit surprised with how all the features are already built into marlin but so few tool changing printers have been made by the public. I think it comes down to the Kinematic coupling implementation, up until when I got my head around the concept of it I couldn't visualize how to achieve the repeatability.
|
Re: 5 x Tool changer Marlin E3D style May 30, 2019 12:03AM |
Registered: 8 years ago Posts: 34 |
I've made the first version of my G code editor and im now able to demonstrate how to print in multi materials minus the actual printing.
I still have to figure out some filament profile settings in slicer then I'm going to focus on the mechanical aspects of the tool changer, I will pick this up again once I have the physical arrangement and electronics to do the tool changing.
I still have to figure out some filament profile settings in slicer then I'm going to focus on the mechanical aspects of the tool changer, I will pick this up again once I have the physical arrangement and electronics to do the tool changing.
|
Re: 5 x Tool changer Marlin E3D style December 28, 2019 03:27PM |
Registered: 4 years ago Posts: 1 |
Hey there, I just found your thread and I’m interested in any updates. I am planning out a CoreXY system with three changeable tools, one being a regular e3d, one being a Chimera and the third being a laser etcher. I have the same board as you and I was going to implement it.
Any update on you progress or any links would be great. Thanks.
Any update on you progress or any links would be great. Thanks.
|
Re: 5 x Tool changer Marlin E3D style March 24, 2020 07:41AM |
Registered: 8 years ago Posts: 34 |
Sorry for the slow reply. I have built the tool changer mechanism and fitted it to my printer and am now figuring out if I can get marlin 2.0 running in a tool changer configuration on the AZTEEG_X3_PRO. I have only just started looking into this tonight, things have changed somewhat since the earlier version of marlin but it looks like the pin allocations are in the v2.0 I just need to figure out how to use them.
|
Re: 5 x Tool changer Marlin E3D style March 24, 2020 08:01AM |
Registered: 8 years ago Posts: 34 |
|
Re: 5 x Tool changer Marlin E3D style March 25, 2020 06:54AM |
Registered: 8 years ago Posts: 34 |
Sorry, only registered users may post in this forum.


