Hangprinter version 3
Posted by tobben
|
Re: Hangprinter version 3 June 14, 2018 03:29AM |
Registered: 5 years ago Posts: 79 |
After manual calibration my printer runs dry. No extrusion, yet. I need to buy a new extruder. All the scrap ones I had lying around are crap.
It is a very beautyful machine and moves elegant! Well done Torbjørn!
My gears are printed on a Markforged industrial FDM 3D Printer. These gears run relativley silent. Maybe bigger gears would fit the DIY printing resolutions better. As I can not get all the information about the hangprinter, I am happy to see the belt drive version. Do I have to make an account to get more info on hangprinter itterations. Is there a possibility to mirror these discussions? Are they accessible for non registered users?
PS: I started to print the new corner clamp and anchor line rollers. This time on an old Wanhao Duplicator . I guess - excluding maybe the gears because of tight fit - it is better to print the system on machines that it is designed for. I had some bearings slipping through the gears and spools because of differnce in tolerance from Markforged and consumer printers and I had to reprint the pulleys with the Wanhao in ABS. But they run fine in combination with the high resolution gears. Maybe it makes sense to machine the pulley in high-res (could be milled or powderbed printed) and the gears in DIY res.
Edited 1 time(s). Last edit at 06/14/2018 03:31AM by Dahah.
It is a very beautyful machine and moves elegant! Well done Torbjørn!
My gears are printed on a Markforged industrial FDM 3D Printer. These gears run relativley silent. Maybe bigger gears would fit the DIY printing resolutions better. As I can not get all the information about the hangprinter, I am happy to see the belt drive version. Do I have to make an account to get more info on hangprinter itterations.
Is there a possibility to mirror these discussions? Are they accessible for non registered users?PS: I started to print the new corner clamp and anchor line rollers. This time on an old Wanhao Duplicator
. I guess - excluding maybe the gears because of tight fit - it is better to print the system on machines that it is designed for. I had some bearings slipping through the gears and spools because of differnce in tolerance from Markforged and consumer printers and I had to reprint the pulleys with the Wanhao in ABS. But they run fine in combination with the high resolution gears. Maybe it makes sense to machine the pulley in high-res (could be milled or powderbed printed) and the gears in DIY res.Edited 1 time(s). Last edit at 06/14/2018 03:31AM by Dahah.
|
Re: Hangprinter version 3 June 14, 2018 03:30AM |
Registered: 5 years ago Posts: 79 |
How about printing 3mm filament? You would get much more material to the nozzle. This could increase the flow rate? Do you have experience with 3 mm filament? How does the stiffness of the filament influences the movements? The extruder motor pulls on the filament and there will be a force generated by this on the system, too? How does 1.75 differs from 3mm?
Edited 4 time(s). Last edit at 06/14/2018 06:01AM by Dahah.
Edited 4 time(s). Last edit at 06/14/2018 06:01AM by Dahah.
|
Re: Hangprinter version 3 June 14, 2018 06:39AM |
Moderator Registered: 10 years ago Posts: 401 |
The Hangprinter fb group is public, you shouldn't need to register to see what's in there. I'm not a moderator there, I just come by and answer questions sometimes.
According to the good engineers over at E3D, there's very little difference in the flow rates we can achieve with 3mm and 1.75mm filaments. I haven't tested 3mm myself yet. I have observed that proprietary high throughput extruders use thicker filaments, like 6mm and beyond. I also have a vague memory of E3D taking an initiative to standardize filaments thicker than 3mm. No idea about how that went though.
torbjornludvigsen.com
|
Re: Hangprinter version 3 June 14, 2018 07:54AM |
Registered: 5 years ago Posts: 79 |
I saw a video from Richrap about your workshop at E3D. He shows a smaller Version of the Hangprinter. Seems like it uses the same parts for the top plate and just a smaller triangle (D-Linerollers/mover). I would like to experiment with mover size. Do I have to change the firmware if I use a bigger or smaller triangle (D-Linerollers/mover)?
Edited 2 time(s). Last edit at 06/14/2018 08:38AM by Dahah.
Edited 2 time(s). Last edit at 06/14/2018 08:38AM by Dahah.
|
Re: Hangprinter version 3 June 14, 2018 08:17AM |
Moderator Registered: 10 years ago Posts: 401 |
|
Re: Hangprinter version 3 June 15, 2018 04:53AM |
Registered: 8 years ago Posts: 5,232 |
Again I apologize if that has been discussed before:
I only watched the shorter videos from Tom Sanlanderer and yourself and I want to ask if the D-axis has to be vertically above the bed center?
Why not install three individual winches above the bottom anchor points?In my imagination, this would improve the print volume shape from 'pyramid' to something like a Delta print volume.
I have to dig deeper into this, but I don't want to watch three 6h videos. If I'd figure out, how the fishing line is running around the printer, I might answer the question myself.
edit/ I partially answered my question: My idea wouldn't change anything, except, you could pull the mover further away from the center. But the strings from the other two anchor points would foul the part.
Too bad the anchor points aren't always level with the nozzle.
Edited 1 time(s). Last edit at 06/15/2018 08:18AM by o_lampe.
I only watched the shorter videos from Tom Sanlanderer and yourself and I want to ask if the D-axis has to be vertically above the bed center?
Why not install three individual winches above the bottom anchor points?
I have to dig deeper into this, but I don't want to watch three 6h videos. If I'd figure out, how the fishing line is running around the printer, I might answer the question myself.
edit/ I partially answered my question: My idea wouldn't change anything, except, you could pull the mover further away from the center. But the strings from the other two anchor points would foul the part.
Too bad the anchor points aren't always level with the nozzle.
Edited 1 time(s). Last edit at 06/15/2018 08:18AM by o_lampe.
|
Re: Hangprinter version 3 June 15, 2018 10:38AM |
Moderator Registered: 10 years ago Posts: 401 |
I always place it vertically, but your question had me think.
The firmware assumes the D anchor to be placed at (x, y) = (0, 0).
This means your Z axis will be parallel with your D-lines when your nozzle is at the origin.
If this direction is also parallel with gravity, then your xy-planes will be horizontal.
Otherwise, they won't but your printer will still work.
You just have to tilt your print bed accordingly.
Since the anchor localization is automated, you don't really have to worry very much about the origin being vertically below the D-anchor.
Caring a lot about vertical D-anchor is more a tradition from the time when we measured anchor locations manually with measurement tape.
Thanks for asking, I didn't realize this before now.
Yes, if you dig through this thread, the version 2 thread, and the group at must-not-be-named, you'll find discussion about having 3 high anchors instead of 1 high and 3 low ones.
Basically, you won't get very high accelerations if you use only high anchors.
You won't be able to constraint all the rotational degrees of freedom either, so which forces low print speeds.
You will get a larger reachable print volume, but my experience is that time is already a larger limitation than space with the current configuration.
If you use only high anchor points, you will win more print volume than you will have the time to ever FFF print in (at least with 1.75/3 mm filament and current low cost extruders).
For some other types of tool heads, a only-high-anchors configuration makes more sense.
torbjornludvigsen.com
|
Re: Hangprinter version 3 June 16, 2018 10:37AM |
Registered: 5 years ago Posts: 79 |
Is there a visual 3D simulation of the hangprinter? I know there is the simulation for the calibration points. But I am looking for a visual simulation like Webbots or MS Robotics Studio. I found some papers about cable driven parallel robots using XDE and Matlab/Simulink or Gazebo and ROS to build simulations.
Matlab:
[link.springer.com]
Gazebo:
[www.researchgate.net]
I am thinking of a visual model (in the best case with physics) of a printing/flying machine where I can change parameters of the payload, the geometry (mover size and cables), motor torque, gear resolution, the extruder, the print material.
Sound s like a lot of work..........
Would it be difficult to adapt the simulations in Matlab or Gazebo for the hangprinter?
Is it possible to generate a visual output from the python simulation for calibration?
Edited 2 time(s). Last edit at 06/16/2018 07:34PM by Dahah.
|
Re: Hangprinter version 3 June 18, 2018 05:06AM |
Moderator Registered: 10 years ago Posts: 401 |
No, I don't think theres any visual 3D simulations of Hangprinter. I think a simulation with those parameters would be interesting, and a quite possible to make for an experienced simulation hacker. Firmware already tries to account for them, and I will be able to help out with sorting out the physics.
The calibration script started out as a simulation of the auto calibration process. I don't think it would be useful for making a 3D visual simulation.
torbjornludvigsen.com
The calibration script started out as a simulation of the auto calibration process. I don't think it would be useful for making a 3D visual simulation.
torbjornludvigsen.com
|
Re: Hangprinter version 3 June 21, 2018 03:20AM |
Registered: 8 years ago Posts: 96 |
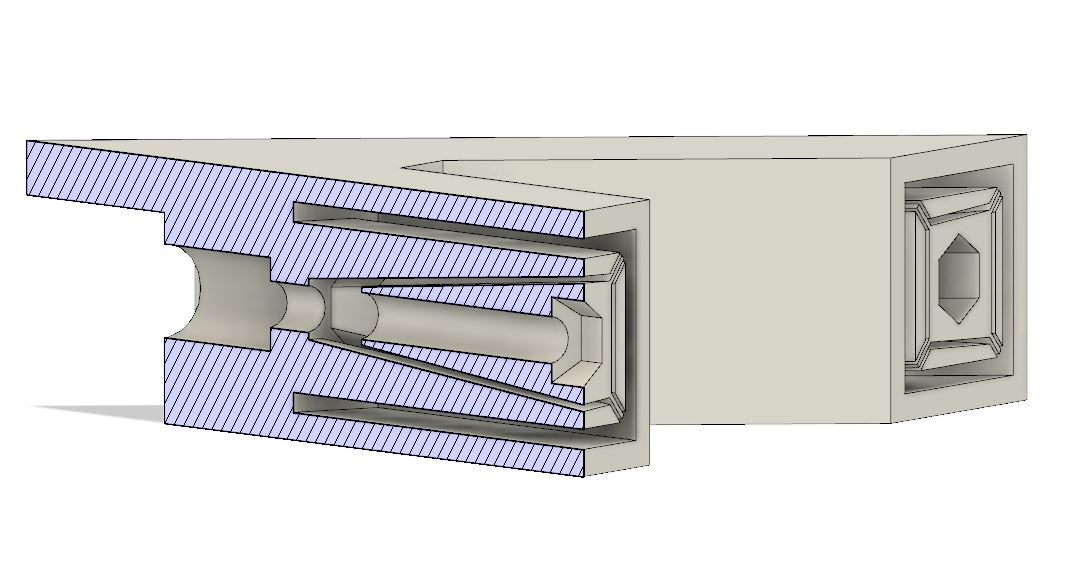
What do you think about this corner clamp design approach? I wanted to fasten the carbon fiber beam rock solid to the clamp, so I though to use a wedge inside the beam to press four lips against the inner wall. This seems to work pretty well and you'll need only two screws per clamp (one for each beam).
[photos.app.goo.gl]
[photos.app.goo.gl]
[photos.app.goo.gl]
At the moment this design weights around 33g, which is about 3x the original's weight. But I'm pretty confident that it can be reduced without losing the rigidity.
[photos.app.goo.gl]
[photos.app.goo.gl]
[photos.app.goo.gl]
At the moment this design weights around 33g, which is about 3x the original's weight. But I'm pretty confident that it can be reduced without losing the rigidity.
|
Re: Hangprinter version 3 June 21, 2018 08:59AM |
Moderator Registered: 10 years ago Posts: 401 |
Woah! I think it's nice!  33g is quite a lot. I'm interested in how low you can get.
How do those lips look?
I like the ziptie solution quite a lot, but I find myself tightening zipties by wedging in D-beamsliders quite often, to get it sturdy enough.
torbjornludvigsen.com
33g is quite a lot. I'm interested in how low you can get.How do those lips look?
I like the ziptie solution quite a lot, but I find myself tightening zipties by wedging in D-beamsliders quite often, to get it sturdy enough.
torbjornludvigsen.com
|
Re: Hangprinter version 3 June 21, 2018 10:10AM |
Registered: 8 years ago Posts: 96 |
It's a bit difficult to take a shot at the lips, but the screenshot of the cross section view is pretty self explanatory, I think.
The next iteration will not have them attached to the clamp. Instead I will design a kind of anchor plug, which will be a separate part. It's then also easier to print. Today as I was disassembling the clamp again I found out, that the bond will be solid even if you take the screw out. Tighten the screws once and then take them away, that's -5g. The clamp has now 4 solid outer layers, let's see how it behaves with only 2.
The next iteration will not have them attached to the clamp. Instead I will design a kind of anchor plug, which will be a separate part. It's then also easier to print. Today as I was disassembling the clamp again I found out, that the bond will be solid even if you take the screw out. Tighten the screws once and then take them away, that's -5g. The clamp has now 4 solid outer layers, let's see how it behaves with only 2.
|
Re: Hangprinter version 3 June 21, 2018 03:46PM |
Moderator Registered: 10 years ago Posts: 401 |
Thanks! Very creative and sturdy. It does rely on a square hollowness and exact outer dimensions of the tube, so not a one-size-fits-all solution, but neat if it works well for you 
torbjornludvigsen.com
torbjornludvigsen.com
|
Re: Hangprinter version 3 June 22, 2018 06:09PM |
Registered: 11 years ago Posts: 69 |
Love watching the development of the Hangprinter. Impressive.
I want to print large vase mode sculptures. Is there a spreadsheet or calculator for size (height and floor space needed) based on printable volume? I used something like thIs for a delta printer idea a while ago. Is the volume a cone shape?
And would PETG be possible?
I want to print large vase mode sculptures. Is there a spreadsheet or calculator for size (height and floor space needed) based on printable volume? I used something like thIs for a delta printer idea a while ago. Is the volume a cone shape?
And would PETG be possible?
|
Re: Hangprinter version 3 June 23, 2018 03:27AM |
Registered: 8 years ago Posts: 5,232 |
|
Re: Hangprinter version 3 June 25, 2018 10:51AM |
Registered: 6 years ago Posts: 95 |
Hey Torb,
I have a hangprinter update. I made this really cool full scale barstool. It came out pretty good. I learn a lot about how the hangprinter does things over the 14 days the print was running. Have a look and let me know what you think. I plan on maybe doing a full set later this year.
Video:
[youtu.be]
Find me on youtube:
[youtube.com]
I have a hangprinter update. I made this really cool full scale barstool. It came out pretty good. I learn a lot about how the hangprinter does things over the 14 days the print was running.
Have a look and let me know what you think. I plan on maybe doing a full set later this year. Video:
[youtu.be]

Find me on youtube:
[youtube.com]
|
Re: Hangprinter version 3 June 25, 2018 01:52PM |
Moderator Registered: 10 years ago Posts: 401 |
I like that you point out that noise level can actually limit the print speed (since you have to pause it every night).
It's also interesting that lines touching the print was a real problem. A good planner tool in software would be useful. This tool would have to do two checks. The first would be checking if your 3d-model fits within the volume your machine can reach without over-tightening the strings. One could simply create an stl out of the reachable volume and see if it encloses the model.
The second check would need to be a simulation with the 3d-model you want to print as an input. When plastic is put down in one part of the print volume, it "shadows" another part of the print volume. (Like a shadow a light torch fired from the anchor would cast, but with an offset.) This shadow travels upwards as your print height increases. If a shadows ever break through the top surface during print simulation, then the model is unprintable. A good tool would let us rotate the model in the middle of a paused simulation, and have the shadows update in real time. Anyone with ray-tracing experience in this thread? I like software, but this is a bit heavy for me on a Monday afternoon.
In hardware, we could prepare pre-calibrated anchor points at different z-heights, then move the linerollers and update anchor calibration with M665 mid print whenever we observe a problem.
torbjornludvigsen.com
|
Re: Hangprinter version 3 June 26, 2018 06:25AM |
Registered: 10 years ago Posts: 4 |
|
Re: Hangprinter version 3 June 26, 2018 07:36AM |
Moderator Registered: 10 years ago Posts: 401 |
Yes, we can increase the mover's width by a lot, but the optimum depends on where the ABC anchors are.
Lowering the extruder is also effective and easily doable. The only drawback is that the nozzle gets less rigid. I've been toying with the idea of tying lines from the nozzle to the three mover corners. Then we could lower the extruder very far down.
torbjornludvigsen.com
Lowering the extruder is also effective and easily doable. The only drawback is that the nozzle gets less rigid. I've been toying with the idea of tying lines from the nozzle to the three mover corners. Then we could lower the extruder very far down.
torbjornludvigsen.com
|
Re: Hangprinter version 3 June 30, 2018 04:15PM |
Registered: 6 years ago Posts: 95 |
Torb,
The simulator would be a great tool to have. I know very little about how to create it, but I am sure a developer could work it out fairly easily.
The adjustable anchor points is something I have talked about with a lot of people. I don't think it would be very difficult to do. Like you said, I think we could just pause, reset the points then update the eeprom.
I am planning on moving the printer to yet another location a little later this year. I plan on trying the anchor location moves at that time. I will be using pretty much the entire room. I have located a vendor that can get 10KG spools of filament. This could get interesting. I should have some prints done in time for MRRF next year. I might try to have them shipped there.
Chris
The simulator would be a great tool to have. I know very little about how to create it, but I am sure a developer could work it out fairly easily.
The adjustable anchor points is something I have talked about with a lot of people. I don't think it would be very difficult to do. Like you said, I think we could just pause, reset the points then update the eeprom.
I am planning on moving the printer to yet another location a little later this year. I plan on trying the anchor location moves at that time. I will be using pretty much the entire room. I have located a vendor that can get 10KG spools of filament. This could get interesting.
I should have some prints done in time for MRRF next year. I might try to have them shipped there.Chris
|
Re: Hangprinter version 3 July 01, 2018 02:20AM |
Registered: 8 years ago Posts: 5,232 |
|
Re: Hangprinter version 3 July 01, 2018 11:34AM |
Moderator Registered: 10 years ago Posts: 401 |
You can move the anchors to any new anchor point that works. The room doesn't need to have any particular shape as long as the new anchor is rigid and at a known position.
Having to move anchors is of course sub optimal, but an ok workaround in some situations I guess.
torbjornludvigsen.com
Having to move anchors is of course sub optimal, but an ok workaround in some situations I guess.
torbjornludvigsen.com
|
Re: Hangprinter version 3 July 01, 2018 12:55PM |
Registered: 8 years ago Posts: 96 |
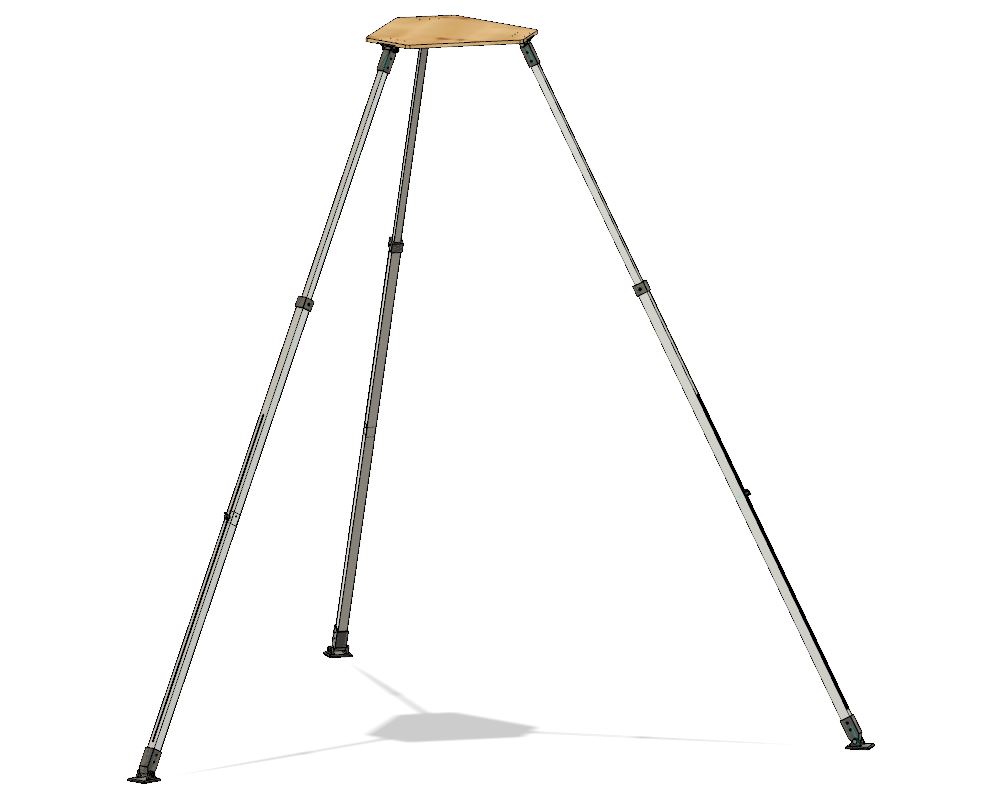
In our lab we don't have a fixed place for the printer, so in the mean time I'll have to set it up at different places. To make my life bit easier I decided to take Torb's wooden frame design and make it from aluminum bars instead. I'm going to combine two 2 meter bars into one telescopic foot with adjustable pads. Screw three of them to the printer ceiling plate and you'll have a nice tripod. I'm also thinking about moving anchor points and it would be nice if I could integrate them into this one. But, first things first.
|
Re: Hangprinter version 3 July 02, 2018 06:32AM |
Registered: 6 years ago Posts: 5 |
Quote
brotherchris
Torb,
The simulator would be a great tool to have. I know very little about how to create it, but I am sure a developer could work it out fairly easily.
Chris
Has anyone looked at this Openscad Simulator for a Delta located here? [github.com] Seems like you could use that code & change the kinetic movement code & STL parts to match the hangprinter and maybe add an option for frame around it. I personally like the tetrahedron frame idea around it since I do not really have a space to hang it from the ceiling. It also keeps all that fishing line in a confined space to keep you from tripping over it.
|
Re: Hangprinter version 3 July 02, 2018 07:07AM |
Moderator Registered: 10 years ago Posts: 401 |
Wow, that project looks awesome!
The frame has a few cons, like limiting build volume and taking up lots of space. But it's been super effective at keeping visitors from tripping at events.
torbjornludvigsen.com
The frame has a few cons, like limiting build volume and taking up lots of space. But it's been super effective at keeping visitors from tripping at events.
torbjornludvigsen.com
|
Re: Hangprinter version 3 July 02, 2018 11:25AM |
Registered: 8 years ago Posts: 96 |
Thanks!
Yep, the danger of people tripping over it was my main concern. This isn't the best solution in utilizing the given space, but you got to start somewhere What I'm also planning, is to have three adjustable cross bars for sturdiness and for accurate calibration. I will most likely put them as down as possible and I also play with the idea to use them as a frame for the print surface. Do you have any additional ideas I should incorporate into the first design?
Yep, the danger of people tripping over it was my main concern. This isn't the best solution in utilizing the given space, but you got to start somewhere
What I'm also planning, is to have three adjustable cross bars for sturdiness and for accurate calibration. I will most likely put them as down as possible and I also play with the idea to use them as a frame for the print surface. Do you have any additional ideas I should incorporate into the first design?
|
Re: Hangprinter version 3 July 02, 2018 12:07PM |
Moderator Registered: 10 years ago Posts: 401 |
I think planning how the beams should connect to the frame (like RichRap did in his design [richrap.blogspot.com]), and to fixate the print surface relative to the frame are the most important improvements compared to the frame presented on my blog. Planning a spool holder (or many), possibly with a reverse bowden tube can also be useful.
torbjornludvigsen.com
torbjornludvigsen.com
|
Re: Hangprinter version 3 July 02, 2018 07:17PM |
Registered: 6 years ago Posts: 5 |
Do you think 1" PVC (25.4mm) or 3/4" PVC (19.05mm) would be strong enough for a frame for this printer? I have a 3D print design for 3/4" tetrahedron corners that has worked well to make a star tetrahedron. I could easily make it work for 1" PVC or larger. I have the fittings as a snug fit, but if used on this printer, I would probably have to add tightening bracket connections on each pipe. I like PVC since it is fairly light weight and seems like it might work for this. I am sure 3/4" electrical conduit would be strong enough, but that would be a bit heavier.
|
Re: Hangprinter version 3 July 03, 2018 04:33AM |
Moderator Registered: 10 years ago Posts: 401 |
I don't have much experience with PVC, and it depends on the size of the frame that you want to build. The 45 x 45 mm pine wood beams in the blog post are just barely stiff enough for that frame, so compare with wooden beams if you have them.
torbjornludvigsen.com
torbjornludvigsen.com
|
Re: Hangprinter version 3 July 03, 2018 05:26AM |
Registered: 8 years ago Posts: 96 |
I wouldn't recommend PVC pipes, because PVC is a fairly soft plastic. The pipes will most likely bend if you are planning to build a frame of reasonable size. In my opinion square aluminum beams are best suited, because of the weight-stiffness-ratio and the relative low price. Steel beams are bit cheaper, but then you'll have to deal with the weight and possible corrosion. Carbon fiber beams would be cool, but they are way too expensive.
Whatever material you're going to use, go for the square ones. They are stiffer than the pipes.
I'm using two different sized aluminium beams. 40x40 mm and 30x30 mm (2 mm wall thickness). The smaller goes into the bigger and both are tightened with a clamp.
Whatever material you're going to use, go for the square ones. They are stiffer than the pipes.
I'm using two different sized aluminium beams. 40x40 mm and 30x30 mm (2 mm wall thickness). The smaller goes into the bigger and both are tightened with a clamp.


Sorry, only registered users may post in this forum.